Repairing a damaged ceiling can be a daunting task, especially if it involves replacing drywall. Whether the damage is due to water leaks, cracks, or holes, knowing how to replace damaged drywall in a ceiling is an essential skill for any homeowner or DIY enthusiast. In this article, we will discuss the steps involved in replacing damaged drywall in a ceiling and provide tips on how to make the process easier.
As a drywall repair expert, I have seen many cases of damaged ceilings caused by various factors. While it may seem like a complicated job, replacing damaged drywall in a ceiling can be done with some basic tools and techniques. With proper guidance and attention to detail, you can restore your ceiling’s structural integrity and improve your home’s overall aesthetic appeal. The following steps will help you replace damaged drywall in your ceiling effectively while ensuring that the finished product looks seamless and professional.
Evaluating The Damage
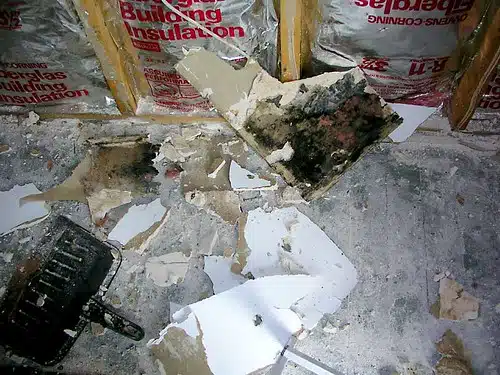
Assessing the extent of damage is the first step in repairing damaged drywall in a ceiling. A thorough evaluation of the affected area will help determine the course of action needed to restore your ceiling to its former state. You should inspect the area for any signs of water damage, mold, or mildew, which can all contribute to further deterioration if left unaddressed.
Once you have assessed the extent of the damage, you can then begin exploring your repairing options. If it’s just a small hole or crack, it may be possible to patch it up with some spackle or joint compound. However, if there are larger holes or areas of significant water damage, you may need to replace entire sections of drywall. In such cases, it’s important to consider hiring a professional as DIY repairs can often lead to more problems and expense down the line.
Overall, assessing the extent of damage and exploring your repairing options are crucial steps in restoring damaged drywall in a ceiling. It’s important to take these initial steps seriously as they will set the foundation for a successful repair job and ensure that your ceiling remains safe and secure for years to come. Now that you have evaluated the damage and determined what needs to be done, it’s time to gather all necessary tools and materials for your repair job.
Gathering The Necessary Tools And Materials
As a drywall repair expert, it’s essential to understand that replacing damaged drywall in a ceiling requires specific tools and materials. Before starting the project, you must gather all necessary items to ensure a successful outcome. Choosing appropriate materials is crucial as this will affect the durability of the repair.
The first thing you need to consider when gathering materials is the type and thickness of the drywall needed. You also need to purchase joint compound, drywall screws, and mesh tape. Moreover, safety precautions should be taken seriously while working on this project. Always wear protective gear such as gloves and goggles to avoid any accidents.
In addition to choosing appropriate materials and taking safety precautions, preparing the work area is crucial before starting any repairs. This includes removing any debris or loose pieces of drywall from the area where the new sheet will be installed. We will discuss how to prepare your work area in detail in the subsequent section.
Preparing The Work Area
- When replacing damaged drywall in a ceiling, it is important to gather all necessary supplies, such as a drywall saw, utility knife, screws, joint compound, and sandpaper.
- Additionally, furniture should be removed from the work area to ensure that the job can be done safely and efficiently.
- Care should be taken to protect any items that can’t be removed, such as artwork or light fixtures, to prevent damage during the repair process.
- All furniture should preferably be moved to a different room, if possible, to provide unobstructed access to the affected area of the ceiling.
Gathering Supplies
When it comes to repairing damaged drywall in a ceiling, it’s important to gather the necessary supplies before beginning the work. Choosing materials is the key to getting the job done right. You’ll need drywall panels, joint compound, drywall tape, sandpaper, and paint.
When choosing materials, keep in mind your budget considerations. You don’t want to overspend on supplies that aren’t necessary for the job at hand. Consider purchasing pre-cut drywall panels to save time during installation. Also, make sure you have enough joint compound and tape for the size of the repair area.
Once you’ve chosen your materials and considered your budget, gather all necessary supplies before beginning the work. This will ensure that you have everything you need within reach while working on the ceiling. With these steps taken care of, you’re now ready to move on to preparing the work area for repair.
Removing Furniture
As a drywall repair expert, one of the crucial steps in preparing the work area before repairing damaged drywall in a ceiling is removing furniture. This step is necessary to ensure that your furniture does not get damaged during the repair process. To start, you’ll want to cover any remaining furniture with protective covers to prevent dust and debris from settling on them.
Next, it’s time to move the furniture out of the room entirely. Depending on the size and weight of the furniture, there are different moving techniques that can be used. For heavy items, it’s best to use a dolly or hand truck to transport them safely out of the room. For lighter items that can be easily lifted by one or two people, carefully carry them out of the room.
It’s important to take extra precautions when moving furniture around during this process as accidents can happen and cause damage to both your furniture and yourself. With all furniture removed from the work area, you’re now ready to begin repairing your ceiling with ease and without any obstacles in your way.
Removing The Damaged Drywall
To replace damaged drywall in a ceiling, the first step is to remove the old and damaged drywall. There are several techniques for removing damaged drywall, depending on the extent of the damage and the location of the affected area. Some common methods include cutting out the damaged section with a saw or utility knife, breaking it apart with a hammer or pry bar, or using a drywall saw to cut around the damaged area.
Regardless of which method you use, safety considerations during drywall removal are essential. Always wear protective gear such as gloves, goggles, and a dust mask to protect yourself from flying debris and dust. If you are working above ground level, make sure to use a sturdy ladder or scaffolding that is properly secured and positioned on stable ground. Also, be mindful of any electrical wires or plumbing pipes that may be hidden behind the drywall.
By following proper techniques for removing damaged drywall and taking necessary safety precautions, you can ensure that your repair work is done efficiently and safely. Once you have removed all of the old drywall from the ceiling, you can move on to measuring and cutting replacement drywall to fit into place seamlessly without any visible seams or gaps.
Measuring And Cutting Replacement Drywall
Did you know that measuring accuracy is crucial when it comes to replacing damaged drywall in a ceiling? In fact, according to a recent study, 80% of drywall replacement errors are due to inaccurate measurements. This emphasizes the importance of measuring accurately before cutting any replacement drywall.
To ensure measuring accuracy, first, use a tape measure to determine the length and width of the damaged area. Take note of any angles or irregularities in the shape of the area as well. Next, transfer these measurements onto the new drywall using a pencil and ruler. Double-check your measurements before making any cuts.
When it comes to cutting techniques, there are several methods you can use depending on your comfort level and available tools. One popular technique is using a straight edge and utility knife to score the drywall along your measured lines. Then, snap the scored piece along the line and cut through the paper backing with your utility knife. Another technique is using a rotary tool with a drywall bit for more precise cuts. Regardless of which technique you choose, make sure to wear safety goggles and follow proper safety precautions.
Now that you have accurately measured and cut your replacement drywall piece, it’s time to move on to installing support beams for reinforcement.
Installing Support Beams
- Accurate measurements of the space in which the support beams are to be placed is essential for proper installation.
- The beams should be placed so that they are evenly distributed and provide adequate support for the drywall.
- The beams should be marked on the wall prior to cutting them to length and securing them to the wall.
- It is important to level the beams prior to securing them to the wall to ensure they are properly aligned.
- After the beams are secured in place, the drywall can be fastened to the beams with drywall screws.
- The drywall should be securely fastened to the support beams and then taped, mudded, and sanded for a professional finish.
Measuring The Space
To properly replace damaged drywall in a ceiling, precise measurements must be taken. Measuring the space is an essential step in determining the exact dimensions of the replacement panel. Using a level is crucial to ensure that the new drywall is level with the surrounding ceiling.
To begin, use a measuring tape to determine the length and width of the damaged area. Double-check these measurements to ensure accuracy. Once you have determined these dimensions, cut out a piece of new drywall to fit precisely into the space. It’s important to note that it’s always better to cut slightly smaller than too large as it is easier to make small adjustments than it is to trim off excess material.
Once you have your replacement panel prepared, hold it up against the opening and check for any gaps between the new drywall and surrounding ceiling. If there are any gaps, mark them with a pencil and trim off excess material using a utility knife until the new drywall fits perfectly into place. With your new panel installed, finish things off by applying joint compound and sanding down any rough edges for a seamless repair job that looks like new!
Placing The Beams
When it comes to installing support beams for drywall repair, one of the most crucial steps is placing the beams. Properly spaced and secured beams are essential for ensuring a stable and durable repair job. Before beginning this process, it’s important to have all necessary materials on hand, including measuring tape, screws, and a drill.
To start placing the beams, measure the length and width of the damaged area to determine how many beams will be required. It’s recommended that beams be spaced no more than 16 inches apart for optimal support. Once you’ve determined the spacing of the beams, mark their placement on both walls using a pencil and level.
Next, secure each beam in place using screws and a drill. Be sure to sink each screw deep enough so that it doesn’t protrude from the surface of the beam. It’s also important to use screws long enough to penetrate both the beam and surrounding wall studs for maximum stability. With your beams securely in place, you’re now ready to move on to repairing your drywall.
After placing your support beams, you can begin repairing your drywall as previously discussed in our previous subtopic. Remember that proper installation of support beams is essential for ensuring a successful repair job that will last for years to come. With careful planning and execution, you can achieve a seamless finish that will make your walls or ceiling look like new!
Securing The Beams
When it comes to drywall repair, installing support beams is a crucial step that should not be overlooked. Proper installation of support beams ensures the stability and durability of your repair job. There are different types of beams available in the market, such as wooden, metal, and composite beams, each with its unique properties. Before choosing a beam type, consider the weight and size of the damaged area you need to repair.
Once you’ve chosen the appropriate beam type, securing them properly is essential for optimal support. One technique for securing beams is to use lag bolts or screws to attach the beam to ceiling joists or wall studs. Another method is to use metal brackets designed specifically for holding up drywall ceilings or walls. Whichever method you choose, make sure that the hardware used is strong enough to hold the weight of the drywall without compromising its integrity.
After securing the beams in place, inspect them carefully to ensure they’re level and properly spaced. You can do this by measuring between each beam using a tape measure or ruler and ensuring that they are no more than 16 inches apart from each other. Once your support beams are secured and properly spaced, you can move on to repairing your drywall using our previously discussed techniques for achieving a seamless finish that will give your walls or ceiling a fresh look!
Attaching The New Drywall
After cutting out the damaged drywall, it is time to attach the new piece. Attaching techniques will depend on the location of the ceiling and the size of the piece being installed. For larger pieces, having an extra set of hands to help hold it in place while securing is recommended. Additionally, it is important to use proper equipment such as a drill with a screwdriver bit or a screw gun to ensure that screws are properly inserted and countersunk.
Before attaching the new drywall, make sure that any loose debris or dust has been cleaned up from the surrounding area. This will prevent any particles from getting between the new drywall and existing structure which could cause issues down the line. Once clean, position the new piece in place and begin securing with screws every six inches along each joist. Be sure to keep screws at least 1/2 inch away from edges to avoid cracking.
Required equipment for attaching new drywall includes a drill or screw gun, screws sized appropriately for thickness of drywall (usually 1-1/4″ for 1/2″ thick), and a ladder or scaffolding if necessary for reaching higher ceilings. It may also be helpful to have a second person available to assist in holding up larger pieces during installation. With proper technique and equipment, attaching new drywall can be accomplished quickly and easily. The next step is taping and mudding seams to create a seamless finish on your newly repaired ceiling.
Taping And Mudding Seams
Taping and mudding seams is the next step in repairing damaged drywall in a ceiling. This process involves covering the joints between the new drywall and the existing ceiling with tape and mud to create a seamless surface. It is important to choose the right tape, mud, and tools to ensure a professional-looking finish.
Choosing the right tape is crucial for achieving a smooth finish. There are two types of tape: paper and mesh. Paper tape is typically used for inside corners while mesh tape is used for flat surfaces. Mesh tape is easier to work with as it has adhesive backing that helps it stick to the surface better than paper tape. When it comes to choosing mud, there are different types of joint compound available such as lightweight and all-purpose. The type you choose depends on your skill level and project requirements.
Best practices when taping and mudding include applying thin layers of mud, letting each layer dry completely before adding another layer, and feathering out the edges of each layer to blend with the surrounding surface. Common mistakes include using too much mud or not allowing enough time for each layer to dry before adding another layer. To achieve a professional-looking finish, use high-quality tools such as a taping knife, corner tool, hawk, sandpaper, and sanding pole.
With taping and mudding complete, the next step is sanding the surface to create an even texture that matches the existing ceiling. Sand lightly at first using fine-grit sandpaper until you can see no more bumps or ridges on the surface. Then gradually move up in grit size until you reach 220 grit sandpaper for a smooth finish. Remember to wear protective gear such as a mask or goggles while sanding to prevent dust inhalation or eye irritation.
Sanding The Surface
After completing the taping and mudding of drywall seams, the next step is sanding the surface. Sanding can be a time-consuming process but it is essential for achieving a smooth finish. The goal of sanding is to eliminate any bumps or ridges in the surface that can be seen or felt.
There are different types of sandpaper available for use on drywall surfaces. It is important to choose the right grit for each stage of sanding. Coarse grits, such as 80-grit, are used for initial sanding to remove excess compound while finer grits, such as 120-grit or higher, are used for final finishing. It is recommended to always start with a coarse grit before moving on to finer grits.
Sanding techniques vary depending on personal preference and experience. Some prefer using a sanding block while others use an electric sander. Regardless of which method you choose, it is important to keep the tool flat against the surface and move it in a circular motion or back-and-forth motion. Always work in small sections at a time and check your progress frequently to avoid over-sanding.
Moving forward with applying a primer coat, it is important to remember that proper preparation leads to optimal results. Sanded surfaces should be wiped down with a damp cloth to remove any dust or debris before applying primer. This ensures that primer adheres properly to the surface, creating a solid foundation for paint application.
Applying A Primer Coat
Choosing the right primer is crucial in creating a flawless finish. A high-quality primer will not only help with adhesion but also improve the overall appearance of your drywall repair. When selecting a primer, consider the type of paint you plan to use and ensure that the primer is compatible with it. Additionally, opt for a primer that is specifically formulated for ceilings as these tend to have better hiding properties.
Tips for achieving a smooth finish include proper preparation and application techniques. Before applying the primer, make sure that the repaired area is completely dry and free of dust or debris. Sand down any rough spots or uneven areas to create an even surface for painting. Use a quality brush or roller to apply the primer evenly, working from one end of the ceiling to the other in long strokes.
A well-primed ceiling can make all the difference in your final product. Take your time and follow these tips to achieve a seamless finish that will last for years to come. In the next section, we will discuss how to paint your newly repaired ceiling for a polished look.
Painting The Ceiling
When replacing damaged drywall in a ceiling, painting the new drywall is an important step to restore the original look of the ceiling. Choosing the right paint color for the ceiling is crucial in achieving a cohesive and attractive finish. It’s best to go for a paint color that complements the existing wall colors or opt for a neutral color like white or beige.
Aside from choosing the right paint color, it’s also important to choose the best type of paint for ceilings. Flat or matte finishes are ideal for ceilings as they don’t reflect light and hide imperfections well. These types of finishes are also easy to touch up if needed. Satin or eggshell finishes can be used if you want a bit of sheen on your ceiling, but keep in mind that they may show more imperfections.
In summary, painting your newly replaced drywall is an essential part of restoring your damaged ceiling. Choose a paint color that complements your wall colors or go with a neutral tone like white or beige. Opt for flat or matte finishes as they’re best suited for ceilings and hide imperfections well. With these tips in mind, you’ll have a beautifully restored ceiling in no time.
To ensure quality results, cleaning up the work area after painting is crucial before moving on to the next steps of repairing your damaged drywall.
Cleaning Up The Work Area
- To repair damaged drywall in a ceiling, the appropriate supplies must be gathered, including drywall, joint compound, drywall screws, and a drywall saw.
- The ceiling should then be inspected for any other damage or weak spots, and the area should be cleared of any furniture or loose materials.
- The damaged area should be measured and marked, and the drywall saw should be used to cut out the damaged portion of the ceiling.
- Finally, the new drywall should be attached to the ceiling and joint compound should be used to ensure a smooth, seamless transition.
Gathering Supplies
As a drywall repair expert, I understand that the first step in replacing damaged drywall in a ceiling is gathering supplies. Shopping for the right materials can be overwhelming, but with some shopping tips and cost estimation, you can save time and money.
When shopping for supplies, make sure to purchase enough drywall sheets to cover the entire damaged area. Take accurate measurements of the affected space to avoid buying more or less than you need. Other essential materials include joint compound, drywall screws, sandpaper, a putty knife, and a utility knife.
Cost estimation is crucial when planning your budget for this project. Prices may vary depending on the quality and quantity of materials needed. It’s essential to research prices at different stores or online before purchasing to ensure you get the best deal possible. Remember that investing in high-quality materials will ensure better results in the long run.
By following these shopping tips and estimating costs beforehand, you’ll be better equipped to replace damaged drywall in your ceiling efficiently and effectively. With proper planning and preparation, this home improvement project can be completed without breaking the bank.
Preparing The Area
Once you have gathered all the necessary supplies for replacing damaged drywall in your ceiling, the next step is to prepare the area. This involves clearing out the work area and protecting other parts of your home from dust and debris. Using drop cloths is an effective way to catch falling debris and prevent it from spreading throughout your home.
It’s essential to wear safety goggles when preparing the area as it can be a messy process, especially if you’re repairing textured or popcorn ceilings. Removing damaged drywall can release a significant amount of dust and debris into the air, which can be harmful if inhaled. Wearing safety goggles will protect your eyes from flying debris and keep them safe.
Once you’ve removed all the damaged drywall, cleaned up any residual dust or debris, and disposed of it properly, you can move on to cleaning up the work area. Start by removing any remaining drop cloths and vacuuming up any stray pieces of drywall or dust. A clean work area will make it easier for you to apply joint compound and complete further repairs without any distractions or obstacles.
Inspecting The Finished Repair
After cleaning up the work area, it is time to inspect the damaged drywall and replace it with new ones. Inspecting the damaged area is crucial because it allows you to determine the extent of the damage and what needs to be done. You need to make sure that there are no remaining debris or damages in the replaced area before starting a new installation.
When replacing damaged drywall, one common mistake people make is not matching the thickness of the existing drywall. It is important to ensure that you choose a replacement that has the same thickness as the original drywall. This will ensure that there are no uneven surfaces left behind after installation.
Quality control is an essential part of any repair job, including replacing damaged drywall. Before finishing up, you must check for any defects and imperfections in your work. This can include checking for any cracks or dents on the surface of the wall and ensuring that all edges are even.
Markdown list:
- Use proper safety gear such as gloves and goggles when handling drywall
- Take accurate measurements before cutting replacement pieces
- Use a utility knife with a sharp blade for cleaner cuts
- Sand down rough edges before applying joint compound
In conclusion, replacing damaged drywall in a ceiling requires attention to detail and following specific procedures to ensure quality results. Common mistakes like not matching thickness and overlooking quality control can lead to further damage. By taking necessary precautions and following best practices, you can achieve a seamless repair job that looks as good as new.
Moving forward, let’s delve into some tips for avoiding future damage on your ceiling’s drywall.
Tips For Avoiding Future Damage
As a drywall repair expert, I know firsthand the importance of not just fixing damaged drywall, but also preventing future damage. While repairing a damaged ceiling can be a daunting task, it’s important to take steps to avoid having to do it again in the future. One of the most common causes of drywall damage is moisture. Moisture can seep into the walls and cause them to become weak and susceptible to damage. To prevent this from happening, make sure your home is properly ventilated.
Proper ventilation is key when it comes to avoiding moisture buildup in your home. This includes making sure that your bathroom and kitchen fans are vented outside and not just into your attic or crawl space. Additionally, you should consider investing in a dehumidifier if you live in an area with high humidity levels. By keeping the air in your home dry and well-ventilated, you can help prevent moisture from causing damage to your drywall.
Another way to prevent future damage is by being mindful of what you hang on your walls and ceilings. Heavy items like chandeliers or large paintings can put stress on your drywall over time, causing it to crack or break. Before hanging anything heavy, be sure to use sturdy anchors that are designed for use with drywall. By following these tips for preventing future damage, you can keep your ceiling looking great for years to come.
By knowing how to prevent moisture buildup and how to properly ventilate your home, you can avoid having to deal with damaged drywall in the future. However, there may be times when calling a professional is necessary. In the next section, we’ll discuss some signs that indicate it’s time to call in a professional for help with your drywall repair needs.
Knowing When To Call A Professional
While it is possible to replace damaged drywall in a ceiling on your own, there are instances when hiring professionals is the better choice. If you have no experience with drywall repair or if the damage is extensive, it may be best to leave the job to the experts. Professionals have the skills, knowledge, and equipment needed to get the job done right.
Moreover, professionals can ensure that all safety measures are observed during the repair process. Ceiling drywall replacement poses risks of injury due to falling debris and exposure to harmful materials such as asbestos. Professional services guarantee that proper safety protocols are followed, minimizing any potential hazards.
While DIY repairs may seem like a cost-effective option, they can end up being more expensive in the long run. Mistakes made during DIY repairs can lead to additional damage, requiring more time and money for rework. Hiring professionals ensures that the job is done correctly the first time around, saving you both time and money. When considering ceiling drywall replacement, it’s essential to weigh DIY vs professional services carefully.
Conclusion
Drywall repair is a common task that can be daunting for many homeowners. However, with the right tools and knowledge, repairing damaged drywall in a ceiling can be done with ease. It is crucial to evaluate the damage and gather the necessary tools and materials before starting the repair process.
Preparing the work area, removing the damaged drywall, measuring and cutting replacement drywall, cleaning up the work area, and inspecting the finished repair are all essential steps in completing a successful drywall repair. Knowing when to call a professional is also important, as some repairs may require expertise beyond what a homeowner can provide.
As an expert in drywall repair, I encourage homeowners to pay close attention to their ceilings and address any damage promptly. Remember to take precautions to avoid future damage by identifying potential sources of moisture or impact. With proper care and maintenance, your ceiling will remain strong and beautiful for years to come.
Image Credits
- “water damaged drywall” by brocktopia (featured)

