Drywall anchors are essential tools for any homeowner or contractor who wants to securely mount objects on a wall without damaging it. They are designed to distribute weight evenly across the drywall, preventing it from crumbling under pressure. However, if not used correctly, drywall anchors can fail and cause damage to the wall or object being mounted. In this article, I will provide an in-depth guide on how to use drywall anchors effectively.
To begin with, it is important to understand the different types of drywall anchors available and their specific applications. There are several types of drywall anchors such as plastic expansion anchors, toggle bolts, molly bolts, and self-drilling anchors. Each type has its own unique advantages and disadvantages depending on the weight and size of the object being mounted. By understanding these differences, you can choose the right anchor for your project and ensure that it holds up over time. In this article, I will explain how each type of anchor works and provide step-by-step instructions on how to install them properly.
The Importance Of Choosing The Right Anchor
Choosing the right anchor is crucial for a successful drywall installation process. The type of anchor you choose will depend on the weight of the item you are hanging, as well as the thickness of the drywall. Using the wrong type of anchor can result in damage to your wall, and potentially even injury or property damage.
Before choosing anchors, it is important to consider what type of wall you have. If you have drywall, you will need to use drywall anchors. If you have plaster walls, you will need to use different types of anchors that are designed specifically for plaster. It is important to follow manufacturer recommendations when choosing anchors, as using the wrong type can lead to failure.
When choosing anchors for your drywall installation, there are several factors to consider. First and foremost, consider the weight of the object you are hanging. This will determine how much weight capacity your anchor needs to have. Additionally, consider the size and shape of the object; larger items may require multiple anchors spaced evenly apart for proper support. Taking these factors into account will ensure a safe and successful installation process.
Properly understanding how different types of anchors work is important in making an informed decision on what type to use for your specific project needs. One common type is plastic expansion anchors which work by creating tension against the sides of a drilled hole in order to secure it in place. Understanding how they work can help ensure their effective use in securing heavy objects on your drywall surface without causing any damage or failure during its working life span.
Plastic Expansion Anchors: How They Work
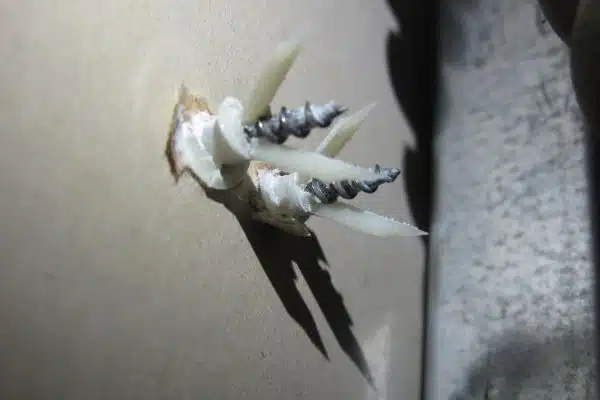
Plastic expansion anchors are one of the most popular types of drywall anchors. They are made of plastic and have a cone-shaped tip that expands when the screw is driven into them. This causes the anchor to grip tightly onto the wall, providing a secure hold for whatever object you want to hang.
One of the advantages of plastic expansion anchors is that they are easy to install. You don’t need any special tools or skills – all you need is a drill, a screwdriver, and your anchor kit. Another advantage is that they are affordable, making it possible for anyone to install them without breaking their budget.
However, there are also some disadvantages to using plastic expansion anchors. First, they may not be as strong as other types of anchors, such as metal ones. Second, they can be brittle and break easily if you overtighten the screw or use them in very hard materials like concrete or brick. Finally, they may not work well in humid environments because the moisture can cause them to degrade over time.
To ensure a successful installation with plastic expansion anchors, follow these tips:
- Choose an anchor that is appropriate for the weight and size of your object.
- Use a drill bit that matches the size of your anchor.
- Make sure to insert the anchor straight into the wall without bending it or causing it to twist.
Step-By-Step Guide To Installing Plastic Expansion Anchors
- Prior to installing plastic expansion anchors, it is important to drill a hole in the wall or ceiling that is the same size as the anchor.
- The hole should be drilled deep enough to accommodate the full length of the anchor.
- Next, the plastic expansion anchor should be firmly inserted into the hole, making sure it is straight and flush with the wall or ceiling.
- Finally, the head of the anchor should be tapped into the wall or ceiling until it is secured and flush with the surface.
Drilling The Hole
To create a sturdy and secure hold for your plastic expansion anchors, drilling the hole is an essential step in the installation process. It is important to use proper drilling techniques to avoid damaging the drywall or creating an unstable anchor hold. As a drywall installation expert, I recommend using a drill bit that matches the size of your anchor to ensure a snug fit.
Before beginning, take precautions while drilling by locating any electrical wires or plumbing behind the wall. Use a stud finder to locate any studs and avoid drilling into them if possible. If you must drill into a stud, use a wood screw instead of an expansion anchor for added stability.
When drilling, start with light pressure and gradually increase as needed. Be careful not to push too hard, as this can cause the bit to slip and damage the wall surface. Once you have drilled through the drywall and reached the desired depth, remove any debris from the hole before inserting your plastic expansion anchor.
In summary, drilling the hole is crucial for installing plastic expansion anchors properly. By using proper techniques and taking necessary precautions, you can create a secure hold without causing damage to your walls or compromising safety. Remember to match your drill bit size with your anchor size and start with light pressure while drilling.
Inserting The Anchor
Now that you have drilled the hole, the next step in installing plastic expansion anchors is to insert them securely. This step is crucial because a poorly inserted anchor can lead to failure and potentially cause damage or harm. As a drywall installation expert, I recommend following these tips for avoiding anchor failure and common mistakes when installing anchors.
Firstly, it is important to ensure that your anchor fits snugly in the hole without being too tight or loose. If it’s too tight, it may cause cracks in the wall or damage the anchor itself. On the other hand, if it’s too loose, it won’t provide enough support and could pull out of the wall over time. Additionally, make sure that your anchor is inserted straight into the hole without any angles as this can also lead to instability.
Secondly, use a hammer or mallet to gently tap on the head of the anchor until it is flush with the surface of the wall. Avoid hitting it too hard as this can cause damage to both the anchor and wall. Once you have inserted all of your anchors, double-check each one by giving a gentle tug on each screw before hanging any objects on them.
In summary, inserting plastic expansion anchors properly is essential for creating a sturdy hold and preventing potential damage or harm. By following these tips for avoiding anchor failure and common mistakes when installing anchors, you can ensure that your walls remain intact and your belongings stay secure. Remember to keep your anchor snug but not too tight or loose and insert them straight into the hole before tapping them gently into place with a hammer or mallet.
Toggle Bolts: How They Work
Plastic expansion anchors may be a popular choice for hanging lightweight objects, but they can easily fail under heavier loads. This is where toggle bolts come in handy. Toggle bolts are heavy-duty anchors that provide superior holding power compared to other drywall anchors. They work by gripping the backside of the drywall and creating a secure hold that can support significant weight.
One advantage of toggle bolts over other types of drywall anchors is their ability to hold more weight. For example, a 3/8-inch toggle bolt can support up to 100 pounds when installed correctly, making it ideal for hanging large or heavy objects like mirrors, shelves, and cabinets. Additionally, toggle bolts are versatile and can be used on a variety of wall types, such as plaster, concrete, and brick.
Toggle bolt installation requires a bit more effort than other types of anchors due to their design. However, with proper technique and tools, installing toggle bolts is still relatively easy for DIYers or professionals alike. In the next section, we will discuss a step-by-step guide to installing toggle bolts properly and efficiently. By following these instructions and using the right materials, you can create a sturdy anchor that will last for years to come without any worries about your possessions falling off the wall.
Step-By-Step Guide To Installing Toggle Bolts
Before installing toggle bolts, the wall should be evaluated to ensure it is appropriate for installation.
Toggle bolts are best installed in an area where drywall is backed by a wall stud for added stability.
The installation process for toggle bolts requires the user to drill a hole in the wall that is larger than the toggle bolt’s diameter.
Once the wall is prepared, the toggle bolt is inserted through the hole and then the wings of the toggle bolt are folded down, and the bolt is tightened until it is firmly secured.
Preparing The Wall
Before installing toggle bolts, it is crucial to prepare the wall properly. Inadequate preparation can result in a substandard installation that can compromise the structural integrity of the drywall. The first step in preparing the wall involves identifying and marking the spot where you want to install your hardware. You can use a pencil or marker to mark your spot accurately.
Next, you need to gather all necessary tools for wall preparation. You will need a drill bit that matches the size of your toggle bolt, a screwdriver or drill, and a stud finder. A stud finder is essential because it helps you locate studs behind the drywall, which are necessary if you want to avoid damaging electrical wires or plumbing pipes behind the wall during installation.
Once you have identified and marked your spot and gathered all necessary tools, proceed to drill a small hole into the drywall using your drill bit. This will help you gauge whether there are any obstructions behind the wall. If there are no obstructions, proceed to drill a larger hole that matches the size of your toggle bolt. Finally, insert your toggle bolt into this larger hole and tighten it until it feels secure. With proper wall preparation, installing toggle bolts becomes an easy task that anyone can accomplish with ease.
Installing The Bolts
Proper wall preparation is essential to ensure a successful toggle bolt installation. Once you have marked your spot and gathered all necessary tools, it’s time to move on to installing the bolts. One of the most critical tips for proper alignment is using a level during installation. This will help ensure that your hardware is straight and secure.
When installing the bolts, it’s important to avoid some common mistakes that can compromise the structural integrity of the drywall. For instance, do not overtighten the bolts as this can cause them to break through the drywall or pull out completely. Additionally, be sure to use the correct size of toggle bolt based on the weight of your hardware.
Once you have installed your toggle bolts correctly, it’s time to attach your hardware securely. Insert your screws into their respective holes and tighten them until they feel secure. With these simple steps, you can easily install toggle bolts and hang items such as shelves, mirrors or pictures with confidence and ease.
Molly Bolts: How They Work
Molly bolts, also known as toggle bolts, are a type of anchor that can be used to hang heavy objects on walls. They work by expanding behind the drywall or plaster to create a strong hold. Choosing the right molly bolt for your project is crucial to ensure that it can support the weight of your object and prevent damage to your wall.
When selecting a molly bolt, consider the weight of the object you want to hang and the thickness of your wall. Molly bolts come in various sizes and weight capacities, so it’s important to choose one that can support the load. In addition, different types of walls require different types of molly bolts. For example, if you’re hanging something on a hollow wall like drywall, you’ll need a toggle bolt that expands behind the wall. If you’re hanging something on a solid wall like brick or concrete, you’ll need an anchor that drills into the wall.
Once you’ve chosen the right molly bolt for your project, there are some tips to keep in mind when using them. First, always pre-drill a hole in your wall before inserting the anchor to prevent cracking or damaging your drywall. Second, make sure to insert the molly bolt straight into the hole and tighten it securely with a screwdriver or drill. Finally, avoid over-tightening the screw as this can cause the anchor to break or strip out of its hole.
Transition: Now that you know how to choose and use molly bolts effectively, let’s dive into a step-by-step guide for installing them in your walls.
Step-By-Step Guide To Installing Molly Bolts
Imagine you’re a traveler navigating through rough terrain with nothing to hold onto. You stumble and fall, unable to gain any footing. But then, you come across a sturdy rope that can support your weight and guide you towards your destination. Just like the rope, Molly bolts are designed to help secure heavy objects on drywall.
Before installing Molly bolts, it’s important to have the proper tools on hand. These include a drill, drill bit, pliers, screwdriver, and of course, the Molly bolt itself. One common mistake people make when using Molly bolts is not pre-drilling the hole in the drywall before inserting the bolt. This can cause damage and may even make it difficult for the bolt to securely fasten.
While Molly bolts are reliable anchors for heavy objects on drywall, there are alternative anchor types that may be better suited for certain applications. For example, self-drilling anchors are ideal for thinner or softer drywall as they eliminate the need for pre-drilling. Understanding which anchor type is best for each situation can save time and prevent damage to both your walls and belongings. In the next section, we’ll explore self-drilling anchors: how they work and when they should be used.
Self-Drilling Anchors: How They Work
After understanding how to install molly bolts, it is essential to know about self-drilling anchors. Self-drilling anchors are a type of hardware that allows for quick installation without requiring pre-drilling. These anchors have revolutionized the market by making the process of securing objects onto drywalls and other materials much easier.
Advantages of self-drilling anchors include their speed of installation, as they do not require pre-drilling holes. They can also handle heavy loads and are suitable for use in various types of walls, such as concrete and brick walls. However, some disadvantages come with using self-drilling anchors. One major drawback is that if they break during installation, it may be difficult to remove them.
When compared to other types of anchors like toggle bolts or plastic anchors, self-drilling anchors offer a quicker and more straightforward installation process. Toggle bolts require larger holes to be drilled beforehand, while plastic anchors are not always reliable when used to hold heavy objects onto drywall surfaces. Overall, self-drilling anchors provide an excellent solution for those who need a fast and secure way to hang objects on their walls.
Moving forward, the next section will delve into a step-by-step guide on how to install self-drilling anchors correctly. By following these steps, you can ensure that your objects remain securely mounted on your walls without any risk of falling or damage.
Step-By-Step Guide To Installing Self-Drilling Anchors
When it comes to installing self-drilling anchors, it’s essential to do it correctly to ensure a secure hold. One common mistake is using an anchor that doesn’t have the weight capacity for the object you’re hanging. It’s crucial to check the packaging of the anchor and make sure it can support the weight of both the object and any additional forces that may occur.
Anchor placement is also critical when installing self-drilling anchors. Make sure to measure and mark where you want the anchor before drilling into the drywall. Once you’ve marked your spot, drill slowly and carefully into the drywall until you feel resistance, then insert the anchor until flush with the surface. If you need to remove an anchor, use pliers or a screwdriver to back it out slowly while applying pressure against the wall.
In summary, properly installing self-drilling anchors requires attention to detail and careful consideration of both weight capacity and anchor placement. By avoiding common mistakes such as using an inadequate weight capacity and ensuring proper placement, you can create a secure hold for your objects without damaging your drywall. In the next section, we’ll discuss tips for choosing the right size anchor for your project.
Tips For Choosing The Right Size Anchor
After successfully installing self-drilling anchors, the next important step is to choose the right size and weight capacity of the anchor. This will ensure that your hanging or mounting project is secure and stable, without causing any damage to your walls. When choosing an anchor, you must first consider the material of the anchor. Anchors come in various materials such as plastic, metal, and nylon, each with their own advantages and disadvantages.
Another crucial factor to consider when choosing an anchor is checking the wall thickness. Different anchors are suitable for different wall types and thicknesses. If you have a thin wall, it’s best to use a smaller anchor that won’t cause too much stress on the wall. On the other hand, if you have a thicker wall, you’ll need a bigger anchor that can support more weight.
To help you choose the right type of anchor for your hanging or mounting project, here are some tips:
- Consider the weight of the item you’re hanging or mounting.
- For lighter items such as picture frames or small shelves, plastic anchors are suitable.
- For heavier items such as TVs or heavy mirrors, metal anchors are recommended.
- Check if your drywall has been reinforced with wood studs behind it. If it has wooden studs behind it, then you can use screws directly into those studs without needing an anchor.
By keeping these tips in mind when selecting drywall anchors for your project and following proper installation techniques, you can ensure that your items are securely mounted without causing any damage to your walls. In the subsequent section, we will discuss some essential tips for choosing the right weight capacity for your chosen type of anchor.
Tips For Choosing The Right Weight Capacity
When considering the size of an anchor for a drywall installation, it is important to choose an anchor that is appropriate for the weight capacity of the item being mounted. The type of wall should also be taken into account, as some anchors are designed to be used only in certain wall types. If multiple mounts are needed, it is important to use the appropriate number of anchors to ensure that the item remains firmly in place. The size of the anchor, type of wall, and number of mounts all play an important role in selecting the right weight capacity for a drywall installation.
Size Of Anchor
Choosing appropriate drywall anchors is crucial in ensuring the stability of your fixtures. The weight capacity of your anchors should match the weight of your object for maximum support. One important factor to consider when selecting an anchor is its size, which can vary depending on the thickness and material of the wall.
When choosing an anchor, it’s essential to know the available sizes and their corresponding weight capacity. Small anchors are ideal for lightweight objects such as picture frames or small shelves, while medium-sized anchors work well for moderately heavy items like mirrors or cabinets. Large anchors are suitable for heavier objects such as TVs or bookshelves. It’s important to note that using an oversized anchor can damage the wall and decrease its holding power.
In summary, selecting the right size of drywall anchor is crucial in ensuring proper installation and support for your fixtures. Choosing appropriate sizes according to the weight capacity required will help prevent damage to walls and ensure that your objects remain securely mounted without any risk of falling off. By taking into account these factors, you’ll be able to choose the right anchor size with confidence and achieve a successful installation every time.
Wall Type
Best practices for choosing the right weight capacity of drywall anchors include considering the weight of the object to be mounted and selecting an appropriate anchor size. However, another crucial factor to consider is the type of wall in which the anchor will be installed. Different wall types require different types of anchors, and using the wrong type can result in weak support or damage to the wall.
Common mistakes when it comes to selecting anchors for different wall types include assuming that all walls are made equal. Drywall is a common material used for interior walls, but not all drywalls are created equal. Some walls may be thicker or made with different materials such as plaster or concrete, requiring specific types of anchors that can withstand their respective weights. It’s important to identify the type of wall you’re working with and choose an anchor that’s suitable for it.
In addition to considering weight capacity and anchor size, it’s crucial to choose an anchor that’s designed for your specific wall type. This will ensure maximum support and prevent damage to your walls. By following these best practices and avoiding common mistakes, you’ll be able to select the right drywall anchor for your project and achieve a successful installation every time.
Number Of Mounts
When it comes to drywall installation, choosing the right weight capacity and anchor size is crucial. However, another factor that should not be overlooked is the number of mounts required for the project. Mounting options can vary depending on the weight and size of the object to be mounted, as well as the type of wall being used.
One common mistake when selecting anchors for multiple mounts is assuming that one anchor can support multiple objects. While some anchors may have a high maximum weight capacity, they may not be designed to support more than one mount. It’s important to choose an anchor that’s suitable for both the weight of the object and the number of mounts needed.
To ensure maximum support and prevent damage to your walls, it’s important to choose an anchor with a high enough maximum weight capacity for all mounts being installed. This will help distribute the weight evenly across all mounts and prevent any potential damage or failure. By considering mounting options and selecting an appropriate anchor size and type, you can achieve a successful installation with multiple mounts every time.
How To Determine The Correct Anchor Placement
Anchor placement is crucial for the stability of your drywall installation. Before choosing the correct anchor type, it is important to identify the wall surface where you will be installing the anchor. The most common types of wall surfaces are drywall, plaster, and concrete. Each surface requires a specific anchor type and placement.
For drywall surfaces, you can use plastic expansion anchors or toggle bolts. When using plastic expansion anchors, drill a hole slightly smaller than the anchor’s diameter and insert the anchor until it is flush with the surface. For toggle bolts, drill a hole large enough to fit the bolt’s wings when folded and insert the bolt through the hole until it pops open behind the surface. Ensure that you place your anchors at least one inch away from any corners or edges to prevent cracking.
When dealing with plaster walls, use either screw-in anchors or molly bolts. Screw-in anchors require pre-drilled holes slightly smaller than their diameter while molly bolts need larger holes to accommodate their expanding sleeves. Place your anchors at least two inches away from any corners or edges as plaster tends to crack easily near these areas.
Determining correct anchor placement involves identifying your wall surface and choosing appropriate anchor types for optimal stability. Properly placed anchors ensure that your drywall installation remains secure over time without sagging or falling off due to inadequate support. In our next section, we’ll discuss common mistakes to avoid when using drywall anchors so that you can install them like a pro!
Common Mistakes To Avoid When Using Drywall Anchors
Imagine you’re a chef, and you’re trying to make a delicious dish for your guests. You carefully select the ingredients, chop them up into perfect portions, heat up the stove, and begin cooking. But as time goes on, you notice that the dish isn’t turning out quite right. The flavors aren’t melding together as they should be, and the texture is off.
Just like cooking requires attention to detail and careful execution, so does using drywall anchors. Even small mistakes can lead to big problems down the line. Here are some common mistakes to avoid when using drywall anchors:
- Not selecting the right anchor for the job: Just like different dishes require different ingredients, different walls require different types of drywall anchors. Make sure to choose an anchor that’s appropriate for the weight of what you’re hanging and the type of wall you’re working with.
- Improper installation: It’s not just about choosing the right anchor – it’s also about installing it correctly. Make sure to follow all instructions carefully and use the right tools for the job.
- Not testing before hanging: Once your anchor is installed, give it a quick test tug before hanging anything on it. This will help ensure that it’s properly secured and won’t fail under weight.
If you’ve already made one of these common mistakes or are experiencing issues with your drywall anchor installation, don’t worry – there are troubleshooting tips that can help:
- If your anchor is spinning in place when you try to screw in a bolt or hook, remove it and try again with a slightly larger anchor.
- If your anchor has fallen out of the wall completely or isn’t holding up as expected, remove it and patch any holes left behind before trying again.
- If your anchor is causing damage to your wall or won’t go in all the way, try drilling a smaller pilot hole first.
With these common mistakes and troubleshooting tips in mind, you’ll be able to hang your items with confidence and avoid any potential issues. But what happens when it’s time to remove those anchors? Read on to find out how to do so safely without damaging your walls.
How To Remove Drywall Anchors Safely
Now that you know the common mistakes to avoid when using drywall anchors, it’s time to learn how to remove them safely. Removing anchors may seem like a simple task, but if not done correctly, it can damage your drywall. Before removing any anchor, assess its size and type to determine the right tools needed for removal.
To remove a plastic anchor, push it into the wall until it’s flush with the surface. Next, use a pair of pliers to grip the anchor and gently pull it out of the wall while twisting it back and forth. For metal anchors, use a screwdriver to unscrew the anchor from the wall. If you encounter resistance while removing an anchor, stop immediately as this could damage your drywall.
After removing all anchors from your drywall, you may notice small holes left behind. These holes can be easily repaired by filling them with spackle or joint compound using a putty knife. Once filled, let it dry completely before sanding down any excess material with fine-grit sandpaper. Finally, paint over the repaired area with matching paint color for a seamless finish.
As an expert in drywall installation and repair, I highly recommend taking extra precautions when removing anchors from your drywall. Always ensure that you have the correct tools on hand for safe removal and take note of any damages that may require professional repair services. By following these steps carefully, you can safely remove anchors without causing damage to your walls or ceiling.
Final Thoughts And Recommendations
Tips and Best Practices for Using Drywall Anchors
When it comes to installing drywall anchors, there are a few tips and best practices that can help ensure successful results. First and foremost, it is important to choose the right type of anchor for your particular project. There are many different types of anchors available, each designed to work with specific materials and load capacities. Be sure to read the packaging carefully to ensure you are selecting the appropriate anchor for your needs.
Another important tip is to always use a drill bit that matches the size of the anchor you are using. This will help ensure that the hole you drill into the wall is just the right size for the anchor, which will provide maximum holding power. It is also recommended that you pre-drill a small pilot hole before inserting the anchor, as this can help prevent damage or cracking to your drywall.
Finally, it is important to follow manufacturer instructions carefully when installing drywall anchors. Improper installation can result in reduced holding power or even failure of the anchor altogether. Take your time and make sure you fully understand how to install each type of anchor before attempting any installation on your own.
By following these tips and best practices, you can feel confident in your ability to install drywall anchors successfully and safely. Remember that proper installation is key when it comes to ensuring maximum holding power and safety in any project involving drywall anchors. With a little patience and attention to detail, anyone can become an expert at using these essential tools in home construction and repairs without encountering any problems along the way.
Conclusion
When it comes to hanging things on drywall, using the right type of anchor is crucial. Plastic expansion anchors are great for lighter items like picture frames, while toggle bolts can support heavier objects like shelves. In this guide, we’ve provided step-by-step instructions for installing both types of anchors and tips for determining the correct placement.
It’s important to avoid common mistakes like using the wrong size or type of anchor and over-tightening screws. When it’s time to remove anchors, do so carefully to avoid damaging your walls. By following these guidelines, you’ll be able to confidently hang items on your drywall without fear of them falling down.
As a drywall installation expert, I highly recommend taking the time to properly choose and install the right anchor for each job. Remember that a well-placed anchor not only makes your space look better but also ensures safety in your home or workspace. So next time you’re hanging something on drywall, don’t rush it – take the time to do it right and enjoy peace of mind knowing your items are securely in place. As they say, “measure twice, drill once.”
Image Credits
- “what happen: nylon drywall anchors” by nicknormal (featured)

