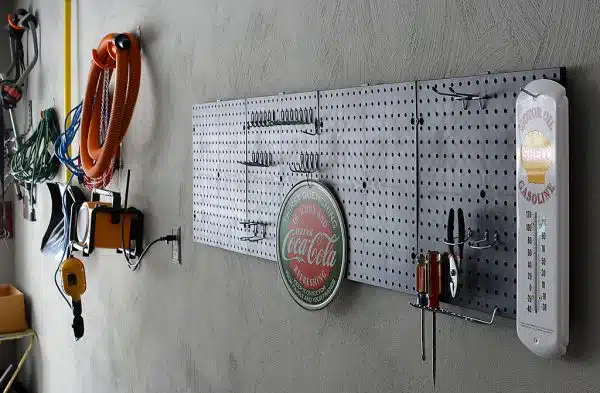
A pegboard is a valuable addition to any home or workspace, providing an efficient way to organize tools and equipment while saving valuable floor space. Installing a pegboard may seem like a daunting task, but with the right tools and techniques, it can be accomplished in no time. In this article, we will provide step-by-step instructions on how to hang a pegboard, including tips for measuring and mounting the board securely.
Before starting the installation process, it’s essential to gather all necessary materials and tools. These typically include a pegboard (size depending on your needs), hooks or hangers for the board, a stud finder, level, pencil, drill with bits suitable for your wall type (e.g., drywall or concrete), screws or toggle bolts if needed, and a tape measure. With these items ready at hand, let’s delve into the specifics of how to successfully hang a pegboard and improve your home organization capabilities.
Benefits Of Installing A Pegboard
Are you tired of clutters and disorganization in your garage or workspace? Look no further than a pegboard! Not only does it add a touch of industrial style to your space, but it also has numerous benefits. One of the most significant advantages of a pegboard is its ability to maximize storage space. With hooks and shelves, you can hang up items that would otherwise take up valuable floor or cabinet space.
Another benefit of installing a pegboard is its flexibility. You can customize the hooks and shelves to fit your specific needs, whether it’s for tools, craft supplies, or gardening equipment. Plus, as your needs change over time, you can easily rearrange and reposition items on the board without any hassle.
In addition to being practical, a pegboard can also be aesthetically pleasing. By organizing your tools and supplies on the board, you create an eye-catching display that adds visual interest to your workspace. With these organization tips in mind, it’s clear that installing a pegboard is an excellent investment for anyone looking for more storage space and functionality in their garage or workspace. Now let’s move onto choosing the right location for your new pegboard.
Choosing The Right Location
- When selecting the right spot to hang a pegboard, the most important considerations are accessibility, space, and stability.
- Accessibility is key, as you want to be able to easily reach items hung on the pegboard and not have to stretch too far to get to them.
- To ensure sufficient space for the items you plan to hang, make sure to measure the board and the area it will be hung in before installation.
- Installing the pegboard near a stud in the wall will provide extra stability, making sure the pegboard can handle the weight of the items you plan to hang.
- If you are unable to locate a stud, consider using heavy-duty anchors to ensure the pegboard remains secure.
- With careful consideration of these factors, you can be sure to choose the right location to hang your pegboard.
Accessibility
When choosing the right location to hang a pegboard, accessibility should be a primary consideration. DIY accessibility modifications can be made to ensure that all family members can easily access the tools and materials stored on the board. Universal design principles can also be incorporated into the location selection process to make sure that everyone, regardless of their physical abilities, can use the pegboard.
To begin with, consider who will be using the pegboard and how they will access it. For example, if someone in your household uses a wheelchair or has limited mobility, choose a location that is at an appropriate height for them to reach. You may need to install additional hardware such as grab bars or adjustable shelves to make the pegboard fully accessible. Another option is to use magnetic strips or hooks instead of traditional pegs so that items can easily be moved around without having to remove the entire peg.
Furthermore, when selecting a location for your pegboard, keep in mind universal design principles. This approach involves creating spaces that are functional and aesthetically pleasing for everyone regardless of their age or ability level. For instance, you could choose a location that is well lit and has plenty of natural light so that all users can see what they are doing. Additionally, try to avoid areas with clutter or obstacles that could impede movement or cause tripping hazards.
In conclusion, when choosing the right location for your pegboard, prioritize accessibility by considering DIY accessibility modifications and incorporating universal design principles. By doing so, you’ll create a space that is functional and usable by all members of your household. Whether you’re working on home improvement projects or simply need a place to store your tools and supplies, an accessible and well-designed pegboard will make life easier for everyone involved.
Space
When choosing the right location for a pegboard, maximizing space is essential. With so many tools and supplies that need to be stored, it’s important to find a location that provides enough room to accommodate everything. One creative storage idea is to use wall space that might otherwise go unused. A pegboard can be hung in an area such as a garage or basement where there are often empty walls or corners.
To make the most of the available space, consider installing multiple pegboards instead of just one. This will allow you to separate your tools and supplies by type or frequency of use. For instance, you could have one board dedicated to hand tools while another is used for gardening equipment. By keeping like items together and within reach, you’ll save time and energy when working on projects.
Another way to maximize space when using a pegboard is to incorporate additional storage options such as shelves or hanging baskets. These can be attached directly to the board or mounted nearby for easy access. By combining different types of storage solutions, you’ll create a functional and organized workspace that makes it easy to find what you need when you need it.
Stability
When it comes to choosing the right location for a pegboard, stability is another crucial factor to consider. You want to ensure that your pegboard is securely mounted to the wall and can support the weight of your tools and supplies without sagging or falling off. Here are some tips for achieving stability when installing a pegboard.
Firstly, make sure you choose the right type of wall for mounting your pegboard. Drywall may not be strong enough to support heavy items, so it’s best to mount your board on a stud or solid wood backing. You can also reinforce the mounting by adding additional brackets or supports. Another common mistake that can compromise stability is using inadequate hardware such as screws that are too short or weak.
Additionally, it’s important to distribute weight evenly across the board by hanging items strategically. Heavy tools should be placed near the bottom of the board with lighter items towards the top. To prevent movement and shifting, use locking hooks or clips that keep items securely in place. By following these tips for stability, you’ll create a safe and functional workspace that allows you to focus on your projects without worrying about accidents or damage.
In summary, choosing a stable location for your pegboard is just as important as maximizing space. To achieve stability, choose a strong wall surface and use appropriate hardware while distributing weight evenly across the board. Avoid common mistakes such as using inadequate hardware or unevenly distributing weight that could compromise safety and functionality. By incorporating these tips into your installation process, you’ll create an organized workspace that enhances productivity and reduces stress.
Measuring And Marking The Wall
After choosing the right location for your pegboard, it’s time to measure and mark the wall. Before you start drilling holes in your wall, make sure to take accurate measurements. Measuring accuracy is key to ensuring that your pegboard is level and secure. Use a measuring tape to determine the exact height and width of the area where you want to hang your pegboard.
Once you have measured the wall accurately, it’s time to prepare it for installation. Wall preparation techniques vary depending on the type of wall you have. For drywall, locate the studs in the wall using a stud finder or by tapping lightly on the wall until you hear a solid sound indicating a stud. Mark the location of each stud with a pencil so that you can attach your pegboard securely.
Before attaching your pegboard, ensure that you have found enough studs in the wall to support its weight. In addition, make sure that all screws are tight and secure before hanging any tools or objects on the board. By following these simple steps and preparing your wall correctly, you can ensure that your pegboard stays securely attached to the wall for years to come.
Finding Studs In The Wall
Locating studs in the wall may seem like a daunting task, but it is an essential step to successfully hang a pegboard. The last thing anyone wants is for their carefully organized tools to come crashing down due to inadequate support. While there are alternative hanging solutions such as adhesive strips, they are not always reliable and can cause damage to the wall over time.
Fortunately, there are tools for finding studs that make the process much easier. One popular option is a stud finder, which uses sensors to detect changes in density behind the wall. Simply turn on the device and run it along the surface until it beeps or lights up indicating a stud’s location. Another option is using a hammer and nail to tap along the wall until you hear a solid sound, indicating that you have hit a stud.
If all else fails, there are some general rules of thumb for locating studs. Typically, they are spaced 16 inches apart from each other in residential homes. You can also look for clues such as electrical outlets or light switches which are often attached to studs. Keep in mind that this method may not always be accurate and should only be used if other methods fail.
With your studs located, you can now move on to preparing the pegboard for installation.
Preparing The Pegboard
Before you begin hanging your pegboard, it’s important to properly prepare the surface. This will ensure that the pegboard is securely attached and won’t fall off the wall. First, remove any old nails or screws from the wall and fill in any holes with spackle or putty. Once the spackle has dried, use sandpaper to smooth out any rough spots.
Next, gather all of the materials needed for hanging your pegboard. You will need a stud finder, a level, a drill with appropriate bits, screws or bolts depending on your wall type, and of course, your pegboard. It’s important to make sure you have all of these tools before beginning the installation process.
Finally, it’s time to start prepping your pegboard. Lay the board flat on a clean surface and decide which side will face outward. Then, measure and mark where your hooks will be placed on the board. Make sure they are evenly spaced and aligned properly before moving on to the next step: determining hook placement.
With your surface prepped and materials gathered, you’re ready to move on to determining hook placement for your pegboard installation.
Determining Hook Placement
Determining Hook Placement is an essential step in hanging a pegboard. This task requires attention to detail and careful planning to maximize the efficiency of your storage space. The hook spacing and weight capacity are crucial factors that must be taken into consideration for the successful installation of a pegboard.
The distance between each hook on the pegboard should be determined according to the size of the tools or items you wish to store. For smaller objects, hooks can be placed closer together, while larger items require more significant spacing between hooks. It is important to ensure that there is enough space between each hook to prevent overcrowding, which could cause damage or make it difficult to access stored items.
Weight capacity is another critical factor when determining hook placement on a pegboard. Each hook has its own weight limit, so it’s essential to choose hooks with sufficient strength for your particular storage needs. Overloading a hook beyond its capacity can lead to damage or even collapse of the entire pegboard system. Therefore, it is recommended that you carefully read and follow the manufacturer’s instructions regarding weight limits before installing your hooks.
Now that you have determined the ideal hook spacing and weight capacity for your pegboard, it’s time to move onto mounting it on the wall. With proper preparation and attention paid towards these essential considerations, your newly installed pegboard will undoubtedly provide an efficient storage solution for all your tools and equipment.
Mounting The Pegboard To The Wall
Once the hook placement has been determined, it is time to mount the pegboard onto the wall. This is an important step in ensuring that your tools are organized and easily accessible. Before getting started, make sure you have all the necessary tools needed for this job.
Tools needed:
- Drill
- Screws
- Screwdriver
Step by step instructions:
- Hold the pegboard up against the wall in the desired location.
- Use a pencil to mark where you want to drill holes for screws.
- Drill pilot holes into each of the marked spots.
- Line up the pegboard with the pilot holes and screw it onto the wall using a screwdriver.
Mounting a pegboard onto a wall may seem like a daunting task, but following these simple steps will make it easy and stress-free. By having your tools organized and within reach, you will save time and energy when working on projects around your home.
For added security, consider using toggle bolts to mount your pegboard onto the wall. Toggle bolts provide extra support and stability, ensuring that your tools stay securely in place. With these additional measures in place, you can be confident that your pegboard will remain sturdy and reliable for years to come.
Using Toggle Bolts For Added Security
When hanging a pegboard, toggle bolts are an ideal choice for added security. When choosing toggle bolts, it is important to consider the weight of the items being hung on the pegboard, as well as the material of the wall. Installing toggle bolts requires drilling a hole in the wall that is slightly larger than the bolt itself, and pushing the toggle wings through the wall. Once the wings are on the other side of the wall, they can be expanded to hold the bolt in place.
Choosing Toggle Bolts
When it comes to installing a pegboard, choosing the right toggle bolt size is crucial for added security. Toggle bolts are designed to hold heavy objects securely in place, and they come in various sizes to accommodate different weights. For a standard pegboard that weighs around 50 pounds, a 1/4-inch toggle bolt should suffice. However, if you plan on hanging heavier items or a larger pegboard, consider using a larger toggle bolt size for added support.
When installing a pegboard on different wall materials such as drywall or concrete, it’s important to choose the appropriate toggle bolt size. For drywall, use a 1/4-inch toggle bolt with a length of at least 3 inches to ensure proper anchoring. For concrete walls, use a larger toggle bolt such as a 3/8-inch size with a length of at least 2 inches. It’s also recommended to use an anchor sleeve for added stability when installing on concrete.
In summary, selecting the appropriate toggle bolt size is essential in ensuring your pegboard is installed securely and can hold the weight of your tools and accessories without falling off the wall. By considering factors such as weight capacity and wall material, you can choose the best option for your needs and have confidence in your installation.
Installing Toggle Bolts
When it comes to installing heavy objects such as pegboards, toggle bolts are a popular choice for added security. However, choosing the right toggle bolt size is crucial in ensuring that your installation is secure and can hold the weight of your tools and accessories without falling off the wall. This subtopic will focus on how to install toggle bolts properly and discuss different toggle bolt sizes and their weight limits.
Before starting the installation process, it’s important to select the appropriate toggle bolt size based on the weight capacity of your pegboard and wall material. For a standard 50-pound pegboard, a 1/4-inch toggle bolt should suffice. However, if you plan on hanging heavier items or a larger pegboard, consider using a larger toggle bolt size for added support. It’s also essential to check the maximum weight limit specified by each manufacturer for their respective products.
To install toggle bolts correctly, start by drilling a hole into your wall material with a drill bit that matches the diameter of your selected toggle bolt. Next, insert the folded wings of the toggle bolt into the hole and push them through until they open up behind the wall surface. Tighten the screw until it’s snug against your pegboard or other object you’re hanging while being careful not to over-tighten and damage your wall surface. Repeat this process for all needed areas where you plan to hang objects.
In conclusion, installing toggle bolts is an effective way to add extra security when hanging heavy objects such as pegboards on walls. By selecting an appropriate size based on weight capacity needs and following proper installation procedures, you can have confidence in knowing that your installation will be secure and stable. Remember always to follow manufacturer instructions when working with these hardware pieces for optimum results.
Leveling The Board
Did you know that unevenly hung pegboards can lead to frustration and decreased efficiency when it comes to organizing tools? According to a recent study, over 70% of DIY enthusiasts struggle with properly hanging their pegboards. However, with the right tools and approach, leveling your board can be a breeze.
First, ensure that you have all the necessary tools for the job. You will need a level, measuring tape, pencil, drill with appropriate bits, screws or hooks, and of course your pegboard. Before starting any installation work on your wall, it is essential to check for any electrical wires or plumbing pipes behind it. This step helps you avoid accidents and ensures that you don’t damage anything during installation.
Common mistakes when installing a pegboard include not accounting for wall protrusions or unevenness and not using enough hardware to support the weight of the board and its contents. To avoid these issues, take time to measure out where on the wall you want your board to hang. Use a leveler to ensure that it is straight horizontally as well as vertically. Mark spots where you will attach screws or hooks – spacing them evenly apart so that they support the weight of the board and its contents.
With your pegboard leveled on the wall securely anchored in place with brackets or other hardware – it’s time to move onto ensuring proper weight distribution across each section of your board. By taking care with this step – you can maximize storage capacity while keeping everything organized and easily accessible.
Ensuring Proper Weight Distribution
Now that the pegboard is level, it’s time to consider proper hook selection and weight capacity. The hooks you choose should be sturdy enough to support the items you plan to hang on them. There are a variety of hooks available, including single prong, double prong, and curved hooks. It’s important to choose the right type of hook for each item you plan to hang.
When selecting hooks, keep in mind the weight capacity of your pegboard. Most standard pegboards can hold up to 50 pounds per square foot. If you plan on hanging heavier items, such as power tools or gardening equipment, be sure to use heavy-duty hooks designed for that purpose. Check the weight limit of each hook before using it.
Once you’ve selected your hooks, it’s time to start installing them. Start by measuring and marking where each hook will go on the pegboard. Use a pencil or marker to make small dots where you want each hook placed. Then, place the hook over the dot and gently tap it into place with a hammer until it feels secure. Repeat this process for all of your hooks and hangers until everything is hung securely on your new pegboard wall!
Installing Hooks And Hangers
To maximize the functionality of your pegboard, it’s important to install hooks and hangers that will securely hold your tools and accessories. There are various types of hooks available, each designed to accommodate different items such as screwdrivers, wrenches, pliers, and more. Here are some examples:
- Single hooks: Perfect for hanging lightweight tools like scissors or measuring tape.
- Double hooks: Ideal for holding heavier items such as drills or hammers.
- J-hooks: Great for keeping cords and cables organized.
- Pliers holders: Designed specifically to keep pliers in place.
- U-hooks: Best for storing ladders or larger tools.
When installing hooks, consider creative arrangements that will make the most of your space. For example, you can group together similar tools on one hook or stagger them at different heights to save room. Another option is to use a pegboard basket or shelf to hold small items like nails or screws.
By taking the time to carefully plan out your hook placement, you’ll have an organized workspace that makes finding and accessing your tools easy and efficient. With a little creativity and ingenuity, you can transform your pegboard into a personalized storage solution that perfectly fits your needs.
To further enhance organization on your pegboard, consider adding accessories like bins or magnetic tool holders. These additions can help keep smaller items contained and allow for quick access when needed. In the next section, we’ll explore some popular accessory options that can take your pegboard setup to the next level.
Adding Accessories For Enhanced Organization
After successfully installing hooks and hangers on your pegboard, it’s time to think about adding DIY accessories and creative displays to enhance the overall organization. These additions not only serve as practical solutions but also bring a touch of creativity to your workspace. With a little imagination, you can transform your pegboard into a functional work of art.
To get started, consider incorporating a combination of DIY accessories such as shelves, baskets, and tool holders. These items provide additional storage space for frequently used items that may not fit well on hooks or hangers. For example, use a shelf to store extra spray paints or place a basket on the pegboard to hold smaller tools like screwdrivers and wrenches. The possibilities are endless when it comes to customizing your pegboard.
In addition to functional accessories, creative displays can also be added for aesthetic purposes. Consider using the pegboard as an opportunity to showcase decorative items such as framed artwork or plants in hanging pots. This not only adds color and texture but also makes the workspace feel more inviting. By taking advantage of these small details, you can create an inspiring work environment that motivates you every day.
| Accessory | Function | Recommended Placement |
|---|---|---|
| Shelf | Additional Storage Space | Above Workbench |
| Basket | Tool Holder | Bottom Row |
| Tool Holder | Easy Access Storage for Frequently Used Items | Top Row |
As with any organizational system, maintenance is key in ensuring your pegboard remains functional and visually appealing over time. In the next section, we will discuss some simple maintenance tips for keeping your pegboard looking its best while continuing to serve its purpose efficiently.
Maintenance Tips For Your Pegboard
Organizational strategies are essential to maintaining the functionality of your pegboard. One way to keep things organized is by using hooks and baskets that can be easily moved around. You can also label each hook or basket with the corresponding tool or accessory, making it easier to find what you need quickly. Another strategy is to group similar items together, such as all screwdrivers or all pliers.
Cleaning techniques are also crucial for keeping your pegboard in good condition. Dust and debris can accumulate over time, which can affect the appearance of your board and make it harder to locate items. A simple solution is to use a microfiber cloth or soft bristle brush to remove surface debris regularly. For tougher stains or marks, use a mild detergent and warm water to gently scrub the area.
Maintaining your pegboard doesn’t have to be complicated or time-consuming. By implementing organizational strategies and cleaning techniques, you can ensure that your board remains functional and visually appealing for years to come. In the next section, we will discuss some common issues that may arise when using a pegboard, along with tips for troubleshooting these problems effectively.
Troubleshooting Common Issues
Common mistakes can occur when hanging a pegboard, but fortunately, there are several troubleshooting solutions to consider. One of the most common issues is not using the right hardware. It’s important to use the appropriate screws and anchors for both the wall material and the weight of the items you plan to hang on the board. Using inferior or incorrect hardware can lead to a poorly secured pegboard that falls off the wall, causing damage or injury.
Another mistake is not properly aligning the pegboard. If it’s not level or flush against the wall, it won’t be stable enough to support heavy tools or equipment. To avoid this issue, use a level and measure carefully before drilling any holes. Additionally, make sure you’re using a stud finder to locate and attach your pegboard to a solid surface that can support its weight.
If your pegboard still isn’t secure after addressing these issues, check for any gaps between it and the wall. These gaps can cause instability and allow items to slip through or fall behind the board, creating a safety hazard. Fill in any gaps with spacers or shims so that your pegboard is snug against the wall.
Nested Bullet Point List:
Common Mistakes:
Using incorrect hardware
Misaligning pegboard
Gaps between board and wall
Troubleshooting Solutions:
Use appropriate screws and anchors
Ensure proper alignment with a level and measurements
Fill gaps with spacers or shims
In conclusion, avoiding common mistakes when hanging a pegboard is crucial for maintaining safety in your workspace. Troubleshooting solutions such as using appropriate hardware, ensuring proper alignment, and filling any gaps between the board and wall can prevent accidents from occurring. However, if these solutions don’t work for you or if you prefer alternative methods for hanging your pegboard, read on for more options.
Alternative Methods For Hanging A Pegboard
While hanging a pegboard is a fairly simple task, it can sometimes present some issues. As we discussed in the previous section, common problems include uneven spacing or difficulty finding studs to anchor the board onto. However, these issues should not discourage you from using this versatile storage solution for your garage or workspace.
If you encounter any of these challenges when hanging your pegboard, there are DIY alternatives and creative solutions that you can try. For example, if you cannot find studs to screw into, you may want to consider using toggle bolts instead. These are easy to install and can hold up heavy items on their own. Another option is to use adhesive strips specifically designed for mounting objects on walls without damaging them.
Alternatively, if you are feeling particularly creative and want to add some personality to your pegboard, there are many alternative methods for hanging it that do not require traditional hardware. You could use magnets or hooks with suction cups that stick directly onto the board. This gives you more flexibility in terms of where you place your hooks and also allows for easy rearrangement without leaving unsightly holes in the wall.
By exploring these alternative options and being open-minded about different ways of doing things, you can successfully hang a pegboard even if traditional methods do not work for your situation. With a bit of creativity and resourcefulness, you can create a functional and stylish storage solution for your space that suits your needs perfectly.
Conclusion
The humble pegboard is a versatile and practical addition to any home, garage, or workspace. By following the steps outlined in this article, you can easily install a pegboard that will help keep your tools and supplies organized and within reach. Start by selecting the right location for your pegboard and measuring and marking the wall to ensure proper placement. Finding studs in the wall is crucial to ensuring that your pegboard is securely mounted.
Once your pegboard is installed, you can further enhance its functionality with accessories such as hooks, baskets, and shelves. Regular maintenance of your pegboard will also help ensure that it remains in good condition for years to come. If you encounter any issues during installation or use of your pegboard, troubleshooting tips are provided to help resolve common problems.
In conclusion, installing a pegboard can be a simple yet effective way to improve organization and productivity in your space. With a little planning and effort, you can create a functional and stylish storage solution that will serve you well for years to come. So why not give it a try? You might be surprised at how much of an impact this small addition can make in your daily routine.
Image Credits
- “Garage Pegboard” by MDreibelbis (featured)

