Installing concrete anchors is an essential process in construction and DIY projects. They provide a reliable and strong hold for heavy objects, from shelving units to wall-mounted TVs. However, improper installation can lead to disastrous consequences such as structural damage or injury. Therefore, it is crucial to understand the proper methods of installing concrete anchors.
As a professional in the field, I have witnessed numerous cases where incorrect installation resulted in costly repairs and potential safety hazards. In this article, I will guide you through the steps of installing concrete anchors correctly and safely. By following these guidelines, you will have the knowledge and skills necessary to complete your project with confidence and ensure that your anchor installation is structurally sound.
Understanding The Types Of Concrete Anchors
As an expert in the installation of concrete anchors, it is essential to understand the different types of anchors available. Two main categories of concrete anchors are commonly used: mechanical and chemical. Mechanical anchors rely on friction and mechanical interlock to hold the load while chemical anchors depend on bonding between the anchor and the base material.
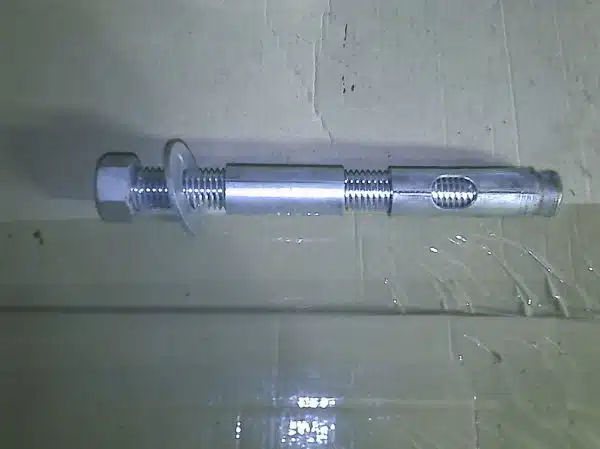
Wedge anchors and sleeve anchors are two common examples of mechanical anchors. Wedge anchors consist of a threaded stud with a cone-shaped end that expands against the walls of the hole when tightened. On the other hand, sleeve anchors consist of a cylindrical sleeve with expansion grooves that expand against the walls of the hole when a bolt is tightened.
Chemical Anchors, as their name suggests, use a chemical reaction to bond with the base material effectively. Epoxy-style chemicals are commonly used on concrete surfaces where high levels of static or dynamic loads need to be handled, while acrylic adhesives are more suitable for lower strength applications. As an expert in this field, I can confidently say that understanding these types of concrete anchors is crucial before choosing one for your project.
In selecting which anchor to use, you must consider various factors such as load capacity requirements, type of application, and environmental conditions such as exposure to moisture or temperature variations. The next section will delve deeper into how you can choose an anchor that best fits your needs based on these factors and more.
Choosing The Right Anchor For Your Project
Factors to consider when choosing the right anchor for your project are crucial. The type of surface you’re working with, the weight of the object you’re hanging, and the environmental conditions of your location are among the factors that determine which anchor is best suited for your project. For instance, if you’re dealing with a hollow wall, then toggle bolts or winged plastic anchors may be ideal. However, if you need to hang a heavy object on concrete walls or floors, then expansion anchors or wedge anchors may be more appropriate.
Comparison of different anchors is also important before installing concrete anchors. Different types of concrete anchors have distinct features that make them suitable for specific applications. For example, sleeve anchors are designed to offer superior holding strength in solid masonry and concrete surfaces than wedge anchors. On the other hand, drop-in anchors are perfect for applications where frequent removals and insertions of bolts are required. Therefore, it’s essential to understand each anchor’s unique characteristics so that you can choose the one that will best fit your project needs.
When selecting an anchor type for your project, it’s advisable to seek professional advice from an expert in concrete anchor installation. An experienced installer can guide you through the entire process and help you make informed decisions about which type of anchor will best fit your needs. You’ll also get invaluable tips on how to install concrete anchors correctly and ensure maximum safety and efficiency during installation.
As we have seen above, choosing the right anchor is critical when installing concrete anchors in any project. In our next section, we’ll discuss gathering the necessary tools and materials required to install these anchors effectively without compromising their performance and safety standards.
Gathering The Necessary Tools And Materials
Before beginning the installation process for concrete anchors, it is essential to gather all necessary tools and materials. Selecting appropriate materials based on the type of anchor being installed is crucial to ensure a secure attachment. For example, if installing a wedge anchor, select an appropriately sized drill bit and hammer drill that can penetrate the surface material.
In addition to selecting appropriate materials, organizing your workspace is key to maximizing efficiency and minimizing errors during the installation process. Ensure all necessary tools are readily available and easily accessible. Clear any clutter or debris from the immediate area before beginning installation to reduce distractions and potential hazards.
By taking the time to gather necessary tools and materials and organize your workspace properly, you can set yourself up for success during the concrete anchor installation process. The next step in this process involves preparing the surface for installation, which requires attention to detail and careful planning.
Preparing The Surface For Installation
Surface preparation is a crucial step in installing concrete anchors. Before installation, it’s important to ensure that the surface is clean and free of debris. This will help to ensure that the anchor adheres properly to the surface, preventing any potential damage or failure.
There are several cleaning techniques that can be used for surface preparation. One effective technique is using a wire brush or sandpaper to remove any loose debris or rust on the surface. Another technique is using a vacuum cleaner with a brush attachment to remove dirt and dust from the surface. Additionally, it’s important to use a degreaser if necessary, such as when installing anchors on surfaces with oil or grease buildup.
Proper surface preparation is essential for successful concrete anchor installation. By taking the time to prepare the surface correctly, you can ensure that your anchors will adhere properly and provide stable support for your project. In the next section, we will discuss how to measure and mark the anchor placement before installation.
Measuring And Marking The Anchor Placement
The first step in the installation process of concrete anchors is accurately measuring and marking the anchor placement. This requires a stud finder, tape measure, level, pencil, and template if necessary, depending on the type of anchor being used. The wall surface should also be considered when determining the placement, taking into account the wall position and clearance requirements. Lastly, the layout of the studs should be taken into account before drilling for the anchor placement.
Measuring
When it comes to installing concrete anchors, measuring is a crucial step that must not be overlooked. Measuring techniques are important to ensure the correct placement of the anchor and prevent any mistakes that may compromise the structure’s stability. One common mistake in measuring is eyeballing or estimating the distance between anchors, which can lead to uneven placement and ultimately weaken the entire system.
To avoid this mistake, it’s essential to use measuring tools such as a tape measure or ruler. These tools help ensure accurate measurements and proper spacing between each anchor. Additionally, marking the exact spot where each anchor will be installed using a pencil or chalk can also prevent errors in measurement.
Another important aspect of measuring is taking into account the weight capacity of each anchor and calculating how many are needed for a given load. This information can typically be found on the packaging or instructions provided with the anchors. By following these guidelines, you can ensure that your anchors will provide maximum support and safety for your project.
In conclusion, measuring accurately is essential for ensuring the success and safety of your concrete anchor installation project. By using proper measuring techniques and avoiding common mistakes, you can have peace of mind knowing that your structure is secure and stable. Remember to always take into account weight capacity and follow manufacturer instructions for optimal results.
Marking
The importance of precision in installing concrete anchors cannot be overstated. Every step in the process must be executed with accuracy to ensure the stability and safety of the structure. One crucial aspect of this is marking the exact spot where each anchor will be installed. The marking process involves outlining the area where the anchor will be placed using a pencil or chalk, and it should not be overlooked.
Marking accurately is essential because even minor errors can result in significant problems down the line. Common mistakes include marking too high or too low, which can lead to uneven placement and ultimately weaken the entire system’s integrity. To avoid these issues, it’s important to take your time when marking and double-check that you have marked the correct spot before drilling.
Another important consideration when marking is taking into account any obstructions or other factors that may impede installation. For example, if there are pipes or electrical wiring behind the wall, you must mark accordingly to avoid damaging them during installation. By paying attention to these details and taking a precise approach, you can ensure that your concrete anchor installation project is successful and safe for years to come.
Drilling The Hole For The Anchor
Drilling the hole for the anchor is a crucial step in securing your concrete anchors. Before drilling, it is important to understand the benefits of pre-drilling holes. Pre-drilling helps ensure that the hole is properly aligned and sized for the anchor, allowing for maximum holding strength. This also prevents the concrete from cracking or breaking under pressure during installation.
When drilling into harder concrete surfaces, it is important to take extra precautions to avoid damage to your tools and equipment. One tip is to use a carbide-tipped masonry bit, which can handle tough surfaces without getting dull easily. Another tip is to apply steady pressure while drilling, making sure not to push too hard or too little. It may also be helpful to periodically remove the drill bit from the hole and blow out any debris or dust that has accumulated.
By pre-drilling and using proper techniques when drilling into harder surfaces, you can ensure that your concrete anchors are securely installed and will hold up over time. In the next section, we will discuss how to clean the hole and remove debris before installing your anchor. Remember, taking these steps now will save you time and frustration in the long run by ensuring that your anchors are installed correctly and efficiently.
Cleaning The Hole And Removing Debris
Before inserting the anchor, it is important to prepare the hole by cleaning it thoroughly. Proper cleaning ensures that the anchor can be securely fastened in place without any interference from dirt, debris or other obstructions. Cleaning the hole also helps to maintain its depth, which is crucial for ensuring that the anchor remains stable and does not loosen over time.
To clean the hole effectively, you will need a few tools. A hand-held brush or a compressed air blower can be used to remove loose dirt and debris from the hole. A vacuum cleaner can also be used to suck up any remaining dust or dirt particles. It is important to avoid using water to clean the hole as this may cause rusting of the anchor or lead to other problems such as weakening of concrete due to water intrusion.
The importance of depth cannot be overstated when it comes to installing concrete anchors. The depth of the hole needs to be just right for proper anchoring of your fixture or equipment. If the hole is too shallow, there won’t be enough support for your load; if too deep, then you risk compromising its structural integrity. Therefore, before inserting an anchor into a cleaned out hole, ensure that it has been drilled deep enough according to specifications provided by manufacturer guidelines.
With a properly cleaned out hole free from debris and at an appropriate depth, you are now ready for inserting your concrete anchor. Ensure that it fits snuggly inside while leaving enough space at top so that once tightened down with nuts and washers (if applicable), they compress against fixture or equipment being anchored securely in place.
Inserting The Anchor Into The Hole
After cleaning the hole and removing debris, the next step in installing concrete anchors is inserting them into the hole. Before doing that, it’s important to confirm anchor depth and hole diameter. The depth of the anchor should be at least equal to the thickness of the material being fastened plus the minimum embedment for that particular anchor type. Hole diameter should also match that of the anchor being used so as to ensure a snug fit.
Once you have confirmed these measurements, insert the anchor into the hole and tighten it using an appropriate torque wrench. Anchor torque refers to the maximum amount of force that can be applied without causing damage or failure to either the anchor or surrounding material. It’s important not to exceed this torque rating during installation. To ensure proper tightening process, you may need to use a calibrated torque wrench or other specialized tools.
After tightening, it’s crucial to allow adequate time for adhesive cure or mechanical setting before applying any load or tension on the anchor. This can vary depending on factors such as adhesive type, temperature and humidity conditions, and other environmental factors. In general, it’s recommended to wait at least 24 hours before applying any load or tension on a newly installed concrete anchor. In some cases, however, longer curing times may be necessary for optimal performance.
Setting The Anchor With Adhesive Or Mechanical Means
Parallelism: When it comes to setting concrete anchors, there are two main methods that you can use: adhesive or mechanical. Both methods have their own set of pros and cons, and the choice ultimately depends on your specific project requirements.
Adhesive vs Mechanical: Pros and Cons:
- Adhesive anchors are ideal for applications where there is limited access to the backside of the anchor location. They require less drilling and can be used in a wider range of base materials. However, they may not be suitable for heavy-duty applications.
- Mechanical anchors, on the other hand, provide a more secure hold for heavy objects but require precise installation and can only be used in certain base materials. They also require more drilling than adhesive anchors.
Tips for Securing Heavy Objects:
- Always use a mechanical anchor when securing heavy objects such as shelves or cabinets.
- Use a level to ensure that the object is straight before securing it with the anchor.
- Make sure to choose an anchor that is rated for the weight of the object you are securing.
In order to ensure a successful installation, it’s important to follow these tips for securing heavy objects with either adhesive or mechanical anchors. By carefully considering your specific project needs and choosing the appropriate method, you can achieve a secure hold that will withstand the test of time. In our next section, we will discuss how to check the alignment and depth of your installed anchor.
Checking The Anchor’s Alignment And Depth
After setting the anchor with adhesive or mechanical means, it is vital to check the alignment and depth of the anchor. However, before doing so, it is necessary to drill pilot holes in the surface where you want to install the anchor. This step is crucial as it helps prevent splitting or cracking of the concrete when inserting the anchor. The size of the pilot hole should be slightly smaller than that of the anchor to ensure a tight fit.
Once you have drilled the pilot holes, use a level to ensure that your anchors are properly aligned. A slight deviation from the desired position can significantly affect the overall strength of your installation. Therefore, taking time to make sure that everything is perfectly straight will save you from costly repairs or replacements later on. It’s also essential to ensure that you insert your anchors at an appropriate depth; otherwise, they may not provide sufficient support for your project.
After checking for proper alignment and depth, it’s time to allow your anchors to cure or set fully. Depending on whether you used adhesive or mechanical means during installation, curing time may vary between a few hours and several days. Do not rush this process as allowing insufficient curing time could compromise your installation’s strength and durability. Once cured, test each anchor’s strength by gently pulling on them using a wrench before proceeding with any further work on your project.
Allowing The Anchor To Cure Or Set
To ensure the stability of your concrete anchors, it is crucial to allow them to cure or set properly. Once you have inserted the anchors into the holes, make sure that they are level and flush with the surface of the concrete. This will prevent any misalignment or wobbling that may compromise their stability.
After this, it is important to check the anchor stability periodically. You can do this by giving it a gentle tug or shake to see if there is any movement. If there is, it may indicate that the anchor has not cured properly or that there is some other issue that needs attention. Remember that a stable anchor is essential for keeping your object secure and preventing accidents.
In addition to checking anchor stability, post-installation maintenance is also important. Keep an eye out for any signs of wear and tear or corrosion that could affect the strength of your anchors over time. Regular cleaning and inspection can help you identify any potential issues early on so that you can address them before they become more serious. By taking these steps, you can ensure that your concrete anchors will remain strong and reliable for years to come.
As we move forward in our installation process, it’s time to focus on attaching the object to the anchor. But before we move onto this step, let’s review what we’ve covered so far: proper hole drilling techniques, selecting appropriate concrete anchors, inserting them correctly into the holes, allowing them to cure properly, checking their stability periodically, and maintaining them post-installation. Now that we have a solid foundation in place, we can confidently proceed with attaching our object securely to our newly installed concrete anchors.
Attaching The Object To The Anchor
Once the concrete anchor has been allowed to cure or set, the next step is to attach the object to the anchor. This involves placing the fastener into the anchor and adjusting tension to ensure that it is secure. This step is crucial in ensuring that the object remains stable and does not wobble.
When securing fasteners into the anchor, it is important to use the appropriate tools for the job. Typically, a drill and screwdriver will be needed to install screws or bolts into the anchor. It is important to avoid over-tightening as this can cause damage to both the anchor and object being attached.
Ensuring stability and preventing wobbling of an attached object can be achieved by checking tension and making any necessary adjustments. It may also be helpful to add additional support structures if needed. Once all adjustments have been made and everything is secure, testing for strength and stability should be done before putting any weight or stress on the object being anchored.
Testing The Anchor’s Strength And Stability
To ensure the safety and reliability of your concrete anchor installation, it is crucial to test its strength and stability. This step is essential to guarantee that the anchor can withstand the weight and pressure it will be subjected to in its intended use. To perform this task effectively, you need specialized testing equipment and proper techniques.
The most common method for testing a concrete anchor’s strength is through tensile or pull-out tests. These tests are performed by applying a controlled force on the anchor until it fails. The results of these tests provide valuable information about the anchor’s load-bearing capacity, which helps determine if it is suitable for its intended purpose. Proper techniques must be used during these tests to ensure accurate results.
Testing equipment such as hydraulic jacks, load cells, or torque wrenches are vital in determining the maximum load capacity of a concrete anchor. However, proper techniques in performing these tests must also be applied to avoid errors in results due to improper handling or misuse of testing equipment. Careful attention to detail and following manufacturer instructions on both testing equipment and procedures will help ensure accurate readings of an anchor’s strength and stability.
Moving forward from ensuring that your anchors are strong enough for their intended use, let us now move on to addressing possible issues that may arise during installation with our subsequent section about troubleshooting common installation issues.
Troubleshooting Common Installation Issues
After testing the strength and stability of your concrete anchor, it’s time to troubleshoot any common installation issues that may have arisen. One of the most common mistakes made during installation is not drilling the hole deep enough. This can cause the anchor to loosen and fail over time. To avoid this, make sure to follow the manufacturer’s recommended drill depth and use a high-quality drill bit.
Another issue that may arise is improper spacing between anchors. If anchors are spaced too far apart, they may not provide enough support for the load they are intended to hold. On the other hand, if they are spaced too close together, they may interfere with each other’s performance. To avoid these issues, be sure to carefully measure and mark out the proper spacing before installing each anchor.
If you encounter any problems during installation or have concerns about the strength and stability of your anchors, there are several troubleshooting tips you can try. First, double-check that you’ve followed all manufacturer recommendations for drill depth, spacing, and torque values. If everything appears correct but you’re still experiencing issues, consider using a different type or size of anchor or consulting with a professional for further guidance.
When working with concrete anchors, safety precautions and best practices for installation are crucial to ensure both your own safety and the effectiveness of your anchors. In the next section, we will cover some important guidelines to keep in mind when installing concrete anchors, including protective gear recommendations and proper tool usage. By following these guidelines closely and taking care during installation, you can ensure maximum durability and reliability from your concrete anchors for years to come.
Safety Precautions And Best Practices For Installation
As a concrete anchor installation expert, safety is always the top priority when installing anchors. It is essential to wear appropriate safety gear such as gloves, goggles, and a hard hat before starting any installation process. These safety gears protect you from potential hazards that may occur during installation and ensure that your installation work goes smoothly.
Apart from wearing safety gear, it is also crucial to choose anchors with the correct weight capacity for your specific application. The weight capacity of an anchor is determined by its diameter, length, and depth of embedment in concrete. Using an anchor with insufficient weight capacity can result in failure or even damage to the structure. Therefore, it is advisable to refer to the manufacturer’s specifications when selecting an anchor for a particular job.
Finally, once you have selected the right anchor and are ready to install it, there are some essential best practices to follow. Firstly, ensure that you drill the hole at the right angle and depth as per the manufacturer’s instructions. Secondly, clean out any debris or dust from the hole before inserting the anchor. Thirdly, apply pressure while tightening the bolt to ensure that it is securely fastened in place.
In summary, installing concrete anchors requires strict adherence to safety precautions and best practices. Wearing appropriate safety gear and selecting anchors with sufficient weight capacity are critical steps towards ensuring successful installations. Following proper drilling techniques and tightening protocols will provide additional assurance that your installation will remain secure over time without compromising on quality or reliability.
Conclusion
Concrete anchors are essential components for securely attaching various objects to concrete surfaces. They come in numerous types, each with unique features and functionalities that cater to specific installation requirements. To install these anchors successfully, one must understand the different types of anchors and select the right anchor for their project.
Before installation, it is crucial to prepare the surface adequately by cleaning and ensuring it is free from debris. Measuring and marking the anchor placement also play a significant role in ensuring that the installed anchors are straight and secure. Attaching the object to the anchor requires precision, patience, and attention to detail to guarantee maximum strength and stability.
As a concrete anchor installation expert, I recommend following safety precautions and best practices when handling these tools. Always wear protective gear like gloves and eye goggles when installing concrete anchors. With proper preparation, installation techniques, and troubleshooting skills, anyone can confidently install concrete anchors with ease. Remember that an efficiently installed concrete anchor will provide substantial support and stability for your objects on your desired surface. Therefore, it’s vital to take steps necessary measures during installation to ensure maximum strength and durability of your installations over time.
Image Credits
- “concrete anchor” by tmib_seattle (featured)

