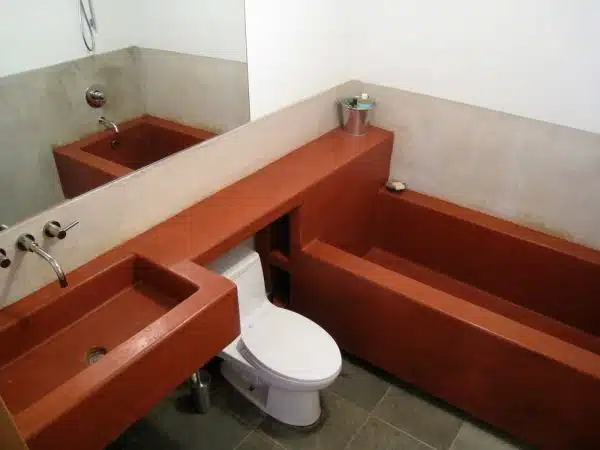
Concrete sinks have become a popular choice for homeowners looking to add a touch of modernity and sophistication to their bathrooms. The sleek, minimalist design of these sinks is perfect for those who want to create a bold statement without compromising functionality. However, purchasing a concrete sink can be costly and may not fit everyone’s budget. Fortunately, you can easily make your own DIY concrete sink with just a few simple tools and materials.
In this article, we will guide you through the steps of making your very own DIY concrete sink. We will cover all the necessary materials you’ll need, as well as provide detailed instructions on how to create your mold and pour the concrete into it. Whether you’re a seasoned DIYer or just starting out, this project is an excellent way to challenge your skills while creating something that serves both form and function in your home. So let’s get started and learn how to make a stunning concrete sink that will impress anyone who sees it!
Benefits Of A Diy Concrete Sink
A DIY concrete sink can provide numerous advantages to homeowners who are looking for a unique and functional addition to their homes. One of the primary benefits is the cost-effectiveness of creating a custom sink. With a little creativity, individuals can design and build a concrete sink that matches their personal tastes and preferences without breaking the bank. Additionally, undertaking such a project can offer a creativity boost for those who enjoy hands-on activities and have an eye for aesthetics.
Aside from financial savings and creative stimulation, another advantage of making a DIY concrete sink is its durability and resilience. Concrete is known for its strength, making it an ideal material for sinks that will be used frequently in high-traffic areas like kitchens or bathrooms. It can also withstand extreme temperatures and moisture levels, ensuring that your sink will last for years to come with minimal maintenance required.
By creating your own concrete sink, you not only get to enjoy its practical functionality but also bask in the satisfaction that comes with completing a project on your own. The process may require some effort, but seeing the finished product in your home can be incredibly rewarding. In the next section, we will discuss the tools and materials needed to begin this exciting endeavor.
Tools And Materials Needed For The Project
Sandpaper is a useful tool for smoothing out any rough edges on the concrete sink before it is finished. A cement mixer is needed to mix the cement and water together to form a concrete mix. Rubber gloves should be worn when handling the cement mix and other materials to protect the skin from any irritation. A mixing container is necessary to mix the cement and water together in a safe environment. A plaster trowel is essential for applying the concrete mix to the sink mold. Plywood, nails, saw and a tape measure are all necessary for constructing the sink mold.
Sandpaper
When it comes to making a DIY concrete sink, sandpaper is an essential tool that you can’t do without. Sandpaper is used to smooth out rough edges and surfaces on the concrete sink. There are different types of sandpaper available in the market, including coarse grit, medium grit, fine grit, and extra fine grit.
To achieve a smooth finish on your concrete sink, it’s important to use the proper sanding technique. Start by using the coarsest sandpaper to remove any bumps or rough spots on the surface. Then gradually move up to finer grades of sandpaper until you reach your desired level of smoothness. Remember to sand evenly and consistently in all areas of the sink.
In conclusion, using different types of sandpaper and proper sanding techniques are crucial for achieving a polished finish on your DIY concrete sink project. With patience and attention to detail, you can create a beautiful and functional addition to your home with this project.
Cement Mixer
Another essential tool that you’ll need when making DIY concrete sink is a cement mixer. This machine will help you mix the concrete evenly and consistently, ensuring that the sink is solid and durable. A cement mixer can also save you time and effort compared to hand-mixing, especially if you’re working on a larger project like concrete countertops or DIY cement planters.
When choosing a cement mixer, consider its capacity, power source, and portability. For smaller projects, an electric-powered mixer with a 2-3 cubic feet drum capacity may suffice. On the other hand, if you’re planning to make multiple sinks or larger items like outdoor benches or tables made of concrete, look for mixers with higher capacities (5 cubic feet or more) and gas-powered engines for better performance.
To use a cement mixer properly, read and follow the manufacturer’s instructions carefully. Start by adding water to the drum before pouring in the dry concrete mix gradually. Turn on the machine and let it run for several minutes until the mixture is smooth and homogenous. Be sure to clean the mixer thoroughly after each use to prevent hardened concrete from building up inside. By having this tool available in your workshop area can definitely help you achieve your desired outcome for your DIY home improvement project in no time!
Rubber Gloves
When working on a DIY concrete sink project, it’s important to have the right tools and materials to ensure that the end result is of high quality. One essential item that should not be overlooked is rubber gloves. Using rubber gloves can help protect your hands from the harsh chemicals in concrete mix, preventing skin irritation or burns.
There are different types of rubber gloves available in the market, but not all are created equal. It’s best to choose a pair that is specifically designed for handling concrete mixtures, such as those made of nitrile or latex material. The gloves should also fit snugly on your hands to prevent any concrete from seeping through.
Some of the best brands for rubber gloves when working with concrete mix include Atlas, Showa Best Glove, and Ansell. These brands offer high-quality gloves that are durable and resistant to punctures, ensuring that you can work with confidence without worrying about tearing or ripping your gloves.
Using rubber gloves may seem like a small detail when working on a DIY project like making a concrete sink, but it can make a big difference in terms of safety and comfort. By choosing the right brand and type of gloves for your needs, you’ll be able to protect your hands while still being able to work efficiently and effectively towards completing your project.
Determining The Size And Design Of Your Sink
Design considerations and size limitations are important factors to consider when making a DIY concrete sink. It is crucial to determine the appropriate size of your sink depending on the available space in your bathroom or kitchen. Consider the number of people who will be using the sink, how it will fit with your existing plumbing, and whether you prefer a single or double basin.
Another design consideration is the style of your sink. Do you prefer a modern look or something more traditional? Will it complement the overall decor of your room? Also, think about the shape and depth of your sink. While rectangular sinks are common, circular ones can create a unique look. Additionally, deeper sinks can be more practical for washing larger items or filling up pots with water.
Lastly, don’t forget about the type of faucet that will go with your sink. The faucet should not only complement your sink’s design but also function well with its size and shape. Keep in mind that some faucets may require certain hole configurations in order to work properly.
Determining the size and design of your DIY concrete sink is an essential step before moving onto building the mold. Consider factors such as space limitations, functionality requirements, and personal preferences when deciding on the dimensions and style of your sink. With these considerations in mind, you’ll be able to create a beautiful and functional addition to any bathroom or kitchen space.
Building Your Sink Mold
As you begin building your sink mold, it’s important to keep in mind the decorative accents that you want to incorporate into the design. Whether it’s adding a unique pattern or texture to the surface of the sink, or installing sink accessories like soap dispensers and towel holders, these details will help make your sink truly stand out. Take some time to brainstorm different ideas and sketch out a rough design before moving on to the next step.
Next, gather all the necessary materials for building your mold. This includes items like melamine boards, silicone caulk, screws, and waterproof tape. Carefully measure and cut each piece of melamine board according to your design specifications, making sure that each piece fits together snugly with no gaps. Use silicone caulk and waterproof tape to seal any seams or joints in the mold to prevent leaks.
Once your mold is built, it’s time to start preparing your concrete mix. But before you do that, take a moment to double-check that everything is in place and secure inside the mold. Make sure that any decorative accents or sink accessories are properly positioned where you want them before pouring in the concrete mix. With everything set up correctly, you’re now ready to move on to mixing and pouring the concrete for your DIY concrete sink!
Preparing Your Concrete Mix
Now that you have your sink mold prepared and ready, it’s time to mix your concrete. This step is critical in achieving the perfect result for your diy concrete sink. The right concrete mix will ensure that your sink is durable and long-lasting.
To make a sturdy and durable sink, add concrete mix additives to your mixture. These additives help in reinforcing the concrete by making it more resistant to cracking and shrinking. Some common additives include latex, fibers, and silica fume. Be sure to follow the recommended dosage for each additive as too much or too little can negatively affect the quality of the final product.
In addition to using additives, mastering proper mixing techniques is also crucial. Ensure that you measure out all ingredients precisely before mixing them together thoroughly. Doing this ensures that there are no lumps in the mixture and that all components are well-distributed throughout. Always use the appropriate tools while mixing such as a drill with a paddle attachment or a cement mixer for larger quantities of concrete. With these tips in mind, you’re now ready to move on to mixing and pouring the concrete into your mold!
Mixing And Pouring The Concrete
Once you have prepared the mold for your concrete sink, it is time to mix and pour the concrete. Before starting, make sure to wear protective gear such as gloves and a mask. Begin by mixing the concrete according to the manufacturer’s instructions. You can either use a premixed bag of concrete or mix your own using Portland cement, sand, and gravel.
Once the concrete is mixed, pour it into the mold slowly and evenly. Use a trowel to spread it out and make sure it fills all corners of the mold. Depending on the size of your sink, this may take some time. Be patient and ensure that there are no air pockets in the mixture.
Concrete curing is an essential part of creating a durable sink. After pouring, cover the mold with plastic sheeting and let it cure for at least three days. This will allow the concrete to harden and set properly. Once cured, remove the mold carefully and inspect your sink for any imperfections or bubbles that need fixing before moving onto waterproofing techniques in order to prevent water seepage issues.
Transition: With your sink now cured and removed from its mold, we’re ready to move onto smoothing out its surface.
Smoothing Out The Surface
After pouring the concrete mixture into the mold, allow it to cure for at least 24 hours. Once cured, remove any excess concrete around the edges of the sink using a chisel or sandpaper. It’s important to be careful during this step to avoid damaging the edges of the sink.
Next, it’s time to start polishing and finishing the surface of your DIY concrete sink. Begin by using a hand-held sander with coarse-grit sandpaper to smooth out any rough spots or bumps on the surface. After that, switch to a finer-grit sandpaper and continue sanding until you achieve a smooth, even surface.
If you want an even smoother finish, consider using concrete polishing techniques such as wet-polishing with diamond pads or applying a topical sealer. These methods can help create a glossy finish that adds both style and durability to your new sink. By taking your time and following these surface finishing techniques, you’ll be able to create a beautiful custom concrete sink that will last for years to come.
To remove the sink from the mold without damaging it, carefully flip over the mold onto a soft surface such as foam padding or carpeting. Gently tap around all sides of the mold with a rubber mallet until the sink releases from the mold. Once removed from the mold, you can further refine its edges and surfaces using additional polishing techniques if desired before installing it in your bathroom or kitchen.
Removing The Sink From The Mold
With the sink finally set and cured, it’s time to remove it from the mold. This step is crucial as it determines the final outcome of your DIY concrete sink. But before we get into the nitty-gritty of this process, let me remind you that removing a concrete sink from a mold requires patience and precision. Rushing through this step may result in cracks or chips on your beautiful sink.
The first tip when removing the sink from the mold is to wear gloves and protective gear. Concrete mix contains chemicals that can be harmful to your skin and eyes, so make sure to protect yourself before proceeding. Next, use a pry bar or a rubber mallet to gently loosen the edges of the mold. Avoid using excessive force as this can cause damages to your sink.
Once you’ve successfully removed the sink from the mold, inspect it thoroughly for any cracks or chips. If there are any imperfections, now is the time to fix them using techniques such as patching or sanding. With careful attention to detail during this step, you can ensure that your DIY concrete sink looks flawless and lasts for years to come.
| Tips | Techniques |
|---|---|
| Wear protective gear | Use a pry bar or rubber mallet |
| Be patient and gentle | Inspect for imperfections |
| Avoid excessive force | Fix imperfections with patching or sanding |
As you’ve successfully removed your DIY concrete sink from its mold, it’s time for the next step: sanding and sealing. This process ensures that your sink has an even surface and is protected against moisture damage. Stay tuned for our upcoming section on how to achieve a polished finish on your beautiful new creation!
Sanding And Sealing The Sink
After the concrete has been allowed to cure for at least 24 hours, it’s time to sand down the surface of your diy concrete sink. This will not only give it a smooth finish but also ensure that any rough patches or inconsistencies in the surface are removed. Begin by using coarse-grit sandpaper and work your way up to finer grits until you achieve the desired level of smoothness. Be sure to wear a protective mask and goggles during this process as dust particles can be harmful when inhaled.
Polishing techniques can also be applied after sanding to enhance the aesthetic appeal of your diy concrete sink. You can choose between a glossy or matte finish depending on your preference. A high gloss finish can be achieved by applying a concrete sealer with a sheen, while a matte finish can be achieved by using a sealer without any sheen. It’s important to note that polishing should only be done after sanding since any rough spots left on the surface will show through the polish.
To ensure that your diy concrete sink is waterproof, you have several options when it comes to waterproofing agents. One popular option is to use a penetrating sealer which soaks into the pores of the concrete, creating an invisible barrier against moisture. Another option is to apply a topical sealer which sits on top of the surface and forms a protective layer against water damage. Whichever option you choose, make sure that it’s specifically designed for use on concrete surfaces.
Now that you’ve sanded and sealed your diy concrete sink, it’s time to move onto installing it in your bathroom or kitchen. But before we get into that step, let’s take some time to go over what tools and materials you’ll need for this final stage of the process.
Installing Your Diy Concrete Sink
After sanding and sealing your DIY concrete sink, it’s time to install it in your kitchen or bathroom. Before doing so, you need to consider waterproofing options for your sink. Concrete is naturally porous and prone to water damage, so it’s important to take measures to prevent water from seeping through the material and causing damage over time.
To waterproof your concrete sink, you can use a penetrating sealer or a topical sealer. A penetrating sealer works by soaking into the pores of the concrete and forming a barrier against water infiltration. A topical sealer sits on top of the surface of the concrete and creates a protective layer that helps repel water. Both types of sealers are effective at preventing water damage, but some people prefer penetrating sealers because they don’t change the appearance of the concrete.
When installing your DIY concrete sink, there are a few tips you should keep in mind. First, make sure you have all the necessary tools and materials before starting the installation process. This will save you time and frustration down the line. Second, be sure to follow any manufacturer instructions carefully for your specific type of sink. Finally, enlist the help of a friend or family member when lifting and positioning your sink to avoid injury or damage to your new fixture.
- Use decorative tiles around your sink area for added visual appeal.
- Invest in high-quality plumbing fixtures for a sleek modern look.
- Consider adding under-cabinet lighting for better visibility at night.
- Add storage solutions like shelves or cabinets under your sink for added convenience.
With these tips in mind, you’re ready to install your DIY concrete sink with confidence! But proper installation is only half the battle – in order to keep your new fixture looking its best for years to come, you’ll need to take good care of it. Read on for tips on maintaining your concrete sink over time.
Tips For Maintaining Your Concrete Sink
Proper maintenance is crucial to keep your DIY concrete sink looking brand new for years to come. One of the most important aspects of maintaining your sink is using the appropriate cleaning techniques. Avoid using abrasive cleaners and scrubbers, as they can damage the surface of your sink. Instead, opt for a mild soap or cleaner specifically designed for concrete surfaces.
Preventing staining is another key factor in maintaining your concrete sink’s appearance. While concrete is a durable material, it is also porous and can absorb liquids that may stain its surface. To prevent this from happening, make sure to wipe up spills immediately and avoid leaving acidic substances such as vinegar or citrus juice on the surface for extended periods of time.
Regularly sealing your concrete sink can also help prevent staining and keep it looking like new. Apply a sealer specifically designed for concrete surfaces every six months to protect against moisture and stains. By following these tips, you’ll be able to maintain your DIY concrete sink’s beauty and functionality for many years to come.
When it comes to alternative finishing options for your DIY concrete sink, there are a variety of choices available depending on the look you’re going for. Some popular options include adding color pigments or stains to the concrete mix before pouring it into the mold. You can also create unique patterns or designs by using stencils or stamps on the surface of the wet concrete before it dries. Additionally, you may choose to add a decorative edge or finish using materials such as metal or wood trim. The possibilities are endless when it comes to customizing your DIY concrete sink!
Alternative Finishing Options
Once the concrete sink is set and dry, it is time to add some decorative accents to give it a finished look. There are several staining techniques that you can use to achieve different effects on your sink. Staining can help add depth and texture, giving your sink a unique appearance that matches your personal style.
One popular technique for staining concrete sinks is acid staining. This involves applying an acidic solution to the surface of the sink, which reacts with the minerals in the concrete to produce rich, earthy tones. Acid stains come in a variety of colors, allowing you to customize your sink to match any decor scheme. Another option is water-based staining, which uses pigments suspended in water to color the surface of the concrete; this method produces more muted and subtle results.
In addition to staining techniques, there are also a variety of decorative accents that you can add to your DIY concrete sink. Consider adding metallic flakes or glass beads to create a shimmering effect on the surface of the sink. You could also embed decorative tiles or pieces of stone into the surface for added visual interest. Whatever method you choose, be sure to follow all safety precautions when working with staining materials.
As you finish up your DIY concrete sink project, keep in mind that there may be some common issues that arise during installation or after use. In the next section we will cover some troubleshooting tips for dealing with these issues and ensuring that your new sink stays looking beautiful for years to come.
Troubleshooting Common Issues
As with any DIY project, there are bound to be some common issues that arise when making a concrete sink. One of the most common issues is air pockets forming in the concrete, which can cause cracks and structural damage. To prevent this from happening, it’s important to mix the concrete thoroughly and remove any air bubbles using a vibrating tool.
Another issue that may occur during the DIY process is uneven coloring or staining in the finished product. This can happen if the concrete mixture isn’t properly measured or if the color additives aren’t mixed well enough. To avoid this issue, make sure to follow precise measurements and mix thoroughly until the desired color is achieved.
Lastly, another common issue when making a concrete sink is rough or uneven edges. This can happen if the mold isn’t properly aligned or if there are inconsistencies in pouring and smoothing out the mixture. To fix this issue, use sandpaper or a polishing tool to smooth out any rough edges and create a sleek finish on your homemade sink.
Moving forward with your DIY project, it’s important to keep safety precautions in mind to prevent injury from tools or chemicals used during construction. Always wear protective gear such as gloves and goggles while working with concrete and other materials. In our next section, we will delve into more detail about safety measures you should take while making your own concrete sink at home.
Safety Precautions To Keep In Mind
Before embarking on a DIY concrete sink project, it’s important to prioritize safety precautions. Concrete work can involve dust and fumes that are harmful to inhale. Thus, it’s crucial to wear appropriate safety gear such as goggles, gloves, a respirator mask, and long-sleeved clothing. These items will protect your eyes, skin, and lungs from potential injury or damage.
Additionally, proper ventilation requirements must be met during the creation of the sink. The area where you’ll be working should have adequate airflow and ventilation systems such as fans or open windows. This ensures that any hazardous fumes or dust particles created during the concrete mixing process are effectively removed from the workspace.
By prioritizing safety measures and taking necessary precautions before beginning your DIY concrete sink project, you can ensure a safe and enjoyable experience. Remember to wear proper safety gear and provide adequate ventilation in your work area. These steps will not only keep you healthy but also make your project run more smoothly.
Looking for inspiration for your next DIY project? Consider exploring various design ideas online or in home improvement magazines to find creative ways to enhance your living space. With careful planning and attention to detail, you can create functional pieces that reflect your personal style while also adding value to your home.
Inspiration For Your Next Diy Project
Symbolism is an important aspect of DIY projects. It is the art of creating something out of nothing. The process involves taking raw materials and turning them into a beautiful masterpiece that can be used for many purposes. A great way to get inspired for your next project is to look at other DIY projects that people have done and see what they have created.
One popular trend in the DIY community is creating concrete planters. They are an easy and affordable way to add some greenery to your home or garden. All you need is a mold, some concrete, and a little bit of creativity. You can make them in any shape or size you want, and they are perfect for repurposing old furniture.
Repurposing old furniture is another great way to get inspired for your next DIY project. Instead of throwing it away, you can turn it into something new and useful. For example, you can take an old dresser and turn it into a bench or storage unit. The possibilities are endless, and all it takes is a little bit of imagination.
Markdown bullet point list:
- Inspiration can come from anywhere
- Repurposing old furniture saves money and reduces waste
- Concrete planters are easy to make and add greenery to your home
- DIY projects allow you to express your creativity
- Turning raw materials into something beautiful gives a sense of accomplishment
By looking at other people’s DIY projects, experimenting with different materials, and repurposing old furniture, you can create something truly unique that reflects your personality and taste. Whether it’s making concrete planters or turning an old dresser into a new piece of furniture, the possibilities are endless when it comes to DIY projects. So why not get started today?
Conclusion
A DIY concrete sink is not only a functional addition to your home, but also a statement piece that adds character and personality. With the right tools and materials, you can create a unique and durable sink that reflects your style and taste. Whether you prefer a minimalist design or something more intricate, the possibilities are endless.
As you embark on this DIY project, remember to take all necessary safety precautions, as working with concrete can be hazardous. However, do not let this deter you from creating something truly special for your home. From determining the size and design of your sink to troubleshooting common issues, this guide has everything you need to know to make your dream concrete sink a reality. So go ahead and dive in – let your creativity flow and watch as your imagination comes to life in the form of a stunning DIY concrete sink!
Image Credits
- “Concrete Sink and Tub in Bathroom #2” by Jeremy Levine Design (featured)

