Installing a pedestal sink can be a challenging task for those without experience in plumbing. However, with the right tools and techniques, it is possible to complete the installation process successfully. As a plumbing professional, I have installed numerous pedestal sinks in various settings and gained valuable insights into the best practices for this type of installation.
In this article, I will guide you through the steps necessary to install a pedestal sink effectively. Whether you are installing a new sink or replacing an old one, understanding these steps will help you achieve a clean and efficient installation job. By following these guidelines, you can save time and money while ensuring that your new sink functions as intended. So let’s get started on this rewarding journey of serving others by providing them with functional bathroom installations!
Choosing The Right Sink
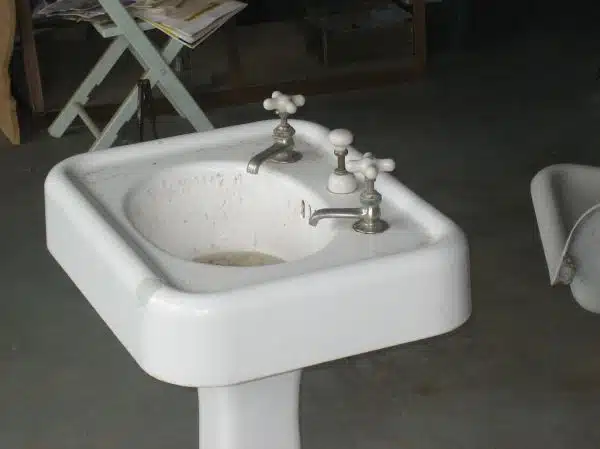
Pedestal sinks are a popular option for those who want to save space in their bathroom or add a touch of elegance to their decor. When choosing a pedestal sink, two important considerations are the material and size of the sink.
Sink material options include porcelain, ceramic, glass, and stone. Porcelain is the most common material used for pedestal sinks due to its durability and affordability. Ceramic sinks are also durable but come in a wider range of colors and styles. Glass sinks offer a unique aesthetic but can be more fragile than other materials. Stone sinks provide a luxurious feel but can be quite heavy and expensive.
Size is another important consideration when selecting a pedestal sink. Measure the distance from the wall to where you want the sink to sit and ensure that there is enough clearance for your knees when sitting on the toilet or using other fixtures in the bathroom. Keep in mind that while smaller sinks may save space, they may not be as functional as larger ones.
When choosing the right sink for your bathroom, consider both the material and size options available to you. This will ensure that your new pedestal sink not only complements your decor but also meets your practical needs. Now that you have selected your sink, let’s move on to preparing the work area for installation.
Preparing The Work Area
After choosing the perfect sink for your bathroom, it’s time to start installing it. Installing a pedestal sink may seem like a daunting task at first, but with the right tools and guidance, it can be done without any hassle. Before getting started, it is important to clear out any clutter in the work area and protect surrounding surfaces from damage.
To start with, clear out all items from the vanity or cabinet that previously held your sink. This will make room for the new pedestal sink and give you enough space to move around during installation. Cluttered spaces can lead to accidents and mistakes during installation. Next, protect surrounding surfaces such as flooring and walls using drop cloths or cardboard sheets. This will prevent any scratches or damage while working on the installation.
In addition to clearing clutter and protecting surfaces, gather all necessary tools and materials before starting the installation process. These include a basin wrench or adjustable pliers, silicone sealant, plumber’s putty, Teflon tape, a leveler, screws or bolts for mounting brackets if required by your sink model, and a drill with appropriate bits if needed. Once you have all these tools ready at hand along with your chosen pedestal sink model, you are ready to begin installing your new sink!
Gathering The Necessary Tools And Materials
Before starting the installation process, it is essential to gather all the necessary tools and materials. Choosing sink materials is crucial when installing a pedestal sink. Most pedestal sinks come in ceramic or porcelain materials, which are durable, easy to clean, and resistant to stains. Moreover, these materials provide a classic look that matches various bathroom styles.
When comparing sink styles, it is best to consider the size of your bathroom and the functionality you are looking for. Pedestal sinks offer a sleek design that saves space while making your bathroom look more spacious. However, they come in different shapes and sizes, so it’s crucial to choose one that suits your needs. Wall-mounted sinks or vanity cabinets with integrated basins are also worth considering if you need extra storage space.
In summary, choosing appropriate sink materials and comparing sink styles can make a significant impact on your bathroom’s overall look and functionality. Gather all necessary tools and materials before starting your installation process to ensure a smooth experience. Next up is shutting off the water supply before proceeding with the installation process.
Shutting Off The Water Supply
After gathering the necessary tools and materials, the next step in installing a pedestal sink is to shut off the water supply. This is an important safety precaution that must be taken before beginning any plumbing installation project. Failure to turn off the water supply could result in serious injury or property damage.
Tools needed for shutting off the water supply include a wrench, pliers, and a bucket or towel to catch any excess water. First, locate the shut-off valve under the sink and turn it clockwise until it is completely closed. If there is no shut-off valve under the sink, you may need to turn off the main water supply to your home. This can usually be done by turning a lever or valve located near your water meter.
Common mistakes when shutting off the water supply include forgetting to turn off both hot and cold water valves, or failing to properly tighten shut-off valves after use. Troubleshooting tips for leaks or other issues with shut-off valves include checking for loose connections or damaged valves that may need to be replaced. With this step completed, you are now ready to move on to removing the old sink and preparing for installation of your new pedestal sink.
Removing The Old Sink
- Prior to installing a pedestal sink, it is necessary to shut off the water supply to the existing sink.
- All pipes connected to the old sink should then be disconnected, including the hot and cold water supply lines and the drain pipe.
- Care should be taken to ensure that all fittings are loosened properly and that the pipe ends are sealed to prevent leakage.
- If necessary, the old sink should be removed from the wall to expose the water pipes for easier access.
Shut Off Water Supply
When it comes to installing a pedestal sink, one of the first steps is to shut off the water supply. This is an important step in order to avoid any potential leaks or accidents during the installation process. In order to properly shut off the water, it is necessary to locate the main water valve in your home. This valve is usually located near where the main water line enters your home.
Once you have located the main water valve, turn it clockwise until it is completely closed. This will prevent any water from flowing into your home’s plumbing system and will allow you to safely remove the old sink. It is important to note that some homes may have additional valves or shut-off switches for individual fixtures and appliances. If this is the case, be sure to locate and turn off these valves as well before proceeding with the installation process.
After you have successfully installed your new pedestal sink, it’s time to turn the water supply back on. To do this, simply locate the main water valve once again and turn it counterclockwise until it is fully open. Be sure to check for any leaks or drips before using your new sink. If everything looks good, congratulations! You have successfully installed a new pedestal sink in your bathroom.
Disconnect Pipes
In order to remove the old sink, the pipes that connect it to the plumbing system must first be disconnected. This process can be a bit tricky, especially if the pipes are old or corroded. To begin, use a wrench to loosen any brackets or clamps that are holding the pipes in place. Once these have been removed, carefully unscrew the connections between the pipes and the sink.
It is important to note that some sinks may have built-in seals or gaskets that need to be removed before the pipes can be disconnected. These seals can often become stuck over time, so it may be necessary to use a lubricant or sealant remover to loosen them up. Once all of the connections have been disconnected, gently lift the sink off of its pedestal and set it aside.
Before installing your new pedestal sink, it is important to inspect and clean all of the existing pipes and connections. Check for any signs of damage or wear and tear, such as cracks or corrosion. Replace any damaged parts as needed and use proper sealing techniques when reconnecting everything. By taking these steps, you can ensure a smooth and problem-free installation process for your new pedestal sink.
Measuring And Marking The Position For The New Sink
It is crucial to ensure that the pedestal sink is installed in the correct position so that it is both functional and visually appealing. To do this, measuring accuracy is key. First, measure the width of the sink’s base and mark its center on the wall with a pencil. Then, measure the height of the sink’s basin and mark that on the wall as well. These marks will help you determine where to place your mounting brackets.
Once you have marked the center and height of your sink, it is important to find studs behind the wall to ensure proper support for your new fixture. Using a stud finder or knocking on the wall can help you locate studs. Once you find them, mark their location on your wall with a pencil. It’s important to note that mounting brackets should always be attached to studs rather than just drywall or plaster.
Measuring accurately and finding studs may seem like tedious tasks, but they are necessary steps when installing a pedestal sink. Taking these steps will ensure that your new fixture is properly supported and positioned for optimal use. The next step in installation involves attaching the sink to the wall using mounting brackets secured into these studs.
Attaching The Sink To The Wall
After measuring and marking the position for the new sink, it is time to attach the sink to the wall. This step is crucial in ensuring that your pedestal sink remains securely in place. Before attaching the sink, make sure that all plumbing connections are complete.
First, attach the mounting bracket to the wall with screws as per manufacturer’s instructions. Then, carefully align and hang the sink onto the bracket. Once in place, secure it to the mounting bracket using bolts or screws provided in the installation kit. Make sure not to overtighten as this could crack or damage your pedestal sink.
Common mistakes when attaching a pedestal sink include using incorrect hardware or failing to properly align and level it. An alternative method is to enlist professional help if you are unsure about any aspect of this process. Remember, a poorly installed pedestal sink could lead to leaks or even collapse causing costly damages.
Next up is installing the faucet which involves connecting water supply lines and tightening them securely with wrenches while avoiding over-tightening which may cause leaks at joints or damage faucets and pipes. With proper installation of both faucet and pedestal sink, a functional and stylish addition will be made to your bathroom space!
Installing The Faucet
Installing the faucet is a crucial step in the installation of a pedestal sink. Choosing the right faucet can be challenging, especially if you are not familiar with the various types of faucets available in the market. There are several factors to consider when selecting a faucet, such as the size of your sink, the style of your bathroom, and your personal preferences.
When installing your new faucet, you may experience some common issues such as leaks or difficulty tightening bolts. It is crucial to troubleshoot these problems before they escalate into more significant concerns. One possible solution is to check that all parts are correctly aligned and tightened. Also, ensure that there are no missing or damaged parts that could cause leaks.
In summary, installing a faucet is an essential aspect of pedestal sink installation. Ensure that you choose the right type of faucet for your sink and troubleshoot any common issues during installation promptly. In the next section, we will discuss how to connect water supply lines without causing damage to your newly installed pedestal sink.
Connecting The Water Supply Lines
Once the pedestal sink has been installed, it is time to connect the water supply lines. Before doing so, make sure that the shut-off valves under the sink are closed. This will prevent any water from flowing while you work on connecting the lines.
Next, attach one end of a flexible supply hose to each shut-off valve. Tighten with an adjustable wrench, being careful not to over-tighten and potentially damage the valve or hose. Then, attach the other end of each supply hose to the corresponding inlet on the bottom of the sink basin. Again, tighten with an adjustable wrench but be cautious not to overtighten and cause leaks.
Common mistakes when connecting water supply lines include forgetting to turn off the shut-off valves before starting work and over-tightening connections which can lead to damaging equipment or causing leaks. Troubleshooting tips include checking all connections for leaks after turning on the water supply and ensuring that there is adequate water pressure coming out of both hot and cold taps.
- Double check all connections for leaks before using your new sink.
- Turn on both hot and cold taps after installation to test for adequate water pressure.
- Take a moment to appreciate your hard work in installing a beautiful new pedestal sink.
- Share photos of your completed project with friends and family.
- Consider hiring a professional plumber if you encounter any issues during installation or experience leaks after completion.
Now that you have successfully connected your pedestal sink’s water supply lines, it’s time to secure it to the floor.
Securing The Sink To The Floor
Gathering Supplies: It is important to gather the necessary supplies before beginning the installation, such as a level, screws, wall anchors, and a drill.
Marking the Floor: Accurately mark the floor in the desired spot for the sink’s pedestal, making sure to double-check measurements for accuracy.
Installing Anchors: Install wall anchors in the wall or floor where the sink will be attached, depending on the type of pedestal sink. Use a drill to insert the anchors, making sure to secure with the appropriate screws.
Gathering Supplies
When installing a pedestal sink, selecting the right pedestal is crucial. The pedestal should be sturdy enough to support the weight of the basin and have holes that align with those on the bottom of the sink. It is essential to choose a pedestal that complements the style of your bathroom and meets your desired functionality needs. For instance, if you have a small bathroom, you may consider purchasing a pedestal sink with built-in storage.
Before attempting to secure the sink to the floor, ensure that you have all the necessary tools required for this task. These tools include adjustable wrenches, pliers, level, silicone caulk gun, drill bits, hammer drill or masonry bit, and screws. You may also need additional supplies such as shims to level out any unevenness on your floor. Having all these items ready will save time during installation and eliminate unnecessary trips to purchase more supplies.
Finally, when choosing where to install your pedestal sink in your bathroom, ensure that it has enough room for both installation and accessibility purposes. Consider how much space you will require when standing in front of it and whether you would like extra storage space around it. Proper planning and preparation before installation can make all the difference in ensuring that your pedestal sink installation goes smoothly without any hiccups along the way.
Marking The Floor
After selecting the right pedestal for your sink and gathering all the necessary tools, the next step in securing your sink to the floor is marking the floor. This process involves placing your sink in its desired location and marking where the holes on the pedestal base meet with the floor. Marking these holes will ensure that you drill accurate holes in the correct spot when it’s time to secure your sink to the floor.
Before marking the floor, it’s essential to protect it using a drop cloth or any other protective material. This precaution will prevent any scratches or damages on your floor during installation. Afterward, place your sink in its desired location and use a level to ensure that it’s even. If you notice any leveling adjustments needed, use shims to level out any unevenness on your floor before marking.
Once you have leveled out your sink and are satisfied with its position, mark where each hole on the pedestal base meets with the floor using a pencil or marker. It’s crucial to double-check these markings before drilling as they determine whether your sink will be accurately secured or not. By following these steps, you can successfully mark your floor and move onto drilling holes for securing your pedestal sink without any issues.
Installing Anchors
After marking the floor for your pedestal sink, the next step in securing it to the floor is installing anchors. Using anchors is crucial in ensuring your sink stays securely in place, especially in high-traffic areas where it’s prone to being bumped or moved. Anchors provide an extra level of support and stability, preventing any potential accidents that may occur.
When installing anchors, start by drilling into the walls based on your markings from the previous step. It’s best to use a drill that’s suitable for your wall type to ensure you don’t damage it during installation. Once you’ve drilled into the walls, insert your anchors into each hole and tap them gently until they’re flush with the wall. Make sure they’re secure before moving onto attaching your sink to the pedestal.
Depending on your sink’s weight and size, you may need multiple anchors for added support. It’s essential to follow manufacturer instructions when installing anchors to ensure maximum safety and durability. By using anchors, you can rest assured that your pedestal sink will be secured firmly to the floor for years of worry-free use.
Sealing The Sink To The Wall
As we move forward with sealing the pedestal sink to the wall, it is crucial to ensure that the surface area is clean and dry. Any debris or moisture on the wall can lead to faulty adhesion, which can cause the sink to become unstable over time. Therefore, start by wiping down the back of the sink and wall with a damp cloth and then let it air dry.
When it comes to sealing your pedestal sink, using a high-quality sealant is essential. One of the most popular options for this job is silicone caulk due to its flexibility and water-resistant properties. However, other types of sealants such as latex or acrylic may also work well depending on your specific needs.
Before applying any sealant, here are some tips you should keep in mind: First, make sure that you have enough material for the job by measuring the length and height of where you will be caulking. Second, use a caulking gun for even distribution of the sealant along the edges of your sink. Finally, smooth out any excess caulk with a tool like a putty knife or your finger for a professional finish.
With our sink now securely attached to the wall, we can move onto installing the drain. To do so, we must first make sure that all necessary piping connections are in place before attaching them to our new sink’s drain hole.
Installing The Drain
- Connecting the drain pipe to the sink necessitates the use of a special slip joint nut, which should be secured to the sink tailpiece with a wrench.
- The drain pipe should then be attached to the trap adapter and the slip joint nut should be tightened with a wrench.
- A plumber’s putty should be applied to the sink drain flange before it is fitted into the sink opening.
- The drain pipe should be sealed to the sink drain flange with a plumber’s tape or a silicone sealant.
Connecting The Drain Pipe
When it comes to installing a pedestal sink, connecting the drain pipe is an important step that requires careful attention. To begin, you will need to install the P trap, which is a curved piece of pipe that prevents sewer gases from entering your bathroom. First, apply plumber’s putty around the bottom of the sink drain and insert it into the opening at the top of the P trap. Then, attach the other end of the P trap to the drainpipe coming out from your wall or floor.
Next, you will need to connect the water supply lines and ensure they are properly secured. This involves attaching a flexible hose or hard pipe to each side of the faucet and tightening them with a wrench. Be sure not to overtighten as this can cause damage to your fittings. Finally, turn on your water supply and check for any leaks. If everything looks good, then congratulations – you have successfully installed your new pedestal sink!
In conclusion, connecting your drain pipe is a crucial step when installing a pedestal sink. By using plumber’s putty and installing a P trap correctly, you can prevent sewer gases from entering your bathroom and ensure proper drainage. Don’t forget to also secure your water supply lines and check for leaks before finishing up! With these tips in mind, you can confidently tackle this project and enjoy your newly installed sink.
Sealing The Drain Pipe
As a plumbing installation professional, I understand the importance of properly sealing the drain pipe of a pedestal sink. This step is crucial in ensuring that your sink functions as it should and prevents any leaks or damage to your bathroom. To begin, you will need to apply plumber’s putty around the base of the drain assembly before inserting it into the opening at the bottom of the sink. Make sure to tighten it securely with a wrench.
Once you have installed the drain assembly, it is important to check for any leaks. Turn on your water supply and let it run for a few minutes while observing for any signs of water leakage around the drain area. If there is no leakage, then congratulations – you have successfully sealed your drain pipe! However, if there are any leaks, simply tighten or adjust the connections until they are secure.
For maintaining a leak-free pedestal sink drain, it is recommended that you regularly clean and inspect your sink’s drainage system. This includes removing any hair or debris from the pop-up stopper and cleaning out the P trap periodically to prevent buildup. By following these tips, you can ensure that your pedestal sink functions properly and remains leak-free for years to come.
Testing The Sink For Leaks
After successfully installing the drain, it is now time to test the sink for leaks. This testing procedure is crucial to ensure that the pedestal sink is properly installed and will not cause any water damage or inconvenience in the future.
One of the most common leaks in pedestal sinks is around the base of the sink. To check for this type of leak, fill up the bowl with water and let it sit for a few minutes. Then, look for any signs of water seeping out from underneath the sink. If you see any water, tighten all connections and retest until there are no leaks.
Another common leak area is around the drain pipe connection. To check for this type of leak, fill up the bowl with water again and watch closely as you remove the stopper. If you see any signs of leaking around this area, disconnect and reattach all connections until there are no more leaks.
With proper installation procedures followed and successful testing completed, you can now move on to finishing touches such as caulking around the base of your pedestal sink to give it a clean and finished look. Remember to always prioritize safety when working with plumbing installations, especially if you are not experienced in doing so.
Finishing Touches
As the saying goes, “the devil is in the details.” With your pedestal sink installation complete, it’s time to put the finishing touches on your bathroom. Adding decorative options can transform an ordinary space into a spa-like retreat. Consider incorporating a few of these simple and affordable ideas:
- Add a pop of color with a new shower curtain or bathmat.
- Hang a piece of artwork or a mirror to reflect light and make the room appear larger.
DIY alternatives are also abundant when it comes to bathroom decor. Get creative and repurpose items you already have on hand, such as mason jars for toothbrush holders or old wine crates for shelving. With just a bit of imagination, you can create a customized space that reflects your personal style.
Before wrapping up your project, it’s important to consider maintenance and care tips for your new pedestal sink. Proper upkeep can prevent costly repairs down the road. Read on for some helpful suggestions to keep your sink in tip-top shape.
Transitioning into our next section about maintenance and care tips, let’s explore how to keep your pedestal sink looking like new.
Maintenance And Care Tips
After completing the finishing touches of installing a pedestal sink, it is important to consider maintenance and care tips to ensure its longevity. Choosing the right materials for cleaning and preventing scratches can make all the difference in the upkeep of your new sink.
When choosing materials for cleaning, it is important to avoid harsh chemicals or abrasive sponges that can damage the surface of your sink. Instead, opt for gentle cleaners such as vinegar and water or mild soap and warm water. These options will effectively clean your sink without causing any harm. Additionally, using a soft cloth or sponge will help prevent scratches on the surface.
Preventing scratches on your pedestal sink requires some extra care and attention. Avoid placing sharp objects directly on the sink’s surface, such as razors or metal hair accessories. It is also important to use caution when moving heavy items near the sink, as dropping them can cause chips or cracks in the porcelain or ceramic material. By taking these precautions and regularly cleaning your pedestal sink with gentle materials, you can keep it looking like new for years to come.
| Materials to Use | Materials to Avoid |
|---|---|
| Vinegar and water | Bleach |
| Mild soap and warm water | Abrasive sponges |
| Soft cloth or sponge | Harsh chemicals |
In conclusion, maintaining a pedestal sink involves choosing appropriate cleaning materials and preventing scratches on its surface. Using gentle cleaners such as vinegar and avoiding harsh chemicals will keep your sink clean without damaging it. Taking precautions to prevent scratches from sharp objects or heavy items will also help preserve its appearance over time. By following these simple maintenance tips, you can enjoy your pedestal sink for many years to come.
Conclusion
Installing a pedestal sink is not as daunting as it may seem. As a plumbing installation professional, I recommend choosing the right sink that fits your bathroom’s style and size, preparing the work area to ensure a smooth installation process, gathering the necessary tools and materials, and shutting off the water supply before removing the old sink.
Installing the drain and testing the sink for leaks are crucial steps that require attention to detail. Once installed, add some finishing touches to enhance the overall appearance of your new sink. Regular maintenance and care will keep your pedestal sink functioning properly for years to come.
As you embark on this DIY project, remember that every step counts towards a successful outcome. So take pride in your work and enjoy your newly installed pedestal sink. A well-installed pedestal sink can transform your bathroom into an oasis of relaxation, providing you with a sense of peace and tranquility every time you walk into this space.
Image Credits
- “pedestal sink” by skvidal (featured)













![How To Replace A Bathtub Drain In A Mobile Home 23 2/365 [Bathtub Drain]](https://green-life.blog/wp-content/uploads/2023/05/3ft8KAJsNnjq-150x150.jpg.webp)

