Yard hydrants, also known as frost-free hydrants, are essential installations for homeowners who rely on outdoor water sources. These devices provide easy access to water for various activities such as watering plants and livestock, filling pools and ponds, and washing cars. Yard hydrants are designed to prevent freezing during cold weather seasons, making them a reliable source of water all year round.
Installing yard hydrants requires some technical know-how and specialized tools. Homeowners who choose to install these devices themselves must adhere to specific instructions and safety precautions to ensure the installation is successful. In this article, we will provide detailed yard hydrant installation instructions, tips, and best practices for homeowners looking to complete this task on their own. We will cover everything from choosing the right location for the hydrant to connecting it to your existing plumbing system. By following our expert advice, you can install a yard hydrant that will serve you well for years to come.
Understanding Yard Hydrants: What They Are And How They Work
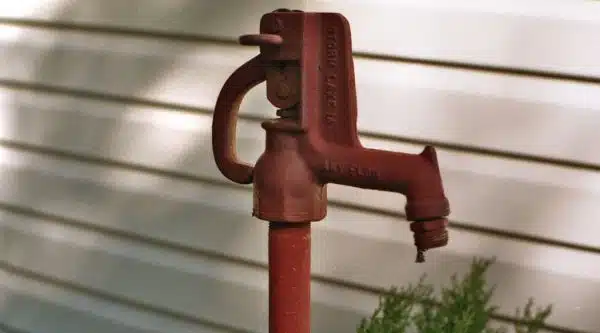
Yard hydrants are outdoor plumbing fixtures commonly used in rural areas to provide water for irrigation, livestock, and other outdoor activities. They work by tapping into a buried water line and extending a vertical pipe above the ground level. The spout of the yard hydrant is connected to the rising pipe, allowing users to access water from above ground.
One of the biggest benefits of yard hydrants is their ability to provide convenient access to water without requiring homeowners or farmers to install costly plumbing systems. Yard hydrants can also help prevent damage from freezing temperatures as they typically have a frost-proof design that allows any remaining water in the pipe to drain out below the frost line.
To ensure proper functioning, regular maintenance of yard hydrants is necessary. This includes checking for leaks or damage, lubricating moving parts such as the plunger and pivot rod with silicone grease, and replacing worn-out components as needed. It’s important to note that improper installation or neglecting necessary repairs can result in costly damages such as burst pipes or contaminated water supply.
Moving on to installation, before you start, make sure you have all the necessary tools and materials at hand.
Tools And Materials Needed For Installation
Basic materials and essential tools are necessary for a successful yard hydrant installation. The basic materials needed include PVC pipes, Teflon tape, pipe glue, and a yard hydrant kit. It is important to ensure that the materials are of high quality to guarantee durability and longevity.
Essential tools required for the installation process include a shovel, drill machine, level, hacksaw, and pliers. A shovel is essential for digging the trench where the PVC pipes will be laid. The drill machine comes in handy when drilling holes for securing the yard hydrant in place. A level ensures that the yard hydrant is installed upright while a hacksaw is used for cutting PVC pipes to size. Pliers help tighten fittings during installation.
When selecting tools and materials, it is crucial to ensure that they meet industry standards. This guarantees that the installation process will be successful and your yard hydrant will function optimally. Choosing high-quality materials and using proper tools also ensures safety during installation.
As you gather your basic materials and essential tools, consider choosing an ideal location for your yard hydrant. Selecting the right location is integral as it determines how well your yard hydrant will perform over time. Therefore, take time to evaluate different locations before settling on one that suits you best.
Choosing The Right Location For Your Yard Hydrant
Picture this: a hot summer day, the sun beating down on your parched lawn. You reach for your garden hose, turn the spigot, and…nothing. Your water source is nowhere near your garden, and dragging a heavy hose across the yard is not an option. This is where a yard hydrant comes in handy. To ensure that your yard hydrant installation will function properly for years to come, it’s essential to choose the right location.
The first thing you’ll want to consider when choosing the location of your yard hydrant is proximity to your water supply. The closer the hydrant is to the water source, the less expensive and easier it will be to install. If you have an existing water line running through your property, locating the hydrant near this line can save you both time and money.
Another important consideration is where you plan on using the hydrant most often. If you’re primarily using it for watering plants or filling up a pool, consider placing it near those areas. Additionally, if you live in an area with harsh winters, make sure to place your yard hydrant in an area that won’t be blocked by snowdrifts or ice buildup.
Now that we’ve covered some of the key factors when choosing a yard hydrant location and installation considerations let’s move on to measuring and digging the trench for installation. By following these guidelines, you’ll ensure that your new yard hydrant will provide reliable access to water whenever and wherever you need it most.
Measuring And Digging The Trench For Installation
Accurate measurement is a crucial step when installing a yard hydrant. Before digging the trench, you must measure the depth of the frost line in your area to ensure that the hydrant’s standpipe will be buried below it. Failure to do so can result in damage to the hydrant and plumbing system during freezing weather.
To determine the correct trench depth, use a tape measure or ruler to mark the height of your yard hydrant’s standpipe. Then, consult local building codes or contact your utility company to find out the depth of the frost line in your area. The trench should be at least 6 inches wider than the standpipe and deep enough to accommodate it without exceeding the required depth.
Measuring accuracy is essential for a successful yard hydrant installation. Taking accurate measurements ensures that you dig at the right depth, preventing damage to both your plumbing system and yard hydrant. Once you have determined how deep you need to dig, mark out where you want your trench using stakes and string lines before proceeding with digging it up.
Now that you’ve measured accurately and dug your trench appropriately, it’s time to move on to installing the main valve and pipe assembly. This part of installation requires more attention as you will need to assemble all parts together carefully while ensuring they are leak-proof. Read on for detailed instructions on how best to proceed with this next step.
Installing The Main Valve And Pipe Assembly
The next step in installing a yard hydrant is to attach the main valve assembly. This component is crucial for regulating water flow and pressure, so it must be installed correctly. Begin by connecting the main valve to the pipe using appropriate pipe connection techniques such as soldering or compression fittings. Ensure that all connections are tight and secure before proceeding.
Next, install the remaining sections of pipe to complete the assembly. Be sure to follow local codes and regulations regarding depth and placement of pipes. It’s important to use quality materials for all components, including pipes, valves, and fittings, as these will impact the longevity and reliability of your yard hydrant.
Proper installation of the main valve assembly is essential for ensuring that your yard hydrant functions properly. Be sure to test the system thoroughly before moving on to installing the hydrant head and rod assembly in order to avoid any potential issues down the road. With careful attention paid to detail during this stage of installation, you can be confident that your yard hydrant will provide reliable service for years to come.
Installing The Hydrant Head And Rod Assembly
Like a conductor leading an orchestra to produce beautiful music, the installation of the hydrant head and rod assembly requires precision and attention to detail. This step is critical in ensuring that the yard hydrant functions properly and provides reliable water supply for your outdoor needs. Take time to carefully align the hydrant head and secure the rod assembly to prevent any mishaps.
To begin, ensure that the hydrant head is aligned perpendicular to the ground. You can use a level tool to check if it’s level or not. Adjust as necessary until it is perfectly vertical, ensuring that it will operate smoothly without any binding or sticking. Once you have confirmed that everything is in its proper place, tighten all bolts and screws using a wrench or pliers.
Securing the rod assembly is equally essential in completing this installation process. Attach one end of the rod assembly securely onto the handle with a cotter pin, ensuring that it won’t come loose with regular use. Next, insert the other end of the rod into the hydrant head and secure it with another cotter pin. Test its movement by operating the handle up and down several times before tightening all bolts once more.
Achieving proper alignment of your yard hydrant head and securing its rod assembly are key steps in setting up your outdoor water supply system for success. Remember always to double-check alignments before securing everything tightly into place, so your yard hydrant operates correctly when needed. Next up: connecting your yard hydrant to your plumbing system!
Connecting The Hydrant To Your Plumbing System
- To begin connecting the hydrant to your plumbing system, it is important to first shut off the main water supply.
- Hoses should then be attached, using proper fittings to ensure a secure connection.
- The connection between the hydrant and hoses should be tested for leaks, using a pressure gauge to ensure the pressure is within the recommended range.
- A shut-off valve should be installed close to the hydrant, to enable easy shut-off in the case of any future maintenance.
- After the hoses and valves have been attached and tested, the hydrant should be filled with water to ensure it is functioning properly.
- Proper maintenance of the hydrant is important to ensure that it continues to work correctly and avoid any future issues.
Shutting Off The Water Supply
Before connecting your yard hydrant to the plumbing system, it is crucial to shut off the water supply. Shutting off the water mains will prevent any accidental water flow during installation, which can cause damage to your property or even injure those involved in the process. In preparation for this step, locate your home’s main water valve and turn it clockwise until it stops.
When shutting off the water supply, it is vital to ensure that all faucets and valves are fully closed to avoid any residual pressure that may be present in the pipes. This will also assist in reducing potential leaks at the connecting joints by releasing excess pressure. Once all valves have been closed, open a faucet at the lowest point of your plumbing system to drain any remaining water.
After shutting off the water supply and draining any remaining water from your plumbing system, you can now proceed with confidence in installing your yard hydrant. By following these steps carefully, you can prevent accidents or other issues that may compromise your safety and satisfaction with this new addition to your home’s exterior.
Attaching The Hoses
Now that the water supply has been shut off and all residual pressure has been drained from your plumbing system, it is time to attach the hoses for optimal yard hydrant performance. The type and size of hose you choose will depend on your particular needs, as well as the length of hose required to reach the desired location. For best results, it is recommended that you use a high-quality garden hose with a diameter of at least 5/8 inch.
When attaching the hoses, it is essential to ensure that they are secured properly to prevent leaks and damage during use. Begin by connecting the female end of your garden hose to the male thread of your yard hydrant’s outlet spout. Tighten this connection using pliers or a wrench to ensure a secure fit. Next, attach any additional lengths of hose required to reach your desired location using similar connections.
Once all hoses have been attached, turn on your home’s main water valve slowly and gradually release any air pockets in your plumbing system by opening faucets throughout your home. Check each connection point carefully for leaks and tighten as necessary before using your new yard hydrant for the first time. With proper installation and regular maintenance, you can enjoy years of reliable service from this valuable addition to your home’s exterior.
Testing The Connections
After attaching the hoses to your yard hydrant and turning on the main water valve, it is important to test the connections before using it. Testing the pressure of your plumbing system can help ensure that there are no leaks or damages in your yard hydrant’s connections. This is crucial for preventing any potential accidents and ensuring that your yard hydrant works efficiently.
To test the pressure of your plumbing system, you can turn on all faucets and showerheads in your home. This will help release any trapped air pockets that may cause pressure fluctuations in your plumbing system. Once the water flows smoothly from all faucets, you can check each connection point carefully for leaks. Tighten any loose connections as necessary to prevent further damage and ensure a secure fit.
Checking leaks is another essential step in testing the connections of your yard hydrant. Leaks can lead to significant water waste and expensive repairs if left unaddressed. To check for leaks, turn off all faucets and observe the base of your yard hydrant for any signs of dripping or moisture. If you notice any leaks, tighten the affected connection points until they stop leaking before using your yard hydrant again. By following these simple steps, you can ensure a reliable supply of water from your new yard hydrant for years to come.
Flushing And Testing The Hydrant For Proper Operation
To ensure that your yard hydrant performs optimally, it is important to flush and test the unit for proper operation. The flushing procedure involves removing any debris or sediment in the water line. This is crucial as foreign objects can clog the valve or cause damage to the hydrant over time.
Before flushing, make sure that all plumbing fixtures connected to the water supply are turned off. Open the hydrant’s drain valve and allow water to flow out until it runs clear. This may take several minutes depending on how long the unit has been inactive. Once clear water is flowing from the hydrant, close the drain valve and turn on each fixture one at a time to check for any unusual noises or fluctuations in water pressure.
After flushing, it’s time to test the hydrant for proper operation. Begin by opening the hydrant’s control valve slowly and allowing water to flow out. Check for any leaks around both the handle and packing nut area of the unit. Ensure that there are no drips or drops present when closing off the control valve. Next, open and close the hydrant several times while observing its behavior. The length of travel of the handle should be smooth without any sticking points or resistance.
By following these steps, you can be certain that your yard hydrant is functioning correctly and ready for use. If you encounter any issues during this process, refer to our subsequent section on troubleshooting common installation issues for further guidance.
Troubleshooting Common Installation Issues
- When installing a yard hydrant, it is important to check for leaks before and after installation.
- The ground should be levelled before the hydrant is installed in order to ensure the hydrant is securely fastened and plumbed properly.
- It is important to firmly secure the hydrant in place to ensure it is stable and will not move during use.
- Regularly checking the connection between the hydrant and the piping system to ensure that it is tight is essential to prevent leaks.
- It is recommended to use a level to check that the hydrant is even and plumbed properly before the final installation.
- Once the hydrant is installed, a thorough inspection should be conducted to make sure the hydrant is secure and there are no signs of leaks.
Checking For Leaks
To ensure the proper functioning of a yard hydrant, checking for leaks is a crucial step in the installation process. As a plumbing installation expert, it is important to provide customers with a checklist for leak detection. This checklist should include inspecting all connections, joints and valves for any signs of leakage.
Addressing leaks promptly is essential as they can lead to serious damage over time. Leaks can result in water damage to the surrounding area or even cause soil erosion around the hydrant. In addition, leaks can also increase water bills significantly and waste valuable resources. Therefore, it is important to educate customers on the importance of addressing leaks promptly and taking necessary actions to prevent them from occurring.
By following these tips and performing regular maintenance checks, customers can ensure their yard hydrant remains fully functional for years to come. As an installation expert, it’s important to emphasize that regular maintenance checks are essential in order to catch any issues early on before they become major problems. Encouraging customers to take proactive measures will not only save them money but also help protect their property from potential damage caused by leaks.
Levelling The Ground
Ground preparation is a crucial aspect of installing a yard hydrant. Levelling the ground is one important step in ensuring the proper functioning of the hydrant and preventing issues from arising. As a plumbing installation expert, it is essential to educate customers on this aspect of installation and provide them with guidance on how to level their ground effectively.
When preparing the ground for installation, it is important to consider landscaping aspects that may affect the placement of the yard hydrant. Factors such as nearby trees or other structures can impact the location of the hydrant and should be taken into account during installation. Additionally, it’s important to ensure that any debris or rocks are removed from the surrounding area before levelling.
Levelling the ground not only ensures proper functionality but also helps prevent soil erosion around the hydrant. By providing customers with information on ground preparation and landscaping considerations, we can help them avoid common installation issues and ensure their yard hydrant remains fully functional for years to come.
Securing The Hydrant
Another important aspect of yard hydrant installation is securing the hydrant itself. Proper securing techniques and anchoring methods are crucial to ensure that the hydrant remains stable and functional over time. As a plumbing installation expert, it is our responsibility to inform customers of the various options available for securing their yard hydrant.
One popular method for securing a yard hydrant is through the use of concrete footings. These footings provide stability and prevent movement or shifting of the hydrant during use. Other anchoring methods include driving metal stakes or using heavy-duty straps to secure the hydrant to nearby structures.
Securing the yard hydrant not only ensures proper functionality but also prevents potential safety hazards from arising due to unstable equipment. By educating customers on the importance of proper securing techniques and providing them with options for anchoring their yard hydrants, we can help them avoid common installation issues and ensure their equipment remains safe and fully functional for years to come.
Maintaining Your Yard Hydrant For Longevity
To ensure the longevity of your yard hydrant, it is crucial to perform routine maintenance. One critical factor in maintaining your yard hydrant is preventing corrosion. Corrosion can cause leaks and other damages that can affect the performance of your hydrant. To prevent corrosion, make sure to keep your yard hydrant dry by wiping it down after each use and avoid using abrasive chemicals during cleaning.
Another essential factor in maintaining your yard hydrant is proper lubrication techniques. Lubricating the moving parts of your yard hydrant will help reduce friction, which can lead to wear and tear over time. It is recommended that you apply a high-quality silicone-based lubricant on all moving parts at least once every six months.
In addition to preventing corrosion and utilizing proper lubrication techniques, regular inspections are also necessary for maintaining your yard hydrant. Inspect the water supply line for any leaks or damage, and check the operation of the plunger assembly periodically. These inspections will help identify any potential issues before they become major problems.
- Use a cover to protect your yard hydrant from harsh weather conditions.
- Keep surrounding vegetation trimmed to prevent any potential damage.
- Insulate pipes exposed to extreme temperatures.
- Install an isolation valve near the supply line to allow for easy maintenance.
As we’ve seen, maintaining your yard hydrant entails preventing corrosion, utilizing proper lubrication techniques, and performing regular inspections. Following these guidelines will ensure that your yard hydrant remains operational for years to come. In the next section, we will discuss tips for winterizing your yard hydrant to prepare it for colder temperatures.
Tips For Winterizing Your Yard Hydrant
Ah, winter. The time of year when everything freezes over and us plumbers get to enjoy the lovely task of winterizing yard hydrants. But fear not! With these preventative maintenance techniques, you can ensure your yard hydrant stays in tip-top shape throughout the cold months.
Firstly, it’s important to shut off the water supply to your yard hydrant before temperatures drop below freezing. This will prevent any trapped water from expanding and potentially damaging the hydrant or pipes. Next, drain any remaining water from the hydrant by opening the valve and letting it run until dry.
Another useful technique is to insulate your yard hydrant with foam insulation or heat tape. This additional layer will help keep the temperature around the hydrant above freezing and prevent any potential damage.
With these winterizing techniques in mind, you can rest easy knowing that your yard hydrant is protected against the harsh elements of winter. Stay tuned for our next section on safety precautions for installing a yard hydrant.
Transitioning into our next topic of discussion, while installing a yard hydrant may seem like a simple task, there are several safety precautions that must be taken to ensure proper installation and functioning.
Safety Precautions For Installing A Yard Hydrant
- Before installation of a yard hydrant, it is important to secure the hydrant in the ground to ensure safety and stability.
- The area around the hydrant should be cleared of all debris, dirt and vegetation to ensure a proper fit.
- A level surface should be established to ensure the hydrant is installed correctly and securely.
- All necessary precautions should be taken to ensure correct and safe installation of the hydrant, such as wearing protective gear and utilizing the proper tools.
Securing The Hydrant
When it comes to installing a yard hydrant, one of the most important things to consider is how to secure the hydrant in place. There are several anchoring methods that can be used, but the most common is to use a concrete anchor. This involves digging a hole and pouring concrete around the base of the hydrant. The concrete will provide a solid foundation that will keep the hydrant securely in place.
Another factor to consider when securing a yard hydrant is the type of soil in which it will be installed. Different soil types require different anchoring methods. For example, if you are installing a hydrant in sandy soil, you may need to use longer anchors than if you were installing it in clay soil. It’s also important to make sure that the anchors are placed deep enough in the ground to provide adequate support.
In addition to using proper anchoring methods and considering soil types, it’s also important to follow all safety precautions when installing a yard hydrant. This includes wearing appropriate safety gear such as gloves and eye protection, and making sure that all tools and equipment are in good working order before starting work. By taking these steps, you can ensure that your yard hydrant is installed safely and securely, providing reliable water access for years to come.
Cleaning The Area
When it comes to installing a yard hydrant, safety should always be a top priority. Along with using proper anchoring methods and considering soil types, it’s important to take steps to ensure that the installation area is clean and level. This means clearing any debris or obstructions from the area where the hydrant will be installed and making sure that the ground is level before beginning work.
Clearing debris from the installation area is essential for several reasons. First, it ensures that there are no potential hazards that could cause injury during the installation process. Second, it allows for a clear working space so that all tools and equipment can be easily accessed and used. Finally, clearing debris helps to prevent any damage to the hydrant once it has been installed by ensuring that there are no sharp objects or other hazards in the surrounding area.
Leveling the ground is also an important step in ensuring a safe and secure installation of a yard hydrant. If the ground is not level, it can lead to instability of the hydrant once it has been installed, which can cause problems with water flow or even lead to damage of the hydrant itself over time. By taking care to level the ground before beginning work on installing your yard hydrant, you can help ensure that your installation goes smoothly and that your hydrant provides reliable water access for years to come.
Common Mistakes To Avoid During Installation
Having taken the necessary safety precautions for installing a yard hydrant, it is important to avoid common mistakes during installation. These mistakes could lead to improper functioning of the hydrant or even damage to your property. Here are some tips for success in installing a yard hydrant.
One common mistake is not digging deep enough for the water supply line and the hydrant itself. The water supply line should be buried below the frost line in your area, which could be several feet deep. The hydrant should also be buried at least three feet deep to ensure proper operation and minimize the risk of freezing during winter months.
Another mistake is not properly securing the hydrant in place. It is important to use concrete around the base of the hydrant and allow it to dry completely before backfilling with soil. This will prevent the hydrant from shifting or tilting over time, which could cause leaks or other issues.
By avoiding these common mistakes and following these tips for success, you can ensure that your yard hydrant installation is done correctly and functions properly for years to come.
Moving forward into frequently asked questions about yard hydrants, it’s important to understand how they work and how they differ from other outdoor water sources.
Frequently Asked Questions About Yard Hydrants
- Installing a yard hydrant requires a few basic steps to ensure the system is properly integrated into existing plumbing infrastructure.
- To ensure proper maintenance of the yard hydrant, check the connections and valves regularly to ensure they are in working order.
- To winterize a yard hydrant, drain the hydrant and add a glycerin solution to the valve to help protect the parts from freezing temperatures.
- When installing a yard hydrant, be sure to use adequate insulation to protect it from freezing temperatures.
- For optimal performance, clean the yard hydrant’s screen and filter regularly to prevent debris buildup.
- To help prevent waterline freeze-ups, insulate the exposed length of the waterline near the yard hydrant.
Installation Requirements
Installing a yard hydrant can be a great addition to any outdoor space. However, it is important to follow the proper installation requirements to ensure that it functions properly and lasts for many years. One key consideration when installing a yard hydrant is the installation depth. The hydrant should be installed at a depth that allows for easy access and use, while also ensuring that it is securely anchored in place.
Another important factor to consider when installing a yard hydrant is frost line considerations. In areas where freezing temperatures are common, it is essential to install the hydrant below the frost line to prevent damage from freezing and thawing cycles. The depth of the frost line can vary depending on location, so it is important to research local codes and guidelines before beginning installation.
Overall, proper installation of a yard hydrant requires careful planning and attention to detail. By considering factors such as installation depth and frost line considerations, you can ensure that your new yard hydrant functions properly and provides reliable water access for years to come.
Maintenance Tips
Proper maintenance is essential for ensuring that your yard hydrant functions properly and lasts for many years. One important aspect of maintenance is cleaning. Over time, dirt and debris can accumulate in the hydrant’s body, leading to clogs and reduced water flow. To prevent this, it is important to regularly clean your yard hydrant using appropriate cleaning techniques. This may involve disassembling the hydrant and using a brush or other cleaning tool to remove any buildup.
Another key aspect of maintenance for yard hydrants is rust prevention. Rust can cause significant damage to the hydrant over time, reducing its lifespan and potentially leading to leaks or malfunction. To prevent rust from forming on your yard hydrant, it is important to keep it dry whenever possible and avoid exposing it to harsh chemicals or corrosive materials. Additionally, you may want to apply a rust inhibitor or protective coating to the exterior of the hydrant as an extra layer of protection.
Overall, proper maintenance of your yard hydrant requires regular attention and care. By taking steps such as cleaning regularly and preventing rust buildup, you can help ensure that your yard hydrant functions properly for many years to come, providing reliable access to water whenever you need it.
Winterizing Procedures
As a plumbing installation expert, I often receive inquiries about yard hydrants during the winter season. One of the most common concerns is how to prevent them from freezing in cold weather. To avoid damage caused by freezing water, it is important to follow proper winterizing procedures for your yard hydrant.
One essential step in winterizing your yard hydrant is to disconnect and drain any hoses or attachments connected to it. This will prevent water from accumulating and freezing inside the hydrant’s body. Additionally, you may want to consider installing a drainage system below the frost line to further protect against freezing. Another effective way of preventing frozen pipes is by introducing an antifreeze solution into the system.
To properly introduce antifreeze into your yard hydrant, you should first drain any remaining water from the system as much as possible. Then, using a funnel or other device, pour an appropriate amount of antifreeze solution into the hydrant’s body until it flows out of the spout. This process can help eliminate any remaining moisture and ensure that your yard hydrant remains functional throughout the winter season.
Professional Installation Vs. Diy: Pros And Cons
Are you considering installing a yard hydrant but unsure whether to hire a professional or do it yourself? While both options have their advantages and disadvantages, it ultimately comes down to your budget, experience, and time constraints.
Professional Installation:
Pros:
Guaranteed workmanship and quality.
Saves you time and effort.
Professionals have the necessary tools and equipment.
Cons:
Costly upfront investment.
Scheduling may be inconvenient.
Limited control over the installation process.
DIY Installation:
Pros:
Cost-effective solution.
Flexibility in terms of timing and execution.
Personal satisfaction in completing the project.
Cons:
Risk of mistakes due to lack of experience.
May take longer to complete.
You will need to invest in tools and equipment.
As a plumbing installation expert, I highly recommend hiring a professional if you are not confident in your ability to install a yard hydrant. While DIY installation may seem like an attractive option due to cost savings, any errors made during installation can lead to costly repairs down the line. Additionally, professionals have access to higher-quality materials that may not be available for DIY projects. Ultimately, investing in a professional installation ensures that your yard hydrant will function properly for years to come.
In weighing the costs of professional versus DIY installation, consider not only the upfront expenses but also potential long-term costs associated with improper installation. If budget is a concern, consider reaching out to multiple professionals for cost comparisons. Remember that while DIY installation may save you money upfront, mistakes can end up being more expensive than hiring a professional from the start.
Conclusion
Yard hydrants are an essential part of any outdoor plumbing system. They provide a convenient source of water for irrigation, livestock watering, and other outdoor activities. This article has provided step-by-step instructions on how to install a yard hydrant properly, including choosing the right location, digging the trench, installing the main valve and pipe assembly, and taking safety precautions.
One interesting statistic worth noting is that according to the Environmental Protection Agency (EPA), outdoor water use accounts for up to 30% of total household water use in the United States. By installing a yard hydrant, homeowners can save water and money by using a separate water source for their outdoor needs.
While professional installation may be more costly, it ensures that your yard hydrant is installed correctly and efficiently. However, for those who are handy with tools and have some plumbing experience, DIY installation can be a viable option. Regardless of which route you choose, it is important to follow all safety precautions and avoid common mistakes during installation to ensure that your yard hydrant operates effectively for years to come.
Image Credits
- “Any Flow Yard Hydrant” by bcostin (featured)

