Water heaters are an essential component of every residential or commercial building. The water heater is responsible for supplying hot water to the entire building, making it a crucial system that requires proper maintenance and care. One of the most important aspects of maintaining a water heater is draining it regularly. Draining the water heater helps remove sediment buildup, which can cause damage to the tank and decrease its efficiency over time. In this article, we will discuss how to drain a water heater properly, ensuring that it continues to function at its best capacity.
As a plumbing technician or plumber, it is essential to know how to drain a water heater properly. It requires special expertise as well as knowledge of the equipment and tools necessary for the process. While draining a water heater may seem like a simple task, if not done correctly, it can lead to significant problems such as leaks or even complete system failure. Therefore, in this article, we will cover everything you need to know about how to drain your water heater safely and efficiently. Whether you’re a homeowner or professional plumber, this guide will provide you with all the information you need to ensure your water heater stays in excellent working condition.
Understanding Your Water Heater
Water heaters are an essential part of most households as they provide hot water for different purposes. It is crucial to have a basic understanding of how the system works and what components make up the water heater. One such component is the anode rod, which is responsible for preventing corrosion in your tank. The anode rod attracts all the corrosive elements in your water, thereby reducing the likelihood of rusting inside your tank.
Flushing frequency recommendations vary depending on factors such as the size of your tank, type of water heater, and usage patterns. However, it is advisable to flush your water heater at least once a year to prevent sediment buildup that can compromise its efficiency over time. Sediment buildup leads to reduced performance and efficiency by clogging up pipes and reducing the amount of available hot water.
It’s easy to overlook maintenance tasks like draining your water heater regularly, but it can lead to costly repairs or even replacement down the line. Understanding how your system works and regular maintenance practices can save you money in the long run. In the next section, we will look at some signs that indicate it’s time to drain your water heater.
Signs That Your Water Heater Needs Draining
As a plumbing technician, I often use an allegory to explain the importance of draining your water heater. Think of your water heater as a pot of boiling soup on the stove. Over time, sediment and minerals settle at the bottom of the pot, making it difficult for the heat to reach the liquid above. Similarly, sediment and minerals accumulate in your water heater and can reduce its efficiency by insulating the heating element from the water.
Checking water quality is an essential aspect of maintaining your water heater. If you notice discoloration or a strange odor in your hot water, it could indicate that your tank needs to be drained. Additionally, if you have hard water, which contains high levels of calcium and magnesium, you may need to drain your tank more frequently than someone with soft water.
The frequency of draining your water heater depends on several factors such as usage patterns and local water quality. However, as a general rule of thumb, it’s recommended that you drain your tank at least once a year to remove any accumulated sediment and minerals. This maintenance task helps prolong the life of your unit while also ensuring that you have access to clean hot water.
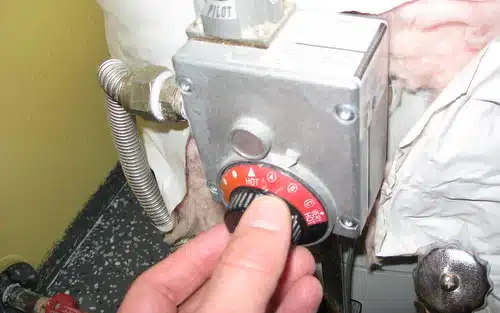
To prepare for draining your water heater, turn off the power supply or gas valve first before cutting off cold-water supply to prevent further flow into the tank. Additionally, make sure to open up all hot-water faucets in order to release pressure inside; this will help with faster drainage later on when opening up drain valve located near bottom portion of tank where excess buildup usually occurs over time due mostly from hard mineral deposits found within untreated tap-water supplies coming in contact with inner walls leading up towards coils or heating elements responsible for warming up contents stored inside vessel itself!
Preparing For Draining Your Water Heater
After determining that your water heater needs draining, it is essential to prepare for the task to ensure a safe and successful operation. Importance of safety cannot be overstated when dealing with hot water and electrical appliances. Before commencing, make sure to switch off the power supply and allow the water heater to cool down completely.
Next, gather all the necessary tools needed for draining your water heater. A garden hose, a bucket, a pair of gloves, and safety goggles are some of the equipment you will need for this procedure. Ensure that you have enough hose length to reach a suitable draining location outside or in a floor drain.
Finally, before starting the draining process, ensure that all necessary precautions are taken. This includes wearing protective gear like gloves and goggles as well as ensuring that there is no one around who could be injured by hot water or steam. Once everything is set up correctly, you can proceed with turning off your water heater.
Turning Off Your Water Heater
Imagine your water heater as a large cauldron of hot water that never stops boiling. Just like how you would turn off the stove’s heat source so as not to burn yourself, you must also turn off your water heater before draining it. Turning off your water heater is an important safety precaution that ensures your well-being while performing maintenance tasks.
Before turning off your water heater, take note of its draining frequency. Ideally, it should be drained at least once a year to prevent sediment buildup and corrosion. However, if you have hard water or frequently use hot water, then more frequent draining may be necessary.
To turn off your water heater, follow these three simple steps:
- Locate the circuit breaker or gas valve that powers the unit and turn it off.
- Wait for the heating element to cool down before proceeding with any maintenance work.
- Turn off the cold-water supply valve that feeds into the water heater.
With these steps completed, you can now safely move on to drain the tank without worrying about potential hazards caused by hot pressurized water. In the next section, we will discuss how to shut off the water supply before beginning this process.
Shutting Off The Water Supply
After turning off your water heater, you can now proceed to drain it. Before doing so, you need to prepare the necessary tools needed for this task. You will need a garden hose, a bucket, and pliers. These tools will help in ensuring that the draining process is done efficiently.
Before starting the draining process, proper safety precautions should be observed. Make sure that the water heater has cooled down before attempting to drain it. Hot water can cause severe burns or scalds if not handled carefully. Also, wear gloves and protective clothing to avoid any accidents while handling the equipment.
To begin draining your water heater, connect one end of the garden hose to the drain valve of your water heater and place the other end into a bucket or drainage area outside your home. Open up the valve using pliers and let all the water flow out of the tank. Once it’s empty, close off the valve then open up a hot water tap in your home; this will help release any air that may be trapped inside your pipes. Congratulations! You have successfully drained your water heater.
To continue with maintenance for your water heater, you may want to know how to attach a hose to it properly. This process is simple; all you need is a hose and some Teflon tape. Apply Teflon tape on both ends of the hose then screw it onto the drain valve of your water heater until tight enough not to leak. Ensure that there are no kinks or bends in the hose as this may hinder efficient draining in future maintenance tasks.
How To Attach A Hose To Your Water Heater
- When selecting the right hose to attach to a water heater, it is important to consider the size and type of hose to ensure a secure connection to the water heater.
- The hose should also be made of durable materials to prevent leaks or ruptures during draining.
- To install the hose, it is necessary to attach it to the drain valve located on the side of the water heater.
- All connections should be firmly tightened to ensure a secure fit, while taking caution to prevent over-tightening the connection.
Selecting The Right Hose
Selecting the Right Hose for draining a water heater is essential to ensure that the process is executed smoothly and safely. As a plumbing technician, it is imperative to guide homeowners in choosing the appropriate length of hose for their water heater. A hose that is too short can make it difficult to carry out the task, while a hose that is too long can become tangled and pose safety hazards.
When selecting a hose, it is also crucial to consider its durability and material. Rubber hoses are popular options as they are flexible, easy to handle, and resistant to high temperatures. However, they may not be suitable for homeowners who have pets or rodents as they can easily chew through the rubber. On the other hand, stainless steel hoses are more durable but can be challenging to maneuver due to their stiffness.
Handling the hose safely should also be emphasized when guiding homeowners on how to attach a hose to their water heater. Before starting the draining process, ensure that the valve at the base of the tank has been turned off and that there are no leaks or cracks on both ends of the hose. When handling hot water from the tank, use protective gloves and clothing to prevent burns or scalds. By following these safety precautions and selecting an appropriate length of hose made from durable material, homeowners can successfully drain their water heaters without causing any harm or damage.
Installing The Hose
Choosing the right hose is just the first step in attaching it to your water heater. The next crucial step is installing it properly to avoid any leaks or mishaps. As a plumbing technician, I highly recommend taking precautions before and during the installation process to ensure safety and efficiency.
Firstly, ensure that the valve at the base of the tank is turned off before attaching the hose to prevent any water from flowing out prematurely. Then, inspect both ends of the hose for leaks or cracks before connecting it securely to the drain valve on your water heater. It’s important to make sure that the hose is tightly fitted and in a position where it won’t kink or bend when hot water starts flowing through it.
Finally, when you turn on the valve and start draining your water heater, be mindful of how you handle and direct the hose. Keep children and pets away from the area as hot water can cause serious burns or scalds. Use protective gloves and clothing while handling hot water from your tank. Installing a hose correctly ensures proper drainage without any harm or damage caused by leaks or spills.
In conclusion, choosing an appropriate hose is only part of a successful draining process; installing it correctly is equally important for safety and efficiency purposes. Take precautions before attaching and during installation by inspecting for leaks, securing fittings tightly, and handling hot water with care. By following these steps correctly, you’ll experience an easy draining process without any mishaps!
Draining Your Water Heater Tank
Draining your water heater tank is a crucial maintenance task that should be performed at least once a year. Neglecting to do so can result in sediment buildup, reduced efficiency, and even damage to the heating elements. To start, turn off the power supply or gas valve and let the water cool down for several hours.
Next, attach a garden hose to the drain valve located near the bottom of the tank and place the other end in a proper drainage area. Open the drain valve and let all of the water flow out until it runs clear. Be sure to take safety precautions as hot water can cause burns or scalds.
Finally, when all of the water has been drained from your tank, shut off the drain valve and remove any remaining sediment using a wet/dry vacuum or flushing with cold water. Dispose of all waste materials according to local disposal procedures. With regular maintenance and care, you can ensure that your water heater operates efficiently for years to come. In order to continue with this process, it is important to flush your water heater tank completely before moving on to any further maintenance tasks.
Flushing Your Water Heater Tank
After draining your water heater tank, the next step is to flush it. This is an essential process that ensures your water heater continues to function effectively and efficiently. Flushing helps remove sediment buildup in the tank, which can cause several problems such as reduced heating efficiency and premature failure of the heating element.
Removing sediment from your water heater tank has various benefits, including extending its lifespan and reducing energy consumption. Sediment buildup interferes with heat transfer, making your water heater work harder to heat up the water. This results in higher energy bills and increased wear and tear on the system, leading to premature failure. Regular flushing helps prevent sediment buildup and keeps your system running smoothly for longer.
In addition to preventing sediment buildup, regular flushing also improves the quality of the hot water coming out of your taps. Sediment buildup can affect the taste and odor of your hot water, making it unpleasant to use or drink. Flushing removes any accumulated debris or bacteria from inside the tank, ensuring that you have clean and fresh-tasting hot water at all times.
Refilling Your Water Heater Tank
After draining your water heater, it’s time to refill the tank. Refilling your water heater is a simple process that requires attention to detail and proper techniques. Proper refilling techniques are important for ensuring that your water heater functions efficiently and effectively.
One of the essential things to consider when refilling your water heater is the importance of maintaining proper water levels. Filling the tank with too much or too little water can result in damage to the heating element, pressure relief valve, and other components. To avoid such issues, ensure that you carefully measure and fill the tank with the correct amount of water.
To refill your water heater, open the cold-water inlet valve and turn on a hot-water faucet in your home until you see a steady stream of water flowing from it. This indicates that all air pockets have been removed, and hot water is flowing through your system. Once this is done, check for any leaks around the connections and tighten any loose fittings as necessary. With these steps completed successfully, you can now move on to turning your water heater back on.
Turning Your Water Heater Back On
- Before turning the power supply back on, it is important to ensure that the water heater tank is adequately drained.
- This can be done by attaching a garden hose to the drain valve at the bottom of the tank and directing the water away from the house.
- After the tank is drained, turn the power supply back on, typically located near the top of the tank.
- Finally, turn the water supply back on to allow the tank to refill and re-pressurize.
Preparing The Tank
To ensure that your water heater functions efficiently, it is essential to drain and clean it periodically. Before turning the water heater back on, it is important to prepare the tank properly. This involves several steps, starting with turning off the power supply or gas valve connected to the unit.
Once you have disconnected the power source or turned off the gas valve, let the water in the tank cool down for several hours. After this, attach a hose to the drain valve located at the bottom of the tank and place a bucket underneath to collect any debris that may come out. Open the drain valve slowly and allow all of the water to flow out of your tank.
Before refilling your water heater, inspect its interior for signs of damage or corrosion. If you notice any issues during this inspection, contact a professional plumber before proceeding further. Once you have verified that everything looks good inside your tank, flush it with a cleaning solution recommended by a plumbing professional. Allow this solution to sit inside your unit for several hours before draining it completely and then proceed with refilling your water heater as usual.
Turning On The Power Supply
After draining and cleaning your water heater, the next step is to turn on the power supply or gas valve. It’s important to check the power supply and ensure that it is functioning properly before proceeding with this step. This can be done by testing the circuit breaker or fuse connected to the unit. Safety precautions should always be taken when working with electricity, so it’s essential to wear protective gear such as gloves, goggles, and a face mask.
Once you have confirmed that the power supply is working correctly, you can proceed with turning on your water heater. If you have a gas water heater, make sure that the pilot light is lit before turning on the gas valve. If you have an electric water heater, turn on the power supply and wait for several hours for it to heat up before using hot water. It’s crucial to follow these steps carefully as failure to do so could lead to damage or malfunction of your unit.
In conclusion, turning on your water heater after draining and cleaning it requires attention to detail and adherence to safety precautions. Always check the power supply before proceeding and take necessary measures to protect yourself from potential hazards. By following these steps carefully, you can ensure that your water heater functions efficiently and provides hot water whenever needed.
Releasing Air From Your Water Heater
To ensure your water heater functions optimally, it is important to release any trapped sediment that may have accumulated inside. This process is necessary because sediment can accumulate over time and reduce the efficiency of the heater. Releasing trapped sediment is a relatively simple procedure that any homeowner can do without professional assistance.
To release the trapped sediment, begin by turning off the power supply or gas to your water heater. Next, turn off the cold-water supply valve, which will prevent any new water from entering the tank while you are working on it. After this, locate the drain valve at the bottom of your heater and attach a garden hose to it. Ensure that the other end of the hose is outside so that drained water does not flood your home.
Once you have attached a hose to the drain valve, open it and let all the water inside flow out completely. As you do this, you may notice some debris coming out with the water; this is normal for heaters that have not been drained in a long time. Releasing trapped sediment helps prevent future buildup and ensures efficient functioning of your heater.
- Use protective gear such as gloves and goggles while working on your heater.
- Wait for at least 24 hours before turning on your heater after draining.
- Check if there are leaks around fittings after draining.
- Schedule regular maintenance checks with a professional plumber to prevent future issues.
After draining your water heater, it’s essential to inspect it for any signs of wear or damage before using it again. In our next section, we will discuss how to inspect your water heater after draining to ensure its longevity and safety.
Inspecting Your Water Heater After Draining
After draining your water heater, it is important to inspect the unit thoroughly. One of the most common issues that can arise in a water heater is sediment buildup. The sediment can accumulate at the bottom of the tank and cause various problems to the unit. Inspecting this buildup is crucial as it can lead to inefficiency, leaks, or even a complete system breakdown.
Another essential inspection step is checking for leaks and rust. Water heaters are susceptible to rust and corrosion over time, especially if they have not been maintained properly. Rust can cause leaks, which can lead to extensive damage if left unchecked. Checking for any signs of rust on your water heater’s pipes or tank will help you identify potential issues early on.
If you notice any significant sediment buildup or rusting in your water heater, it may be time to consider replacing the unit altogether. A professional plumber can assist you with determining whether repair or replacement is necessary based on their expert assessment of your specific situation. By addressing these issues promptly, you can avoid more costly repairs down the road.
Moving forward, we will discuss common mistakes to avoid when draining your water heater so that you can ensure its longevity and efficiency for years to come.
Common Mistakes To Avoid When Draining Your Water Heater
Careless mistakes when draining your water heater can lead to safety hazards and costly repairs. As a plumbing technician, I have witnessed numerous homeowners make avoidable errors during the process. Here are some common mistakes to avoid when draining your water heater.
Safety tips should always be a top priority when working with hot water heaters. One of the most common mistakes is not turning off the power supply before draining the tank. This can cause serious electrocution or even death. Always shut off the power supply from the circuit breaker box or thermostat before proceeding.
Another mistake is improper disposal of the sediments accumulated at the bottom of the tank. These sediments can contain heavy metals and other harmful chemicals that can contaminate groundwater and soil if not disposed of properly. Avoid dumping them into the sink or toilet, but instead take them to a hazardous waste disposal facility.
Remember, proper maintenance of your water heater is essential for optimal performance and longevity. In our next section, we will discuss how to maintain your water heater to ensure it operates efficiently and lasts for many years without any issues.
Maintaining Your Water Heater For Optimal Performance
After draining your water heater, it’s crucial to maintain it regularly to ensure optimal performance. Regular maintenance has numerous benefits, including extending the lifespan of your water heater and ensuring that it operates efficiently, reducing energy consumption and lowering your utility bills. Neglecting maintenance, on the other hand, can have severe consequences such as corrosion and leaks leading to costly repairs or even requiring a complete replacement.
One of the most important aspects of maintaining your water heater is checking and replacing the anode rod regularly. The anode rod attracts corrosive elements in the water, helping to protect the tank from rusting. However, over time, the anode rod will deteriorate until it can no longer function correctly. Without this protection, the tank will eventually corrode and leak. Other vital maintenance tasks include flushing out sediment buildup at least once a year and inspecting all valves for leaks or damage.
While some homeowners may feel confident enough to perform basic maintenance tasks themselves, there are times when calling a professional plumber for water heater maintenance is necessary. If you notice any signs of leaks or corrosion, strange noises coming from the unit or if you’re unsure about performing any maintenance tasks yourself, call a licensed plumber immediately. A professional plumber has the knowledge and expertise required to diagnose issues accurately and provide prompt solutions before they become larger problems that require expensive repairs or replacements.
When To Call A Professional Plumber For Water Heater Maintenance
As a plumbing technician, I often encounter homeowners who prefer to DIY their water heater maintenance. While this may seem cost-effective, it could lead to more problems in the long run. It’s important to know when to DIY and when to call a professional plumber for water heater maintenance.
One sign that your water heater needs professional attention is when there is a lack of hot water or poor heating performance. This could be due to a malfunctioning thermostat or heating element. Attempting to fix these issues on your own could lead to further damage or even injury. A professional plumber has the necessary skills and equipment to diagnose and repair any issues with your water heater.
Another reason why you should hire a professional plumber for water heater maintenance is if you notice leaks around the tank or pipes. Leaks can cause significant damage to your home and also indicate that there may be corrosion or other damage within the water heater itself. Only an experienced plumber can properly diagnose and repair leaks in your system.
In conclusion, while it may be tempting to DIY your water heater maintenance, it’s important to know when it’s time to call a professional plumber. Signs such as poor heating performance and leaks should not be ignored as they can indicate bigger problems with your system. As a plumbing technician, I highly recommend leaving any complex repairs or maintenance tasks to the professionals for safety and peace of mind.
Conclusion
As a plumbing technician, understanding how to properly drain your water heater is crucial for optimal performance and longevity. Signs such as strange noises or sediment buildup are indicators that it’s time to drain your water heater. Taking the necessary steps to prepare and shut off your water heater and supply will ensure a smooth draining process.
However, it’s important to avoid common mistakes such as not allowing enough time for the water to cool or neglecting regular maintenance. By maintaining your water heater, you can prevent costly repairs and extend its lifespan. As a professional plumber, I encourage homeowners to know when it’s appropriate to call in a professional for maintenance or repairs. Remember, taking care of your water heater is key in providing hot water for your daily needs.
Image Credits
- “Water Heater Thermostat” by Mark Florence (featured)








![How To Replace A Bathtub Drain In A Mobile Home 20 2/365 [Bathtub Drain]](https://green-life.blog/wp-content/uploads/2023/05/3ft8KAJsNnjq-150x150.jpg.webp)



![How To Get Hair Out Of A Bathtub Drain 27 2/365 [Bathtub Drain]](https://green-life.blog/wp-content/uploads/2023/05/cOEu5edpkejq-150x150.jpg.webp)

