Shower valves are an essential component of any bathroom, providing you with the necessary control over the temperature and flow of water. However, over time, these valves can suffer from wear and tear or become damaged, leading to leaks or other issues that need to be addressed. Replacing a shower valve cartridge is one such solution that can help keep your shower running smoothly and efficiently.
As a plumbing expert, I have seen many homeowners struggle with this task due to its technical nature. In this article, we will discuss how to replace a shower valve cartridge in a step-by-step approach. With the right tools and techniques, you can perform this task with ease and ensure that your shower remains functional for years to come. So let’s dive in and explore the process of replacing a shower valve cartridge.
Understanding Your Shower Valve
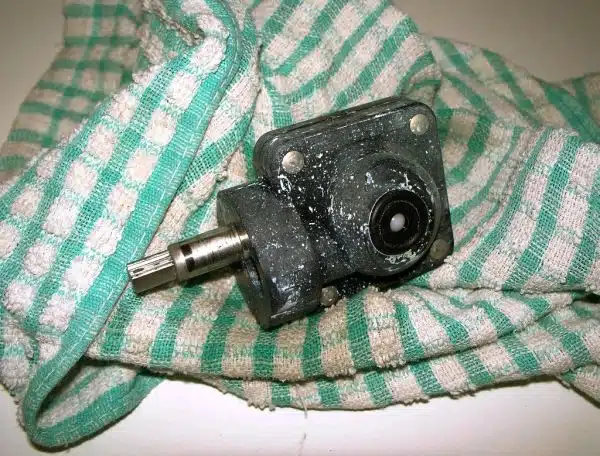
As a plumbing professional, understanding the anatomy of your shower valve is crucial to successfully replacing a shower valve cartridge. The valve body is the main component of the shower valve and is responsible for controlling water flow. It also houses the cartridge, which controls hot and cold water temperature and pressure.
Troubleshooting common issues with your shower valve can help you determine if a cartridge replacement is necessary. Some common issues include leaks, low water pressure, inconsistent water temperature, or difficulty turning the handle. If you notice any of these problems with your shower valve, it may be time to replace the cartridge.
Identifying the type of cartridge in your shower valve is the next step in replacing it. There are different types of cartridges such as single-handle or double-handle cartridges that vary in size and shape depending on the manufacturer and model. Identifying which type of cartridge you have will help ensure that you purchase the correct replacement part for your specific shower valve model.
Identifying The Type Of Cartridge
- Cartridges are the replaceable parts of shower valves that control the flow of water.
- They come in a variety of shapes, sizes and designs, the most common being the 12-point and 8-point cartridges.
- Shower valves can be either compression, diverter or cartridge valves.
- Compression valves require disassembly of the valve body, while cartridge valves require removal of the cartridge from the valve body.
- The disassembly process involves turning off the water supply, removing the handle, unscrewing the bonnet nut, and pulling out the cartridge.
- It is important to identify the type of cartridge used in the valve before proceeding with the disassembly process.
Types Of Cartridges
To properly replace a shower valve cartridge, it is important to first identify the type of cartridge that is currently installed. There are different brands of cartridges available in the market, each with its own set of pros and cons. Knowing these can help in determining which type of cartridge is suitable for your shower system.
One type of cartridge is the ceramic disc cartridge, which is popular for its durability and long lifespan. It has two ceramic discs that control the flow and temperature of water through the valve. However, it can be more expensive compared to other types of cartridges. Another type is the compression cartridge, which uses washers to control water flow. It is relatively cheaper but may require frequent replacements due to wear and tear.
Lastly, there’s the ball valve cartridge, which has a rotating metal or plastic ball inside that controls water flow and temperature. It offers ease of use with its single handle operation but can be more complex than other types when it comes to repairs. Understanding these different types of cartridges can greatly help in identifying which one needs replacement and what kind of replacement part should be purchased.
In conclusion, knowing the different types of shower valve cartridges available can aid in choosing a replacement part that suits your needs. Each type has its own advantages and disadvantages depending on factors such as cost and durability. By familiarizing oneself with these options, one can make an informed decision on what kind of shower valve cartridge to install or replace.
Types Of Valves
Identifying the type of cartridge is crucial in replacing a shower valve cartridge, but it’s also important to understand the different types of valves. There are three common types of valves: single-handle, double-handle, and thermostatic. Single-handle valves have one lever that controls both water flow and temperature, while double-handle valves have separate levers for hot and cold water. Thermostatic valves use a pre-set temperature control to maintain a consistent water temperature.
Each type of valve has its own set of advantages and disadvantages. Single-handle valves offer convenience and ease of use, but they can be prone to leaks due to wear and tear on the internal components. Double-handle valves may require more effort to adjust the water temperature, but they tend to be more durable over time. Thermostatic valves are popular in households with young children or elderly individuals as they prevent sudden changes in water temperature.
Common problems with shower valves include leaks, low water pressure, and inconsistent water temperature. To prevent these issues from occurring, regular maintenance is key. This includes cleaning the valve regularly and checking for any signs of wear or damage. It’s also important to check the valve’s cartridges or washers periodically as these parts often need replacing due to wear and tear over time.
By understanding the different types of valves and their pros and cons, homeowners can make informed decisions about which type of valve is best suited for their needs. Regular maintenance can help prevent common problems from occurring, keeping your shower system running smoothly for years to come.
Disassembly Process
In order to replace a shower valve cartridge, it is essential to identify the type of cartridge and valve that needs replacing. Once the type of cartridge has been identified, the disassembly process can begin. Disassembling the valve requires certain tools and safety precautions to be taken.
To start the disassembly process, turn off the water supply to the shower. This will prevent any accidental flooding or damage during the repair process. Next, remove any decorative coverings or handles from the valve using a screwdriver or pliers as necessary. It’s important to remember which handle controls hot and cold water when removing them.
Once you have removed all exterior components, use a wrench or pliers to remove the valve assembly from inside the wall. Be sure to follow safety precautions such as wearing protective gloves and eye wear to prevent injury during this step. With the valve assembly removed, you can now access and replace the faulty cartridge with a new one that matches your specific type of valve. By following these steps carefully and using proper tools and safety precautions, homeowners can successfully disassemble their shower valves for repairs or replacements.
Gathering The Necessary Tools
Tool organization is essential when making any plumbing repair, including replacing a shower valve cartridge. Before beginning the repair process, gather all the necessary tools and ensure they are in good condition. The required tools for this project include a screwdriver, pliers, an adjustable wrench, and a replacement cartridge. It is crucial to have everything readily available to avoid unnecessary trips that can prolong the repair process.
Safety precautions must be taken when working with water and electricity. To minimize the risk of electric shock, turn off the power supply to the bathroom or house before starting any repair work. Additionally, shutting off the water supply is vital before attempting to replace a shower valve cartridge. Turning off the water supply prevents any accidental leaks that could cause significant damage to your home.
In summary, tool organization and safety precautions are essential steps to ensure that your shower valve cartridge replacement process goes smoothly without any accidents. Having all necessary tools at hand will save time and effort while minimizing frustration during the process. Remember always to prioritize safety by turning off both electrical and water supplies before starting any repairs on your plumbing system.
Turning Off Water Supply
Before replacing a shower valve cartridge, you must first turn off the water supply to prevent any unwanted leaks or accidents. Shutting off the water supply is necessary and should be done with utmost care. There are two main ways of shutting off the water supply: by turning off the main water valve or by shutting off the shower’s local valves.
Turning off the main water valve is a crucial step in replacing a shower valve cartridge. This ensures that there is no more running water throughout your house. To shut off the main water valve, locate it, which is usually found near the meter box or on an exterior wall of your home, and turn it clockwise until it stops. This will effectively stop all water from flowing into your home.
Draining any remaining water in your pipes is also necessary before proceeding with replacing the shower valve cartridge. To do this, turn on all faucets in your home including showers and tubs then flush all toilets until there is no more running water. It is important to drain all existing water because even a small amount can cause significant damage when you remove the old cartridge.
- Check for any leaks before starting
- Ensure that you have all necessary tools ready
- Take pictures or notes of how everything was assembled before taking it apart
- Wear protective gear such as gloves and goggles
- Have someone assist you if possible
Next, removing the handle and trim section is vital in order to access and replace the shower valve cartridge.
Removing The Handle And Trim
After turning off the water supply, the next step in replacing a shower valve cartridge is to remove the handle and trim. However, this step can be challenging if the handle is stuck or the trim is corroded. In such cases, it may require additional tools and techniques to remove them safely.
Removing stuck handles requires careful handling to avoid damaging other parts of the valve. One effective method is to use a handle puller tool that can grip onto the handle and apply even pressure to pull it off without twisting or breaking it. If a puller tool is not available, try using a rubber mallet to gently tap around the edges of the handle until it loosens enough to be removed by hand. It’s essential not to force it as this can damage the valve stem.
Dealing with corroded trim requires extra caution as it often involves working with sharp edges and rusty parts. Begin by spraying penetrating oil on any rusted bolts or screws and let it sit for at least 15 minutes before attempting to loosen them with pliers or a wrench. If these methods do not work, try using a hacksaw blade or rotary tool with a cutting wheel attachment to carefully cut through any corroded parts that are preventing the trim from being removed. Be sure to wear protective gloves and eyewear when doing this type of work.
Transitioning into removing the old cartridge section, once you have successfully removed both the handle and trim, you will have access to the cartridge itself. The next step involves removing the old cartridge from its housing in preparation for installing a new one. This process varies depending on the type of valve you have, but generally involves unscrewing retaining clips or nuts that hold it in place before pulling it out carefully by hand.
Removing The Old Cartridge
As we move forward in replacing the shower valve cartridge, the next step is to remove the old cartridge. This step is crucial and requires careful attention to ensure that it’s done correctly. Removing the cartridge involves taking apart the valve body, which could be tricky if you’re not familiar with how it works.
One of the common mistakes when removing a cartridge is failing to shut off the water supply before starting. This mistake can lead to water damage, and it’s essential to avoid it at all costs. Once you’ve turned off the water supply, follow these steps: First, remove any decorative cap or handle screw covering the valve body. Second, remove the handle and unscrew any retaining nut holding down the cartridge. Finally, use pliers or a specialized cartridge puller to extract the old cartridge from its place.
After successfully removing your old valve cartridge, you’ll need to inspect it for any signs of wear and tear that could have led to its failure. At this stage, it’s also crucial that you inspect your valve body for any mineral buildup or debris that could cause problems later on. In our next section of cleaning the valve body, we’ll provide further guidance on ensuring that your new shower valve runs smoothly once installed.
Cleaning The Valve Body
Valve maintenance is crucial for ensuring that your shower valve cartridge operates efficiently. If you notice any leaks, low pressure, or difficulty in controlling the temperature, it may be time to clean the valve body. Before proceeding with cleaning, turn off the water supply to avoid any mishaps.
To start cleaning the valve body, remove the handle and faceplate using a screwdriver. Next, use a soft-bristled brush or cloth to scrub away any buildup or debris on the valve body. Be sure to clean around the cartridge area thoroughly. Once done, rinse with warm water and dry with a towel.
Preventative measures can also help prolong the life of your shower valve cartridge. Regularly checking for leaks and addressing them promptly can prevent damage from occurring in other areas of your plumbing system. Additionally, using a water softener can reduce mineral buildup and extend the lifespan of your shower valve cartridge. By following these simple steps, you can ensure that your shower remains functioning optimally for years to come.
Now that you have cleaned the valve body and taken preventative measures, it’s time to install the new cartridge.
Installing The New Cartridge
- The necessary tools for replacing a shower valve cartridge include a screwdriver, adjustable wrench, and pliers.
- Before beginning the installation process, the new cartridge should be fitted with replacement seals, O-rings and any other components that may be needed.
- The existing shower valve cartridge should be removed from the shower valve by using a screwdriver to loosen the retaining clip and a pair of pliers to remove the old cartridge.
- Once the new cartridge is in position, the retaining clip should be tightened using a screwdriver and an adjustable wrench should be used to ensure the cartridge is securely held in place.
- After the new cartridge has been installed, the water supply to the shower valve should be checked to ensure it is secure and no water is leaking from the valve.
- Finally, the temperature of the shower should be tested to ensure the new cartridge is functioning correctly.
Gathering Tools
Before beginning the task of replacing a shower valve cartridge, it is important to gather all the necessary tools. Choosing the right cartridge for your shower is crucial in ensuring that it functions properly. It is recommended to choose a replacement cartridge from the same manufacturer as your existing shower valve.
DIY vs professional replacement can be a dilemma for those attempting to replace their shower valve cartridge. While DIY may seem cost-effective, it can lead to costly mistakes if not done correctly. Hiring a professional plumber may initially seem more expensive but can save you time and money in the long run by ensuring that the job is done properly.
In addition to choosing the right cartridge and deciding whether to attempt a DIY or professional replacement, other essential tools needed for this project include pliers, screwdrivers, an adjustable wrench, and silicone lubricant. These tools will aid in removing the old cartridge and installing the new one with ease. Gathering these tools beforehand will make the process smoother and less stressful.
Preparing The New Cartridge
After gathering all the necessary tools and deciding on whether to choose a DIY or professional replacement, preparing the new cartridge is the next step in replacing a shower valve cartridge. Proper lubrication is crucial in ensuring that the new cartridge functions smoothly. Use silicone lubricant to coat the O-rings of the new cartridge before installing it into the valve body.
It is important to handle the new cartridge with caution to prevent any damage during installation. Avoid dropping or placing any heavy objects on it as this can cause cracks or breaks that can affect its functionality. Also, make sure to align the pins on the new cartridge with those in the valve body before inserting it.
Before inserting and securing the new cartridge, turn on both hot and cold water supplies to flush out any debris that may have accumulated in the pipes during the replacement process. Once done, insert and secure the new cartridge using pliers and an adjustable wrench. Make sure not to over-tighten as this can cause damage. With proper handling precautions and lubrication, installing a new shower valve cartridge can be done smoothly and without complications.
Installing The New Cartridge
Proper lubrication is essential in ensuring that the new shower valve cartridge functions smoothly. Before installing the new cartridge, make sure to coat its O-rings with silicone lubricant, which helps prevent friction and damage to the cartridge. Avoid using petroleum-based lubricants as these can cause swelling or deterioration of the O-rings over time.
When installing the new cartridge, it is important to avoid common mistakes that can affect its functionality. For instance, handle the new cartridge carefully to prevent any damage during installation. Also, ensure that you align the pins on the new cartridge with those in the valve body before inserting it. Failure to do so can damage both the cartridge and valve body.
To complete the installation process, flush out any debris that may have accumulated in the pipes by turning on both hot and cold water supplies before inserting and securing the new cartridge. Use pliers and an adjustable wrench to insert and secure it properly without over-tightening as this can cause damage. With proper lubrication and careful handling, installing a new shower valve cartridge should be a smooth process that ensures your shower functions as expected.
Reassembling The Valve
As you begin to reassemble the valve, it’s important to remember that this step is just as crucial as disassembling the valve. It may seem simple enough, but missing a small component or forgetting to lubricate a part can cause major issues down the line. Take your time and follow these steps carefully.
First, gather all of the valve components that you removed during disassembly. This may include the cartridge, retaining clip, and any other small parts that were removed in order to access the cartridge. Lay them out on a clean surface so that you can easily see each piece and ensure that nothing is missing.
Next, lubricate any parts that require it. This will help to prevent damage from friction and make reassembly easier overall. Use a silicone-based lubricant and apply it sparingly to any o-rings or rubber seals. Be sure not to over-lubricate, as this can cause issues with water flow.
Finally, carefully reinsert each component into its proper place within the valve body. Pay close attention to any clips or fasteners that need to be secured in order to keep everything in place. Once everything is properly seated and secure, you’re ready to move on to turning the water supply back on.
Remember, taking your time during reassembly will save you time and headaches in the long run. Double-check everything before proceeding and don’t rush through this step. With care and attention, your shower valve should be working like new again in no time!
Turning Water Supply Back On
After reassembling the valve, it is important to label all the parts that were removed during disassembly. This will help you remember where each part goes in case you need to replace them in the future. Labeling is also crucial if you are working on multiple valves at once to avoid mixing up parts and causing confusion.
Before turning the water supply back on, it is important to take safety precautions. Make sure all electrical appliances near the shower area are turned off and unplugged. Wear protective gloves and eyewear to prevent injuries from any remaining water or debris. If possible, cover the shower area with a plastic sheet or towel to avoid any potential water damage.
Once you have taken these safety measures, turn on the water supply slowly and check for leaks around the valve. If there are no leaks, turn on the shower and test the hot and cold water settings to ensure they are functioning properly. If there are still leaks or issues with the function of the valve, it may be necessary to call a professional plumber for further assistance.
Testing The Valve For Leaks
After successfully replacing the shower valve cartridge, it is important to test the valve for leaks. Leak prevention is crucial in maintaining a functional and safe plumbing system. Testing the valve for leaks ensures that the new cartridge has been properly installed and that any potential issues have been addressed before they become significant problems.
To begin testing, turn on the water supply and allow the valve to run for a few minutes. Check for any drips or leaks around the valve body, connections, and pipes leading to and from the valve. If no leaks are present, turn off the water supply and check again after a few hours. This will help identify any slow leaks that may occur over time.
If leaks are present, carefully inspect all parts of the valve to identify where they are coming from. Common sources of leaks include loose fittings, damaged O-rings or washers, or improper installation of the new cartridge. Troubleshooting tips include tightening connections with pliers or a wrench, replacing damaged parts with new ones, or double-checking that all steps were followed correctly during installation.
Moving forward with leak-free operation is essential in maintaining an efficient plumbing system. In case you encounter problems such as low water pressure or unusual noises coming from your showerhead post-installation; our next section will cover troubleshooting common issues related to shower valves in detail.
Troubleshooting Common Issues
One common issue that homeowners encounter with their shower valves is a faulty cartridge. While replacing the cartridge can be a simple DIY fix, there are some common mistakes to avoid. For instance, many people forget to turn off the water supply before attempting to remove the old cartridge. This can lead to flooding and water damage.
Another mistake is not cleaning the valve body before installing the new cartridge. Debris or mineral buildup from the old cartridge can prevent proper installation and cause leaks. It’s important to clean the valve body thoroughly with a soft-bristled brush and vinegar or another mild cleaning solution.
If you’re not comfortable tackling this repair on your own, there are DIY alternatives such as watching tutorial videos or consulting online forums for advice. However, it’s always best to call in a professional plumber if you have any doubts about your ability to complete the repair safely and effectively.
Transition: Now that you know how to troubleshoot common issues like replacing a shower valve cartridge, let’s move on to some tips for preventing future problems.
Tips For Preventing Future Problems
- Regular inspection of the shower valve is of utmost importance to ensure its continued functioning.
- Close monitoring of the valve’s performance should be done to detect any potential leaks.
- Pay attention to any signs of wear and tear on the valve’s parts, and replace them as necessary.
- Taking proactive measures to prevent future problems with the shower valve is beneficial in the long run.
- Regular maintenance and replacement of the valve’s cartridge is a key factor in ensuring its longevity.
- By implementing these proactive measures, the risk of more serious issues with the shower valve can be minimized.
Regularly Inspect The Shower Valve
Regularly inspecting the shower valve is crucial for preventing future problems. As a plumbing expert, I cannot stress enough the importance of maintenance to avoid costly repairs or replacements. By keeping a close eye on your shower valve, you can catch any signs of wear and tear before they cause major damage.
One of the most common signs of wear and tear on a shower valve is leaks. If you notice water dripping from your showerhead even when it’s turned off, it’s likely that your valve needs attention. Another sign to look out for is difficulty turning the handle to adjust water temperature or pressure. This could indicate that the cartridge inside the valve is wearing down and needs to be replaced.
Regular inspection of your shower valve can save you time, money, and frustration in the long run. By catching any issues early on, you can prevent them from becoming bigger problems that require extensive repairs or even complete replacement. As someone who serves others by providing plumbing expertise, my advice would be to make checking your shower valve a part of your regular maintenance routine – it will pay off in the end!
Check For Leaks
As a plumbing expert, I know that preventing future problems with your plumbing system is crucial. One of the most common causes of such problems is leaks. Leaks not only waste water but also cause damage to your walls and floors, leading to costly repairs. Therefore, it’s essential to check for leaks regularly in your plumbing system.
Common causes of leaks include worn-out seals and gaskets, corrosion, and loose connections. These issues can be prevented by taking proper care of your pipes and fixtures. For instance, avoiding harsh chemicals when cleaning your pipes can prevent corrosion. Also, tightening loose connections and replacing worn-out seals can prevent leaks from occurring.
To prevent leaks, it’s essential to conduct regular inspections of your plumbing system. You should check for any signs of leakage around fixtures such as sinks, toilets, showers, and bathtubs. Additionally, inspect exposed pipes for signs of rust or corrosion that may lead to leaks in the future. By conducting these inspections regularly and addressing any issues early on, you can prevent costly repairs down the line.
In conclusion, checking for leaks regularly is vital in preventing future problems with your plumbing system. By understanding the common causes of leaks and implementing prevention tips such as regular maintenance checks and careful use of chemicals, you can save money on repairs while ensuring that your home remains safe from water damage caused by leaking pipes or fixtures.
Replace Worn Parts
Another effective way to prevent future problems with your plumbing system is by replacing worn parts. Over time, fixtures and pipes can wear out due to constant use, which leads to leaks and other issues. Replacing these worn parts can extend the lifespan of your plumbing system and save you money on repairs in the long run.
Some of the common fixtures that require replacement include faucet handles, valves, and cartridges. These parts are prone to wear and tear, especially in areas with high mineral content in water. Additionally, pipes can also wear out due to corrosion or age. Replacing damaged or corroded pipes can prevent leaks from occurring and ensure that your plumbing system operates efficiently.
To determine which parts need replacement, it’s crucial to conduct routine inspections of your plumbing system. Look for any signs of wear or damage around fixtures such as faucets, showerheads, and valves. Inspect exposed pipes for signs of corrosion or rust that may indicate a need for replacement. By being proactive about replacing worn parts before they fail completely, you’ll save yourself from costly repairs and ensure that your plumbing system operates smoothly.
When To Call A Professional
Tips for Preventing Future Problems have been covered, and now it is time to address the signs that indicate when a professional plumber needs to be called. While replacing a shower valve cartridge can be done by an experienced DIY enthusiast, certain circumstances may require the expertise of a plumbing professional. If you are unsure of your abilities or encounter some issues during the process, it is best to seek help.
The cost of hiring a professional plumber can vary depending on several factors such as the complexity of the job, location, and experience level of the plumber. On average, expect to pay between $150 to $300 for labor costs alone. Additional costs may include parts and materials needed for the job. While this may seem expensive, it is important to weigh the cost against potential damages that could occur if done incorrectly.
In conclusion, if you notice any signs indicating a faulty shower valve such as low water pressure or inconsistent temperature regulation, do not hesitate to call a professional plumber. Attempting to fix the problem yourself may lead to further complications and potentially cost more in repairs down the line. Enjoy your newly replaced shower valve with confidence knowing it was installed correctly by a qualified plumbing expert.
Conclusion: Enjoy Your Newly Replaced Shower Valve
The shower valve cartridge replacement process may seem daunting, but with proper knowledge and techniques, it can be accomplished with ease. Like a well-oiled machine, your shower valve needs to function smoothly, and replacing the cartridge ensures that. The benefits of DIY plumbing tasks such as this go beyond just saving money; they provide a sense of accomplishment and self-sufficiency.
Proper maintenance is essential for ensuring your shower valve’s longevity. Neglecting regular check-ups or ignoring signs of wear and tear could lead to bigger problems down the line. Replacing the cartridge is just one step in maintaining your shower’s functionality. It is important to keep an eye out for leaks, rust, or any other damage that could affect the valve’s performance.
As a plumbing expert, I highly recommend taking care of your home’s plumbing systems to prevent costly repairs and replacements. By learning how to replace a shower valve cartridge, you take control of your home’s maintenance needs and save yourself from relying on outside help. With regular upkeep and proper technique, you can enjoy a fully functioning shower system for years to come.
Conclusion
Replacing a shower valve cartridge can seem like a daunting task, but with the right tools and knowledge, it is a manageable DIY project. Understanding your shower valve and identifying the type of cartridge needed are essential first steps. Gathering the necessary tools and turning off the water supply will ensure a smooth process.
Once you have removed the handle and trim, troubleshooting common issues may arise. It is important to follow proper procedures to prevent future problems. However, if you encounter any difficulties, it is always best to call a professional for assistance. By following these steps and taking preventative measures, you can enjoy your newly replaced shower valve for years to come.
In conclusion, replacing a shower valve cartridge requires careful attention to detail and safety precautions. While it may seem intimidating at first, with patience and persistence anyone can do it. Remember to troubleshoot common issues and take preventative measures for optimal functioning. And if all else fails or if you feel unsure about any aspect of the process, don’t hesitate to seek professional help. With these tips in mind, you can confidently replace your shower valve cartridge and enjoy an efficient plumbing system in your home or establishment.
Image Credits
- “2009_02_19” by Dennis S. Hurd (featured)

