Water heaters are a crucial component of any household, providing hot water for showers, cleaning, and other daily tasks. However, when they begin to leak, they can cause significant damage and disruption to the home. Troubleshooting a leaky water heater can be daunting for homeowners who lack plumbing expertise. This article aims to provide an in-depth guide on how to troubleshoot a leaky water heater, including identifying the source of the leak and determining whether it requires professional intervention.
As a plumbing technician with years of experience in repairing and maintaining water heaters, I understand the importance of having a functional and reliable water heating system. Leaks can occur due to various reasons such as corrosion or improper installation, causing potential hazards such as mold growth or electrical malfunctions. It is essential that homeowners are equipped with the necessary knowledge and tools to deal with these issues promptly and effectively. By following the steps outlined in this article, readers will be able to identify the cause of their leaky water heater and determine whether it is something they can fix themselves or if they need to seek professional help.
Understanding Your Water Heater
Water heaters are a crucial component of any household. They provide hot water for showers, washing dishes, and laundry. Proper water heater maintenance is essential to ensure that they function efficiently and safely. However, like any other appliance, water heaters can develop problems over time. One of the most common issues that homeowners face is a leaky water heater.
A leaky water heater can be caused by several factors, including a faulty valve or a damaged tank. It is essential to identify the source of the problem as soon as possible to prevent further damage and potential safety hazards. In some cases, a small leak may be a sign of a more significant issue that requires immediate attention from a professional plumber.
Water heater maintenance can help prevent leaks and other issues from occurring. Regular inspections should be performed to ensure that all components are functioning correctly. Homeowners should also drain their water heaters periodically to remove sediment buildup that can cause corrosion or reduce efficiency. By taking these steps, homeowners can extend the lifespan of their water heater and avoid costly repairs or replacements.
Identifying the source of the leak is the first step in troubleshooting a leaky water heater. This process involves examining all components of the unit to determine where the leak is coming from. Once identified, appropriate action can be taken to repair or replace the affected part(s). In the next section, we will discuss how to identify the source of a leaky water heater in more detail.
Identifying The Source Of The Leak
Understanding your water heater is crucial when troubleshooting leaks. Once you have identified that there is a leak, the next step is to identify the source of the leak. Common causes of leaks in water heaters include loose connections, damaged pipes or valves, and a corroded tank. It’s essential to determine the cause of the leak before attempting any DIY repairs.
Loose connections and damaged valves are relatively easy to repair with basic plumbing skills and tools. Tightening loose connections or replacing damaged valves can solve many problems. However, if the issue is due to a corroded tank, it’s best to call in a professional plumber as this requires specialized expertise and equipment. Attempting to fix a corroded tank without proper training can lead to more significant problems down the line.
DIY repair options for water heater leaks should only be attempted after identifying the source of the problem. If you have ruled out loose connections and faulty valves, checking the pressure relief valve would be an excellent place to start as this valve releases excess pressure from your hot water system. Checking this valve is simple; locate it on your unit (typically on top or near the side), verify that it isn’t clogged with debris or sediment buildup by lifting its lever slightly until some water flows out, then release it back into place. If these DIY options do not resolve your issue, seeking professional help may be necessary.
Moving forward from understanding your water heater and identifying common causes of leaks, we can now look into specific steps for troubleshooting issues further by checking the pressure relief valve.
Checking The Pressure Relief Valve
If you notice a leak coming from your water heater, it is crucial to troubleshoot the issue immediately. One of the potential culprits for a leaky water heater could be a faulty pressure relief valve. This component is responsible for regulating pressure inside the tank and preventing the buildup of too much heat or pressure that could cause damage to the unit.
To check if your pressure relief valve is causing the issue, start by adjusting the pressure. Turn off your water heater and close off the cold-water supply valve. Locate the pressure relief valve on top of your tank and open it to release any built-up air or steam. Use a wrench to adjust the nut on top of the valve, tightening it until you feel resistance and then loosening it half a turn.
After adjusting the pressure, it’s time to test whether your valve is functioning correctly. Place a bucket underneath the discharge pipe that connects to your pressure relief valve and lift up on its lever so that water flows out into the bucket. If water does not flow out or only trickles out, this may indicate that your valve is faulty and needs replacing. If water flows freely, then you can move onto inspecting your drain valve.
Inspecting The Drain Valve
To inspect the drain valve of a leaky water heater, start by turning off the power or gas supply and shutting off the cold-water inlet valve. Next, attach a garden hose to the drain valve and place the other end in a bucket or outside. Slowly open the valve and allow the water to drain out completely. Inspect the drained water for any signs of sediment buildup or debris.
Cleaning tips for a clogged drain valve include using a wire brush or compressed air to clear out any blockages. If cleaning does not solve the issue, consider replacing the valve entirely with a new one. When replacing, turn off all power sources and water supply before unscrewing and removing the old valve. Install the new valve by threading it into place tightly and ensuring there are no leaks.
Checking and maintaining your drain valve is crucial in preventing leaks in your water heater system. Once you have finished inspecting your drain valve, move on to checking the inlet and outlet connections for any signs of wear or damage that may need repair or replacement. Remember to always take safety precautions when working with water heaters and seek professional assistance if necessary.
Checking The Inlet And Outlet Connections
A water heater’s inlet and outlet connections are a crucial part of its operation. If they begin to leak, it can cause significant problems for your home. Checking these connections is an essential step in troubleshooting a leaky water heater.
First, inspect the connections for rust or corrosion. Over time, these components can deteriorate due to exposure to water and heat. If you notice any signs of rust or corrosion, it’s best to replace the affected parts immediately. This will prevent further damage to the surrounding areas and ensure that your water heater continues to operate correctly.
Secondly, check the gaskets on both the inlet and outlet connections. These rubber seals help prevent leaks by creating a tight seal between the pipes and fittings. If they become damaged or worn out, water can seep through causing leaks around the connections. Replacing gaskets is relatively simple and can be done with minimal tools or experience.
By checking both the inlet and outlet connections for rust and replacing worn-out gaskets, you can significantly reduce the likelihood of experiencing a leaky water heater. Following these steps ensures that your water heater operates efficiently while preserving its lifespan. The next section will cover inspecting the tank for corrosion, which is another critical aspect of troubleshooting a leaky water heater.
Inspecting The Tank For Corrosion
After checking the inlet and outlet connections, the next step is to inspect the tank for corrosion. Corrosion is one of the primary reasons why water heaters leak, so it’s crucial to conduct thorough inspections regularly. To inspect the tank for corrosion, you need to turn off the power supply and let the water heater cool down completely. Once cooled, drain out all of the water from the tank and examine its interior for any signs of rust or damage.
There are several techniques you can use when inspecting a water heater tank for corrosion. First, use a flashlight to illuminate its interior and look for any visible signs of rust or discoloration on the walls or bottom of the tank. You can also tap on different parts of the tank with a screwdriver or other tool to check if there are any soft spots that could indicate corrosion damage.
Preventing corrosion in your water heater is essential to ensure its longevity. One way to prevent corrosion is by installing an anode rod in your water heater tank. An anode rod attracts corrosive elements in your water supply, which prevents them from attacking your tank’s walls and causing damage. Regularly flushing out your water heater can also help prevent sediment buildup that contributes to corrosion.
Transition: Once you’ve inspected your water heater tank for corrosion, another crucial step is checking the heating element.
Checking The Heating Element
Is your water heater still leaking after checking the temperature and pressure relief valve? It’s possible that a faulty heating element is causing the problem. To check if this is the case, you will need to test for continuity.
Testing continuity involves disconnecting power to the water heater and using a multimeter to test for electrical flow through the heating element. Before testing, refer to your manufacturer’s manual for specific instructions on how to disconnect power and access the element. Once you have access, set your multimeter to the ohms setting and touch one probe to each terminal of the heating element. If there is no reading or an infinite reading, this indicates that there is a break in continuity and that the element needs replacement.
If testing continuity reveals that your heating element needs replacing, it’s important to purchase the correct replacement part for your specific model of water heater. The table below shows some common types of heating elements and their corresponding specifications:
| Type of Heating Element | Wattage | Voltage | Length (inches) |
|---|---|---|---|
| Screw-in | 1500 | 120 | 7 1/2 |
| Screw-in | 4500 | 240 | 13 1/2 |
| Flat | 5500 | 240 | N/A |
Replacing a heating element can be a complex process that requires specialized tools and knowledge. If you’re not comfortable with doing it yourself, it’s best to call in a professional plumber or technician to ensure proper installation.
Inspecting The Anode Rod
After checking the heating element, it’s time to inspect the anode rod. The anode rod is a crucial component of your water heater that prevents rust and corrosion from forming inside the tank. Over time, the rod will deteriorate and need to be replaced. It’s important to replace the anode rod regularly to extend the life of your water heater and prevent leaks.
To inspect the anode rod, first turn off the power or gas supply to the water heater. Locate the anode rod on top of the tank and remove it using a socket wrench or ratchet. If you notice that more than six inches of the core steel wire is exposed, it’s time to replace the anode rod. Look for any signs of damage such as heavy corrosion or pitting on the surface of the rod.
Anode Rod Maintenance Tips:
- Check your anode rod at least once a year.
- Replace your anode rod every 3-5 years depending on usage.
- Consider upgrading to a powered or electronic anode for longer lasting protection.
Next, we’ll discuss how to replace a pressure relief valve if necessary.
Replacing The Pressure Relief Valve
Is your water heater leaking from the pressure relief valve? This could be due to a buildup of sediment or mineral deposits. Before replacing the valve, try performing some maintenance on it. This simple DIY repair can save you time and money in the long run.
To perform pressure relief valve maintenance, first turn off the power supply and cold water inlet to your water heater. Then, locate the valve and remove any debris around it. Next, lift up on the lever to relieve any pressure that may have built up inside. If water continues to leak after doing this, you may need to replace the valve entirely.
Here is a table outlining some common issues with pressure relief valves and their possible solutions:
| Issue | Possible Solution |
|---|---|
| Valve leaks constantly | Replace valve |
| Valve drips periodically | Check for buildup or debris around valve |
| Valve doesn’t release pressure when lifted | Replace valve |
Next, we will discuss how to replace your drain valve.
Replacing The Drain Valve
After replacing the pressure relief valve, it’s time to move on to another potential source of water heater leaks: the drain valve. This component is located near the bottom of the tank and is used for draining the hot water and flushing out sediment buildup. Over time, it can become loose or corroded, leading to leaks that can cause damage to your home.
To troubleshoot a leaky drain valve, start by inspecting it for visible signs of damage or corrosion. If you notice any issues, such as cracks or rusted areas, it’s best to replace the valve entirely. However, if there are no visible problems, you may be able to tighten the valve with a wrench to stop the leak.
If you decide to replace the drain valve yourself, there are a few DIY tips to keep in mind. First, make sure you have all necessary tools on hand before getting started. You’ll likely need a wrench, pipe tape, and potentially a hacksaw if you need to shorten the new valve stem. Additionally, be sure to shut off power to your water heater and turn off the water supply before beginning any work. With these precautions in place, you can safely remove and replace your old drain valve with minimal hassle.
With proper drain valve maintenance and DIY replacement tips in mind, you can effectively troubleshoot leaks from this component of your hot water system. However, if you’re still experiencing issues after attempting these solutions or are uncomfortable with performing repairs yourself, it’s always best to consult a plumbing technician for further assistance. Next up in our guide is tightening the inlet and outlet connections for additional peace of mind when it comes to preventing leaks from your water heater.
Tightening The Inlet And Outlet Connections
According to the US Environmental Protection Agency, a leaky water heater can waste up to 3,000 gallons of water annually. This is not only wasteful but also costly as it adds up to your monthly utility bills. As a plumbing technician, it’s essential to check for leaks in your water heater regularly. Tightening the inlet and outlet connections is one of the ways to fix leaky pipes.
Before tightening the inlet and outlet connections, it’s crucial to check for leaks first. Turn on the hot water tap and observe if there are any visible leaks or drips around the connections. If you notice any leaks, turn off the power supply and close the inlet valve before proceeding with tightening. Once you’re sure there are no leaks, use pliers or wrenches to tighten both connections. It’s important not to over-tighten as this may cause damage, but ensure they’re tight enough to prevent any leakage.
Using sealant for tight connections is also an effective way of preventing future leaks. Apply Teflon tape or pipe dope on both ends of each connection before tightening them. The sealant will fill any gaps between the threads, ensuring that no water escapes through them. Make sure not to apply too much sealant as this may lead to blockages in your pipes or damage your water heater.
Now that you’ve tightened all connections and checked for leaks let’s move on to flushing the tank. This step will help remove sediments that accumulate at the bottom of your tank over time, leading to corrosion and reduced efficiency. Flushing your tank can improve its lifespan while ensuring optimal performance, which we’ll discuss in detail in the next section.
Flushing The Tank
Flushing your water heater tank is an essential maintenance task that should be carried out periodically. Benefits of flushing include extending the life of your water heater and reducing the risk of leaks. It also helps to remove sediment that builds up at the bottom of the tank, which can cause clogs and reduce efficiency.
To flush your water heater, you will need to follow some simple steps. First, turn off power or gas supply to the unit, then turn off the cold water supply valve. Next, attach a hose to the drain valve on the tank and run it outside or into a bucket. Open the valve and let all of the water drain out completely. Afterward, turn on the cold water supply valve for a few minutes to help clear out any remaining sediment.
Common mistakes to avoid when flushing your tank include not turning off power or gas supply before starting, not letting enough time for all of the water to drain out completely, and not opening both hot and cold valves when draining. Failing to follow these steps can lead to damage to your tank or injury.
Next section topic: Calling a Professional Plumber
Calling A Professional Plumber
When faced with a leaky water heater, the first instinct of many homeowners is to attempt to fix it themselves. While this can be a viable solution in some cases, it’s important to weigh the cost of hiring a professional plumber against the potential risks and expenses of attempting a DIY repair. Depending on the extent of the damage and your level of expertise, you could end up causing further damage to your water heater or even injuring yourself.
If you do decide to call in a professional plumber, it’s important to keep in mind that there will be costs associated with this service. The exact cost will depend on a variety of factors, such as the severity of the leak and the time required for repairs. However, most plumbers charge an hourly rate plus any necessary materials, so you can expect to pay several hundred dollars for their services.
For those who are looking for more cost-effective alternatives, there are some DIY solutions that may work depending on your situation. For example, if the leak is coming from a valve or pipe joint rather than from within the tank itself, tightening or replacing these components may solve the problem without requiring professional help. However, it’s important to be cautious when attempting any type of repair yourself and to consult with an expert if you’re unsure about how to proceed.
Preventative maintenance tips can help you avoid costly repairs down the line.
Preventative Maintenance Tips
Regular maintenance is essential to keep your water heater functioning optimally. It can help prevent leaks and ensure that it lasts for a long time. Checking the pressure relief valve regularly is one of the most important preventative maintenance tasks you can perform. This valve is responsible for regulating pressure inside the tank and preventing it from becoming too high, which could cause leaks or damage to the unit.
Common causes of water heater leaks include corrosion, sediment buildup, and loose connections. Corrosion occurs when minerals in the water react with the metal tank, causing damage over time. Sediment buildup can also lead to leaks if not removed regularly, as it can create pockets of water that become trapped between layers of sediment and corrode the tank from within. Loose connections are another common culprit, as they allow water to escape through small gaps in fittings or pipes.
By understanding the importance of regular maintenance and knowing what causes water heater leaks, you can take steps to prevent them from happening in your home. By making sure that your pressure relief valve is working properly, removing sediment buildup periodically and tightening any loose connections, you can keep your water heater leak-free for years to come.
Transition: Now that we have discussed the importance of preventative maintenance and common causes of water heater leaks, let’s move on to some final tips for keeping your water heater in excellent condition.
Conclusion: Keeping Your Water Heater Leak-Free
To keep your water heater leak-free, it is essential to take preventive measures. One way of preventing leaks is by regularly checking the temperature and pressure relief valve. This important safety feature helps regulate the pressure inside the tank and prevents potential accidents from occurring. You should also ensure that the drain valve is free from debris and sediment buildup, which can cause leaks.
Another crucial factor in maintaining a leak-free water heater is regular maintenance. This involves flushing out the tank at least once a year to remove any sediment buildup that could lead to corrosion and eventually cause leaks. Additionally, you should inspect all parts of the unit for signs of wear or damage, including the anode rod, heating element, and thermostat.
In conclusion, taking proactive steps towards preventing water heater leaks can save you time, money, and frustration in the long run. By following these tips and ensuring that your unit receives regular maintenance by a professional plumber, you can avoid costly repairs or replacements down the line. Don’t wait until it’s too late! Schedule routine maintenance today to keep your water heater in good working order for years to come.
Conclusion
As a plumbing technician, understanding your water heater and the potential sources of leaks is essential in troubleshooting any issues. Identifying the source of the leak is the first step, which may include checking the pressure relief valve, inspecting the drain valve, or examining inlet and outlet connections. Flushing the tank may also help alleviate any buildup that may be causing the leak.
If these steps do not solve the problem, it may be time to call a professional plumber who can assess and repair any underlying issues. Preventative maintenance such as regular flushing and inspections can help keep your water heater leak-free.
In conclusion, a leaky water heater can be a frustrating issue for homeowners. By understanding how to identify and troubleshoot potential sources of leaks and performing preventative maintenance regularly, you can keep your system running smoothly. Remember, as with any plumbing issue, sometimes it’s best to leave it to the professionals – like a doctor diagnosing an ailment or a detective solving a case- they have both experience and expertise that can save you time and money in the long run.
Image Credits
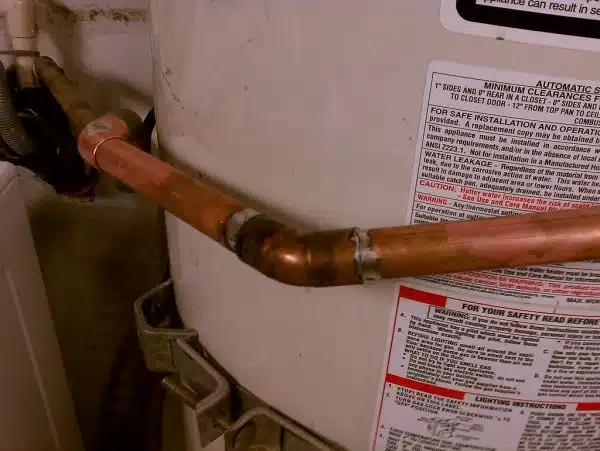
- “Replacing leaky TPR valve on water heater. More copper soldering.” by slworking2 (featured)







![How To Replace A Bathtub Drain In A Mobile Home 24 2/365 [Bathtub Drain]](https://green-life.blog/wp-content/uploads/2023/05/3ft8KAJsNnjq-150x150.jpg.webp)

