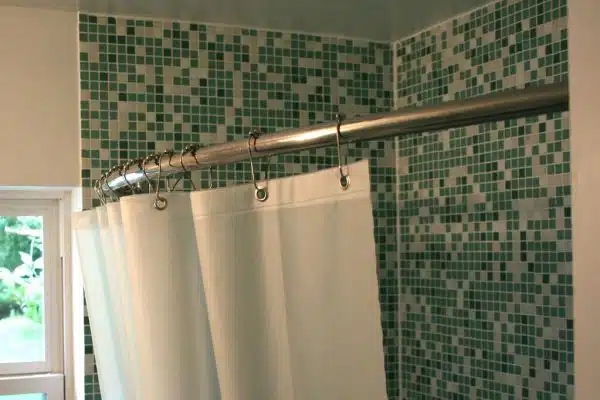
For anyone looking to upgrade their bathroom, installing a curved shower rod can be an easy and affordable way to add both functionality and style. With the ability to create extra space in your shower area, a curved shower rod can make a big difference in your daily routine. But for those who are not experienced with home improvement projects, installing a curved shower rod may seem like a daunting task. Fortunately, with the right tools and techniques, it is possible to install one of these rods with relative ease.
This article will provide step-by-step instructions on how to install a curved shower rod in your bathroom. From gathering the necessary tools to measuring and mounting the rod, we will guide you through each stage of the process. By following these instructions carefully, you can ensure that your new curved shower rod is securely installed and ready for use in no time. Whether you are a seasoned DIY enthusiast or someone who has never attempted a home improvement project before, this guide will help you achieve professional-looking results without breaking the bank.
Assessing Your Bathroom For Compatibility
When it comes to installing a curved shower rod, assessing your bathroom’s compatibility is crucial. Before purchasing any hardware, it’s important to take into account the size of your shower and the necessary length of the rod. A curved shower rod can add valuable inches to your shower space, providing more room for movement and reducing the likelihood of bumping into the walls or shower curtain.
In addition to measuring the shower size and determining the appropriate rod length, you’ll also need to consider the wall material and anchor type. If your walls are made of tile or other hard materials, you may need special anchors or tools to securely install the rod without causing damage. On the other hand, if your walls are made of drywall or another soft material, you may be able to use standard anchors or screws.
By taking these factors into account before beginning installation, you can ensure that you choose a compatible curved shower rod that will not only fit in your bathroom but also provide long-lasting support and durability. In the following section, we’ll discuss how to choose the right curved shower rod based on your specific needs and preferences.
Choosing The Right Curved Shower Rod
When it comes to upgrading your bathroom, one overlooked feature is the curved shower rod. It may seem like a small detail, but replacing a standard straight rod with a curved one can make a big difference in how your shower looks and feels. The main benefit of a curved shower rod is that it creates more space in the shower, making it feel larger and more comfortable.
Another advantage of using a curved shower rod is that it provides additional support for your curtains or liner. A straight rod can often cause the curtain to bunch up or get stuck, which can be frustrating when you’re trying to take a relaxing shower. With a curved rod, the curtain has more room to move freely, reducing the likelihood of it getting caught on anything.
Maintenance is an important consideration when choosing any bathroom fixture, including your shower rod. Luckily, most modern curved rods are made from durable materials that require little upkeep. However, if you want to keep your rod looking its best over time, it’s important to clean it regularly with mild soap and warm water. Avoid using abrasive cleaners or harsh chemicals that could damage the finish of the rod.
When it comes to installing a curved shower rod, gathering the necessary tools and materials is an essential first step. With just a few simple tools and some basic knowledge of plumbing and carpentry, you can have your new curved shower rod up and running in no time. So let’s get started!
Gathering The Necessary Tools And Materials
After choosing the right curved shower rod, it’s time to gather the necessary tools and materials for installation. Tool selection is crucial in ensuring a successful installation process. You will need a power drill, level, measuring tape, screwdriver, pencil, and safety goggles.
Before starting the installation process, material preparation is also essential. The first step is to read the manufacturer’s instructions carefully. This will give you an idea of what materials are needed for your specific curved shower rod. Typically, manufacturers provide screws or mounting hardware with the product. However, if they are not included, make sure to purchase screws that match the size and weight capacity of your rod.
Once you’ve gathered all necessary tools and materials, you can proceed with installing your curved shower rod. But before doing so, if applicable, you must remove the existing shower rod first. This may require unscrewing or unclipping it from its brackets or wall mounts. After removing it completely, make sure to clean any residue or debris left behind before proceeding with installing your new curved shower rod.
Removing The Existing Shower Rod (If Applicable)
Assessing compatibility is an essential step before removing the existing shower rod. Ensure that the curved shower rod you intend to install is compatible with your bathroom’s dimensions. Before taking any steps, measure the length of your bathtub or shower area and compare it to the length of the new shower rod. Additionally, make sure that your current setup can accommodate a curved shower rod. Some bathrooms may have limited space, making it difficult to install a curved shower rod.
Proper removal techniques are crucial when removing the existing shower rod. Begin by loosening any screws or brackets holding the old shower rod in place. Then, gently pull on the old shower rod until it comes loose from its attachments. If necessary, use pliers to remove any stubborn screws or brackets that refuse to budge. Be careful not to damage any tiles or walls while removing the old shower rod.
Once you have removed the existing shower rod, inspect the area for any potential damage caused during removal. Check if there are any holes left behind by screws or brackets that need patching up before installing a new curved shower rod. Assessing compatibility and properly removing your old shower rod will ensure that you start your installation process on a solid foundation without encountering significant issues later on down the line when measuring for length and placement of your new curved shower rode section topic.
Measuring The Length And Placement Of The New Rod
To install a curved shower rod, you need to measure the length and placement of the new rod. This step is crucial as it ensures that the rod fits perfectly in your shower space. There are different measuring techniques that you can use depending on the type of curved shower rod you have.
When measuring for a curved shower rod, there are several factors to consider, such as the length of the existing straight rod and the distance between the wall and the outer edge of your bathtub or shower. Rod length considerations also depend on whether you want a tight or loose fit. A tight fit is ideal if you want to prevent water from escaping while a loose fit allows for easier installation.
To measure for your new curved shower rod, start by measuring the length of your existing straight rod. Then, add an extra two inches on each side to accommodate for the curve of the new rod. Next, measure from the wall to where you want to place your curve and add another two inches on each side. These measurements will ensure that your new rod fits perfectly in your bathroom.
Now that you know how to measure your curved shower rod’s length and placement, it’s time to move onto marking the mounting locations. This next step is equally important as it ensures that your new curved shower rod stays in place once installed without any issues.
Marking The Mounting Locations
Once you have measured the length and placement of your new curved shower rod, it’s time to mark the mounting locations. Before you start, make sure to find studs in the wall where you plan on mounting the rod. This is important for ensuring that your shower rod stays secure and doesn’t come loose over time. To find studs, use a stud finder or knock on the wall until you hear a solid sound instead of a hollow one.
Once you have found the studs, use a level to ensure that your rod will be installed straight. This is an important step as a crooked rod can throw off the entire look of your bathroom. You may need to adjust your markings slightly to ensure that everything is level before proceeding.
Different types of mounting hardware can be used for installing curved shower rods, including tension mounts or brackets with screws. If you are using brackets with screws, you will need to drill holes for anchors (if needed) before attaching the brackets to the wall. Make sure to follow any manufacturer instructions carefully and use appropriate tools when drilling into walls.
Transition: Now that you have marked your mounting locations and found studs in the wall, it’s time to move onto drilling holes for anchors (if needed).
Drilling Holes For Anchors (If Needed)
Once you have measured and marked where the holes for the shower rod will be drilled, it is important to ensure anchoring safety. Anchors are used to provide additional support for the shower rod, but they require drilling into the wall. Before drilling into your walls, make sure you know what type of wall you have and whether it can support anchors.
If your walls cannot support anchors or if you do not want to drill into your walls, there are anchor alternatives available. Some curved shower rods come with tension-mounts that rely on tension between two opposing surfaces to stay in place. These mounts are easy to install and adjust, but may not provide as much stability as anchored rods.
However, if you choose to use anchors, follow these tips for anchoring safety:
- Use a stud finder to locate studs in the wall
- Choose an appropriate drill bit size for the anchor
- Hold the drill level and perpendicular to the wall when drilling
- Insert the anchor until it is flush with the wall
- Do not over-tighten screws into the anchors
Now that you know how to safely use anchors, it’s time to move on to installing them.
Installing The Wall Anchors
With the holes drilled into the wall, it’s time to move onto installing the anchors. The type of anchor you use will depend on a few factors, including the weight of the shower rod and the type of wall material. There are several types of anchors available, such as toggle bolts, expansion bolts, and plastic anchors. Each anchor has its own advantages and disadvantages, so it’s important to choose one that suits your particular needs.
Once you’ve chosen your anchor, it’s important to follow proper installation techniques to ensure a secure hold. Start by inserting the anchor into the hole in the wall and tapping it gently with a hammer until it sits flush with the surface. Then, using a screwdriver or drill (depending on the type of anchor), insert the screw into the center of the anchor and tighten until snug. Be careful not to overtighten, as this can cause damage to both the anchor and your wall.
With your anchors securely in place, you’re now ready to mount your curved shower rod. This is often a two-person job, so grab a friend or family member to help you out. Simply slide one end of the rod into one of your mounting brackets and then do the same for the other end. Once both ends are securely in their respective brackets, adjust them as needed so that they are level and at your desired height. Congratulations – you’ve successfully installed a curved shower rod!
Mounting The Curved Shower Rod
Rod compatibility is an important consideration when mounting a curved shower rod. It is essential to ensure that the rod you have chosen is compatible with the wall structure and the type of surface on which it will be mounted. For example, if you have a drywall surface, it may be necessary to use anchors to secure the rod.
Mounting techniques for a curved shower rod can vary depending on the design of the product. Some rods require tension mounting, while others may need to be screwed into place. Tension-mounted rods are easier to install as they do not require any drilling or hardware installation. However, they may not provide adequate stability and could potentially fall down if not installed correctly.
When mounting a curved shower rod, it is important to follow the manufacturer’s instructions carefully. This will help ensure that the rod is installed securely and will not come loose over time. Additionally, using proper tools such as a level and drill can help make the installation process smoother and more efficient. In the next section, we will discuss how to secure the rod with screws and finish off your new curved shower rod installation in no time!
Securing The Rod With Screws
After mounting the curved shower rod, the next step is to secure it with screws. This will ensure that the rod stays in place and does not move around when you are using it. The process of securing the rod with screws is relatively straightforward and requires only a few tools.
Before securing the rod, you may want to consider alternative installation methods such as adhesive options. While screws are the most secure option, adhesive can be a good choice if you do not want to drill into your walls or if you have tile walls that are difficult to drill through. However, keep in mind that adhesive may not be as durable as screws and may need to be replaced more frequently.
When installing the shower rod, potential issues may arise such as difficulty aligning the screw holes or gaps between the wall and the end caps. To troubleshoot these issues, make sure your measurements are accurate and use a level to ensure that everything is straight. If there are gaps between the wall and end caps, try adjusting their position or using small shims behind them to fill in any spaces. With these tips in mind, attaching the end caps is a simple final step in completing your curved shower rod installation.
Attaching The End Caps
To complete the installation of your curved shower rod, you will need to attach the end caps. This step is crucial as it ensures that the rod stays securely in place and prevents any damage to your bathroom walls. There are various types of end caps available in the market that can be used for different types of rods.
Selecting end caps is an important decision as it can affect the overall look and feel of your shower area. You may want to choose end caps that match the finish of your rod or ones that complement your bathroom decor. Additionally, you can customize end caps by adding decorative elements or painting them with a color that suits your preference.
Once you have selected and customized your end caps, it’s time to attach them. Make sure to follow the manufacturer’s instructions carefully and use the appropriate tools for installation. After attaching both end caps, gently test the stability of the rod by pulling on it from different angles. If there is any wobbling or movement, adjust the placement of the end caps until you achieve a secure fit. With this step complete, you can now enjoy a stylish and sturdy curved shower rod in your bathroom!
Testing The Stability Of The Rod
After installing a curved shower rod, it is crucial to test its stability, ensuring that it can hold the weight of your shower curtains. A sturdy and reliable rod will prevent any potential accidents or mishaps from occurring while you are taking a shower. To test the stability of your newly installed curved shower rod, follow these simple steps.
Firstly, hang a few towels on the rod and push them gently to see if the rod moves or sways. If you notice any movement, try adjusting the brackets that anchor the rod to the wall until they are tightly secured. Secondly, give the rod a gentle shake with your hand to check if it wobbles. If there is any wobbling movement, it may indicate that the weight capacity of your curved shower rod has been exceeded.
To ensure optimal safety and longevity of your curved shower rod, here are some tips to keep in mind:
- Do not exceed the weight capacity limit recommended by the manufacturer.
- Avoid hanging heavy items such as wet towels or multiple curtains on one side of the rod.
- Regularly check for any signs of wear and tear on both ends of the curved shower rod.
- Tighten all screws and brackets periodically to maintain stability.
Ensuring proper rod stability is essential for creating a safe and secure environment inside your bathroom while also prolonging the life expectancy of your curved shower rod. With these simple testing techniques and maintenance tips, you can have peace of mind knowing that your new addition will remain steadfast for many showers to come.
As you have now successfully tested for stability, it’s time to adjust your curved shower rod height according to your preference.
Adjusting The Rod To Desired Height
As you stand in front of your shower, envision the type of experience you seek. Do you want a rod that is high or low? The height at which you adjust the curved shower rod is solely dependent on your preference. First, take measurements from both ends of the wall where the rod will be installed to ensure that it is level and at an equal distance from each end.
Once you have measured and marked your desired height, position the first mounting bracket against the wall and drill into place using a power drill. Be sure to use screws that are appropriate for the type of wall material you are working with. Once one side is secured, repeat this process with the other mounting bracket.
After ensuring that both brackets are correctly positioned and leveled, slide the curved shower rod into place. Check once again to be sure that both ends are evenly aligned before tightening any screws or bolts needed to secure it in place. Adjusting height may require some trial and error, but with patience and attention to detail, your new curved shower rod will provide an excellent bathing experience.
With your new curved shower rod installed at your desired height, it’s time to hang your shower curtain! The positioning of the curtain rings is essential as they need to be evenly spaced along the length of the rod for smooth operation. Before hanging your curtain, make sure that all hooks or rings are present and securely attached so that they do not fall off during use. With everything in order, it’s time to enjoy a relaxing shower in style!
Hanging Your Shower Curtain
Once your curved shower rod is installed, it’s time to hang your shower curtain. This is where you can really let your personal style shine through. With so many shower curtain designs available, you’re sure to find one that complements your bathroom décor perfectly.
Before hanging your shower curtain, be sure to give it a good cleaning first. Even new curtains can have dust or debris on them from being packaged and shipped. Follow the care instructions on the label to ensure proper cleaning and maintenance of your shower curtain.
To hang your shower curtain on a curved rod, simply slide the rings onto the rod and evenly distribute them across the length of the rod. Make sure there are no gaps between the rings, as this can cause water to leak out of the shower. Finally, adjust the tension of the rod if needed to ensure a secure fit.
- When choosing a shower curtain design, consider colors and patterns that complement your bathroom décor.
- For an extra layer of protection against mold and mildew, look for a shower curtain with antimicrobial properties.
- If you prefer a more eco-friendly option, choose a fabric shower curtain made from sustainable materials.
- To keep your shower curtain looking fresh and clean, wash it regularly according to manufacturer’s instructions.
- For added convenience, choose a double-sided or reversible shower curtain that can be flipped over for extended use before needing to be washed.
Now that you’ve hung up your fresh and clean shower curtain on your newly installed curved rod, it’s time to step back and admire how much better it looks than before. Not only does a clean and stylish shower curtain add aesthetic appeal to your bathroom but it also serves as an important barrier against water escaping from the shower. Enjoy using your newly installed curved shower rod with confidence knowing that you’ve taken all necessary steps to ensure its functionality.
Enjoying Your Newly Installed Curved Shower Rod
Now that you have successfully installed your curved shower rod, it is time to enjoy the benefits of this upgrade. A curved shower rod provides more space in the shower, allowing for a more comfortable and enjoyable experience. You can now stretch out your arms without touching the curtain and have more room to move around.
To make the most out of your newly installed curved shower rod, here are some cleaning tips. To prevent soap scum buildup, wipe down the rod with a clean cloth after each use. For tough stains, use a mixture of vinegar and water to clean the surface. Additionally, avoid using abrasive cleaners or tools that may scratch or damage the rod’s finish.
Proper maintenance is also crucial in ensuring that your curved shower rod lasts longer. Check for any loose screws or hardware periodically and tighten them as needed. If you notice any rust or corrosion on the rod, remove it immediately using a rust remover solution. By following these simple steps, you can keep your new curved shower rod looking great for years to come.
| Advantages | Cleaning Tips |
|---|---|
| More space | Wipe down after each use |
| Comfortable experience | Use vinegar and water for tough stains |
| Room to move around | Avoid abrasive cleaners or tools |
| Prevents curtain from sticking to body |
With these tips in mind, you can now enjoy your newly installed curved shower rod with confidence. Not only does it provide more space and comfort, but with proper maintenance and cleaning practices, it can last for many years to come. Happy showering!
Conclusion
In conclusion, installing a curved shower rod can be a simple and affordable way to add both style and functionality to your bathroom. By assessing compatibility, choosing the right rod, gathering necessary tools, removing the existing rod (if applicable), measuring and testing for stability and adjusting the height, you can have a successful installation.
With the right tools and a bit of patience, installing a curved shower rod is as easy as pie. Just like how adding whipped cream to a freshly baked pie makes it more enjoyable, adding a curved shower rod can make your bathroom feel more spacious and inviting. So why not take the next step in home improvement and upgrade your bathroom with a stylish new shower rod today?
Image Credits
- “curved shower rod” by splityarn (featured)

