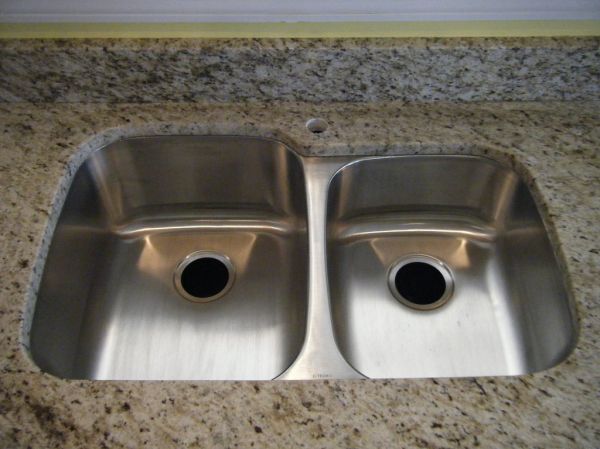
Stainless steel sinks are an essential part of any kitchen, but they can easily become dull and stained if not properly cleaned. As a cleaning expert, I understand that maintaining a sparkling and hygienic stainless steel sink is crucial for both aesthetics and functionality. In this article, I will provide you with step-by-step instructions on how to clean a stainless steel sink effectively.
Firstly, it is important to understand the characteristics of stainless steel. Although it is resistant to corrosion and staining, it can still be damaged by harsh chemicals or abrasive materials. Therefore, it is essential to use non-abrasive cleaners that are specifically designed for stainless steel surfaces. Additionally, regular cleaning is necessary to prevent any buildup of dirt or grime that may cause discoloration or damage over time. With the proper tools and techniques, you can keep your stainless steel sink looking brand new for years to come.
Understanding Stainless Steel Characteristics
Stainless steel is a popular material for kitchen sinks due to its durability, sleek appearance, and resistance to corrosion. However, despite its resilience, stainless steel requires proper maintenance to maintain its optimal condition. Regular cleaning is necessary to prevent the accumulation of dirt and grime that can lead to corrosion and discoloration.
One important characteristic of stainless steel is its sensitivity to abrasive materials that can scratch or damage the surface. Therefore, it is essential to use gentle cleaning agents that do not contain harsh chemicals or abrasive particles when cleaning stainless steel sinks. Acidic or alkaline cleaners should be avoided as they can cause discoloration or corrosion.
In addition to using gentle cleaners, it is crucial to protect your stainless steel sink from exposure to corrosive substances such as salt water, bleach, or chlorine. If these substances come into contact with your sink’s surface, rinse it thoroughly with water immediately. By understanding the characteristics of stainless steel and taking appropriate measures in maintaining its condition, you can enjoy a beautiful and functional sink for years to come.
When it comes time for cleaning your stainless steel sink, gathering necessary cleaning tools becomes imperative.
Gathering Necessary Cleaning Tools
Gathering the necessary supplies for cleaning a stainless steel sink is critical for achieving the desired results. Products such as sponges, cloths, and scrub brushes should be selected based on the severity of the stain and the surface of the sink. Cleaning agents such as soaps, detergents, and bleach should be chosen with consideration for their effectiveness, safety, and environmental impact. Specialized cleaners for stainless steel may be beneficial for achieving the desired results.
Gathering Supplies
To properly clean a stainless steel sink, it is important to gather the necessary supplies. Choosing an appropriate cleaner is the first step in this process. Avoid using abrasive cleaners, which can damage the sink’s finish, and opt for a non-abrasive cleaner instead. Look for a cleaner specifically designed for stainless steel sinks to ensure that it will effectively remove stains and leave the sink looking clean and shiny.
Another important consideration when gathering supplies is protecting the sink’s finish. While stainless steel sinks are durable, they can still be susceptible to scratches and other damage if not treated carefully. To protect the sink’s finish, consider using a soft sponge or cloth when cleaning, rather than harsh scrubbing tools like steel wool or scouring pads. Additionally, be sure to rinse the sink thoroughly after cleaning to remove any leftover residue from the cleaner.
In summary, gathering supplies is a crucial part of properly cleaning a stainless steel sink. By choosing an appropriate cleaner and taking steps to protect the sink’s finish during cleaning, you can help keep your sink looking its best for years to come. Remember to always read product labels carefully and follow manufacturer instructions for best results.
Choosing Cleaning Products
When it comes to cleaning a stainless steel sink, gathering the necessary tools and supplies is essential. One of the most important factors to consider is choosing the right cleaner for the job. While there are many options on the market, it’s important to select a cleaner specifically designed for stainless steel sinks. Green cleaning solutions or DIY solutions can also be effective for those who prefer a more natural approach.
When selecting a cleaner, it’s important to avoid abrasive products that can scratch or damage the sink’s finish. Instead, opt for non-abrasive cleaners that are gentle enough not to harm the metal surface. Additionally, consider using a soft sponge or cloth instead of rough scrubbing tools like steel wool or scouring pads. This will help protect your sink’s finish and ensure that it stays looking its best.
In conclusion, choosing the right cleaning products is an important part of properly cleaning a stainless steel sink. Whether you opt for commercial cleaners or DIY solutions, be sure to choose products that are safe for use on stainless steel and won’t damage your sink’s finish. With proper care and attention, your stainless steel sink will stay clean and shiny for years to come.
Preparing The Sink For Cleaning
After gathering the necessary cleaning tools, it is now time to prepare the sink for cleaning. Before starting the cleaning process, wear protective gloves to avoid any injuries or skin irritation. This simple step can prevent accidents and ensure a safe cleaning experience.
After wearing gloves, seal the sink for extra protection. Cover the drain with a stopper or tape to prevent any water from entering the pipes. Then, apply petroleum jelly or olive oil on the sink’s surface to create an extra layer of protection against harsh chemicals and scratches.
Once the sink is properly sealed and protected, it’s time to start cleaning. Begin by applying a non-abrasive cleaner on a soft cloth or sponge. In the next section, we will discuss how to apply this cleaner effectively for optimal results.
Applying A Non-Abrasive Cleaner
When it comes to cleaning stainless steel sinks, choosing the appropriate cleaner is crucial. Certain cleaners can be too abrasive and cause damage to the surface of your sink. It’s important to avoid damaging products such as bleach, ammonia, and scouring powders. Instead, opt for a non-abrasive cleaner that is specifically designed for stainless steel.
There are many non-abrasive cleaners on the market that work well for cleaning stainless steel sinks. Some popular options include baking soda, vinegar, and dish soap. When choosing a cleaner, make sure to read the label carefully to ensure that it is safe for use on stainless steel. It’s also important to follow the manufacturer’s instructions for application and use.
To apply the cleaner, start by dampening a soft cloth or sponge with water. Then add a small amount of your chosen non-abrasive cleaner to the cloth or sponge and gently rub it onto the surface of your sink in circular motions. Be careful not to apply too much pressure or scrub too vigorously as this can cause scratches on your sink’s surface. Once you have finished applying the cleaner, rinse your sink thoroughly with warm water and dry it with a clean towel.
Transition: Now that you have applied a non-abrasive cleaner to your stainless steel sink, it’s time to move onto the next step: scrubbing with a soft cloth.
Scrubbing With A Soft Cloth
Moving on to the next step, it’s time to scrub your stainless steel sink with a soft cloth. But before doing that, let me tell you about the benefits of vinegar. Vinegar is an excellent natural cleaner that can help remove water spots and stains from your sink. It’s also safe to use on stainless steel surfaces and won’t damage the material.
Now, let’s talk about the best scrubbing techniques for your sink. For starters, make sure you’re using a non-abrasive cleaner. Then, take a soft cloth and dip it in hot water mixed with a few drops of dish soap. Use this soapy cloth to gently scrub the surface of your sink in circular motions. Don’t apply too much pressure as it may leave scratches on the surface.
Incorporating these techniques will help you achieve a sparkling clean sink that looks as good as new. However, if you’re dealing with tough stains or stubborn grime, don’t fret! In the next section, we’ll discuss how to remove those tough stains with baking soda and other cleaning agents. So keep reading to learn more about effective cleaning methods!
Removing Tough Stains With Baking Soda
Removing Tough Stains with Baking Soda:
When it comes to stainless steel sinks, they are known for their durability and resistance to rust and stains. However, tough stains can still occur due to constant use or neglect. One of the best solutions for removing stubborn stains from your stainless steel sink is baking soda. Baking soda is a natural and safe way to clean most household surfaces including stainless steel.
To remove tough stains from your stainless steel sink using baking soda, first apply a generous amount of baking soda onto the affected area. Then, using a damp cloth or sponge, rub the baking soda into the stain in circular motions. Let it sit for a few minutes before rinsing it off with warm water. For extra shine after cleaning, you can use vinegar by pouring it onto a cloth or sponge and wiping down the sink.
It is important to avoid using harsh chemicals on your stainless steel sink as they can cause damage and scratches. Baking soda provides an effective alternative that won’t harm your sink’s surface while also being eco-friendly and affordable. By following these simple steps, you can keep your stainless steel sink looking shiny and new for years to come. In the next section, we’ll discuss how to properly clean the drain and garbage disposal to ensure that your entire kitchen sink system stays sanitary and functioning smoothly.
Cleaning The Drain And Garbage Disposal
After cleaning your stainless steel sink, it is important to pay attention to the drain and garbage disposal. To maintain a clean and odor-free sink, unclogging drains should be part of your regular cleaning routine. Here are some tips on how to do this:
Use a plunger: A plunger is an effective tool for unclogging drains. Simply place it over the drain and push and pull repeatedly until the clog clears.
Try baking soda and vinegar: Mix equal parts baking soda and vinegar in a cup and pour it down the drain. Let it sit for about 30 minutes before running hot water down the drain to flush away any remaining debris.
Use a drain snake: If the clog is stubborn, you can use a drain snake to break it up and remove it.
Eliminate odors: To eliminate odors from your garbage disposal, cut up a lemon or lime into small pieces and run them through the disposal while running cold water.
By following these simple steps to unclog your drains and eliminate odors from your garbage disposal, you can ensure that your stainless steel sink stays clean and fresh-smelling for longer periods of time. Remember to incorporate these tips into your regular cleaning routine for best results.
To ensure that all residue has been removed from both the sink basin and drain after cleaning, rinsing the sink thoroughly with warm water is necessary. This step will help remove any leftover soap suds or debris that may have accumulated during cleaning. Once you have finished rinsing, dry off both the sink basin and faucet with a soft cloth or towel to prevent water spots from forming on its surface.
Rinsing The Sink Thoroughly
Just like how a chef needs to clean their workspace after cooking up a storm, it is important to rinse your stainless steel sink thoroughly after each use. Doing so will not only remove any leftover soap or food particles but also prevent water spots and stains from forming on the surface. The sink’s smooth and shiny surface may resemble a clear lake, but without rinsing, it can turn into a murky pond in no time.
The frequency of rinsing your sink depends on how often you use it. If you are someone who cooks at home frequently or has a large family, it is recommended to rinse the sink after every use. On the other hand, if you live alone and don’t use the sink as often, you can get away with rinsing it once a day or every few uses. By incorporating this simple step into your daily routine, you can ensure that your sink remains sparkling clean and free of harmful bacteria.
Rinsing the sink thoroughly may seem like an insignificant step in cleaning your kitchen; however, neglecting it can have adverse effects on both the appearance and hygiene of your kitchen. So next time you’re done washing dishes or preparing food in your stainless steel sink, take an extra minute to give it a good rinse with warm water. Your future self will thank you for preventing stubborn stains and making cleaning easier down the line. Now that we’ve covered the importance of rinsing let’s move on to drying with a microfiber cloth to achieve that perfect shine.
Drying With A Microfiber Cloth
Once the stainless steel sink is thoroughly rinsed and cleaned, it is important to dry it properly. The most common method people use is to let it air-dry, but this can lead to water spots and streaks. To prevent this, using alternative drying methods is recommended.
One alternative method is to use a microfiber cloth. Microfiber cloths are highly absorbent and can pick up moisture effectively. Begin by wiping the sink down with the cloth, ensuring that all areas are covered. Once complete, use another clean microfiber cloth to wipe away any remaining moisture.
Another effective way to dry a stainless steel sink is to use a squeegee. This tool can be used to remove excess water without leaving marks or streaks. Simply run the squeegee over the surface of the sink, starting at one end and working your way towards the other end until all water has been removed.
By using these alternative drying methods, you can prevent water spots from forming on your stainless steel sink while also achieving a spotless shine. In the next section, we will explore how you can take your cleaning process one step further by polishing your sink with olive oil.
Polishing With Olive Oil
- Applying olive oil to a stainless steel sink is an effective way to polish and protect it from future wear and tear.
- The oil can be applied with a soft cloth, lint-free towel, or even a paper towel for a quick and easy solution.
- Olive oil helps to prevent rusting and corrosion, as well as helping to keep the sink looking clean and shiny.
- Additionally, olive oil is a natural product, making it a safe and non-toxic choice for polishing.
Applying Olive Oil
As you gaze upon your stainless steel sink, you can’t help but notice the unsightly water spots and scratches. It’s time to give it a good cleaning and polishing. Did you know that olive oil can be a great solution for this task? Not only is it an affordable option, but it also has numerous benefits that make it stand out from other oils.
One of the main benefits of olive oil is its ability to restore shine to stainless steel surfaces. The natural properties of the oil help to remove stains while creating a protective barrier against future damage. Additionally, olive oil contains antioxidants which can further improve the appearance of your sink. If you don’t have any olive oil on hand, there are alternative options such as coconut or vegetable oils that can also be used for cleaning stainless steel sinks.
To apply olive oil to your sink, start by cleaning it thoroughly with soap and water. Rinse off any residue and dry with a soft cloth. Next, add a small amount of olive oil onto another clean cloth and rub it into the surface of the sink in circular motions. Make sure to cover all areas evenly and use moderate pressure when applying the oil. After letting it sit for a few minutes, wipe away any excess with a clean cloth to reveal a shiny and polished finish.
Remember, maintaining the cleanliness and shine of your stainless steel sink requires some effort on your part. Incorporating olive oil into your regular cleaning routine can go a long way in keeping your sink looking new for years to come. So why not give it a try? Your kitchen will thank you!
Benefits Of Olive Oil
As a cleaning expert, I’m always on the lookout for affordable and effective solutions to help homeowners maintain their homes. One such solution is using olive oil to polish stainless steel surfaces like sinks. Aside from being an economical option, olive oil has numerous benefits that make it stand out from other oils.
One of the main benefits of using olive oil is its ability to restore shine to stainless steel surfaces. Its natural properties help remove stains and create a protective barrier against future damage. Additionally, olive oil contains antioxidants that can further improve the appearance of your sink. These benefits make it an excellent choice for those looking to keep their kitchen or bathroom looking new.
Aside from its use in polishing stainless steel, olive oil is also widely used in skincare products due to its moisturizing properties. It’s rich in vitamins A and E which are essential for maintaining healthy skin. Applying a small amount of olive oil onto your skin after showering can help lock in moisture and keep your skin soft and supple throughout the day.
In conclusion, incorporating olive oil into your regular cleaning routine can go a long way in keeping your home looking its best while also providing benefits for your skin. Whether you’re polishing your stainless steel sink or moisturizing your skin, this versatile oil proves to be a valuable addition to any household.
Maintaining A Regular Cleaning Schedule
Polishing your stainless steel sink with olive oil can help give it a brilliant shine, but regular cleaning is crucial to maintaining its beauty. Consistency is key when it comes to keeping your stainless steel sink in tip-top shape. Wiping down the surface after each use will prevent buildup, and using natural cleaners will ensure that your sink stays clean without harming the environment or your health.
The importance of consistency cannot be overstated when it comes to cleaning your stainless steel sink. Waiting too long between cleanings can lead to discoloration and damage that may be difficult to repair. Develop a routine that works for you, whether it’s wiping down the sink after each use or setting aside time each week for a deeper clean.
In addition to consistency, using natural cleaners can provide numerous benefits for both you and the environment. Harsh chemicals found in many commercial cleaning products can be damaging to your health if ingested or inhaled, and they can also harm aquatic life if they enter waterways. By choosing natural cleaners like baking soda, vinegar, or lemon juice, you’ll not only keep yourself safe but also do your part for the planet.
Preventing Scratches And Damage
To keep your stainless steel sink looking pristine, it is important to take measures to prevent scratches and damage. Scratches can occur from a variety of sources, including abrasive cleaning tools, sharp objects, and heavy impacts. To avoid these issues, it is recommended that you use only gentle cleaning tools and avoid placing heavy or sharp objects in the sink.
One of the most effective ways to prevent scratches in your stainless steel sink is to use gentle cleaning products. Harsh chemicals can strip away the protective coating on the surface of your sink, leaving it vulnerable to scratches and other types of damage. Instead, opt for mild detergents and non-abrasive sponges or cloths when cleaning your sink.
Another way to prevent damage to your stainless steel sink is to be mindful of how you use it. Avoid using the sink as a chopping block for food preparation, as this can lead to scratches from knives and other sharp utensils. Additionally, try not to place heavy pots or pans directly on the surface of the sink; instead, use a protective mat or towel underneath these items.
As you work to protect your stainless steel sink from scratches and other types of damage, it is important to remember that prevention is key. By using gentle cleaning products, being mindful of how you use your sink, and avoiding harsh chemicals whenever possible, you can help ensure that your sink stays looking beautiful for years to come. In the next section we will discuss how to tackle those pesky rust stains that may occasionally appear on your stainless steel sink.
Removing Rust Stains
Rust stains are a common problem in stainless steel sinks, especially if they are not cleaned regularly. Rust stains can be caused by a variety of factors such as hard water, iron-rich well water or metal cookware left to soak in the sink for too long. If you have rust stains on your stainless steel sink, there are several methods that you can use to remove them.
One popular method is using vinegar or lemon juice. Both of these acidic substances can help dissolve the rust and make it easier to scrub away. To use this method, simply pour some vinegar or lemon juice onto the rust stain and let it sit for a few minutes. Use a scrub brush to gently scrub away the stain until it is gone. Rinse the area thoroughly with water and dry with a clean cloth.
If you do not have vinegar or lemon juice on hand, there are several DIY rust stain removers that you can try. These include using baking soda and water, salt and lime juice, or even toothpaste! To use any of these methods, simply mix the ingredients together to create a paste and apply it directly to the rust stain. Let it sit for a few minutes before scrubbing away with a soft-bristled brush.
Next up is cleaning the faucet and handles. It is important to remember that these areas are often touched frequently so they should be cleaned regularly as well. Use a soft cloth dampened with warm water and mild soap to wipe down the faucet and handles. Rinse thoroughly with water and dry with a clean cloth. For tough spots that won’t come off with soap and water, try using an all-purpose cleaner or rubbing alcohol on a soft cloth before rinsing again with water.
Cleaning The Faucet And Handles
Did you know that the faucet and handles of your sink are the most touched surfaces in your kitchen? According to a study conducted by NSF International, these areas harbor more germs than any other place in your home. That’s why it’s essential to clean them regularly.
Cleaning the Faucet: To clean the faucet and handles, start by spraying an all-purpose cleaner onto a microfiber cloth. Wipe down the entire surface until it is free of dirt and grime. For hard-to-reach areas, use a soft-bristled toothbrush or an old toothbrush to scrub away any buildup.
Polishing Techniques: After cleaning, it’s time to polish your faucet and handles. There are various methods for polishing stainless steel, such as using baking soda or olive oil. However, for this task, we recommend using a commercial stainless-steel cleaner and polish. Apply a small amount of the product onto a dry microfiber cloth and rub it in circular motions over the surface until it shines like new.
Now that you have successfully cleaned and polished your sink’s faucet and handles let’s move on to troubleshooting common issues that may arise during cleaning.
Troubleshooting Common Issues
As with any cleaning task, there may be common issues that arise when cleaning a stainless steel sink. One issue that many people face is the buildup of hard water stains or mineral deposits. To prevent this buildup, it is important to regularly clean your sink with a mild detergent and warm water. Additionally, using a soft cloth or non-abrasive sponge can help to avoid scratches on the surface of the sink.
Another common issue that people face is damage to the finish of their stainless steel sink. This can occur due to improper cleaning techniques or the use of harsh chemicals. To protect against future damage, it is important to use only non-abrasive cleaners and avoid using steel wool or other abrasive materials when cleaning your sink. Additionally, be sure to rinse your sink thoroughly after each use and dry it with a soft cloth or paper towel to prevent water spots from forming.
In addition to preventing buildup and protecting against future damage, there are several other tips for maintaining the look and functionality of your stainless steel sink. One helpful tip is to use a silicone-based spray on the surface of your sink after each cleaning. This will help to repel water and keep your sink looking shiny and new for longer. Another useful tip is to avoid leaving acidic foods or substances in your sink for extended periods of time, as these can cause discoloration or damage over time.
Nested Bullet Point List:
- Protecting Against Future Damage:
- Use only non-abrasive cleaners
- Avoid using steel wool or other abrasive materials
- Preventing Buildup:
- Regularly clean with mild detergent and warm water
- Use soft cloth or non-abrasive sponge
Maintaining the look and functionality of your stainless steel sink requires regular attention and care. By following these simple tips for preventing buildup, protecting against future damage, and maintaining overall cleanliness, you can ensure that your sink remains in top condition for years to come. Remember to always use non-abrasive cleaners, rinse your sink thoroughly after each use, and avoid leaving acidic substances in the sink for extended periods of time. With a little bit of effort and attention, you can keep your stainless steel sink looking shiny and new for years to come.
Conclusion
Stainless steel sinks are a popular choice for homeowners due to their durability, sleek appearance, and resistance to stains and corrosion. However, like any other surface in your home, stainless steel sinks require regular cleaning to maintain their shine. As a cleaning expert, I have compiled a comprehensive guide on how to clean a stainless steel sink.
To ensure that your stainless steel sink stays in pristine condition, it is important to first understand its unique characteristics. Stainless steel is a durable and non-porous material that can withstand harsh chemicals and high temperatures. However, it is also susceptible to scratches and rust stains if not properly cared for. Therefore, it is crucial to gather the necessary cleaning tools such as a non-abrasive cleaner, soft cloth, and gentle scrubbing pad before starting the cleaning process.
Once you have gathered all the necessary tools, you can begin preparing the sink for cleaning by removing any debris or food particles from the surface. Afterward, you can apply the non-abrasive cleaner and gently scrub with a soft cloth to remove any stubborn stains or grime. To prevent scratches and damage while cleaning your stainless steel sink, it is recommended to avoid using abrasive cleaners or scrubbers.
In conclusion, keeping your stainless steel sink clean requires some effort but can be easily achieved with proper care and maintenance. Remembering these simple steps will keep your sink looking new for years to come: understand your sink’s unique characteristics; gather necessary cleaning tools; prepare the sink for cleaning; apply a non-abrasive cleaner; scrub with a soft cloth; prevent scratches and damage; remove rust stains if necessary; clean the faucet and handles regularly; troubleshoot common issues if they arise. By following these steps diligently, you will be able to maintain your stainless steel sink’s pristine appearance for many years ahead!
Image Credits
- “Stainless Steel Undermount Sink” by granite-charlotte (featured)

