A kitchen sink drain is one of the most important components in a kitchen. It serves as a conduit for draining dirty water and food scraps from the sink to the sewer or septic system. Installing a kitchen sink drain can be a challenging task, but it is essential for ensuring proper drainage and preventing clogs.
As a plumbing technician, I have seen many homeowners attempt to install their own kitchen sink drains, only to encounter various problems that require professional intervention. In this article, I will guide you through the steps of installing a kitchen sink drain, providing tips on how to avoid common mistakes and ensure that your installation is successful. By following these instructions, you will be able to complete this task with confidence and enjoy a fully functional kitchen sink.
Assessing Your Plumbing Needs
Before embarking on any plumbing project, it is vital to assess your plumbing needs. This assessment will help you determine if you need professional assistance or if a DIY option is suitable for your project. If the installation of the kitchen sink drain requires complex plumbing work, it may be best to seek professional help. Professional plumbers have the expertise and experience necessary to handle intricate plumbing projects that require specialized tools.
On the other hand, if the installation of the kitchen sink drain is relatively straightforward, you may choose to undertake a do-it-yourself (DIY) option. However, before deciding on a DIY option, consider your level of skill and experience in plumbing. Plumbing work can be complicated, and mistakes can result in costly damage to your home’s plumbing system. It is essential to have a clear understanding of what needs to be done and be confident that you can complete the job correctly.
In conclusion, assessing your plumbing needs is an important first step when installing a kitchen sink drain. Determine if professional assistance is necessary or if you can undertake a DIY option. Consider your skill level and experience when making this decision. The next step is gathering the necessary tools and materials required for installing the kitchen sink drain.
Gathering The Necessary Tools And Materials
Choosing the right materials is crucial when it comes to installing a kitchen sink drain. You will need to purchase a drain kit that matches the size of your sink and fits the plumbing in your home. It’s important to note that not all drain kits are universal, so be sure to check the specifications before purchasing one.
For beginners, it may be helpful to invest in a kit that includes all necessary parts and tools. This can save you time and avoid any confusion as to which parts you need. Additionally, make sure you have a basin wrench, pliers, plumber’s putty, and pipe tape on hand. These tools will come in handy during installation.
Tips for beginners include taking your time and following instructions carefully. Rushing through the process can lead to mistakes and ultimately cause further problems down the line. If you encounter any difficulties or are unsure of how to proceed at any point during installation, don’t hesitate to seek professional assistance.
Transition: Now that you have gathered all necessary tools and materials, the next step is removing the old sink drain.
Removing The Old Sink Drain
Before starting the installation of a new kitchen sink drain, it’s important to remove the old one. This process involves some essential tools that every plumber should have in their toolkit. The first step is to turn off the water supply valves and disconnect any plumbing connections from the old drain.
Next, we need to remove the nuts holding the old drain in place. For this, we use a pair of pliers or a wrench to loosen these nuts and detach them from the sink. Once they are loose enough, we can easily remove the old drain from its position. It’s important to note that some drains may be glued in place and require additional effort to remove.
After removing the old drain, it’s crucial to dispose of it properly. We do not want to leave any debris or waste lying around that could potentially cause damage or harm later on. We can either recycle or throw away the old drain depending on local regulations and guidelines. With this step complete, we can move onto cleaning the sink area before installing our new kitchen sink drain.
Cleaning The Sink Area
Proper cleaning practices are essential in maintaining the longevity of your kitchen sink. Regular cleaning helps prevent the buildup of debris, grime, and bacteria that can cause unpleasant odors and lead to clogs. The best cleaning practices include using a non-abrasive cleaner and avoiding harsh chemicals that may damage your sink’s surface.
Choosing the right cleaning products is also crucial for ensuring a clean and healthy kitchen sink area. Consider using natural alternatives such as vinegar or lemon juice mixed with baking soda to remove tough stains and disinfect your sink. Avoid using abrasive sponges or steel wool pads that may scratch or damage the sink’s surface.
In addition to regular cleaning, it is recommended to wipe down the sink area after each use to prevent water stains and buildup. By incorporating these best cleaning practices into your routine, you can ensure a clean and hygienic kitchen sink area for years to come. With a well-maintained sink, you will be able to prepare food and wash dishes with ease. Now that we have covered proper cleaning techniques let’s move on to preparing the new sink drain.
Preparing The New Sink Drain
After cleaning the sink area, it’s time to prepare the new sink drain. Choosing materials for the new drain is important since it affects the durability and longevity of the sink. It’s recommended to choose high-quality stainless steel, brass or copper materials for the best results. Make sure to buy all necessary components, including a strainer assembly, tailpiece and basket strainer.
Proper sealing is essential when installing a kitchen sink drain. Apply plumber’s putty around the base of the basket strainer before inserting it into the drain hole. Tighten it securely from below using an adjustable wrench. Connect the tailpiece to the basket strainer and tighten using slip-joint pliers.
Attaching the strainer assembly is an important next step in installing a kitchen sink drain. This can be done by attaching a rubber gasket and washer between the tailpiece and P-trap. Connect these pieces together using slip-joint pliers and adjust as necessary until everything is snugly fit together. Remember to check all connections for leaks before moving on to further steps in installation process.
Attaching The Strainer Assembly
- Prior to installing the strainer assembly, the sink must be prepared by confirming the necessary gaskets and drains are present and in good condition.
- The tailpiece and basket strainer should be connected with the sink drain inlet, making sure that the gaskets are properly aligned.
- After attaching the tailpiece, the strainer assembly should be securely tightened with a basin wrench to prevent any leaks.
- Finally, the drain line should be connected to the tailpiece and the entire assembly should be tested for any signs of leaking.
Preparing The Sink
In order to properly install a kitchen sink drain, it is important to begin by preparing the sink. This involves measuring the depth of the sink and applying plumber’s putty around the opening where the strainer assembly will be attached. Measuring the depth of the sink is important because it ensures that the strainer assembly will fit snugly and securely without any leaks.
To measure the depth of the sink, first remove any existing drain components. Use a tape measure to determine how deep the opening is from the top edge of the sink to where it begins to curve downward. This measurement will be used when selecting a strainer assembly that fits correctly. Once this measurement has been obtained, apply plumber’s putty around the opening where the strainer assembly will be installed. The putty helps create a watertight seal between the strainer assembly and sink.
After applying plumber’s putty, insert and tighten down the strainer assembly into place with a wrench or pliers. Be sure not to overtighten as this can cause damage to both your plumbing and your new sink. With these steps taken care of, you are now ready to move on to attaching additional components such as tailpieces and trap assemblies.
Attaching The Strainer
To ensure the proper installation of a kitchen sink drain, it is important to know how to properly seal the strainer assembly. In order to do this, you must first consider the different types of strainer assemblies available in the market. Some common types include snap-in, twist-and-lock, and basket strainers. When selecting a strainer assembly, it is important to choose one that fits your sink’s size and depth.
Once you have selected the appropriate type of strainer assembly for your sink, it is time to install it properly. Begin by applying plumber’s putty around the opening where the strainer assembly will be attached. This helps create a watertight seal between the strainer assembly and sink. Next, insert and tighten down the strainer assembly into place with a wrench or pliers. It is important not to overtighten as this can cause damage to both your plumbing and your new sink.
Overall, knowing how to properly attach the strainer assembly is an essential step in installing a kitchen sink drain. By selecting the right type of strainer assembly and following these steps carefully, you can ensure that your sink functions optimally without any leaks or damages.
Installing The Tailpiece
Did you know that the tailpiece is the part of the drain assembly that connects the sink to the p-trap? It’s a crucial component in ensuring proper drainage of wastewater. When installing a kitchen sink drain, it’s important to choose a tailpiece material that will withstand frequent use and exposure to water. Common materials include PVC, brass, and stainless steel.
Adjusting tailpiece height is an essential step in installing a kitchen sink drain. The height of the tailpiece determines how far the trap arm extends from the wall and can impact how well the water drains from your sink. You’ll want to make sure that your tailpiece is adjusted so that it lines up with your sink’s drain opening and allows for optimal water flow.
When choosing a tailpiece material, consider durability, cost, and ease of installation. PVC is a popular choice as it’s affordable and easy to work with. Brass offers greater durability but may be more expensive. Stainless steel is also durable but requires special tools for installation. Whatever material you choose, ensure that it fits properly with your other components to avoid leaks or improper drainage.
Now that we’ve covered adjusting tailpiece height and choosing tailpiece materials, let’s move on to connecting the drain to the p-trap.
Connecting The Drain To The P-Trap
After installing the tailpiece, the next step in the process of installing a kitchen sink drain is connecting the drain to the P-trap. This is an important step that requires proper alignment and sealant application to ensure a leak-free connection.
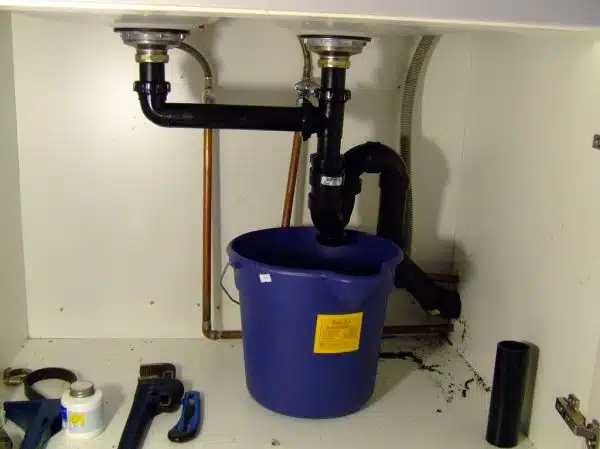
To begin, place the P-trap assembly underneath the sink and align it with the drain opening. Make sure that both ends of the P-trap are properly aligned with the tailpiece and waste arm. Once you have achieved proper alignment, tighten all connections by hand.
Next, apply a generous amount of plumber’s putty or silicone sealant to both sides of the slip-joint washer. Place this washer between the bottom of the strainer and top of the P-trap assembly before tightening with slip-joint pliers. Ensure that each connection is tight but not over-tightened which can cause damage to parts.
Following these steps will ensure that your kitchen sink drain is properly connected to your P-trap and ready for use. The next step in completing this installation process is tightening all connections using slip-joint pliers or wrenches as necessary to create a secure and durable connection.
Tightening The Connections
Proper tightening techniques are essential in ensuring that your kitchen sink drain is installed correctly. The connections between the various components need to be tightened enough, but not too much. Over-tightening can cause damage to the components and lead to leaks, while under-tightening can also result in leaks.
One common mistake people make when tightening connections is using too much force. This can cause the connection to be over-tightened and damaged, leading to leaks. Another mistake is not using a wrench or pliers to tighten the connection properly. Hand tightening may not be enough, especially for larger connections.
To avoid these mistakes, use proper tightening techniques such as using a wrench or pliers and tightening until snug but avoiding overtightening. It’s important to check for leaks before moving on to the next step of installing your kitchen sink drain.
Transition: Now that you’ve tightened all the connections using proper techniques, it’s time to check for leaks and ensure everything is working correctly.
Checking For Leaks
While tightening the connections is an essential step in installing a kitchen sink drain, it is not the only one. Before moving on to checking for leaks, it’s important to address a common concern: what if the connections are too tight? Over-tightening can cause damage or cracks in the pipes, resulting in leaks. However, under-tightening can also lead to leaks. As a professional plumber, it’s crucial to strike a balance and ensure that each connection is tightened just right.
Common leaks that occur after installing a kitchen sink drain include those around the flange and those caused by loose or damaged connections. To prevent these types of leaks, here are some tips: First, make sure you use plumber’s putty when installing the flange. This will create a watertight seal between the sink and drain pipe. Second, double-check that all connections are tightened securely but not over-tightened. Third, inspect all components of the drain regularly for signs of wear and tear.
If applicable, installing a garbage disposal is usually the next step after completing the drain installation. Before beginning this process, be sure to turn off power to the area where you’ll be working to prevent electrocution. Then remove any old mounting hardware from your sink before inserting new hardware into place using screws and bolts as necessary. Finally, attach your disposal unit with its own mounting bracket before connecting it to your newly installed kitchen sink drain system through its inlet pipe using PVC cement or silicone caulk depending on which type of material is used in construction of piping system in your residence.
Installing The Garbage Disposal (If Applicable)
When it comes to installing a kitchen sink drain, you may also need to install a garbage disposal. This can be a helpful addition to your kitchen, but it does require some additional installation steps. Before beginning the installation process, make sure that you have all of the necessary tools and materials on hand.
Once you are ready to begin installing the garbage disposal, start by turning off the power supply to the area. This will prevent any accidents or injuries from occurring during the installation process. Next, connect the mounting assembly to the sink flange and attach the disposal unit to the mounting assembly. From there, connect the discharge tube and dishwasher drain hose (if applicable).
It is important to note that regular garbage disposal maintenance is necessary in order to keep it functioning properly. This includes cleaning regularly and avoiding putting certain items down the disposal such as bones or grease. If you do encounter any issues with your garbage disposal, there are troubleshooting tips available online or you can contact a professional plumber for assistance. With proper care and maintenance, your garbage disposal should provide reliable service for years to come.
Looking ahead, once you have successfully installed your garbage disposal, it’s time to test out your new drain system. But before we move on to testing out your newly-installed drain system, let’s review how important proper maintenance of your garbage disposal is in ensuring its longevity and trouble-free operation.
Testing The Drain
Now that the garbage disposal has been installed, it’s time to move onto testing the sink drain. There are several methods to test the drain, but one of the most common is to fill up the sink with water and let it drain. If there are any leaks or clogs, they will become apparent during this process. Another method is to pour a small amount of dish soap down the drain and run hot water for a few minutes. This will help clear out any buildup and ensure that the drain is working properly.
If issues arise during testing, there are several troubleshooting tips you can try before calling in a professional. One common issue is slow draining, which can be caused by a clog in the pipes or an improperly installed drain. To fix this, try using a plunger or plumbing snake to clear out any obstructions. If this doesn’t work, you may need to adjust the height of the drain.
Adjusting the drain height (if necessary) is an important step in ensuring that your sink drains properly. If your sink isn’t draining as quickly as it should be, it may be because the drain isn’t at the right height. Adjusting it involves loosening a few screws and moving it up or down until it’s at the correct level. Once you’ve done this, test the sink again to ensure that everything is working as it should be. Remember that proper installation and testing are key to avoiding future problems with your kitchen sink drain.
Adjusting The Drain Height (If Necessary)
As a plumbing technician, adjusting the drain height is an important step to ensure the proper installation of a kitchen sink drain. The height of the drain should align with the bottom of the sink to prevent water from pooling and causing damage to your countertop or cabinets. To adjust the height, you will need to remove the tailpiece and cut it down or add an extension piece.
Before making any adjustments, make sure you have chosen the proper sealant for your installation. A quality sealant will provide a watertight seal around the edges of your drain and prevent leaks from occurring. Silicone caulk is a popular choice for sealing sinks as it is waterproof and can withstand high levels of heat and moisture.
Once you have adjusted the drain height and applied sealant, allow it to dry completely before using your sink. Testing for leaks at this stage is crucial to avoid costly repairs in the future. By following these steps, you can be confident in your ability to install a kitchen sink drain that functions properly and efficiently. In preparation for troubleshooting common problems, let’s move on to examining how to identify and resolve these issues in our next section.
Troubleshooting Common Problems
Common problems that homeowners face with kitchen sink drains include clogging, slow draining, and foul odors. These issues can arise due to improper installation or regular wear and tear. However, there are common solutions that can be applied to address these problems.
One solution is to use a plunger to clear the clog. Simply place the suction cup over the drain and push down repeatedly until the water begins to drain properly. Another effective solution is pouring hot water down the drain to melt any grease or food particles that may be causing the blockage. You can also use a mixture of baking soda and vinegar to clean the drain by pouring it down the drain and allowing it to sit for several minutes before flushing it out with hot water.
Prevention tips can help you avoid these common problems in the first place. For instance, avoid pouring grease or oil down the drain as these substances solidify once they cool, leading to a buildup of debris in your pipes. Similarly, avoid placing food scraps or other items in your sink that may cause blockages. Instead, scrape your plates into a garbage can before rinsing them off in your sink.
In summary, troubleshooting common problems with your kitchen sink drain involves using common solutions such as plunging or pouring hot water down the drain. To prevent these issues from occurring in the first place, follow prevention tips such as avoiding pouring grease or oil down the drain and scraping plates into a garbage can instead of rinsing them off in your sink. In order to maintain a healthy kitchen sink drain, there are several steps you should take on a regular basis.
Maintaining Your Kitchen Sink Drain
It is not enough to just install a kitchen sink drain, regular maintenance is important. Neglecting the sink drain could lead to clogs and other common problems that can cause inconvenience in the kitchen. As such, it is essential to know how to maintain your kitchen sink drain properly.
Tips for preventing clogs are simple and easy to follow. To start with, avoid pouring grease or oil down the drain as they can solidify and cause blockages. Additionally, use a strainer or stopper in your sink drain to prevent hair, food particles, and other debris from going down the drain. Also, avoid using chemical cleaners as they can corrode pipes over time.
Importance of regular maintenance cannot be overstated. It helps identify minor problems early before they escalate into bigger ones that require costly repairs. For instance, if you notice your sink draining slowly or making unusual noises when water flows through it, it could be an indication of a clogged pipe or damaged drain line that requires immediate attention.
- Tips for preventing clogs include:
- Avoid pouring grease or oil down the drain
- Use a strainer or stopper in your sink drain
- Avoid using chemical cleaners
- Run hot water through your sink after use
Regular maintenance should include cleaning your sink regularly with soap and warm water, checking for leaks under the sink, and inspecting the garbage disposal for damage. With proper care and maintenance of your kitchen sink drain system, you can avoid common problems that come with neglecting it.
Conclusion
Installing a kitchen sink drain can be a daunting task, but with the right tools and materials, it can be done successfully. It is essential to assess your plumbing needs before beginning the installation process. Gathering the necessary tools and materials is also crucial to ensure that you have everything you need for the job.
Removing the old sink drain and cleaning the sink area are vital steps in preparing for the new sink drain. Once you have prepared the new sink drain, testing it is necessary to ensure that it functions correctly. Adjusting the drain height may also be necessary to achieve optimal performance.
It is interesting to note that according to a study by The Freedonia Group, demand for kitchen and bathroom fixtures in North America will continue to grow at an annual rate of 5.7% through 2023. This statistic emphasizes how crucial it is for homeowners to have basic knowledge of plumbing tasks such as installing a kitchen sink drain.
As a plumber/plumbing technician, it is essential always to maintain your kitchen sink drain properly. Troubleshooting common problems should also be an ongoing process to ensure optimal performance of your plumbing system. With proper installation and maintenance, your kitchen sink drain will function correctly for years to come.
Image Credits
- “Kitchen sink drain – after” by Andrea_R (featured)



![How To Get Hair Out Of A Bathtub Drain 10 2/365 [Bathtub Drain]](https://green-life.blog/wp-content/uploads/2023/05/cOEu5edpkejq-150x150.jpg.webp)




![How To Replace A Bathtub Drain In A Mobile Home 15 2/365 [Bathtub Drain]](https://green-life.blog/wp-content/uploads/2023/05/3ft8KAJsNnjq-150x150.jpg.webp)

