As an expert in concrete patio installation, I have seen numerous homeowners struggle with the process of DIY concrete patio installation. While it may seem like a daunting task, with the right guidance and tools, anyone can successfully install a concrete patio on their own. In this article, I will provide you with step-by-step instructions on how to properly prepare your space, pour and finish your concrete, and care for your new patio.
Before beginning any DIY project, it is important to understand the scope of work required and have a clear plan in place. Installing a concrete patio involves several steps that must be completed correctly in order for the final product to be durable and long-lasting. This article will cover everything from selecting the appropriate materials to finishing techniques that will ensure your new patio is not only functional but also aesthetically pleasing. By following these instructions closely, you can save money by completing the installation yourself while still achieving professional results.
Assessing Your Space
Before starting a concrete patio installation, it is essential to assess the area. First and foremost, you need to evaluate the drainage system. Ensure that water does not collect in one area as it can damage the patio’s foundation in the long run. If there are any issues with drainage, address them before beginning the installation process. It is also vital to consider the slope of the ground where you plan to install your patio. Ideally, a slope of 1/4 inch per foot should be maintained away from your house to avoid water damage.
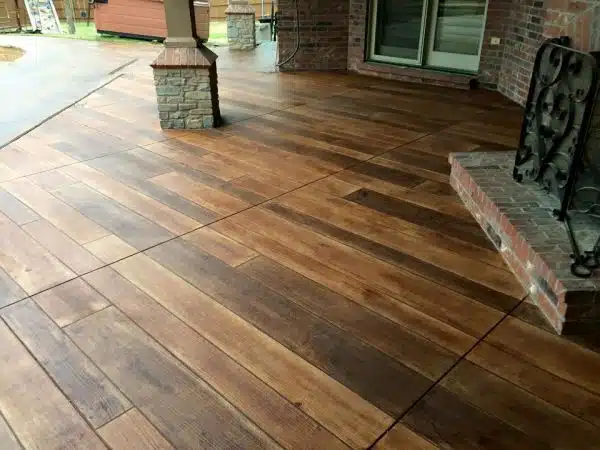
The next thing to consider is color options. Concrete patios come in different colors and finishes, which can add an aesthetic touch to your outdoor space. You can choose from various shades of gray or opt for colored concrete that complements your home’s exterior. Stamped concrete is another option that can mimic natural stone or brick patterns and textures.
Assessing your space before starting a DIY concrete patio installation project ensures that you have all aspects covered for a successful outcome. Once you have evaluated drainage and color options, it’s time to measure and mark out the area where you want your patio installed.
Measuring And Marking Out The Area
To ensure a successful concrete patio installation, accurate measurement and marking out of the area are critical. The first step is to determine the size and shape of the patio you want to install. You can use stakes and strings to mark out the perimeter of your patio. Make sure that you measure accurately to avoid any mistakes when pouring the concrete.
In addition to measuring accuracy, material selection is also crucial in ensuring a durable and long-lasting patio. When selecting materials for your project, consider factors such as climate, foot traffic, and design preferences. For instance, if you live in an area with extreme weather conditions, it’s important to choose concrete mixtures that can withstand these conditions.
By taking the time to measure accurately and select appropriate materials, you’ll be well on your way to completing a successful DIY concrete patio installation. In the next section, we will discuss how to excavate the site properly before pouring your concrete slab. This step is crucial in ensuring that your patio has proper drainage and a stable foundation for years of use.
Excavating The Site
After measuring and marking out the area, it’s now time to excavate the site. This step involves removing the topsoil and digging down to a suitable depth, usually around 6 inches. Excavating ensures that your patio is level with the surrounding ground and provides ample space for the base layer.
Before starting, ensure you have all the necessary equipment needed for excavation. This includes a shovel, wheelbarrow, and a mini-excavator if working on larger areas. Safety precautions are also essential during excavation. Wear protective gear such as gloves, boots, and eye protection to prevent injury from sharp objects in the soil or flying debris.
Here are some key points to keep in mind when excavating your patio area:
- Begin by removing any grass or vegetation from the area
- Use a string line or laser level to ensure you’re digging at an even depth
- Check for any underground utilities such as gas lines before digging
- Dispose of excess soil responsibly
Now that you’ve successfully excavated your patio area, it’s time to move onto creating a base for your patio.
Creating A Base For Your Patio
Before laying out the concrete for your patio, you need to prepare the ground by creating a firm base. The process may seem intimidating, but with the right tools and techniques, it can be done smoothly. The first step is to remove any grass, weeds, or debris from the area where you want to install your concrete patio.
Tools needed for this task include a shovel, wheelbarrow, tamper, measuring tape, and level. Once you have cleared the area of any unwanted vegetation or debris, use a shovel to dig down about 6 inches deep. Then level out the ground surface with a tamper until it is compacted and smooth.
Preparing the ground in this way will provide stability and prevent cracking of your concrete patio in the future. Additionally, it will ensure that water does not pool on your patio surface after rainfall. By taking these steps seriously and investing time into preparing your base correctly, you are setting yourself up for success in creating a beautiful and long-lasting outdoor living space.
Next up is laying forms for your patio which will help contain your concrete pour and give your patio shape.
Laying The Forms For Your Patio
When selecting forms for a concrete patio installation, it is important to consider the size and shape of the area to ensure the forms will fit correctly. Additionally, the type of forms should be chosen based on the consistency of the concrete mix for the project. Before laying the forms for a concrete patio installation, the surface should be leveled and cleared of any debris. The forms should also be secured in place using stakes to prevent them from shifting during the installation.
Selecting The Forms
To ensure the stability and longevity of your concrete patio, selecting the appropriate forms is a crucial step in the installation process. There are several options available, but choosing between them depends on your preferences and needs. Form liners, for instance, offer several benefits such as creating intricate textures or patterns on the surface of your patio. This can add an extra layer of visual appeal to your outdoor space.
Customizing form shapes is also another consideration when laying out the forms for your patio. Irregularly-shaped patios may require more precise measurements, while rectangular or square-shaped patios can be easier to lay out. The shapes of your forms will affect not only the appearance of your finished product but also its functionality. It’s important to think about how you’ll use your patio while determining what shape it should take.
Ultimately, selecting forms that suit both the style and function of your patio is key to a successful installation. Consider using form liners for added visual texture and customizing form shapes based on how you plan to use your outdoor space. With careful planning and attention to detail during this step, you’ll be able to create a beautiful concrete patio that will stand the test of time.
Preparing The Forms
When preparing for the installation of your concrete patio, laying out the forms is one of the most important steps to consider. Proper form preparation ensures an even and level surface that will support the weight of the concrete mix ratios you’ll be using. To begin, choose form materials that are durable and sturdy enough to withstand the weight of wet concrete. Common form materials include wood, metal, plastic, and foam.
Once you have chosen your form materials, it’s time to prepare them for use. Begin by measuring and cutting each piece to fit your desired patio shape. If you’re working with wood forms, you may need to sand or plane them down to create a smooth surface for the concrete mix ratios. Metal forms can be sprayed with a release agent to prevent sticking while foam forms may require additional bracing to keep them in place during pouring.
Lastly, ensure that your forms are properly secured before beginning any concrete pouring. This means checking that they are level and securely fastened together at corners or edges. A solid foundation for your patio begins with well-prepared forms that provide a stable base for the wet concrete mix ratios. By taking time to carefully lay out and secure your forms, you’ll be on your way to creating a beautiful and long-lasting outdoor space for years to come.
Choosing The Right Concrete Mix
As you prepare to pour your concrete patio, it’s important to choose the right mix for your project. You want a mix that is strong enough to withstand the elements and heavy foot traffic, but also one that fits within your budget. Mixing techniques and cost comparison are two factors to consider when selecting your concrete mix.
First, let’s talk about mixing techniques. Hand-mixing is an option for small projects, but for larger patios, you’ll likely need a mixer. A drum mixer or a mortar mixer can be rented from most home improvement stores. Make sure to follow the manufacturer’s instructions for mixing time and speed. It’s also important to use the correct amount of water, as too much can weaken the concrete and too little can make it difficult to work with.
Now, let’s discuss cost comparison. Ready-mix concrete is more expensive than buying bags of premixed concrete from a home improvement store and mixing it yourself. However, ready-mix may save you time and effort compared to hand-mixing or renting a mixer. Additionally, ready-mix can be delivered directly to your worksite and poured directly into your forms.
To summarize, when choosing the right concrete mix for your project, consider both mixing techniques and cost comparison. Follow manufacturer instructions for mixing times and water ratios if using a mixer, or purchase ready-mix for convenience at a higher cost. With these considerations in mind, you’ll be well on your way to pouring a solid foundation for your new patio.
Pouring The Concrete
- Preparation of the space for a concrete patio installation is essential for a successful project.
- The area must be cleared of debris, leveled, and compacted soil must be used to ensure stability.
- The concrete mix should be prepared according to manufacturer’s instructions, and mixed in a wheelbarrow or mortar mixer.
- The concrete should be poured in one continuous motion to reduce the risk of air pockets or cracking.
- The concrete should be spread evenly with a trowel and floated for a smooth finish.
- After the concrete has cured, the entire area should be sealed for protection and durability.
Preparing The Space
When it comes to DIY concrete patio installation, preparing the space is a crucial step that should not be overlooked. Before pouring the concrete, you must ensure that the chosen materials are appropriate for your budget and will meet your needs. Choosing the right materials can make all the difference, both in terms of durability and aesthetics.
To prepare the space for pouring concrete, you must first measure and mark out the area where you want to install your patio. This will help you determine how much material you need and how much it will cost. Budgeting is an essential aspect of this process as it ensures that you don’t overspend or waste money on unnecessary expenses.
Once you have measured and marked out your desired patio size, it’s time to clear away any debris or obstacles from the area. This includes removing any grass or weeds, rocks or stones, and other debris that may interfere with the concrete’s adhesion. By taking these steps to prepare the space adequately, you can ensure that your DIY concrete patio installation goes smoothly and efficiently.
Mixing The Concrete
Once you have prepared the space for pouring concrete, the next step in a DIY concrete patio installation is mixing the concrete. This part of the process can be challenging and time-consuming, but it is crucial to get the mixture right to ensure a durable and long-lasting patio. The consistency of your concrete mixture is essential, as it will determine how well the material adheres to your desired shape.
To mix the concrete properly, you will need specific equipment such as a mixing bucket or wheelbarrow, a shovel or hoe for mixing, and water. It’s important to follow instructions carefully when mixing your concrete as even small mistakes can lead to problems down the line. The right consistency should be thick enough that it holds its shape but not so stiff that you can’t work with it.
Once you’ve mixed your concrete thoroughly, it’s time to pour it into your prepared space. This part of the process requires careful attention to detail, ensuring that your mixture doesn’t dry out before you’ve finished pouring. You’ll also want to smooth out any uneven areas using a trowel or other tools available on hand. By following these steps carefully, you can ensure that your DIY concrete patio installation goes smoothly and efficiently while creating an outdoor living space that will last for years to come.
Pouring The Concrete
After preparing the space for your DIY concrete patio installation and mixing the concrete, it’s time to pour the mixture into the building forms. The process of pouring the concrete requires precision and focus to ensure that you achieve a smooth and even surface. One of the most important aspects of pouring concrete is timing – you need to make sure that you pour the mixture before it dries out, but not too quickly as this can lead to cracking.
As you pour the concrete into the building forms, use a shovel or hoe to spread it evenly across the surface. Be sure to fill in all areas, including corners and edges, to prevent any weak spots from forming. Once you’ve poured all of your concrete, use a trowel to smooth out any uneven areas on the surface. You can also add decorative elements at this stage if desired, such as stamped patterns or color additives.
After smoothing out any imperfections on your newly-poured patio surface, cover it with plastic sheeting or other materials that can help protect it from damage while curing. This curing process typically takes several days, during which time you should avoid walking or placing heavy objects on your new patio. With proper care and maintenance after installation, however, your DIY concrete patio will provide a long-lasting outdoor living space for years to come.
Finishing The Surface Of Your Concrete Patio
After pouring and leveling the concrete for your patio, it’s time to finish its surface. One way to add interest and character is by staining the concrete. There are two types of stains: acid-based and water-based. Acid-based stains react chemically with the concrete to create unique, variegated coloring effects that can resemble natural stone. Water-based stains come in a wider range of colors and create a more uniform look. Both stain types require thorough cleaning and preparation before application.
Another option for finishing your concrete patio is choosing a texture. There are several ways to add texture to your patio, including stamping, scoring, or polishing it. Stamping involves pressing patterns into the surface while it’s still wet, creating a decorative effect that can resemble brick or stone pavers. Scoring involves cutting shallow grooves into the surface, creating geometric shapes or designs that can be filled with contrasting colors of grout or sealant. Polishing creates a smooth, glossy surface that reflects light beautifully.
Staining options and texture choices provide endless possibilities for customizing your concrete patio installation. Whether you want the look of natural stone or something more modern and sleek, there’s a finish that will work for you. Once you’ve chosen your stain color or texture style, you may want to consider adding decorative elements such as outdoor lighting fixtures or planters to enhance its beauty even further.
Adding Decorative Elements To Your Patio
To enhance the appearance of your concrete patio, you can add decorative elements such as stencils and colors. Using stencils is a great way to give your patio a unique look. You can choose from an array of stencil patterns and designs that will complement the overall design of your outdoor space. Stenciling is also a cost-effective way of adding a decorative touch to your patio.
If you want to add color to your concrete patio, there are various options available. One popular method is by using acid stains, which provide a vibrant and long-lasting color. Acid stains react with the chemicals present in concrete, creating a unique pattern that enhances the natural beauty of the material. Another option is by using concrete dyes, which offer unlimited color choices and are easy to apply.
By using stencils and adding colors, you can create a beautiful and personalized outdoor living space that reflects your style and personality. These decorative elements will not only improve the aesthetic appeal of your patio but also increase its value. So why settle for plain gray when you can have a beautiful colored concrete surface?
Transition: Now that you’ve added your desired decorative elements to your concrete patio, it’s time to ensure its longevity through proper curing techniques.
Curing Your Concrete Patio
After adding decorative elements to your concrete patio, the next step is to ensure it cures properly. One key aspect of curing is moisture control. If you live in a dry climate, you will need to take extra steps to prevent the concrete from drying out too quickly and cracking. On the other hand, if you live in a humid environment, you will need to take measures to prevent excess moisture from getting trapped under the surface of the concrete.
Temperature management is another important factor in ensuring your concrete patio cures properly. Concrete needs to be kept at a consistent temperature during the curing process. Avoid exposing it to extreme temperatures or fluctuations in temperature, as this can cause cracking or other damage. Consider using insulating blankets or other temperature control methods if necessary.
By taking proper care during the curing process, your concrete patio will be strong and durable for years to come. In the next section, we will discuss how sealing your concrete patio can further enhance its longevity and appearance. Remember that every step of the installation process is important for achieving optimal results. With attention to detail and careful planning, your DIY concrete patio installation can be a success.
Sealing Your Concrete Patio
One of the most crucial steps in protecting your newly installed concrete patio is sealing it. Did you know that a properly sealed concrete patio can last up to 25 years with proper maintenance? However, choosing between DIY and professional sealant application is a decision that requires careful consideration.
If you are confident in your DIY skills, using a sealant from your local hardware store can be a cost-effective option. However, keep in mind that these products may not provide long-term protection against harsh weather conditions and foot traffic. On the other hand, professional sealant application guarantees high-quality materials and workmanship that can last for years.
When it comes to different types of sealants for concrete patios, there are two main categories: penetrating and film-forming. Penetrating sealants seep into the pores of the concrete surface, providing protection without altering its appearance. Film-forming sealants create a protective layer on top of the surface, enhancing its color and shine. The type you choose depends on personal preference and patio usage.
Ensuring your concrete patio remains in good condition is an ongoing task that starts with proper sealing. While there are benefits to both DIY and professional application, choosing the right type of sealant is equally important. In our next section, we will discuss how to maintain your newly sealed concrete patio to ensure it lasts for years to come.
Maintaining Your Concrete Patio
After sealing your newly installed concrete patio, it is important to maintain it in order to prevent stains and enhance its color. Neglecting basic maintenance can lead to costly repairs down the line. Here are some tips for ensuring your concrete patio stays in top condition:
Firstly, regularly sweep or blow off any debris from the surface of your patio. This will prevent dirt and grime from becoming ingrained into the concrete, which can cause discoloration over time. If you notice any spills or stains on your patio, clean them up immediately with a mild detergent and water solution.
Secondly, consider applying a protective coating every few years to keep your patio looking fresh and new. There are various types of coatings available depending on the level of protection required for your specific situation.
Lastly, be mindful of heavy furniture or objects being dragged across the surface of your patio as this can cause scratches and damage. Consider using furniture pads or lifting heavy objects instead.
By following these basic maintenance tips, you can ensure that your concrete patio remains a beautiful addition to your outdoor living space for years to come.
Moving forward, if you encounter any problems with your concrete patio such as cracking or settling, don’t worry – there are solutions available. In the next section, we will discuss troubleshooting common problems that can arise with concrete patios and how to address them effectively.
Troubleshooting Common Problems
Solving issues during a concrete patio installation can be a challenging experience, but with the right troubleshooting techniques, it is possible to overcome them. One of the most common problems that occur during this process is cracking. Concrete cracks can form due to a variety of reasons such as shrinkage, excessive water usage, and temperature changes. To prevent cracking, it is important to use the correct mix of aggregates and cement and ensure that the surface is level before pouring the concrete.
Another issue that may arise when installing a concrete patio is unevenness. This problem can be caused by different factors such as incorrect mixing ratios or improper leveling. In order to fix this issue, one option is to add more concrete in certain areas to even out the surface. Alternatively, you can grind down high spots using a concrete grinder or sandpaper.
Lastly, drainage issues can occur if water pools on top of your concrete patio after rainfall or watering your plants. To avoid this problem, make sure to create proper slope and drainage channels in your design before pouring the concrete. If you notice pooling water on your patio after it has been installed, consider installing a French drain or adding a layer of permeable gravel on top of the surface to allow for better drainage.
Troubleshooting common problems during a DIY concrete patio installation can save you time and money while ensuring that your project turns out perfectly. By following these tips and techniques for solving issues like cracking, unevenness, and drainage problems, you’ll be able to create a beautiful and functional outdoor space that will last for years to come.
As important as it is to troubleshoot any issues during your DIY project, safety considerations should also be taken into account throughout the entire process. Keep reading for some tips on how to stay safe while installing your own concrete patio at home.
Safety Considerations
When it comes to DIY concrete patio installation, safety should be your top priority. Before starting the project, make sure you have all the necessary safety gear such as gloves, safety glasses, and a dust mask. Concrete can be hazardous if not handled properly, so take precautions to protect yourself.
Another important aspect of ensuring safety is preparing the work site. Remove any debris or obstacles from the area where you will be working. Mark off the boundaries of your patio with stakes and string to ensure that you pour the concrete in the correct location. Remember to also check for any underground utilities before digging or excavating.
Overall, taking steps to prioritize safety before beginning a DIY concrete patio installation project is crucial. By wearing proper safety gear and preparing the work site appropriately, you can minimize risks and ensure a successful outcome for your project. However, for more complex projects that require advanced skills and knowledge, it may be best to hire a professional to avoid potential dangers.
It’s important to keep in mind that while DIY projects can save money, they may not always be suitable for every situation. For example, if your project requires extensive excavation or specialized equipment, it may be best to enlist the help of professionals who are trained and experienced in handling these types of tasks. Always prioritize safety when deciding whether to tackle a home improvement project on your own or hire a professional for complex projects.
Hiring A Professional For Complex Projects
One of the most common objections to hiring a professional for a concrete patio installation is the cost. Many homeowners assume that doing it themselves would be cheaper than hiring someone else. However, this is not always the case. While DIY projects may seem less expensive upfront, they can actually end up costing more in the long run due to mistakes and lack of experience. Professionals have the necessary tools and knowledge to complete the project efficiently and effectively, ultimately saving homeowners time and money.
Another benefit of hiring a professional for complex projects like a concrete patio installation is their expertise. They have years of experience, training, and certifications that allow them to provide high-quality workmanship. They know how to properly prepare the site, install the concrete correctly, and ensure it lasts for years to come. This level of expertise can also give homeowners peace of mind knowing that their investment is in good hands.
On the other hand, there are some drawbacks to hiring professionals for home projects such as a concrete patio installation. Homeowners may have less control over the process and design compared to doing it themselves. Additionally, there may be a higher upfront cost depending on the scope of work needed. However, when considering all factors such as time, quality of workmanship, and potential future repairs or replacements needed due to mistakes made during DIY projects, hiring a professional can ultimately provide more value in the long run.
Overall, while it may seem tempting to take on a complex project like a concrete patio installation yourself, there are many benefits to hiring a professional with experience and expertise in this area. From saving time and money to ensuring high-quality workmanship that lasts for years to come, homeowners can enjoy their new outdoor space without worrying about potential mistakes or issues down the line.
Conclusion
As an expert in concrete patio installation, I have seen firsthand the transformative power of a well-built patio. Beyond its functional purposes, a patio can serve as a gathering space for loved ones and provide a sense of connection to the outdoors. The process of building a patio may seem daunting, but with careful planning and execution, it can be a rewarding DIY project.
From assessing your space to troubleshooting common problems, there are many steps involved in creating a beautiful and durable concrete patio. Each stage requires attention to detail and patience, but the end result is worth the effort. As you embark on this project, remember that your hard work will pay off in the form of countless memories made on your new outdoor oasis.
Symbolically speaking, building a patio is like laying the foundation for new beginnings. It represents an investment in yourself and your home, providing opportunities for growth and connection. Just as each step in the installation process builds upon the last, so too do our experiences shape us into who we are meant to be. So take pride in your work and enjoy the fruits of your labor – your new concrete patio will be a source of joy for years to come.
Image Credits
- “Concrete Wood Patio – Ponca City, OK” by Decorative Concrete Kingdom (featured)

