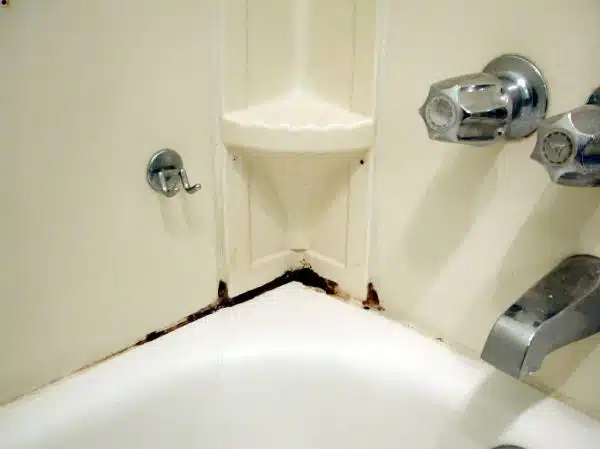
As a professional home improvement contractor, it is not uncommon to come across old caulk in tubs, showers, and sinks. This unsightly residue can accumulate over time, leading to discoloration and mildew growth. Removing old caulk requires patience and the right tools, but it can be done without damaging surfaces or causing harm to one’s health.
Old caulk often serves as a breeding ground for mold and mildew. While it may seem like a small problem at first glance, the effects of this buildup can lead to larger issues such as structural damage or health concerns. Therefore, it is essential to know how to remove old caulk properly and efficiently. In this article, we will discuss some of the best methods for removing old caulk from your tub shower or sink, allowing you to maintain a clean and healthy living space.
Assessing The Condition Of Your Caulk
Before you begin removing old caulk from your tub, shower or sink, it is essential to assess the quality of the existing caulk. You can do this by inspecting for any signs of damage, such as cracks or discoloration. If you notice that the old caulk is peeling away from the surface or if it appears to be brittle, it’s time to remove and replace it.
Identifying signs of damage in your caulk is crucial because leaving damaged caulk in place can lead to water leaks and mold growth. Water can seep into those tiny cracks and crevices, causing damage to underlying structures, leading to costly repairs. Moreover, mold thrives in moist environments such as bathrooms and can cause health problems for occupants.
To ensure that you remove all the damaged caulking effectively, you must prepare adequately for this task. Gathering the right tools and materials will make your job easier and more efficient while ensuring that you achieve a professional-looking finish.
Gathering The Right Tools And Materials
As the old saying goes, “the right tools make all the difference.” This holds especially true when it comes to removing old caulk from your tub, shower, or sink. Before attempting this task, it’s important to gather the necessary materials and tools to ensure a successful outcome.
DIY vs Professional: One of the first things to consider is whether or not you will be tackling this project on your own or hiring a professional. While taking care of this task yourself can save money, it may also require additional time and effort on your part. Hiring a professional can be more costly upfront but may save you time and frustration in the long run.
Cost Comparison: Another thing to consider is the cost of materials and tools needed for this project. Depending on what you already have at home, you may need to purchase items such as a caulk removal tool, scraper, utility knife, and cleaning solution. The cost of these items can add up quickly if you don’t already have them on hand. It’s important to weigh the cost of purchasing these items versus hiring a professional who would likely come equipped with all necessary tools and materials.
To prepare the area for caulk removal, there are several steps you can take before diving in. These include thoroughly cleaning the area with soap and water, drying it completely with a towel or cloth, and covering any nearby surfaces that could potentially be damaged during the process. Taking these steps will help ensure that your caulk removal project goes smoothly and without any unwanted mishaps.
Preparing The Area For Caulk Removal
Before you start removing old caulk from a tub, shower, or sink, it’s important to prepare the area properly. This involves using protective gear and cleaning the surrounding area thoroughly. Here are some tips for getting started:
Using protective gear: Before you begin removing old caulk, make sure you have the necessary protective gear. This may include gloves, safety glasses, and a dust mask. These items will protect your skin, eyes, and lungs from any debris that may be released during the removal process.
Cleaning the area thoroughly: Once you have your protective gear on, it’s time to clean the area around the caulk thoroughly. Use a mild detergent and warm water to scrub away any dirt or grime that may have accumulated around the caulk. Rinse the area with clean water and allow it to dry completely before moving on to the next step.
Removing any loose caulk: If there is any loose or peeling caulk in the area, use a putty knife or scraper to gently remove it before proceeding with the main removal process. This will make it easier to remove all of the old caulk without leaving behind any remnants that can interfere with new caulking.
By following these steps, you’ll be well on your way to successfully removing old caulk from your tub, shower, or sink. The next step involves applying heat to loosen up the remaining caulk so that it can be easily removed without damaging your fixtures or surfaces.
Applying Heat To Loosen The Caulk
Removing old caulk can be a daunting task, especially if it has been in place for years. One effective method of loosening the caulk is by using heat. This can be done using a hair dryer, heat gun, or torch. The heat softens the caulk and makes it easier to remove, saving you time and effort.
It is important to exercise caution when using heat to remove caulk. Always wear protective gear such as gloves and goggles. Keep the heat source moving constantly and do not leave it in one spot for too long as this could damage the surface underneath. Additionally, ensure that there are no flammable materials nearby when using a torch.
Using a hair dryer or heat gun on low settings is typically sufficient for removing caulk from most surfaces. However, if the caulk is particularly stubborn, you may need to use a torch on low settings. Remember to keep the flame moving constantly and avoid overheating any one area. By applying heat to loosen the caulk, you will make it much easier to remove and achieve professional-looking results with minimal effort.
Transition: Now that you have successfully loosened your old caulk with heat, it’s time to move on to the next step of removing it entirely using a razor blade or putty knife.
Using A Razor Blade Or Putty Knife To Remove The Caulk
After applying heat to the caulk, the next step is to remove it with either a razor blade or putty knife. Both tools are effective in removing old caulk, but each has its own set of pros and cons.
A razor blade is a sharp, thin tool that can easily slice through the caulk. It’s great for precision work and getting into small spaces. However, it can also be dangerous if not used properly, as it can easily cut skin or damage surfaces. Additionally, it may take longer to remove larger sections of caulk.
On the other hand, a putty knife has a wider blade that makes it easier to remove larger sections of caulk quickly. It’s also less likely to cause damage to surfaces or injure the user. However, its wider blade makes it less precise than a razor blade and may make it difficult to get into tight spaces.
When choosing between a razor blade and putty knife for removing old caulk, consider the size of the area you need to cover and how precise you need to be. If you’re working with smaller sections or need more precise cuts, go for the razor blade. If you’re working with larger areas or want to minimize risk of injury or damage, opt for the putty knife. Whichever tool you choose, make sure to use caution and follow safety guidelines when using sharp tools.
Moving forward from here, once all of the old caulk has been removed by either a razor blade or putty knife, scrubbing with an abrasive pad or brush can help ensure any remaining residue is removed before applying new caulk.
Scrubbing With An Abrasive Pad Or Brush
Ironically, after all the elbow grease you’ve put into scrubbing the old caulk away, you may still find some stubborn remnants. For those hard-to-reach spots or especially tricky areas, it’s time to bring out the big guns: abrasive pads and brushes. This method requires a bit more muscle than the previous steps, but it can be highly effective in removing any remaining residue.
One of the most popular options for an abrasive pad is a scouring pad made of nylon or steel wool. These materials can help break down any leftover caulk and lift it away from the surface. Be careful not to use too much pressure as this can scratch or damage your fixtures. Another option is using a stiff-bristled brush like an old toothbrush or grout brush. These brushes can help get into tight spaces and really work at loosening up any stubborn bits.
Alternative methods include using sandpaper or razor blades to carefully scrape away remaining caulk. However, these methods require extra caution as they can easily damage surfaces if not used properly. It’s also important to note that abrasive pads and brushes may not be suitable for certain finishes like porcelain or fiberglass, so always double-check before proceeding.
Pros and cons of using abrasive pads and brushes: On one hand, these tools are highly effective in getting rid of any remaining caulk buildup. They’re also relatively inexpensive and easy to find at most hardware stores. However, they do require some physical effort and can potentially damage certain surfaces if not used correctly. If you’re unsure about whether this method is right for your particular fixture, consider consulting with a professional contractor before proceeding with this step. With that said, let’s move on to our next section where we’ll explore applying a chemical caulk remover for those particularly tough spots!
Applying A Chemical Caulk Remover
When it comes to removing old caulk from a tub, shower, or sink, there are several tools and techniques at your disposal. Among these is the use of chemical caulk removers, which can quickly dissolve stubborn sealant and make it easier to scrape away. However, it’s important to understand that not all chemical caulk remover alternatives are created equal. Some may contain harsh chemicals that can be toxic or damaging to certain surfaces.
Before using any type of chemical caulk remover, it’s crucial to take proper safety precautions. This includes wearing gloves and eye protection, as well as ensuring adequate ventilation in the room where you’ll be working. Additionally, always follow the manufacturer’s instructions carefully and don’t leave the product on for longer than recommended.
One popular alternative to traditional chemical caulk removers is a citrus-based solvent. These products use natural ingredients like orange oil to break down the sealant without posing a risk to human health or the environment. Another option is a soy-based stripper, which is similarly effective but tends to work more slowly than other types of chemical removers. Ultimately, the best choice will depend on your specific needs and preferences.
Transition: Now that you’re familiar with some of the different types of chemical caulk remover alternatives available, let’s move on to discussing another approach: using a caulk softener.
Using A Caulk Softener
After applying a chemical caulk remover, the next step in removing old caulk from a tub shower or sink is to use a caulk softener. This product has its own benefits and limitations that homeowners should be aware of before using it.
One of the main benefits of using caulk softener is that it makes the removal process easier and less tedious. The product works by penetrating the old caulk and breaking down its adhesive properties, making it easier to remove with a scraper or putty knife. Caulk softeners are also effective at dissolving any remaining residue left behind after scraping away the old caulk.
However, there are also some limitations to using a caulk softener. For one, not all products work on all types of caulks or surfaces. Some may be too harsh for delicate materials such as marble or granite. Additionally, it may take longer for the product to fully penetrate and soften the old caulk, especially if it has been in place for a long time.
Using a caulk softener can be an effective way to make the process of removing old caulk from a tub shower or sink easier and more efficient. Homeowners should carefully choose their product based on their specific needs, taking into account any limitations that may come with its use. Once the old caulk has been softened and removed, the next step is to address any residual residue left behind with a solvent specifically designed for this purpose.
Removing Residual Caulk With A Solvent
When removing old caulk, it’s common to find residual caulk remaining on the surface. Fortunately, you can remove this residual caulk with a solvent. Using the right solvent will help you avoid damaging the surface or leaving behind any residue.
The best solvents for removing residual caulk are denatured alcohol, mineral spirits, or acetone. Denatured alcohol is safe to use on most surfaces and won’t damage the finish. Mineral spirits are also great for removing caulk residue and are particularly useful on ceramic surfaces. Acetone is a powerful solvent that works well on stubborn caulk residue but should be used with caution as it can damage some finishes.
When using solvents to remove residual caulk, safety precautions must be taken. Always work in a well-ventilated area and wear gloves and eye protection. Additionally, make sure that the solvent you’re using is compatible with the surface you’re working on by testing it in an inconspicuous area first.
Now that you’ve removed all of the old caulk and its residue from your tub shower or sink, it’s time to sand the surface for a smooth finish. Sanding will help prepare the surface for recaulking and ensure that your new sealant adheres properly.
Sanding The Surface For A Smooth Finish
When removing old caulk from a tub, shower, or sink, sandpaper is an essential tool. Different types of sandpaper are available, such as aluminum oxide, garnet, silicon carbide, and ceramic. The grit of the paper should be chosen based on the material being sanded, with finer grits being recommended for softer surfaces. For hard surfaces, such as porcelain, a medium to coarse grit sandpaper should be used.
Sandpaper Types
When it comes to sanding the surface for a smooth finish, using the right type of sandpaper is crucial. Different grits of sandpaper are available and each one serves a unique purpose. The most commonly used grits are 80, 120, and 220. The lower the number, the coarser the sandpaper is and the more material it removes. On the other hand, higher numbers indicate finer grits suitable for smoothing out rough spots.
The technique used when sanding also depends on the project at hand. For instance, when removing old paint or stubborn stains from a surface, start with coarse grit paper and gradually move to finer grits for a smoother finish. Sanding in circular motions or back and forth will also make a difference in achieving an even surface.
It’s important to note that when working with delicate surfaces like wood or metal, extra care needs to be taken as over-sanding can damage them irreparably. In such cases, starting with finer grit paper is advisable as too much pressure can cause unwanted scratches and marks on the surface. With these tips in mind, you can achieve a smooth finish that enhances your home’s aesthetic appeal without damaging your fixtures or fittings in any way.
Sandpaper Grits
When it comes to achieving a smooth finish on any surface, using the right sandpaper grit is essential. Different sandpaper grits serve different purposes and can help you achieve the desired results with ease. For instance, the coarser sandpaper grits, such as 80 or 120, are best used for removing old paint or stubborn stains from surfaces. On the other hand, finer sandpaper grits like 220 are ideal for smoothing out rough spots.
When sanding surfaces evenly, it’s important to start with a coarse sandpaper grit before moving on to finer ones. This technique allows you to remove any unwanted material from the surface while gradually achieving a smoother finish. It’s also essential to be gentle when working with delicate surfaces like wood or metal as over-sanding can cause irreversible damage.
To achieve an even surface when sanding, it’s advisable to use circular motions or back and forth movements. These techniques ensure that you don’t miss any spots while also preventing unwanted scratches and marks on the surface. With these tips in mind and by using different sandpaper grits appropriately, you can easily achieve a smooth finish that enhances your home’s aesthetic appeal without causing any damage.
Cleaning And Drying The Area
After sanding the surface, it’s time to remove the old caulk from your tub, shower or sink. This is a necessary step in preparing for new caulking because any remaining old caulk can prevent proper adhesion of the new one. Removing old caulk is not a difficult process but requires patience and some elbow grease.
To begin, use a utility knife or a razor blade to cut along the edges of the old caulk. Be careful not to scratch the surrounding surfaces. Then, use a putty knife or a scraper tool to gently pry off the old caulk from the surface. Work slowly and carefully, making sure not to damage the underlying surfaces. You may also want to use a caulk softener to loosen stubborn residues.
Preventing mold growth after applying new caulk is essential to ensure its longevity. Before applying new caulk, make sure that all surfaces are completely dry. Use fans or dehumidifiers if necessary as moisture can cause mold growth over time. Additionally, apply silicone-based caulking as it has antimicrobial agents that resist mold growth better than other types of caulks.
Now that you have removed all traces of old caulk and dried the area thoroughly, it’s time to apply new caulking properly. Follow manufacturer instructions carefully and work in small sections at a time for best results. With these techniques in mind, you’ll be able to remove old caulk safely and effectively while preventing future mold growth with proper drying techniques before applying new caulking.
Applying New Caulk
Once the old caulk has been removed, it’s time to apply new caulk. The first step is to ensure that the area is clean and dry. Any leftover residue from the old caulk can interfere with the adhesion of the new caulk. If necessary, use a cleaning solution and scrub brush to remove any remaining debris.
Choosing the right caulk is also important. There are many types of caulks available on the market, each designed for specific purposes. For a tub shower or sink, it’s best to choose a silicone or latex-based caulk that is waterproof and flexible. These types of caulks are ideal for areas that are exposed to moisture because they won’t crack or peel over time.
To apply caulk evenly, use a caulking gun and run a steady bead along the joint where the tub or sink meets the wall or countertop. Smooth out any bumps with your finger or a caulking tool, being sure not to press too hard as this can cause the caulk to be too thin in some areas. Once you’ve finished applying the caulk, allow it to dry completely before exposing it to any moisture.
Choosing The Right Type Of Caulk For Your Needs
Are you looking for the right type of caulk to use for your home improvement project? Choosing the right one can be a daunting task, but it is essential to ensure that the job is done correctly. In this section, we will discuss the benefits of silicone caulk and common mistakes to avoid.
Silicone caulk is a popular choice among homeowners due to its flexibility and durability. It has excellent adhesive properties and can withstand extreme temperatures, making it suitable for use in areas exposed to moisture and heat. Additionally, it is resistant to mold and mildew growth, so it is ideal for use in bathrooms and kitchens.
When choosing silicone caulk, it is important to avoid common mistakes that can compromise its effectiveness. One mistake is failing to clean the surface before applying the caulk. Dirt or debris left on the surface can prevent the caulk from adhering correctly. Another common mistake is using too little or too much caulk, which can lead to uneven coverage and gaps that allow water to seep through.
In summary, silicone caulk offers numerous benefits that make it an ideal choice for many home improvement projects. However, it is crucial to avoid common mistakes when using this type of caulk. In the next section, we will provide you with tips on how to maintain your caulk properly.
Tips For Maintaining Your Caulk
Preventive measures are essential for maintaining your caulk. One of the most important things you can do is to keep your bathroom dry. This means wiping down any excess water after every use, and making sure that there is no standing water in your sink or bathtub. You should also make sure that your bathroom is well-ventilated, as moisture buildup can lead to mold and mildew growth.
There are several DIY alternatives to consider when it comes to re-caulking your bathtub or sink. One popular option is using a silicone caulk remover tool, which helps to scrape away old caulk without damaging the surrounding tile or grout. Another option is using a chemical remover, which dissolves the caulk and makes it easier to remove with a scraper or putty knife. However, be sure to read all instructions carefully before using any chemical products.
In addition to preventive measures and DIY alternatives, hiring a professional for difficult removal jobs may be necessary. A professional contractor will have access to specialized tools and techniques that can safely remove old caulk without causing damage to your bathtub or sink. Additionally, they can provide expert advice on how often you should re-caulk and what type of caulking material is best suited for your specific needs. Ultimately, investing in professional help can save you time, money, and frustration in the long run.
Hiring A Professional For Difficult Removal Jobs
Hiring a professional for difficult caulk removal jobs can have both benefits and drawbacks. The primary benefit is that professionals have the necessary tools and experience to remove tough caulk without damaging the surrounding surfaces. They also have access to professional-grade chemicals that are more effective than those available to the average homeowner.
However, there are some drawbacks to hiring professionals for caulk removal. The most obvious one is cost, as hiring a professional can be significantly more expensive than doing it yourself. Additionally, some people may feel uncomfortable having strangers in their home or may not want to take the time to schedule an appointment.
Ultimately, whether or not you should hire a professional for caulk removal depends on your individual circumstances. If you’re confident in your ability to remove the old caulk safely and effectively, then doing it yourself may be the best option. On the other hand, if you’re unsure about how to tackle the job or don’t have the time or resources to do it yourself, then hiring a professional may be worth considering.
Conclusion
Assessing the condition of your caulk is the first step in ensuring a successful removal process. Gather the right tools and materials, such as a heat gun, razor blade or putty knife, and cleaning supplies. Preparing the area for caulk removal is crucial to avoid any damage to surrounding surfaces. Applying heat to loosen the caulk will make it easier to remove. Use caution when using tools to avoid damage to your tub, shower, or sink.
Applying new caulk is essential after removing old caulk. Choosing the right type of caulk for your needs is important to ensure a long-lasting seal. Regular maintenance and cleaning also help maintain your caulk. However, if you have difficulty removing old caulk or applying new caulk, hiring a professional may be necessary.
As home improvement contractors, we understand the importance of proper caulking in maintaining your bathroom fixtures’ integrity. We hope this guide has provided you with valuable information on how to remove old caulk from your tub, shower, or sink properly. Remember that regular maintenance is key to prolonging the life of your fixtures and avoiding costly repairs down the road. So go ahead and take on that DIY project with confidence – just don’t hesitate to call us if you need assistance!
Image Credits
- “Moldy Old Caulk” by Editor B (featured)

