Wainscoting is a classic and elegant way to add character and depth to the walls of any room. DIY wainscoting can be a cost-effective method of achieving this look, while also allowing you to personalize the design to fit your specific style and needs. While it may seem like a daunting task for those without experience in woodworking or home renovation, with the right tools and guidance, anyone can successfully install their own wainscoting.
In this article, we will provide step-by-step instructions on how to DIY wainscoting, including selecting materials, measuring and planning the layout, cutting and installing the paneling, and finishing touches. We will also offer tips on how to avoid common mistakes that can lead to an uneven or unfinished appearance. With our expert guidance, you’ll be able to transform any room into a beautiful and functional space that showcases your DIY skills.
Benefits Of Installing Wainscoting
Wainscoting is a popular decorative feature that can add value to any home. It is a type of paneling that covers the lower portion of your walls, usually up to chair rail height. Installing wainscoting has several advantages, including aesthetic appeal and cost effectiveness.
One of the main advantages of wainscoting is its ability to create visual interest in a room. By adding texture and depth to your walls, wainscoting can give your space a timeless and elegant look. It also provides an opportunity for customization, as there are many different types of materials and styles available to choose from.
Another advantage of wainscoting is its cost effectiveness. Compared to other types of wall finishes, such as wallpaper or paint, wainscoting can be an affordable option. Additionally, it is durable and long-lasting, which means you won’t have to replace it as often as other finishes.
To install wainscoting yourself, there are a few tools and materials needed. These include measuring tape, a level, nails or screws, adhesive or construction adhesive glue, saws (such as a jigsaw or circular saw), molding pieces (such as quarter round or baseboard molding), sandpaper or wood filler for finishing touches. Let’s explore these items in more detail in the next section.
Tools And Materials Needed
Tools needed for a DIY wainscoting project include a saw, tape measure, pencil, chalk line, nail gun, and miter saw. Materials required include wood panels, trim, glue, filler, nails, paint, and sandpaper. The saw is needed to cut the wood panels to size while the miter saw is used to cut angles for the trim. The nail gun is used to secure the wood panels to the wall and glue is used to attach the trim to the wood panels.
Tools
As a DIY wainscoting enthusiast, it is crucial to have the right tools in your arsenal. Power tools are necessary for making the installation process easier and faster. A circular saw is an essential tool that can cut through large pieces of wood with ease. A cordless drill is also a must-have tool for drilling holes into the wall and attaching the wainscoting boards.
While working with power tools, safety should always be a top priority. It is important to wear protective gear such as safety goggles, gloves, and earplugs. Additionally, make sure to read and understand the instructions before using any power tool to avoid accidents or injuries.
Apart from power tools, other materials needed include a level, measuring tape, adhesive, nails or screws, and paint or stain (depending on your preference). With all these tools and materials at hand, you can successfully install wainscoting in your home without having to hire a professional.
Materials
As a DIY wainscoting enthusiast, it is crucial to have the right materials in your arsenal. There are different types of wainscoting materials available in the market, such as MDF (medium-density fiberboard), hardwood, PVC, and beadboard. Each type of material has its advantages and disadvantages, which should be considered before making a purchase.
MDF is a popular choice for wainscoting because it is affordable and easy to install. It also has a smooth surface that makes painting or staining easier. Hardwood is a more expensive option but offers durability and a classic look. PVC is resistant to moisture and termites, making it ideal for areas with high humidity levels such as bathrooms or basements. Beadboard adds texture to the walls and creates a cozy cottage feel.
When choosing wainscoting materials, cost comparison should also be taken into consideration. While some materials may be more expensive than others, they may last longer and require less maintenance over time. It is important to weigh the pros and cons of each type of material before making a decision.
In addition to the wainscoting boards themselves, other necessary materials include adhesive, nails or screws, paint or stain (depending on your preference), measuring tape, level, safety gear such as goggles and gloves, and power tools such as a circular saw or cordless drill. By having all these tools and materials at hand and considering the different types of wainscoting materials available along with their costs comparison involved can help you successfully install wainscoting in your home without having to hire a professional.
Planning And Measuring Your Space
To ensure a successful wainscoting project, measuring accuracy and design considerations are crucial. Measuring your space accurately will help determine the amount of materials needed and avoid costly mistakes. Start by measuring the height of your walls, then decide on the height of your wainscoting. A common rule is to have it be one-third or two-thirds of the wall’s height. Additionally, consider any obstacles such as outlets or baseboards that may affect the placement of panels.
Design considerations are equally important when planning your wainscoting project. Consider the style and overall aesthetic of your space. Wainscoting can come in various styles such as traditional raised panel, shaker, or beadboard. The style you choose should complement the rest of your decor seamlessly. Also, consider any color schemes you have in mind and how it will work with different types of wood or paint finishes.
By taking into account measuring accuracy and design considerations, you’ll be able to plan a successful wainscoting project that’s tailored to your individual style and needs. Remember to take precise measurements and keep an open mind when considering different styles that will enhance the look and feel of your home. In the next section, we’ll explore choosing the right wainscoting style to bring your vision to life.
Choosing The Right Wainscoting Style
- Wainscoting can be a great way to add a touch of class and character to any room, but it is important to consider all of the available types, materials, and finishes in order to ensure the best fit for any given space.
- Common types of wainscoting include board and batten, beaded board, raised panel, and flat panel, each of which has advantages and disadvantages that should be considered for any given room.
- When selecting a wainscoting style, it is important to consider the design of the room and the desired effect; for example, a more formal room may benefit from a raised panel wainscoting, while a more casual room may look better with a board and batten style.
- The material and finish of the wainscoting should also be taken into account; wood is the most popular choice, but there are many other materials available, including MDF, vinyl, and metal.
- The finish of the wainscoting should match the overall style of the room; for example, a painted finish would be appropriate for a rustic or shabby chic room, while a stained finish would look better in a more modern or contemporary space.
- With careful consideration of all available types, materials, and finishes, it is possible to choose the perfect wainscoting for any room.
Types Of Wainscoting
When it comes to choosing the right wainscoting style for your home, there are various types of wainscoting that you can consider. Each style has its own unique features and characteristics that can enhance the overall look and feel of your interior space. In this article, we will provide you with a detailed styles comparison of the most popular types of wainscoting, as well as some DIY installation tips to help you achieve the perfect finish.
The first type of wainscoting is beadboard, which is a classic and timeless option. It consists of narrow strips or planks that are installed vertically on walls, creating a series of parallel lines and grooves. Beadboard wainscoting is ideal for adding texture and visual interest to any room in your home. Another popular type is raised panel wainscoting, which features flat panels that are raised above the surface of the wall. This style often comes with decorative details such as carved moldings or beveled edges.
Finally, there is board and batten wainscoting, which consists of wide boards that are installed vertically on walls along with narrow strips called battens. This style is ideal for adding a rustic or country touch to your interior space. When comparing these styles, it’s important to consider factors such as cost, ease of installation, durability and maintenance requirements. By following some simple DIY installation tips and carefully selecting the right style for your home, you can create a beautiful and functional space that reflects your personal taste and style.
Room Design Considerations
When it comes to choosing the right wainscoting style for your home, there are several factors that you need to consider. One of these is room design considerations, which includes room color and furniture placement. Room color is an important consideration because it can affect the overall look and feel of your interior space. The right color scheme can create a cohesive and harmonious design, while the wrong one can make your space look disjointed and uninviting.
Another factor to consider when choosing a wainscoting style is furniture placement. This is important because it can affect the flow and functionality of your space. When placing furniture in a room with wainscoting, it’s important to consider the height of the wainscoting as well as its placement on the wall. The right furniture arrangement can complement the wainscoting and enhance its visual appeal, while the wrong one can detract from its beauty.
In summary, when choosing the right wainscoting style for your home, it’s important to consider not only the style itself but also room design considerations such as room color and furniture placement. By taking these factors into account, you can create a beautiful and functional space that reflects your personal taste and style. With careful planning and attention to detail, you can achieve a stunning finish that will enhance the overall look and feel of your interior space for years to come.
Materials & Finishes
When it comes to wainscoting, the material and finish are just as important as the style. The right texture and color scheme can elevate the look of a room while adding depth and dimension. Popular textures for wainscoting include beadboard, raised panel, and flat panel. Each texture has its own unique charm that can complement different design styles.
In addition to texture, choosing the right finish is also crucial in achieving the desired aesthetic. Some popular finishes for wainscoting include painted, stained, or natural wood. Painted finishes create a clean and modern look while stained finishes offer warmth and richness. Natural wood finishes give off a rustic feel that can add character to any space.
When selecting materials for your wainscoting project, it’s important to consider your color scheme. Neutral colors such as white or beige work well with all textures and finishes, creating a classic look that never goes out of style. However, bold colors like navy blue or emerald green can add a pop of personality to your space and make a statement. Ultimately, the choice between neutral or bold color schemes will depend on personal preference and existing decor in the room.
By carefully considering all aspects of materials and finishes when choosing your wainscoting style, you can create a beautiful space that reflects your individual taste while serving your needs in functionality and style. Whether you prefer classic or contemporary design elements, there is sure to be a perfect combination of material texture, finish type, and color scheme that will enhance the overall look of your interior space.
Preparing Your Walls For Installation
A common misconception with wainscoting is that it can be installed without proper wall preparation. However, this couldn’t be further from the truth. Wall preparation is essential to ensure the longevity and stability of your wainscoting installation. Before you begin any installation process, it’s vital to inspect your walls for unevenness, cracks, and damage that could compromise the integrity of your project.
The next step in preparing your walls for wainscoting installation is surface cleaning. It’s crucial to remove all dirt, dust, and debris from the surface of your walls before starting any work. Use a damp cloth or sponge to wipe down the walls thoroughly and allow them to dry completely before proceeding with any other preparations.
Once you’ve inspected and cleaned your walls, it’s time to fill in any gaps or imperfections using spackling paste or wood filler. This will ensure a smooth finish for your wainscoting panels. After the filler has dried completely, sand the surface until it’s smooth and even. With these preparations complete, you’re now ready to move on to cutting and installing baseboards for your wainscoting project.
Cutting And Installing Baseboards
The baseboard is an essential element in wainscoting because it provides the foundation for the decorative paneling. Before cutting the baseboards, you must determine the appropriate height for your wainscoting. You can use a measuring tape to measure from the floor to where you want your chair rail or wainscoting to end. Once you have this height, add the thickness of your baseboard and make a mark on the wall. This will be your guide for installing the baseboards.
When selecting materials for your baseboards, consider using wood that matches or complements your existing trim work. Oak, pine, and poplar are popular choices for their affordability and ease of cutting. Cutting techniques depend on whether you are using a miter saw or hand saw. Miter saws provide accurate cuts and angled edges while handheld saws take longer but offer more control.
In summary, cutting and installing baseboards is an important step in creating beautiful wainscoting. Choose materials that match your existing trim work and use proper cutting techniques with either a miter saw or hand saw. Once cut to length, install them carefully using finishing nails and adhesive glue to ensure they are securely attached to the wall before moving onto installing the chair rail.
Installing The Chair Rail
According to a recent survey, installing the chair rail is one of the most challenging parts of DIY wainscoting projects. However, with proper guidance and attention to detail, this task can be accomplished with ease. Before starting, it is essential to measure the length of your wall accurately and purchase enough chair rail molding for the project.
To begin installing the chair rail, cut it to size using a miter saw. Cutting angles can be tricky, so it’s crucial to make precise cuts at a 45-degree angle. Once you have all your pieces cut and ready, start securing them to the wall using finishing nails and adhesive glue. Make sure you check that each piece is level as you go along.
Securing the chair rail in place is an important step in achieving a professional look for your wainscoting project. Once you’ve finished installing it, take a step back and admire your work before moving on to cutting and installing the panels. Remember that patience and attention to detail are critical when completing any DIY project.
Cutting And Installing The Panels
To achieve a professional-looking wainscoting, proper panel placement is critical. Before cutting the panels, it is essential to determine their size and position in relation to the chair rail and baseboard. To do this, measure the height of your wall and subtract the height of your chair rail from it. Divide that number by the desired number of panels you want. This will give you the height of each panel.
Once you have determined panel size, it is time to cut them. There are various cutting techniques you can use depending on your tools and skills. A circular saw or jigsaw can be used for straight or curved cuts, respectively. Another option is to use a table saw with a dado blade to create grooves for hidden panel fasteners. Whatever method you choose, ensure that each panel has clean edges and fits snugly against the chair rail and baseboard.
After cutting all panels, place them onto the wall using a level to ensure they are straight and evenly spaced. Nail each panel securely into place with finishing nails, being careful not to over-nail as it can cause splitting or cracking of the wood. Once all panels are in place, inspect them closely and make any necessary adjustments before moving on to filling in nail holes and sanding for a smooth finish.
Filling In Nail Holes And Sanding
As the saying goes, “the devil is in the details.” When it comes to DIY wainscoting, filling in nail holes and sanding are two crucial details that can make or break the final product. Properly filling in nail holes will give your wainscoting a seamless finish, while sanding will ensure a smooth surface for painting or staining.
There are several filling techniques you can use for nail holes. One option is to use wood filler, which comes in different colors to match your wainscoting’s wood type. Apply the filler with a putty knife and let it dry completely before sanding it down. Another option is to use wax sticks, which are easy to apply and don’t require any drying time. Simply rub the wax stick over the hole until it’s filled and smooth out any excess with a plastic scraper.
Once all of your nail holes are filled, it’s time to move on to sanding. Sanding by hand may take longer, but it allows for more control over the process. Start with a coarse grit sandpaper and work your way up to finer grits until you achieve a smooth surface. If you’re using an electric sander, be sure to keep it moving constantly and avoid applying too much pressure in one spot.
With your nail holes filled and your wainscoting sanded down, you’re one step closer to achieving professional-looking DIY wainscoting. The next step is painting or staining your wainscoting – but before we dive into that process, let’s discuss some tips for achieving flawless results.
Painting Or Staining Your Wainscoting
Once your wainscoting is installed, the next step is to determine how you want to finish it. One of the most popular options is painting or staining it. This will not only add color and personality to your space but also protect your wainscoting from wear and tear.
Color options are endless when it comes to painting or staining your wainscoting. You can choose a color that complements the existing décor or go for something bold and eye-catching. Consider using a paint with a satin or semi-gloss finish for easy cleaning, especially in high-traffic areas like hallways and entryways. Staining your wainscoting will give it a more natural look while still providing protection against scratches and scuffs.
Finishing techniques are important to consider as they affect the final appearance of your wainscoting. When painting, use a brush or roller to apply an even coat of paint, making sure to remove any excess paint before applying. For staining, use a clean cloth to apply the stain evenly and wipe away any excess. Sanding between coats can also help achieve a smooth finish.
- Use painter’s tape to protect adjacent surfaces.
- Consider adding multiple layers for added durability.
- Experiment with different finishes such as matte or glossy.
Now that you’ve painted or stained your wainscoting, it’s time to add some decorative moulding for an extra touch of elegance.
Adding Decorative Moulding
After painting or staining your wainscoting, you may want to add an extra touch of elegance by incorporating decorative moulding. This can elevate the overall design and create a more sophisticated look for your space. There are a variety of design ideas when it comes to decorative moulding, including crown moulding, chair rail moulding, and baseboard moulding.
When selecting the type of decorative moulding for your wainscoting project, consider the style of your home and the overall aesthetic you wish to achieve. For example, if you have a modern home with clean lines, a simple chair rail moulding may be more appropriate than ornate crown moulding. Additionally, consider the size and proportion of the room – larger rooms may benefit from thicker or taller mouldings to create a grander effect.
Once you have chosen your decorative moulding, it’s time to install it onto your wainscoting. Start by measuring and cutting the pieces to fit snugly against each other and any existing corners or edges. Use adhesive or nails to secure them in place. It is important to take extra care during installation as any gaps or unevenness will be noticeable once painted or stained. With careful attention to detail, adding decorative moulding can be an impactful addition to your DIY wainscoting project that adds both beauty and value to your home.
As you move forward with installing decorative moulding on your wainscoting project, it’s important not to overlook other aspects of the room such as electrical outlets. In our next section, we will provide tips for seamlessly incorporating electrical outlets into your newly installed wainscoting without sacrificing functionality or aesthetics.
Installing Electrical Outlets
Before beginning the installation of electrical outlets, it’s essential to turn off the power supply to the room you’re working in. Electrical wiring should be handled with extreme caution, and any mistakes could result in serious injury or damage to your home. Therefore, it’s crucial to follow safety guidelines while installing outlets.
When installing electrical outlets on wainscoting, start by marking where each outlet will be located using a pencil. Then, use a stud finder to locate the studs behind the wall. It’s essential to ensure that each outlet is anchored securely into a wall stud. Cut holes for the boxes using a drywall saw and insert them into place. Run electrical wires from an existing outlet or circuit breaker box to the new outlet box.
To install electrical outlets on wainscoting, you’ll need wire strippers, pliers, wire nuts, an electrical tester, and an outlet box cutter. If you’re not comfortable working with electricity or don’t have experience with wiring, it’s best to consult an electrician. By following these steps and taking safety precautions when working with electrical wiring, you can safely install outlets on your wainscoting project.
Moving forward with your DIY wainscoting project requires careful attention to detail and safety considerations when dealing with electrical wiring. Following proper procedures during installation is essential in avoiding costly mistakes or potential hazards down the line. With that said, let’s move onto some tips for achieving a professional finish for your wainscoting project while avoiding common mistakes along the way.
Tips For A Professional Finish
Sanding is an important part of the process to ensure a smooth surface and reduce the amount of dust and debris. Priming is necessary to create a good base for the paint and protect the wall. Painting should be done with a good quality brush or roller for an even finish. Caulking should be applied to fill any gaps and seams to create a seamless look.
Sanding
To achieve a professional finish on your wainscoting project, sanding is a crucial step that should not be overlooked. Using sandpaper is the traditional way to smooth out the surface of wood panels, but it’s important to choose the right grit for the job. The higher the number on the sandpaper, the finer the grit, which means it will create a smoother finish. Start with a coarser grit and work your way up to a finer one until you’re satisfied with the smoothness of your wainscoting.
Avoid over-sanding as this can ruin the natural beauty of wood grain. It’s important to use proper sanding techniques such as using even pressure and keeping your movement consistent. Sanding safety precautions should also be taken into consideration, especially when working with power tools like orbital sanders or belt sanders. Always wear protective gear like goggles and a dust mask to avoid inhaling sawdust.
When sanding is complete, make sure to do some finishing touches like wiping down all surfaces with a damp cloth and checking for any rough spots or scratches that need attention. Some common sanding mistakes to avoid include not paying attention to details like corners and edges, skipping grits in between stages, or letting sawdust accumulate on surfaces during sanding sessions. With these tips and tricks in mind, you can achieve a smooth finish on your DIY wainscoting project that will impress anyone who sees it!
Priming
To achieve a professional finish on your wainscoting project, there are several tips and techniques that you can follow. One important step is priming, which is necessary to prepare the surface for painting or staining. Priming helps the paint or stain adhere better to the wood and prevents any stains or tannins from bleeding through.
Before applying primer, make sure the surface of your wainscoting is clean, dry, and free from any dust or debris. Use a tack cloth to remove any remaining sawdust or particles that may have been left over from sanding. You can then apply a coat of primer using a brush or roller, making sure to cover all surfaces evenly. Allow the primer to dry completely before moving on to the next step.
When choosing a primer, consider using one that is specifically designed for wood surfaces. This will ensure that it provides maximum adhesion and durability. Some primers also have stain-blocking properties, which can be helpful if you’re working with an older house that has previous layers of paint or stain. By following these tips and taking your time with each step of the process, you can achieve a professional-looking finish on your wainscoting project that will enhance the overall look of your space.
Common Mistakes To Avoid
To achieve a professional-looking wainscoting, it is crucial to avoid common mistakes that can affect the overall outcome. One of the most common mistakes is failing to measure accurately, leading to uneven panel spacing or an unbalanced design. Always take precise measurements before making any cuts and ensure that your panels are evenly spaced.
Another mistake to avoid is using poor quality materials or tools. Cheap or low-quality materials may seem like a good way to save money, but they can end up costing you more in the long run due to their short lifespan and subpar performance. Similarly, using inadequate tools can lead to poorly cut panels or uneven edges, which will ultimately affect the overall appearance of your wainscoting.
Troubleshooting tips are also essential when installing wainscoting. In case of any issues during installation, such as uneven gaps between panels or misalignment, don’t panic. Instead, use these tips to fix the problem: check your measurements again and use spacers for even panel spacing; sand down any rough edges with fine-grit sandpaper; and adjust panel placement as necessary.
| Mistake | Solution |
|---|---|
| Failing to measure accurately | Take precise measurements before cutting |
| Using poor quality materials or tools | Invest in high-quality materials and tools |
| Uneven gaps between panels | Use spacers for even panel spacing |
| Rough edges on panels | Sand down with fine-grit sandpaper |
Avoiding mistakes and being prepared for troubleshooting scenarios are crucial when DIY-ing wainscoting. By taking accurate measurements and investing in the right materials and tools, you can avoid common mistakes that may affect your project’s success. If you do encounter any issues during installation, follow these simple troubleshooting tips to get back on track with ease.
Diy Wainscoting Cost And Time Estimate
A wise man once said, “Time is money.” This statement holds true even in the realm of DIY wainscoting. Before embarking on a wainscoting project, it is essential to estimate the budget and time required for the task. Accurate projections will help you avoid unexpected expenses and delays that could affect the timeline of your project.
Estimating the budget for a DIY wainscoting project can be tricky. However, with careful planning and research, you can get an idea of what to expect. Here are three key factors to consider when estimating your budget:
- Materials: Wainscoting requires various materials such as lumber, paint or wallpaper, nails or adhesives, and tools like saws or hammers.
- Labor: If you plan on hiring someone to install your wainscotting paneling or trim work or doing it yourself.
- Miscellaneous Expenses: Additional costs may include permit fees if required in your area, delivery charges for materials, and any unforeseen expenses.
Time management is crucial when tackling a DIY wainscoting project. Without proper planning and organization, the project can quickly become overwhelming and stressful. Here are some tips to help you manage your time effectively:
- Make a plan: Create a detailed plan including a timeline that outlines each step of the process from beginning to end.
- Schedule wisely: Block out specific times in your calendar dedicated solely to working on your wainscoting project.
- Be realistic: Set achievable goals based on the amount of time you have available.
In summary, estimating both time and budget for DIY wainscoting projects is paramount. Take into account all possible expenses before starting work on your walls so that there are no surprises halfway through the job. Effective time management will ensure that everything runs smoothly from start to finish without any significant delays along the way.
Conclusion
Wainscoting is a simple and cost-effective way to add style and elegance to any room in your home. By following the steps outlined in this article, you can easily complete a DIY wainscoting project in just a few days. Before beginning, it is important to plan carefully, measure accurately, and choose the right style of wainscoting for your space. With the right tools and materials, installing wainscoting can be done by anyone with basic DIY skills.
According to a recent survey, 78% of homeowners who installed wainscoting reported feeling more satisfied with their homes after completing the project. This is because wainscoting adds depth and texture to walls, making rooms feel more cozy and inviting. By following the tips and advice provided in this article, you too can achieve professional-looking results that will improve the look and feel of your home. So why wait? Get started on your DIY wainscoting project today!
Image Credits
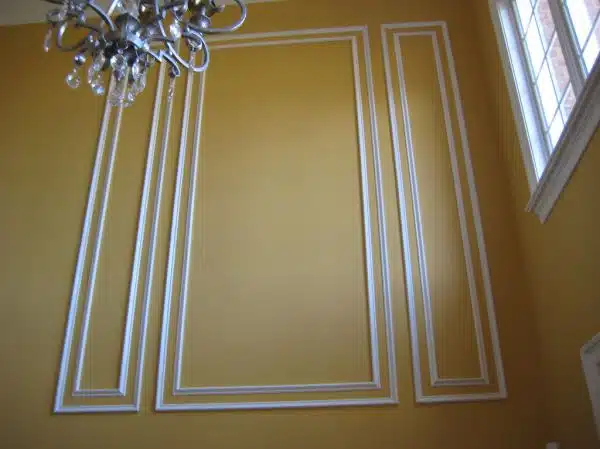
- “Shadow box wainscoting” by The Finishing Company Richmond Va (featured)











![How To Repair Rotted Wood 27 Texture : Altario Buick Estate Wagon : Rotting Faux Wood Paneling [1 of 2]](https://green-life.blog/wp-content/uploads/2023/05/z1CersK-gCjq-150x150.jpg.webp)

