As a grill cleaning specialist, I understand the importance of maintaining a clean and hygienic grill after every use. A dirty grill not only affects the quality of your food but also poses health risks to you and your family. Therefore, it is essential to follow a proper cleaning routine after each use and an annual deep cleaning process.
Cleaning a grill after each use might seem like a tedious task, but it can significantly increase the lifespan of your grill while ensuring that your food remains safe and delicious. In this article, I will provide you with expert tips on how to clean your grill after each use and an annual deep cleaning process that will keep your grill in top shape throughout the year. By following these simple steps, you can ensure that your guests are served with mouth-watering grilled dishes without compromising their health and safety.
Safety Precautions Before Cleaning
Before you begin cleaning your grill, it is important to take some safety precautions. Pre cleaning preparation involves ensuring that the grill has cooled down completely before starting any cleaning process. This can be achieved by unplugging and disconnecting the propane tank from the grill. It is also advisable to wear protective gloves and clothing to prevent injuries while handling hot surfaces.
Additionally, ensure that there are no flammable materials around the grill area, such as paper or leaves, which could ignite a fire during cleaning. You should also remove any excess grease or debris from the grates using a scraper or brush before beginning the cleaning process.
Cleaning tools and equipment are essential for effective and safe cleaning of your grill. Gather your cleaning supplies, including a bucket of soapy water, a non-toxic degreaser, a scrub brush with firm bristles or scouring pad, and clean towels for drying. Using these tools will help in removing all dirt and debris from your grill without damaging the surface. Remember to always read the manufacturer’s instructions before using any chemicals on your grill.
With these safety precautions in place and proper cleaning tools at hand, you can now proceed to clean your grill thoroughly after each use. Gather your cleaning supplies and follow the subsequent steps carefully for effective results without causing damage to your grill.
Gather Your Cleaning Supplies
As a grill cleaning specialist, I have seen countless grills that were not properly cleaned after every use and annually. Neglecting to clean your grill can cause build-up of grease and charred food debris, leading to uneven heating and even fire hazards. To ensure the longevity of your grill and the safety of your family, it is important to clean your grill properly after every use and annually.
Before you start cleaning your grill, it is essential that you gather all the necessary supplies. Cleaning supplies checklist would include a sturdy wire brush, cleaning solution or detergent, sponge or soft cloth for wiping down surfaces, gloves for protecting your hands from harsh chemicals and heat-resistant gloves if you plan on cleaning while the grill is still hot. You may also need a putty knife for scraping off tough grime or rust spots.
Once you have gathered all your supplies, make sure they are stored in a safe place where they are easily accessible. It’s best to store them in a dry area away from direct sunlight or moisture as humidity can cause rust on metal tools like wire brushes. Proper storage will also ensure that you don’t misplace any items when it comes time to clean your grill again. With all these cleaning supplies at hand, we’re ready to move onto our next step: removing the grates and burners.
Remove The Grates And Burners
- Grease should be removed from the grates and burners after each use, as it can be a fire hazard.
- Scrubbing the grates with a stiff wire brush should be done to remove any stuck-on food particles.
- Cleaning the burners should be done using a damp cloth or paper towels to avoid damaging them.
- Deep cleaning the grates and burners should be done annually to ensure cooking performance.
- Removal of the grates and burners should be done prior to deep cleaning for optimal results.
- Care should be taken when handling the grates and burners to avoid damage or injury.
Remove Grease
In order to maintain a clean and efficient grill, it is crucial to remove grease buildup after each use. As a grill cleaning specialist, I recommend incorporating degreasing techniques into your regular maintenance routine. These techniques can include using hot soapy water, vinegar and baking soda, or specialized degreaser products. By removing excess grease from the grates and burners, you can prevent flare-ups and ensure that your food is cooked evenly.
Preventing grease buildup is also key to keeping your grill in top condition. While cooking, be sure to avoid over-oiling meats or using fatty cuts of meat that may drip excess grease onto the grates. Additionally, regularly cleaning out the drip tray and disposing of excess grease can help prevent clogs in the burners and reduce fire hazards. By taking these preventative measures, you can avoid having to spend excessive time and effort on removing stubborn grease buildup later on.
Overall, removing grease from your grill after each use is an essential step in maintaining its longevity and performance. With the right degreasing techniques and preventative measures in place, you can ensure that your grill stays clean and functional for years to come. So next time you fire up the grill for a backyard cookout, don’t forget to take a few extra minutes to give it a thorough cleaning!
Scrub Grates
A crucial step in maintaining a clean and efficient grill is to remove the grates and burners for cleaning. As a grill cleaning specialist, I recommend doing this regularly to prevent grease buildup and ensure that your food is cooked evenly. With regular use, grates can accumulate debris and grease buildup that can impact the flavor of your food.
When it comes to grate maintenance, scrubbing them with a wire brush after each use is a good habit to adopt. This will remove any excess debris or charred residue that may have accumulated during cooking. For tougher stains, alternative cleaning methods such as vinegar and baking soda or specialized grill cleaners may be necessary. It’s important to follow the manufacturer’s instructions for any cleaning products used on your specific grill model.
In addition to regular scrubbing, inspecting the grates for signs of wear and tear is essential. If the grates are rusted or damaged, they may need to be replaced altogether. By incorporating these grate maintenance practices into your regular routine, you can ensure that your grill stays in top condition and cooks your food perfectly every time.
Clean Burners
As a grill cleaning specialist, one important step in maintaining a clean and efficient grill is to remove the grates and burners for cleaning. While regular cleaning of the grates is important, it’s also crucial to check the burners for any signs of wear and tear. Burner maintenance is essential to ensure that your grill operates properly and cooks your food perfectly every time.
Cleaning frequency for burners may vary depending on how often you use your grill. For those who use their grills frequently, it’s recommended to clean the burners at least once a month. This will help prevent any buildup of grease or debris that can impact flame distribution and result in uneven cooking. It’s also important to inspect the burner ports regularly for any blockages or damage.
To clean the burners, start by removing them from the grill and inspecting them for any visible signs of damage or rust. Use warm soapy water and a soft-bristled brush to gently scrub away any residue or buildup from the surface of the burners. Be sure not to scratch or damage the surface while cleaning. Once cleaned, rinse off with water thoroughly before reinstalling them back into your grill.
In conclusion, removing the grates and burners for cleaning is an important aspect of maintaining a functional grill. It’s essential to incorporate regular burner maintenance into your routine as well as grate maintenance. By following these practices, you can ensure that your grill remains in top condition and performs optimally every time you use it.
Scrub The Grates And Burners
After removing the grates and burners, it is time to scrub them clean. This is an important step in grill maintenance as it helps remove any leftover food particles and grease that may have accumulated over time. Neglecting this step can lead to a buildup of rust and corrosion, which can shorten the lifespan of your grill.
To effectively clean the grates, start by using a wire brush to scrape off any debris. Then, fill a bucket with warm soapy water and use a sponge or cloth to scrub away any remaining residue. For especially stubborn stains, you may need to use a grill cleaner specifically designed for your type of grill. Be sure to rinse the grates thoroughly with water afterwards to avoid leaving any soap residue behind.
In addition to cleaning after each use, it’s also important to perform an annual deep cleaning of your grill. This not only ensures that all parts are functioning properly but also helps prevent rust and corrosion from forming. To do this, disassemble the entire grill and wash each part separately with warm soapy water. Rinse everything thoroughly before allowing it to dry completely before reassembling the unit.
Moving forward into rust prevention and general upkeep of your grill requires attention to detail and regular adherence to recommended cleaning processes. To keep your grill working optimally for longer periods without undue damage or wear from rusting, maintaining its cleanliness should always be a top priority. In our next section, we will discuss how to clean the inside of your grill effectively without causing damage or unnecessary wear on its components.
Clean The Inside Of The Grill
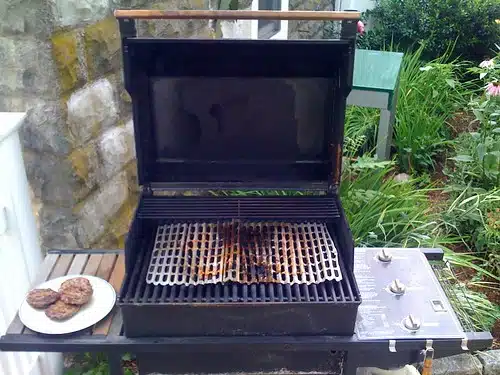
After each use, it’s essential to clean the inside of your grill. Grill maintenance is a crucial aspect of keeping your grill functioning correctly and preventing rust. Not cleaning the inside of your grill after each use can lead to grease build-up, which can cause flare-ups during future grilling sessions.
Different cleaning methods are available for cleaning the inside of your grill, but choosing the right one depends on a few factors. One method is using a wire brush to scrape off any leftover residue from previous grilling sessions. Another option is using aluminum foil to cover the grill grates and then heating up the grill for 10-15 minutes before removing it and wiping down the grates with a cloth or paper towel. For more challenging stains, you might consider using a chemical cleaner specially designed for grills.
When cleaning the inside of your grill, it’s vital to remember that each type of grill has different needs. For example, gas grills require more delicate treatment than charcoal grills because they have more parts that could become damaged if not cleaned correctly. By understanding what your specific type of grill requires, you can ensure that you’re choosing the right cleaning method and avoiding any potential damage to your equipment.
To maintain your grill’s performance and prevent rust from forming, it’s important to clean its drip pans regularly. These pans collect excess grease and debris from cooking sessions; if left uncleaned, they can cause problems with drainage and lead to rust formation on the bottom of your grill. Cleaning these pans after each use will help prevent these issues from occurring in the future.
Clean The Drip Pans
After cleaning the inside of the grill, it’s important to address the drip pans. Drip pans play a crucial role in catching grease and food debris that falls off during cooking. As such, they can easily become caked with burnt-on residue, which can lead to fires and other safety hazards. Regular cleaning of your grill drip pans is essential to ensure safe and effective operation.
One of the benefits of keeping your drip pans clean is that it helps prevent flare-ups while cooking. Flare-ups occur when grease accumulates on or near the burners and ignites, causing flames to shoot up around your food. This not only poses a fire risk but also leads to uneven cooking and burnt food. By regularly cleaning your grill’s drip pans, you reduce the likelihood of flare-ups occurring.
Cleaning your grill drip pans doesn’t have to be a daunting task. There are several DIY solutions you can use that are both effective and affordable. For example, you can mix baking soda with water to create a paste that you can apply directly onto your dirty drip pan. Let it sit for 10-15 minutes before scrubbing off with a brush or scouring pad. Alternatively, you can use vinegar or lemon juice mixed with baking soda for an even more potent solution.
Before firing up your grill again, it’s important to check the ignition system thoroughly. Faulty ignition systems can pose serious safety risks and make grilling difficult or impossible altogether. Ensure all wires are properly connected and free of corrosion or damage. If any issues arise during inspection, consult a professional technician for repairs before using your grill again.
Check The Ignition System
Picture yourself as a grill master, skillfully cooking up the perfect meal for your guests. You’ve got everything under control, the temperature is just right, and the food is sizzling away. Suddenly, disaster strikes – your grill won’t light. Just like a car without an ignition system, a grill without a functioning spark ignitor is useless. The ignition system is a crucial part of any grill and should be checked regularly to avoid any mishaps.
The first step in checking the ignition system of your grill is to ensure that the gas supply is intact and there are no leaks or damages to the gas line. This can be done by running a soapy water solution over the gas connection and watching for any bubbles that indicate a leak. Next, inspect all components of the ignition system for damage or wear and tear. If there are any cracks or visible damage to wires or electrodes, they should be replaced immediately.
Once you have checked for damage, move on to testing the spark ignitor itself. Turn on your gas supply and press the ignitor button while watching for sparks at the electrode tip. If there are no sparks present, it may be time to replace your spark ignitor. Ignition systems can vary between different types of grills, so consult your owner’s manual or seek professional advice if you’re unsure about how to proceed.
With your ignition system in good working order, you’re one step closer to having a perfectly cooked meal every time you fire up your grill. In our next section, we’ll discuss how to properly wipe down the exterior of your grill after each use to keep it looking great year-round.
Wipe Down The Exterior Of The Grill
After checking the ignition system, it is essential to wipe down the exterior of your grill. Exterior maintenance is crucial in keeping your grill looking new. Over time, grime and grease can build up on the outside of your grill, making it look dingy and unappealing. To avoid this, use a soft cloth or sponge to clean the outside of your grill after each use.
To ensure a thorough cleaning, you will need some cleaning accessories. Must-have tools for a thorough grill cleaning include a wire brush, scraper, and degreaser. The wire brush helps to remove any leftover residue from the grates while the scraper works well for removing burnt-on food particles. A degreaser is an effective way to get rid of any grease buildup on the exterior of your grill.
Regularly covering your grill when not in use is also important in maintaining its appearance. This protects it from outdoor elements such as rain and wind that can cause damage over time. It’s recommended to invest in a quality cover that fits snugly over your grill. Covering your grill will not only protect it but also save you time on cleaning and maintenance in the long run.
Numeric list:
Here are four tips for maintaining the exterior of your grill:
- Use a soft cloth or sponge to wipe down the outside of your grill after every use.
- Invest in must-have cleaning accessories such as a wire brush, scraper, and degreaser.
- Regularly cover your grill with a quality cover that fits snugly over it when not in use.
- Store your cleaning accessories nearby so that they’re easily accessible for quick cleanups.
By following these simple steps, you’ll be able to keep the exterior of your grill looking new for years to come!
Cover The Grill
Did you know that leaving your grill uncovered can lead to a 60% increase in rust and corrosion? Not only does this make your grill look unappealing, but it can also compromise the safety and longevity of your equipment. Investing in a high-quality grill cover is an easy way to protect your investment and ensure that it lasts for years to come.
Benefits of covering your grill go beyond just protecting it from the elements. A good cover will also keep out unwanted pests like spiders, mice, and other critters that might be attracted to the smell of leftover food. In addition, covering your grill will save you time on cleaning because it keeps dust, dirt, and debris from accumulating on the surface.
When choosing a grill cover, there are a few things to keep in mind. First, make sure that it is made from weather-resistant materials like polyester or vinyl. These materials provide excellent protection against rain, snow, and UV rays. Additionally, look for covers with adjustable straps or drawstrings so that you can get a snug fit around your grill.
Now that you know about the benefits of covering your grill and how to choose the right cover for your needs let’s move on to annual deep cleaning.
Annual Deep Cleaning
After covering the grill, it is important to perform an annual deep cleaning. This helps to maintain the grill’s performance and prolong its lifespan. Deep cleaning removes all the accumulated grease, dirt, and food debris that can cause rust or damage to the grill.
Benefits of Deep Cleaning
- Improved Performance: A clean grill will heat up faster and cook food more evenly.
- Prolongs Lifespan: Removing rust and debris prevents them from causing damage to the grill’s components.
- Better Taste: Food cooked on a clean grill will have better flavor.
- Hygienic: Deep cleaning ensures that bacteria and germs are eliminated from the grill’s surfaces.
Common Mistakes to Avoid
- Using Harsh Chemicals: Avoid harsh chemicals as they can cause damage to the grill’s surfaces.
- Scrubbing Too Hard: Scrubbing too hard can scratch or damage the surface of your grill.
- Neglecting Hard-to-Reach Areas: Make sure you clean all parts of your grill, especially areas that are hard to reach.
- Not Drying Thoroughly: Make sure you dry your grill thoroughly after cleaning it, as leaving moisture on it can cause rust.
It is essential to take safety precautions while performing a deep clean on your grill. Ensure that you wear protective gear such as gloves and goggles when using cleaning agents, especially if they contain harsh chemicals or ammonia. Also, ensure that you read and follow manufacturer instructions carefully before using any cleaning product on your grill. Following these steps will help ensure that your annual deep clean is safe and effective in maintaining your grill’s performance for years to come.
Safety Precautions For Deep Cleaning
As a grill cleaning specialist, safety precautions are just as important as the actual cleaning process. Before deep cleaning your grill, it is crucial to take necessary steps to prevent any potential accidents. One common mistake people make is not turning off the gas supply when cleaning the grill. This can lead to a gas leak and even cause an explosion. Always ensure that the gas supply is turned off before starting any cleaning procedures.
Another important aspect is protective gear. When deep cleaning your grill, you must wear gloves and eye protection to avoid any injuries from sharp edges or chemicals in cleaning products. Cleaning products should also be handled with care and used according to instructions. Using harsh chemicals or abrasive tools can damage your grill’s surface and affect its lifespan.
Preventing grease fires is also a vital safety procedure when deep cleaning your grill. Grease build-up can ignite quickly if not cleaned properly, leading to dangerous fires that may cause significant property damage or injuries. To prevent this, clean all parts of the grill regularly after each use, including burners, grates, and drip pans.
With these safety precautions in mind, you can now proceed with disassembling your grill for deep cleaning without worrying about any potential hazards.
Disassemble The Grill
Safety is a top priority when it comes to cleaning your grill. Before you start disassembling your grill, make sure that the gas source is turned off and the propane tank is disconnected. Additionally, wear protective gloves and goggles to avoid injuries.
To disassemble your grill, you will need specific tools. These include a wire brush, a putty knife, and a screwdriver. Use the wire brush to remove any debris or food particles from the grates. Then use the putty knife to scrape off any stubborn buildup. Once you have cleaned the grates, use the screwdriver to remove them from the grill.
When reassembling your grill, make sure that all components are securely attached. Check that all connections are tight and secure before turning on the gas source or reconnecting the propane tank. Properly maintaining your grill by disassembling and cleaning it regularly will help prolong its lifespan and ensure safe cooking practices for years to come.
As you finish reassembling your grill, it’s time for another crucial step: scrubbing the interior of the grill thoroughly. This step removes any lingering dirt or grease that has accumulated over time. Use warm soapy water along with a wire brush or sponge to scrub each surface inside of the grill thoroughly. Once you have completed this step, rinse everything down with clean water before proceeding with drying and putting back everything in its place for storage until next use!
Scrub The Interior Of The Grill
- When cleaning the interior of the grill, it is important to choose the right scrubbing utensils. Utensils such as wire brushes and sponges can be used to remove grease and food residue.
- Additionally, metallic surfaces of the grill should be cleaned with a degreaser or soap and water to remove fat and food particles.
- After scrubbing, surfaces should be rinsed with clear water and dried with a cloth or paper towel.
- Annual maintenance should include a thorough scrubbing of the interior of the grill, as this will help to extend the life of the grill.
Scrubbing Utensils
As a grill cleaning specialist, I have found that scrubbing utensils are essential in maintaining a clean and functional grill. There are various types of scrubbing utensils available on the market, including wire brushes, nylon scrubbers, and steel wool pads. Each has its own unique benefits and drawbacks. Wire brushes are great for removing tough grease and grime but can leave behind bristles that may get stuck in your food. Nylon scrubbers are gentler than wire brushes but may not be as effective at removing stubborn residue. Steel wool pads are abrasive and can scratch the interior of your grill.
To ensure that your scrubbing utensils remain clean and sanitary after each use, it is essential to sanitize them properly. The best way to sanitize your utensils is by washing them with hot soapy water or placing them in the dishwasher if they are dishwasher safe. If you prefer an eco-friendly option, you can also soak them in a mixture of vinegar and water for 10-15 minutes before rinsing thoroughly.
In conclusion, selecting the right type of scrubbing utensil is crucial in maintaining a clean grill, while proper sanitation will ensure their longevity and effectiveness. Whether you choose wire brushes, nylon scrubbers or steel wool pads, make sure to sanitize them after each use to prevent bacteria growth. By following these simple steps, you can keep your grill looking great and functioning optimally for years to come!
Grill Surfaces
Grill surface maintenance is an essential aspect of grill cleaning that should not be overlooked. Over time, the interior surfaces of your grill can accumulate grease and grime, which can affect the flavor of your food and the efficiency of your grill. To prevent this, it is important to regularly scrub the interior surfaces of your grill using appropriate cleaning tools.
One common issue with grill surfaces is rust formation. Rust is a result of oxidation that occurs when metal surfaces are exposed to air and moisture for extended periods. Rust can weaken the structural integrity of your grill and affect its overall performance. To prevent rust formation on your grill surface, it is important to keep it clean and dry after each use.
To effectively scrub the interior of your grill, you need to select the right type of scrubbing tool based on the material of your grill surface. For example, wire brushes are suitable for stainless steel surfaces but may damage porcelain-coated grates or cast iron grills. Nylon brushes are gentle enough to use on delicate surfaces but may not be effective at removing tough residue. Additionally, you should avoid using abrasive cleaners or scouring pads as they can scratch and damage the surface of your grill.
By following these tips for proper grill surface maintenance and rust prevention, you can ensure that your grill remains in top condition for years to come. Regular cleaning with appropriate tools will not only improve the flavor of your food but also prolong the life of your grill. Remember to always choose a suitable tool for your specific needs and take care when handling any chemicals or cleaning agents used in maintaining a clean and healthy cooking environment.
Clean The Burners And Venturi Tubes
To maintain grill performance, it is crucial to clean the burners and venturi tubes regularly. Cleaning frequency depends on how frequently the grill is used. If you use your grill frequently, it is recommended to clean the burners and venturi tubes annually. However, if you use your grill occasionally or seasonally, cleaning every two years would suffice.
Cleaning the burners and venturi tubes is a meticulous process that requires attention to detail. First, remove the grates and heat deflectors to access the burners and venturi tubes. Then, use a wire brush or a specialized burner cleaning tool to remove any debris or grease buildup from both components. It’s essential to ensure that there are no blockages in the venturi tubes as they play a critical role in regulating gas flow.
Maintaining a clean burner and venturi tube will significantly impact your grill’s overall performance by reducing flare-ups and ensuring even heat distribution. By doing so, your food will cook evenly without any burnt spots or raw areas. A well-maintained grill also ensures safety by preventing gas leaks caused by blockages in the venturi tubes.
Now that we have covered how to clean the burners and venturi tubes let’s move on to reassembling the grill correctly for safe usage.
Reassemble The Grill
Reassembling Techniques are an essential aspect of the grill cleaning process. It is vital to ensure that all parts are put back together correctly to prevent any accidents or malfunctions. Before reassembling, it is recommended to inspect each part for any signs of damage or wear and tear; if there are any issues, replace them before proceeding. Additionally, it is crucial to refer to the manufacturer’s manual for specific instructions on how to reassemble each component.
Post Cleaning Maintenance is another critical aspect of grill care. After reassembling the grill, wipe down all surfaces with a dry cloth and apply a protective coating of oil or cooking spray on the grates and other metal components. This step helps prevent rust and corrosion and prolongs the life of your grill. Furthermore, it is advisable to cover your grill when not in use, protecting it from the elements.
In conclusion, Reassembling Techniques and Post Cleaning Maintenance are crucial steps in keeping your grill in top condition after each use and annually. A well-maintained grill will not only provide excellent cooking results but also ensures safety while using it. By following these tips, you can enjoy grilling for years to come!
Conclusion
Grill maintenance is crucial for ensuring a safe and hygienic cooking experience. Before beginning the cleaning process, make sure to disconnect the gas supply and wear protective gloves. Gather all necessary equipment such as a grill brush, steel wool pads, soap water, and a vacuum cleaner.
Start by removing the grates and burners from the grill. Scrub them thoroughly using a non-abrasive cleaner and steel wool pads. Next, clean the inside of the grill with soap water and a brush. Disassemble the grill to clean its interior with a vacuum cleaner or steel wool pads.
Clean the burners and venturi tubes using a wire brush or paper clip to remove any debris that may have accumulated inside them. Reassemble the grill and ensure all parts are securely in place before reconnecting it to the gas supply.
Annual cleaning involves deep cleaning of your grill including checking for signs of rust, grease buildup, or other damage. For an extensive cleaning process, seek professional help from grill specialists who can dismantle your grill entirely for thorough cleaning. Regular maintenance will not only increase your grill’s lifespan but also guarantee healthy food preparation every time you use it.
Image Credits
- “Clean Your Weber Grill” by stevegarfield (featured)

