Air fryers have become increasingly popular in recent years due to their ability to cook food with less oil and in a healthier way. However, like any kitchen appliance, air fryers require cleaning to ensure they continue to function efficiently and effectively. In this article, we will discuss the best way to clean an air fryer according to expert advice.
Cleaning an air fryer may seem like a daunting task, but it is essential for maintaining the quality of the appliance and preventing any potential health hazards. Neglecting proper cleaning can lead to a buildup of food residue and grease, which can affect the performance of your air fryer and even cause fires. Therefore, it is crucial to follow a systematic approach when cleaning your air fryer and use appropriate tools and techniques that are safe for both you and your appliance. In this article, we will provide you with step-by-step guidance on how to clean your air fryer thoroughly from top to bottom so that you can continue enjoying healthy meals without any worries.
Why Cleaning Your Air Fryer Is Important
Cleaning your air fryer is an essential aspect of maintaining its functionality and longevity. Just like any other kitchen appliance, air fryers require regular cleaning to avoid buildup of grease and food residue that can affect their performance. Neglecting this vital task not only promotes the growth of bacteria and mold but also impacts the taste and quality of your food.
Regular cleaning of your air fryer has numerous benefits that make it worth the effort. For starters, it helps to eliminate any unpleasant odors that may result from cooking different types of foods. Additionally, it ensures that the heating elements are free from debris, which can cause them to overheat or malfunction. By keeping your air fryer clean, you are also promoting better health by reducing the risk of ingesting harmful bacteria that can lead to infections.
In summary, the importance of cleaning your air fryer cannot be overstated. Regular cleaning not only enhances its durability but also promotes better hygiene and overall health. With these benefits in mind, it is crucial to develop a habit of cleaning your air fryer after every use to maintain its efficiency and keep it in top condition for longer periods. Understanding how different parts work together is paramount in ensuring efficient cleaning procedures – let’s take a closer look at each part’s function.
Understanding The Parts Of Your Air Fryer
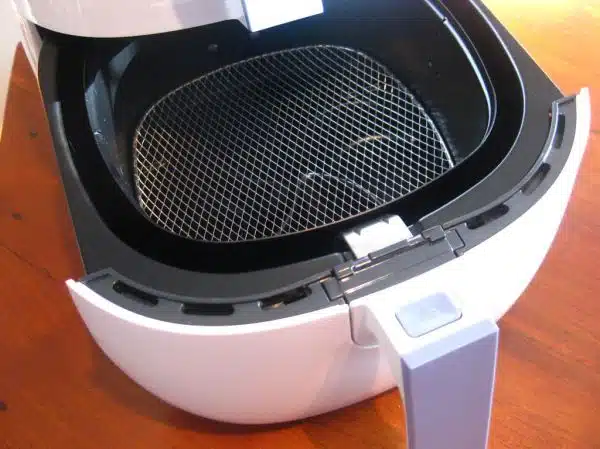
Before you start cleaning your air fryer, it’s important to have a basic understanding of its parts. An air fryer typically consists of a basket, a crisper plate, and an outer shell. The basket is where you place your food and is usually removable for easy cleaning. The crisper plate sits at the bottom of the basket and helps to evenly distribute heat across the food. The outer shell houses the heating element and other components that make your air fryer work.
Identifying air fryer components can be difficult if you’re not familiar with their names or functions. For instance, the heating element is responsible for generating heat that cooks your food while the fan circulates hot air around it. The control panel allows you to select cooking temperature, time, and other settings depending on what type of food you’re cooking. Additionally, some air fryers come with accessories like skewers or racks that can be used to cook different types of food.
By understanding air fryer parts and how they work together, you’ll be better equipped to clean your appliance efficiently and safely. In the next section, we’ll discuss how to prepare your air fryer for cleaning so that you can maintain its performance and prolong its lifespan.
Preparing Your Air Fryer For Cleaning
Moving on, now that we have a clear understanding of the parts of your air fryer, it’s time to move on to the next important aspect of maintaining it – preparing your air fryer for cleaning. This step is crucial as incorrect preparation can lead to damage or even render your air fryer unusable.
Preparing your air fryer for cleaning involves several key steps that must be followed carefully. Firstly, ensure that the air fryer has cooled down completely before handling it. Next, disconnect the power cord from the power supply and remove any removable parts such as the basket and tray. These can be washed separately using warm soapy water and a soft sponge. Do not use abrasive cleaners or scrubbers as they may damage the non-stick coating.
It is essential to gather the necessary supplies before embarking on this task. This will help you work efficiently and avoid any delays or interruptions during the cleaning process. You will need a soft sponge, dishwashing liquid, warm water, a microfiber cloth for drying, and if required, a non-abrasive brush to clean hard-to-reach areas such as vents and corners. With these supplies at hand, you can go ahead with confidence knowing you have everything you need to keep your air fryer in top condition.
(Note: The subsequent section about ‘gathering the necessary supplies’ would follow here without writing ‘step’.)
Gathering The Necessary Supplies
Before diving into the cleaning process, it is essential to gather the necessary supplies. This step will ensure that you have everything on hand and avoid interruptions during the cleaning process. The following are the items you need to clean your air fryer: a soft cloth or sponge, warm water, mild dish soap, baking soda, vinegar, and a toothbrush.
When selecting cleaning solutions for your air fryer, it is crucial to choose a gentle cleanser that won’t damage its interior. Avoid abrasive cleaners and those containing bleach or ammonia as they can cause surface scratches or discoloration. Instead, opt for mild dish soap or an equal mixture of baking soda and water for tougher stains.
Proper cleaning techniques are vital in maintaining your air fryer’s longevity and performance. Always unplug the device before starting the cleaning process, then use a soft cloth or sponge dipped in warm soapy water to wipe down the interior surfaces gently. For hard-to-reach areas like vents and corners, use a toothbrush dipped in vinegar to remove any stubborn debris. Rinse all surfaces with water thoroughly and dry them off with a clean towel before reassembling the air fryer.
Moving onto our next section which focuses on cleaning the exterior of your air fryer…
Cleaning The Exterior Of Your Air Fryer
As an air fryer cleaning expert, it’s essential to emphasize the significance of exterior maintenance. Not only does it contribute to the appliance’s longevity, but it also ensures hygienic food preparation. The first step in maintaining your air fryer’s exterior is unplugging and cooling down the appliance before starting the cleaning process.
Next, using a damp cloth or sponge, wipe down the surface of your air fryer. Avoid using abrasive cleaners or scouring pads as they can leave scratches on its surface. If there are stubborn stains that won’t come off with water alone, use dish soap mixed with warm water to wipe them away gently. Be sure not to immerse the air fryer in water as this can damage electrical components.
Cleaning frequency will depend on how often you use your appliance. However, it’s advisable to give your air fryer a thorough cleaning every two weeks or after every use if possible. A clean exterior not only contributes to maintaining hygiene but also enhances your kitchen’s aesthetic appeal.
Moving forward into our next section, we’ll discuss how to clean the interior of your air fryer thoroughly. Keeping both exterior and interior clean will ensure optimal performance and longevity for your appliance!
Cleaning The Interior Of Your Air Fryer
After cleaning the exterior of your air fryer, it’s time to move on to the interior. The interior is where all the cooking takes place, so it’s important to keep it clean for both hygienic and practical reasons. But before we get into how to clean the interior, let’s investigate a theory that some people believe in: that you don’t need to clean your air fryer after every use.
Cleaning frequency is an important consideration when it comes to maintaining your air fryer. While some people may believe that they don’t need to clean their air fryer after every use, this is not true. In fact, failing to clean your air fryer regularly can lead to a buildup of grease and food residue that can damage the appliance over time. To avoid damage and ensure optimal performance, it’s recommended that you clean your air fryer after every use.
To help you effectively clean the interior of your air fryer, refer to the table below for a step-by-step guide:
| Step | Action |
|---|---|
| 1 | Let the air fryer cool down completely before cleaning |
| 2 | Remove any food leftovers from inside the basket or tray |
| 3 | Use a soft sponge or brush with non-abrasive detergent or soap |
| 4 | Dry all parts thoroughly before reassembling |
By following these steps and cleaning your air fryer regularly, you’ll be able to maintain its longevity and ensure that your food always tastes great. However, what if you encounter stubborn stains and grease? Don’t worry; we will cover how to remove them in the next section.
Removing Stubborn Stains And Grease
While air fryers are a great alternative to deep-frying, they can still accumulate grease stains and burnt-on food residues. These stubborn stains can be challenging to remove, but with the proper tools and techniques, you can restore your air fryer’s cleanliness. Here are some tips for tackling these tough stains.
When it comes to removing grease stains, start by unplugging the air fryer and letting it cool down completely. Then, use a gentle degreaser or dish soap mixed with warm water to wipe down the affected areas with a sponge or soft cloth. Avoid using abrasive materials that could scratch the surface of your air fryer. For particularly stubborn stains, try using a baking soda paste made by mixing baking soda and water until it forms a thick consistency. Apply the paste onto the stain and let it sit for several minutes before wiping it away with a damp cloth.
If you’re dealing with burnt-on food residues, first soak the affected area in warm soapy water for about 10-15 minutes to loosen up any debris. After soaking, use a non-abrasive sponge or brush to gently scrub away any remaining residue. If there are still stubborn bits stuck on, try using a plastic scraper tool to carefully chip away at them without damaging the interior of your air fryer.
Next section topic: Cleaning The Air Fryer Basket
Cleaning The Air Fryer Basket
Removing stubborn stains and grease from your air fryer is a necessary task that requires careful attention. However, once you have successfully tackled these tough spots, it’s time to move on to cleaning the air fryer basket. Cleaning the basket is a crucial part of maintaining your appliance’s longevity and ensuring that it continues to function correctly.
When starting with cleaning the air fryer basket, take a moment to consider the materials that make up the basket. Depending on the brand and model of your appliance, your basket may be made of various materials such as stainless steel or non-stick coating. Knowing what materials make up your basket can help you determine which cleaning products are safe to use without causing damage.
The frequency of cleaning your air fryer basket will depend on how often you use it. If you use your air fryer daily or several times per week, then it is recommended that you clean the basket after every use. However, suppose you are an occasional user who only uses their air fryer once in a while. In that case, cleaning the basket after every few uses should suffice.
• Use warm water and mild dish soap when cleaning your air fryer basket. • Avoid using abrasive sponges or scouring pads that might scratch or damage its surface. • If your air fryer has a non-stick coating, do not use metal utensils when cooking or cleaning. • Ensure that the basket is entirely dry before placing it back into the appliance.
Cleaning the air fryer tray is another essential step in maintaining its cleanliness and ensuring optimal performance. To keep your appliance functioning correctly and prolong its lifespan, follow these steps carefully when cleaning both its tray and basket regularly.
Cleaning The Air Fryer Tray
Effective cleaning methods are crucial to maintaining the longevity of your air fryer tray. First, it is important to unplug the appliance and wait until it cools down before cleaning. Removing any leftover food debris from the tray should be done carefully using a non-abrasive sponge or cloth. Harsh chemicals and abrasive materials can damage the non-stick coating on the tray.
Common mistakes to avoid include soaking the tray in water for a long time, using harsh detergents, or placing it in a dishwasher. These methods can cause rusting and discoloration of the tray. Instead, use warm soapy water with a gentle dishwashing liquid and scrub gently with a soft sponge. Rinse thoroughly with water and dry with a clean towel before placing it back into the air fryer.
In conclusion, regular cleaning of your air fryer tray is necessary for its optimal performance and durability. Avoiding common mistakes such as using harsh detergents or soaking it in water will ensure that your air fryer remains functional for years to come. The subsequent section will discuss how to clean the heating element effectively without causing damage to your appliance.
Cleaning The Heating Element
After cleaning the air fryer tray, it is important to clean the heating element. The heating element is responsible for cooking food in the air fryer, and over time, it can become covered in grease and food particles. Cleaning the heating element will help to ensure that your air fryer continues to cook evenly and efficiently.
To clean the heating element, start by unplugging the air fryer and allowing it to cool completely. Once it has cooled down, use a soft-bristled brush or a microfiber cloth to gently wipe away any debris that has accumulated on the heating element. Avoid using harsh cleaning chemicals or abrasive materials, as these can damage the surface of the heating element.
Cleaning tips for maintaining your air fryer’s heating element include wiping it down after each use and avoiding using too much oil when cooking with your air fryer. Additionally, if you notice any buildup on the heating element that cannot be removed with gentle cleaning methods, consider contacting a professional for assistance.
Moving forward, it is important to regularly clean not only the tray and heating element but also other parts of your air fryer such as its fan and vents. These areas can also become clogged with food particles over time, which can reduce airflow and negatively impact the performance of your appliance. By following maintenance suggestions and regularly cleaning all parts of your air fryer, you can ensure that it remains in good working condition for years to come.
Cleaning The Fan And Vents
To maintain the optimal performance of your air fryer, it is important to regularly clean its fan and vents. This crucial step in air fryer maintenance ensures that the appliance functions properly and prevents any safety hazards from occurring. Cleaning frequency will vary depending on usage, but it is recommended to clean the fan and vents after every 5-7 uses.
Cleaning the fan and vents can be done with basic cleaning tools such as a soft-bristled brush or a toothbrush. It is important to unplug the appliance and wait for it to cool down before beginning the cleaning process. Use the brush to gently remove any debris or food particles that may have accumulated in the fan or vent areas. If there are stubborn stains, a damp cloth can be used to wipe them away.
Here are some tips for cleaning your air fryer’s fan and vents:
- Use a soft-bristled brush or toothbrush
- Unplug the appliance and wait for it to cool down before cleaning
- Gently remove any debris or food particles that may have accumulated
- Use a damp cloth for stubborn stains
- Clean after every 5-7 uses
Now that you have successfully cleaned your air fryer’s fan and vents, let’s move on to drying the appliance thoroughly before its next use.
Drying Your Air Fryer
After cleaning the fan and vents of your air fryer, it is crucial to ensure that the appliance is thoroughly dried before reassembling it. Any moisture left inside can lead to rust formation, which can not only damage the device but also impact the quality of food prepared. Therefore, it is best to let your air fryer dry naturally by placing it on a clean and dry surface for a few hours.
In addition to drying your air fryer, there are several tips you can follow to prevent rust from forming over time. Firstly, avoid using abrasive scrubbers or harsh chemicals when cleaning the appliance as they can scratch or damage its coating, exposing the metal underneath. Secondly, store your air fryer in a dry place away from moisture and humidity. Lastly, consider wiping down the unit with a soft cloth after each use to remove any residual condensation.
Regular maintenance of your air fryer is essential for ensuring that it functions efficiently and lasts long. Apart from cleaning the fan and vents regularly as discussed earlier, you should also take care to clean other parts such as the basket and drip tray after each use. Additionally, inspecting the power cord for any signs of wear and tear or fraying can help prevent electrical hazards.
As important as regular maintenance is for preventing rust and ensuring longevity, proper reassembly of your air fryer after cleaning is equally crucial. In the subsequent section, we will discuss some tips on how to put all parts back together correctly without causing any damage or malfunctions.
Reassembling Your Air Fryer
Did you know that a staggering 30% of air fryer owners have reported difficulty reassembling their units after cleaning? This is why it’s important to follow reassembling tips to ensure your air fryer is properly put back together.
One common mistake when reassembling an air fryer is not properly aligning the cooking basket and drawer. It’s crucial to ensure the basket is placed in the drawer correctly, with its handle facing outward. The drawer should then be pushed back into the unit until it clicks into place.
Another mistake people make is forgetting to reconnect the power cord before attempting to use the air fryer again. Always double-check that all parts are securely reassembled and plugged in before turning on your appliance.
Now that you’ve successfully cleaned and reassembled your air fryer, it’s important to maintain it properly to extend its lifespan and keep it functioning at optimal levels. Here are some tips for maintaining your air fryer…
Tips For Maintaining Your Air Fryer
- Regularly cleaning the basket of an air fryer is essential to ensure the appliance remains in good working order.
- To clean the basket, it is recommended to use hot soapy water and a soft cloth to wipe away any grease or food residue.
- The exterior of the air fryer should also be regularly cleaned to avoid grease build-up and to keep the appliance looking new.
- A damp cloth and mild detergent should be used to wipe down the exterior of the air fryer, taking care not to get any water inside the appliance.
- Regular maintenance of an air fryer is necessary to ensure it is functioning correctly.
- This can include regularly checking the temperature setting, using the correct wattage of power, and replacing the filters as recommended by the manufacturer.
Cleaning The Basket
Maintaining the cleanliness of your air fryer is crucial in ensuring its longevity and safe operation. Cleaning the basket is one of the most important aspects of air fryer maintenance. Not only does it prevent food residue buildup, but it also ensures that your food remains free from any contaminants. In this article, we’ll provide you with some cleaning techniques and tips on how to properly maintain your air fryer basket.
To clean the basket, start by letting it cool down completely. Once cooled, remove it from the air fryer and soak it in warm soapy water for at least 30 minutes. Use a soft sponge or cloth to gently scrub the inside and outside of the basket. Be sure to pay close attention to any hard-to-reach areas where food debris may have accumulated. Rinse thoroughly with water and dry completely before placing it back into the air fryer.
It’s important to note that harsh detergents or abrasive sponges can damage non-stick coatings on your basket. Therefore, avoid using these products when cleaning your air fryer basket. Instead, opt for mild dish soap and a soft sponge or cloth. By following these simple cleaning techniques and maintenance tips, you can ensure that your air fryer remains in good condition for years to come!
Cleaning The Exterior
Maintaining the cleanliness of your air fryer is crucial in ensuring its longevity and safe operation. We’ve already discussed cleaning the basket, which is essential for preventing food residue buildup and keeping your food free from contaminants. However, cleaning the exterior of your air fryer is just as important to ensure that it functions properly and lasts for a long time.
To prevent exterior buildup, use a soft damp cloth or sponge to wipe down the exterior after every use. If there are any stubborn stains or grease marks, you can use a gentle cleaning solution such as vinegar and water or mild dish soap diluted with water. Avoid using abrasive materials or harsh chemicals that could damage the surface of your air fryer.
In addition to regular wiping down, it’s also important to periodically deep clean the exterior of your air fryer. Start by unplugging it and letting it cool down completely. Then, use a soft cloth or sponge to wipe off any loose debris or dust. Next, dip a clean cloth into a mixture of warm water and mild dish soap and gently scrub the surface of your air fryer. Finally, rinse with clean water and dry thoroughly before plugging it back in again. By following these simple tips for cleaning the exterior of your air fryer, you can keep it looking great and functioning properly for years to come!
Regular Maintenance
Ensuring that your air fryer is functioning correctly and lasting for a long time requires regular maintenance. This involves keeping the basket clean to prevent food residue buildup, wiping down the exterior after every use, and periodically deep cleaning the surface. Neglecting to maintain your air fryer may not only result in poor cooking results but also shorten its lifespan.
Regular maintenance is crucial in preventing food residue buildup and ensuring that your air fryer continues to function properly. After each use, it’s essential to wipe down the exterior with a damp cloth or sponge to remove any grease marks or stains. If left unattended, these stains may build up over time and become challenging to remove.
To ensure longevity and optimal performance of your air fryer, periodic deep cleaning is necessary. Start by unplugging it and letting it cool down before wiping off any loose debris or dust from the surface. Next, gently scrub it using a mixture of warm water and mild dish soap before rinsing with clean water and drying thoroughly. Regular maintenance will not only keep your air fryer looking great but also ensure that it works correctly for years to come!
Frequently Asked Questions About Cleaning Your Air Fryer
Cleaning your air fryer is an essential task that should be done regularly to maintain its optimal performance. However, many people often encounter difficulties when it comes to cleaning their air fryers. In this section, we will answer some frequently asked questions about cleaning your air fryer and provide you with some useful tips.
Cleaning hacks are a great way to make the cleaning process of your air fryer easier and more effective. One of the most popular hacks is to use vinegar and baking soda. Simply mix equal parts of vinegar and water in a spray bottle, then spray the inside of the air fryer basket and let it sit for about 10 minutes. After that, sprinkle baking soda on top of the mixture, scrub with a brush or sponge, rinse thoroughly with water, and dry with a cloth.
One common mistake that people make when cleaning their air fryer is not allowing it to cool down completely before starting the cleaning process. It’s crucial to wait until the appliance has cooled down because hot surfaces can cause burns or damage to your skin or equipment. Another common mistake is using abrasive cleaners or rough materials such as steel wool pads that can scratch the non-stick surface of your air fryer’s basket. Always use soft sponges or brushes and mild detergents when washing your appliance.
Overall, maintaining good hygiene practices when it comes to cleaning your air fryer is critical for its longevity and optimal functioning. Remember to always allow time for cooling down, use gentle materials when scrubbing away dirt or grime buildup, and take advantage of time-saving hacks such as vinegar-baking soda mixtures for efficient cleaning results without damaging surfaces!
Conclusion
Maintaining cleanliness in your kitchen appliances is essential for both health and hygiene. Cleaning your air fryer regularly is no exception. By understanding the different parts of your air fryer, preparing it for cleaning, gathering necessary supplies, and following proper cleaning techniques, you can maintain a well-functioning appliance that produces healthy and delicious meals.
As an expert in air fryer cleaning, I cannot emphasize enough the importance of keeping your appliance clean and well-maintained. Neglecting to do so not only affects the quality of food produced but also poses a significant risk to your health. By following the steps outlined in this article, you can ensure that your air fryer remains in pristine condition and produces mouth-watering meals every time.
Remember, taking care of your air fryer is not only about cleaning it regularly but also ensuring that it operates correctly by maintaining its various components. Regular maintenance will not only prolong the life of your appliance but also ensure optimal performance. So make sure to follow these tips and techniques diligently to enjoy healthy, tasty meals for years to come!
Image Credits
- “Phillips Air Fryer” by phonakins (featured)

