Painting rusted metal is a common challenge that most professional painters encounter. Rust, which is the result of corrosion and oxidation of iron and steel, not only makes surfaces unsightly but also weakens them. Painting over rusted metal requires expertise and precision to ensure that the paint adheres well to the surface and provides long-lasting protection against further corrosion. This article explores effective techniques for painting rusted metal, including preparation, priming, and finishing.
Preparation is a critical step in painting rusted metal. Before applying paint, it is essential to remove any loose or flaky rust using a wire brush or sandpaper. The surface should then be cleaned thoroughly with soap and water to remove any dirt and grease. After cleaning, dry the surface completely using a clean rag or towel. Once the surface is dry, apply an appropriate primer that adheres well to rusty surfaces or use a rust converter to convert the remaining rust into a stable compound that can be painted over. By following these simple steps, you can achieve excellent results when painting rusted metal surfaces.
Understanding The Causes Of Rust
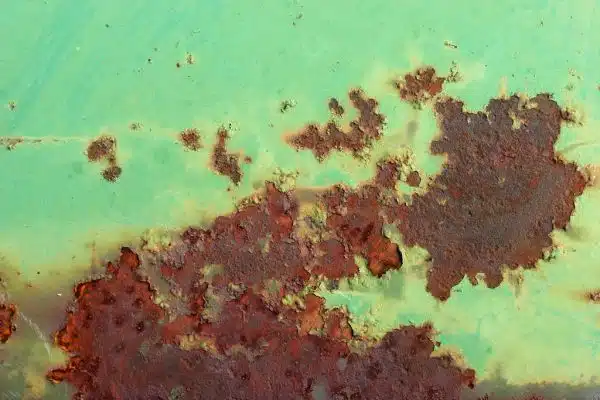
The sight of rust on metal surfaces is a common occurrence, especially in humid environments. Rust is an oxide that forms when iron or steel is exposed to moisture and oxygen. The reaction between the two elements results in the formation of hydrated iron (III) oxide, which commonly appears as reddish-brown flakes or powders on metal surfaces. Apart from being unsightly, rust can weaken metal structures and affect their functionality.
Causes of rust are many but can be broadly classified into physical and chemical factors. Physical factors refer to environmental conditions such as humidity and temperature changes, while chemical factors refer to the presence of corrosive elements like salts and acids. The combination of these factors accelerates the corrosion process, leading to faster rusting. Prevention methods include applying protective coatings such as paint or varnish that create a barrier between the metal surface and its environment. Regular cleaning and maintenance can also help prevent rust by removing contaminants that accelerate corrosion.
Identifying rust on metal surfaces requires keen observation skills. Before painting over rusty surfaces, it’s essential to determine whether the rust has penetrated deeply into the metal or is just superficial. Deeply penetrated rust may require more aggressive treatment methods such as sandblasting to remove all traces of rust before applying a fresh coat of paint. Superficial rust can be removed using sandpaper or wire brushes before applying a primer coat to prepare for painting.
Identifying Rust On Metal Surfaces
Rust formation is a common problem that affects metal surfaces. Identifying rust sources is crucial in preventing rust formation. Generally, rust forms due to exposure of metal surfaces to moisture and oxygen over time. If left unattended, the rust can spread over the entire surface area and lead to structural damage.
To prevent rust formation, it is essential to identify the source of the problem. Moisture and humidity are common culprits that cause rust formation on metal surfaces. Other causes may include exposure to saltwater or chemicals containing corrosive elements. To prevent rust from forming, it is recommended to keep metal surfaces dry and clean at all times.
Additionally, applying a coat of protective paint or sealant can help prevent moisture from penetrating the surface of the metal. Regular inspection and maintenance of metal surfaces can also help identify any signs of corrosion before they lead to extensive damage. In the next section, we will discuss how to assess the extent of rust damage on metal surfaces and determine an appropriate course of action for addressing it.
Assessing The Extent Of Rust Damage
“Rust never sleeps.” This famous adage rings true for metal surfaces that are constantly exposed to the elements. Assessing rust damage is a crucial step in determining the appropriate rust repair techniques to be used. It is important to identify the extent of the damage before proceeding with any repairs, as this will affect the success and longevity of the final outcome.
To assess rust damage, start by examining the metal surface for visible signs of rust such as discoloration or bubbling paint. Use a wire brush or sandpaper to remove any loose rust and paint, revealing the extent of corrosion beneath. Then, use a bright light to inspect the surface for deep pits or holes which may require more extensive repairs.
Once you have assessed the extent of rust damage, you can proceed with choosing appropriate rust repair techniques. These may include chemical treatments, such as acid-based solutions or rust converters, or mechanical methods like sandblasting or grinding. The choice of technique will depend on several factors including the severity of corrosion and type of metal being treated. Always ensure that any repairs are done thoroughly to prevent future corrosion and ensure better adhesion of paint.
Assessing rust damage is an essential step in restoring rusty metal surfaces. By identifying areas that require repair and using appropriate techniques, you can achieve a successful restoration project that lasts longer. The next section will discuss choosing the right paint for rusty surfaces, which is equally important in ensuring your restored surface looks great and lasts long.”
Choosing The Right Paint For Rusty Surfaces
The selection of a suitable primer is essential for painting over rusty surfaces. Primers should be oil-based, specifically formulated for rust prevention and corrosion protection. When it comes to paint type, an oil-based enamel or an acrylic paint is recommended for rusty surfaces. Additionally, a high-quality epoxy paint can be used for a long-lasting finish. Applying the paint is best done with a brush or roller for an even coat and to ensure maximum adhesion. To get the best results, it is important to apply multiple thin layers of paint, rather than one thick layer. Finally, make sure the painting surface is clean and dry before starting the painting process.
Primer Selection
When it comes to painting rusty metal, selecting the right primer is crucial. Primers serve as a preparatory coat that enhances adhesion and promotes durability of the paint layer. There are different types of primers available in the market, each with unique properties that suit particular conditions. As a professional painter, it is essential to consider several factors affecting primer performance before choosing one.
The first factor to consider when selecting a primer is the type of metal surface you are painting. Different metals require different types of primers. For instance, if you are painting galvanized steel, an etching primer would be ideal as it promotes adhesion by chemically reacting with zinc oxide on the surface. On the other hand, if you are painting iron or steel surfaces that have rusted extensively, a rust converter primer would be more appropriate as it converts rust into a stable compound that can be painted over.
Other factors affecting primer performance include temperature and humidity levels during application and curing stages, surface preparation methods used, and the type of topcoat paint to be applied over the primer layer. It is vital to read and follow manufacturer’s instructions carefully when applying primers to ensure optimal performance.
In conclusion, selecting the right type of primer for rusty metal surfaces is critical for achieving a long-lasting paint job. Understanding different types of primers available and factors affecting their performance can help professional painters make informed decisions when choosing a suitable product for their project.
Paint Types
When it comes to painting rusty surfaces, selecting the right paint is just as important as choosing the right primer. Different types of paints offer unique benefits that suit particular conditions and environments. As a professional painter, it is crucial to consider several factors affecting paint performance before making a decision.
Different types of paints suitable for rusty surfaces include acrylic, oil-based, and epoxy paints. Acrylic paint is ideal for outdoor surfaces as it provides excellent protection against UV rays and weathering. Oil-based paint offers superior adhesion and durability, making it a popular choice for heavily rusted surfaces. Epoxy paint provides maximum protection against corrosion and abrasion, making it suitable for industrial applications.
Other factors affecting paint performance include surface preparation methods used, application techniques employed, and environmental conditions during application and curing stages. It is vital to read manufacturer’s instructions carefully when applying paints to ensure optimal performance and longevity of the paint job.
Choosing the right type of paint for rusty surfaces can be challenging, but understanding different types available and their benefits can help professional painters make informed decisions when selecting a suitable product for their project. By considering various factors affecting paint performance, painters can achieve a long-lasting finish that protects against rust and other forms of corrosion on metal surfaces.
Paint Application
After selecting the right type of paint for rusty surfaces, it is now time to consider the application method that would be most suitable. Two common methods for applying paint are brush and spray. The brush application method is more traditional and offers greater control over the amount of paint applied. It also allows for touch-ups and corrections in case of errors during painting. On the other hand, spray application offers better coverage, especially on large surfaces, and can create a smooth finish.
In addition to the chosen application method, drying time is another crucial factor to consider when painting rusty surfaces. The drying time varies depending on several factors such as humidity, temperature, and the type of paint used. For instance, oil-based paints take longer to dry than acrylic paints because they contain solvents that evaporate slowly. Waiting for the paint to dry completely before applying a second coat or handling objects painted is essential to achieve optimal results.
In conclusion, selecting the right paint for rusty surfaces is not enough; professional painters must also consider other factors such as application method and drying time to achieve a smooth and long-lasting finish that protects against rust and other forms of corrosion. By understanding these factors and following manufacturer’s instructions carefully, painters can provide their clients with a high-quality job that meets their needs while ensuring safety standards are met during painting.
Selecting The Proper Tools And Materials
To effectively paint rusted metal, you will need to select the proper tools and materials. The first consideration is the type of brushes that you will use. A high-quality brush with natural bristles is recommended for this task. The bristles should be stiff enough to apply paint evenly, but not so stiff that they damage the surface of the metal.
Another important factor when painting rusted metal is choosing the right type of paint. Rust resistant paints are specially formulated to adhere to corroded surfaces and provide a protective coating. These types of paints are available in various finishes, including gloss, satin, and matte. It is important to choose a finish that complements your project’s aesthetic while also providing adequate protection against rust.
When selecting tools and materials for painting rusted metal, it is essential to invest in high-quality products that will produce an excellent final result. By using a good quality brush and rust resistant paint, you can ensure that your painted surface will resist future oxidation and remain beautiful for years to come.
Transition: Now that we have discussed how to select the proper tools and materials for painting rusted metal, let us move on to preparing the surface for painting.
Preparing The Surface For Painting
Before you can start painting a rusted metal surface, it is crucial to prepare it properly. The most common mistake beginners make is not preparing the surface adequately, which can lead to poor paint adhesion and a short-lived finish. If your goal is to achieve a long-lasting and flawless finish, follow these essential steps for preparing your rusted metal surface.
Firstly, remove any loose rust with a wire brush or sandpaper. Loose rust can be easily removed by scrubbing it off with a wire brush. It is vital that you do this step thoroughly as any remaining loose rust will continue to spread under the new coat of paint. Once you have removed all the loose rust, use sandpaper or an abrasive pad to smooth out any rough areas on the metal surface.
Secondly, clean the surface with soap and water and dry it thoroughly. After removing the loose rust, ensure that there are no contaminants on your metal surface by cleaning it with soap and water. Rinse off all residue and dry it completely using a clean cloth or air compressor. Make sure there are no traces of moisture left on the metal before proceeding.
Lastly, apply a rust converter or primer to prevent further corrosion. Rust converter chemically converts any remaining rust into an inert substance that can be painted over. Apply it onto your cleaned and dried metal surface according to manufacturer’s instructions before applying primer. Primer provides an additional layer of protection against future corrosion while also improving paint adhesion for better durability.
These tips for preparing your rusted metal surface will help you achieve a lasting finish that looks great while protecting your surfaces from further damage. Now that you know how to prepare your rusty metal surface let us move on to removing loose rust with a wire brush in the next section.
Removing Loose Rust With A Wire Brush
After preparing the surface for painting, it’s time to remove any loose rust. Did you know that rust affects more than just the appearance of your metal surfaces? According to a study by the National Association of Corrosion Engineers, corrosion costs the US economy over $300 billion annually. That’s why it’s important to use the right techniques and tools to remove rust before painting.
One effective technique for removing loose rust is wire brushing. A wire brush is a tool with bristles made from different materials such as steel or brass. When choosing the right wire brush for the job, consider the type of metal surface you’re working on and the severity of rust. For heavy rust, use a stiff-bristled brush, while a softer bristle brush is better suited for light rust.
To effectively use a wire brush, start by donning protective gear such as gloves and goggles. Then, using short strokes in one direction, scrub away the rust until it’s gone. Be sure to work with a steady hand and avoid applying too much pressure as this could damage the metal surface. Once done, wipe away any debris using a clean cloth before moving on to sanding.
Transitioning into sanding the surface smooth, it’s important to note that this step should only be taken once all visible rust has been removed using wire brushing. Sanding helps smooth out any rough patches left behind after removing rust and prepares the surface for painting.
Sanding The Surface Smooth
Once the rust has been removed from your metal surface, the next step is to sand it smooth. Sanding is an important part of the process as it helps to remove any rough or uneven spots on the surface, ensuring that your paint job is even and uniform. To get started with sanding, you will need a few tools including sandpaper and a sanding block.
The importance of sandpaper cannot be overstated when it comes to achieving a smooth metal surface. It’s recommended to use a coarse grit sandpaper first to remove any remaining rust and rough spots. Once this is done, switch to a finer grit sandpaper to finish off the job. This will ensure that your metal surface is perfectly smooth and ready for painting.
When it comes to corners or hard-to-reach areas, using a sanding block can be helpful in achieving an even finish. It allows you to apply consistent pressure while also protecting your fingers from getting scraped or cut by sharp edges. Don’t forget to wear protective gloves while sanding as it can be tough on the hands.
To prepare for the next step of cleaning the surface with soap and water, make sure you have thoroughly sanded all areas of your metal surface. Once this is done, wipe down with a clean cloth or compressed air blower to remove any dust particles left over from sanding. You’re now ready for the next step in preparing your rusted metal surface for painting.
Cleaning The Surface With Soap And Water
After sanding the surface smooth, it’s time to clean the rusted metal. Cleaning the rust from the metal surface is essential for ensuring that the paint will adhere properly. Rust stains can be challenging to remove, especially if they’ve been present for a long time. In such cases, degreasers can be used to tackle stubborn rust stains.
When using degreasers or other chemical cleaning agents, it’s crucial to wear protective gear while cleaning. This includes gloves, goggles, and a respirator mask. These tools protect your hands, eyes, and respiratory system from any potential harm caused by inhaling fumes or coming into contact with hazardous chemicals.
After cleaning with soap and water or a degreaser, it’s important to dry the surface thoroughly before proceeding with painting. Moisture on the surface can cause issues such as bubbling or peeling of paint. Ensure that there are no water droplets left on the surface by wiping it down with a clean cloth or allowing it to air dry completely before moving onto the next step in painting rusted metal.
Drying The Surface Thoroughly
As a painter, I have often encountered rusted metal surfaces that require a fresh coat of paint. One thing I always emphasize to my clients is the importance of drying the surface thoroughly before painting. This step can make all the difference in the final outcome, as any moisture left on the surface can lead to bubbling, peeling, or cracking of the paint.
Proper ventilation is crucial during this stage, especially if you’re working with oil-based paints or solvents. Rust is typically formed due to exposure to moisture and air, so it’s essential to remove any remaining water from the metal surface before applying paint. Using a hair dryer can speed up the drying process, but it’s important to keep it at a safe distance and avoid overheating the surface.
To ensure that your metal surface is dry and ready for painting, follow these simple tips:
- Wipe down the area with a clean cloth or paper towel.
- Use compressed air to blow away any dust or debris.
- Allow ample time for natural air-drying.
- Use a hair dryer on low heat and speed settings.
- Check for moisture using a moisture meter or by placing a piece of plastic wrap on the surface overnight.
By taking these steps and ensuring that your metal surface is completely dry before painting, you’ll be able to achieve a smooth and even finish that lasts longer. The next step in this process involves applying a rust converter that will help seal off any remaining rust particles and prevent further damage.
Applying A Rust Converter
When it comes to painting rusted metal, applying a rust converter can be a crucial step in the process. Rust converters are products that chemically convert rust into a stable form that can be painted over. There are many benefits of using a rust converter, including stopping the spread of rust, creating a smooth surface for paint application, and increasing the longevity of your paint job.
Before applying a rust converter, it’s essential to prepare the surface properly. This means removing any loose rust or flaking paint with a wire brush or sandpaper and cleaning the surface with soap and water. Once the surface is clean and dry, apply the rust converter according to the manufacturer’s instructions. It’s important to wear protective gear such as gloves and goggles when working with these products.
When applying a rust converter, there are some tips you should keep in mind for optimal results. First, make sure to apply enough product to completely cover all areas affected by rust. Second, allow ample time for the product to dry and cure before painting over it. Finally, remember that not all rust converters are created equal – be sure to choose one that is appropriate for your specific project and follow all safety precautions listed on the label.
With your rusty metal now treated with a high-quality rust converter, you’re one step closer to achieving a professional-looking paint job. The next step is using a primer specifically formulated for rusty surfaces – this will help ensure that your final coat of paint adheres well and lasts longer. Keep reading for more information on how to use primer effectively on rusty metal surfaces.
Using A Primer For Rusty Surfaces
Having applied a rust converter to the metal surface, it is now time to move on to the next step in painting rusty metal – applying a primer. A primer acts as a basecoat that helps paint adhere better to the surface and provides extra protection against corrosion. Choosing the right primer is crucial for achieving the desired results.
When selecting a primer for a rusty surface, opt for an oil-based or epoxy-based one as they are more effective in preventing rust from spreading. Look for primers that have anti-corrosive properties and are specifically designed for use on ferrous metals. It is important to note that primers come in different colors, but using one with a color close to your topcoat will make it easier to achieve even coverage.
Tips for application:
- Clean the surface thoroughly before applying the primer. Any dirt, grease, or loose rust can prevent proper adhesion.
- Apply the primer evenly using long strokes in one direction, overlapping each stroke slightly.
- Allow sufficient drying time between coats as per manufacturer’s instructions.
A professional painter knows that taking shortcuts when applying a coat of paint is never an option. Applying paint to rusty metal requires careful planning and execution. In the next section, we will discuss some essential tips and tricks for ensuring that your final coat of paint looks flawless on your rusty metal surface.
Applying Paint To Rusty Metal
To ensure that the rust doesn’t show through the paint, it’s important to choose appropriate colors for your project. Darker shades like black or navy blue are great choices for covering up rust stains on metal surfaces. For a more decorative approach, you can also opt for bright and vibrant colors to add a pop of color to your space. Keep in mind that light shades may not be suitable for rusty surfaces.
When painting over extremely rusted surfaces, it’s important to take extra precautions to ensure that the paint adheres properly. Begin by cleaning the surface with a wire brush or sandpaper to remove any loose rust flakes or debris. Afterward, apply a rust converter solution to neutralize any remaining rust and prevent further corrosion. This will also help create a smooth surface for the paint to adhere to.
Once the surface is prepped and primed, it’s time to apply the paint. Apply thin coats of paint using a high-quality brush or roller until you achieve full coverage. Avoid applying thick coats as this can lead to drips and unevenness in the finish. Allow each coat of paint to dry completely before applying additional coats if necessary. With these tips in mind, you can easily transform your rusty metal surfaces into beautiful works of art!
Moving on from painting, finishing and sealing the surface is just as important in ensuring its longevity and durability.
Finishing And Sealing The Surface
- Sanding is paramount for a successful painting job on rusted metal, as it provides a smooth surface for the primer and paint.
- Priming is the next step, necessary to ensure the paint adheres to the metal and provides a protective layer.
- Sealing the surface after priming is beneficial, as it helps to protect the paint job from the elements and further rusting.
- It is important to use the appropriate sandpaper grit when sanding to ensure the surface is properly prepared.
- The priming layer should be applied evenly and allowed to dry before painting, to avoid any issues with the paint job.
- After painting, a sealing layer should be added to protect the paint job and ensure longevity.
Sanding
To achieve a smooth and polished finish on rusted metal, sanding is an essential step in the process. Sanding helps to remove any rust, rough patches, or imperfections on the surface before applying paint. There are different types of sandpaper that can be used for this task depending on the level of rust and the desired finish.
The first step in sanding rusty metal is to choose the right type of sandpaper. For light rust, a fine-grit sandpaper such as 220 grit would work well. However, for heavy rust or deep scratches, a rougher grit like 80 grit may be needed. The technique for sanding should also be considered, as it plays a significant role in achieving a smooth and even finish. It is best to start with a coarse grit and gradually move up to finer grits until the desired finish is achieved.
When sanding rusty metal, it is important to use proper techniques such as using light pressure and moving in circular motions. Avoid using too much force as it can cause scratches or damage to the surface. Additionally, make sure to clean off any debris or dust from the surface before moving onto the next stage of painting. With these techniques and careful attention to detail, you can achieve a professional-looking finish on your rusty metal surfaces without breaking a sweat!
Priming
After sanding rusty metal, the next step is priming. Primers are essential for providing a smooth surface for the paint to adhere to and prevent rust from reoccurring. There are different types of primers for rusted metal, such as oil-based, water-based, and epoxy-based. The type of primer you use depends on the level of rust and the environment where the object will be placed.
Before applying primer on rusty surfaces, it is crucial to ensure that the surface is clean and free of debris or dust. It is recommended to use a wire brush or sandpaper to remove any loose particles before wiping it down with a damp cloth. When applying primer, it is important to follow the instructions on the label closely, such as using thin coats and allowing sufficient drying time between coats. In addition, make sure to wear protective gear such as gloves and a respirator when working with primers.
After priming comes finishing and sealing the surface. This final step helps protect your newly painted surface from damage caused by weather elements or scratches. There are various types of sealers available such as polyurethane clear coat or lacquer spray that can provide glossy or matte finishes depending on your preference. Before applying sealer, make sure that your painted surface has completely dried out and follow instructions carefully for best results. With these tips in mind, you can achieve a durable and long-lasting finish for your rusted metal objects!
Sealing
After completing the priming process, it’s time to move on to the next step of finishing and sealing the surface. Sealing provides an extra layer of protection, ensuring that your newly painted surface stays in good condition for a long time. One of the benefits of sealing your painted surface is that it can help prevent damage caused by weather elements, scratches, and other types of wear and tear. Additionally, a good sealant can also enhance the appearance of your painted object.
There are several common techniques for sealing rusted metal surfaces. One of these is applying polyurethane clear coat spray or lacquer spray. These types of sealers can provide a glossy or matte finish, depending on your preference. Another technique involves using wax or oil-based sealer, which can give a more natural look to your surface while still protecting it from damage. The choice of sealer will depend on the type of object you are painting and its intended use.
When applying sealer, it’s important to follow instructions carefully for best results. Ensure that your painted surface has completely dried out before beginning the sealing process. Use thin coats and allow sufficient drying time between applications to achieve an even finish. Finally, remember to wear protective gear such as gloves and a respirator when working with sealers or any other chemicals used in the painting process. By following these tips and techniques, you can achieve a durable and long-lasting finish for your rusted metal objects!
Maintaining Painted Rusty Surfaces
While many people believe that once a metal surface becomes rusted, it is beyond repair, this is not always the case. With proper maintenance, even painted rusty surfaces can remain in good condition for several years. Preventing rust from forming in the first place is the best way to ensure a long-lasting paint job on your metal surfaces.
To prevent rust from forming on your metal surfaces, clean them regularly and keep them dry. Applying a coat of primer before painting can also be helpful. If you notice any rust starting to form, remove it as soon as possible and repaint the area. It’s important to remember that neglecting the initial signs of rust can lead to further damage and costly repairs down the line.
Long-term maintenance of painted rusty surfaces requires periodic inspection and touch-ups. Even if no visible signs of rust are present, it’s important to keep an eye out for any areas where the paint may be chipped or scratched. Touching up these areas with fresh paint will help prevent rust from forming underneath. Additionally, applying a coat of wax or sealant over your painted metal surfaces can provide an extra layer of protection against moisture and other elements.
To maintain painted rusty surfaces:
Clean regularly and keep dry
Apply primer before painting
Remove any visible signs of rust promptly
Inspect periodically for chipped or scratched areas
Touch up any damaged areas with fresh paint
Apply wax or sealant for extra protection
Overall, maintaining painted rusty surfaces is not difficult but does require regular attention and care. By following these simple steps, you can extend the life of your metal surfaces and avoid costly repairs in the future. Remember that prevention is key when it comes to preventing rust on metal surfaces.
Conclusion
Rusted metal can be an eyesore and a potential hazard, but painting it can give it new life. Understanding the causes of rust and identifying its presence is crucial before any painting can begin. One must assess the extent of damage and choose the right paint for rusty surfaces. Proper tools and materials are also essential in achieving a successful paint job.
Using a primer for rusty surfaces is necessary to ensure adhesion between the surface and paint. Applying paint to rusty metal should be done with care, using even strokes to avoid drips or uneven application. Finishing and sealing the surface is also important to protect against future rusting.
Maintaining painted rusty surfaces requires regular cleaning and touch-ups as needed. In conclusion, painting rusted metal requires careful attention to detail, proper preparation, and use of appropriate tools and materials. With these steps, one can transform an unsightly rusted surface into a beautiful piece of art that stands the test of time. So go ahead, grab your brushes, sandpaper, masking tape, drop cloths, and primers – let’s get painting!
Image Credits
- “Rust on Green Metal” by GrungeTextures (featured)

