Painting walls is one of the most common home improvement projects that homeowners undertake. It is an affordable and easy way to give a room a fresh new look. Many people choose to paint their walls themselves rather than hiring a professional painter, as it can be a fun and rewarding DIY project. However, for those who are not experienced with painting, it can be an intimidating task to tackle on your own. This article will provide you with some tips and tricks on how to paint walls using paint brushes.
Painting with brushes is a traditional method of applying paint that has been used for centuries. While there are now many other tools available for painting, such as rollers and sprayers, brushes remain a popular choice because they offer more control and precision. In this article, we will cover the materials you will need to get started, the preparation steps you should take before beginning your project, and the techniques you can use to ensure that your finished product looks professional. By following these guidelines, you can transform any room in your home into a beautiful space that reflects your personal style.
Choosing The Right Paint Color
When embarking on a painting project, the first step is to choose the right paint color. This decision can make or break a room’s overall aesthetic, and it’s essential to take your time in making the right choice. Color psychology plays an important role in this process since different shades evoke different emotions and moods. For example, blue hues are associated with calmness and productivity, while yellow tones can bring warmth and energy to a space.
Another crucial factor to consider is popular paint color trends. While it’s essential to choose a color that reflects your personal taste, staying up-to-date with current trends can help ensure your home remains stylish and relevant. In 2021, muted tones like dusty pinks, sage greens, and soft blues are expected to be popular choices for interior walls. Of course, these trends may not suit everyone’s tastes or preferences. Therefore, it’s crucial to select a hue that you’ll love for years to come.
Once you’ve determined the perfect paint color(s), measuring your walls for accurate estimates is the next step in preparing for your project. Knowing how much paint you need will save you time and money in the long run by ensuring you purchase precisely what you require without any waste. With proper planning and preparation, painting your walls will be an enjoyable and successful endeavor that enhances your home’s beauty and value for years to come.
Measuring Your Walls For Accurate Estimates
- Accurately calculating the square footage of the walls to be painted is essential for providing an accurate estimate and completing the job efficiently.
- Measuring the walls of a room is a simple process that can be done with a tape measure and a few mathematical calculations.
- It is important to measure both the length and width of the walls to ensure that all areas to be painted are accounted for.
- Once all measurements are taken, it is possible to calculate the total square footage of the walls and make an accurate estimate for the cost of the job.
Calculating Square Footage
Calculating Square Footage is the first and most important step in estimating paint needs when painting your walls. This is because it helps you determine how much paint you will need to cover the entire surface area of your walls. To calculate your square footage, simply measure the length and height of each wall and multiply them together. Then, add up the square footage of all the walls to get the total square footage of your painting project.
It’s important to note that not all surfaces are the same, and some may require more paint than others due to factors such as texture or previous color. In order to get an accurate estimate, it’s best to use a paint coverage calculator or consult with a professional painter. Additionally, it’s always a good idea to purchase slightly more paint than you think you’ll need in case of touch-ups or mistakes.
By calculating coverage accurately, you can ensure that you have enough paint for your project without overspending on unnecessary materials. With this knowledge, you can confidently begin your painting project knowing that you have accurately estimated how much paint you will need for each wall.
Measuring Walls
When preparing for a painting project, accurately measuring your walls is crucial in determining how much paint you will need. To ensure an accurate estimate, it’s important to use proper marking techniques when measuring your walls. This includes using a level to mark straight lines and measuring from the floor or ceiling instead of the baseboard or crown molding.
It’s also important to avoid common measuring mistakes such as failing to account for doorways and windows, or assuming that all walls are the same size. Additionally, irregularly shaped walls or rooms may require more precise measurements and calculations.
By taking the time to accurately measure your walls, you can avoid overestimating how much paint you will need for your project. With this knowledge, you can confidently purchase the correct amount of materials and begin your painting project with ease.
Preparing Your Room For Painting
Did you know that preparing your room for painting can take up to 50% of the entire project time? Before you start painting walls using paint brushes, it is crucial to prepare your room properly. This will not only make the painting process more manageable, but it will also ensure a smooth and professional-looking finish.
Choosing paint finishes is an important part of the preparation process. Paint finishes affect the durability and overall appearance of your walls. Matte finishes are great for hiding imperfections on your walls, while glossy finishes are easier to clean and maintain. Satin and eggshell finishes are perfect for high-traffic areas like hallways or kitchens because they offer both durability and easy maintenance.
Removing furniture and fixtures from the room is another essential step in preparing your space. Not only does it give you more space to work with, but it also protects your belongings from accidental paint splatters or drops. Here’s a bullet-point list of things you should consider before starting to paint:
- Cover floors with drop cloths or plastic sheeting
- Remove curtains, blinds, light fixtures, switch plates, and outlet covers
- Take down any artwork or decorations hanging on the walls
- Move furniture to the center of the room or completely out of the space
By taking these steps to prepare your room before painting, you’ll be setting yourself up for success. The next step in this process is gathering the necessary supplies so that you can start painting confidently without any interruptions.
Gathering The Necessary Supplies
Now that you have properly prepared your room for painting, it’s time to gather the necessary supplies and start working on your walls. Before anything else, make sure to choose the right brush size. For large areas, use a 4-inch or 6-inch brush, while a 2-inch brush is good for smaller areas and touch-ups.
Once you’ve chosen the right brush size, set up a designated painting area. Cover the floor with drop cloths or old newspapers to protect it from paint spills and splatters. Remove any furniture or decor that can get in the way of your work. You may also want to open windows or turn on fans to ensure proper ventilation.
With your designated painting area all set up, it’s now time to choose the right type of paint brush for your project. The most common types are natural bristle brushes and synthetic bristle brushes. Natural bristle brushes are best used with oil-based paints, while synthetic bristle brushes work well with water-based paints like latex.
Next section topic: Choosing the Right Type of Paint Brush
Choosing The Right Type Of Paint Brush
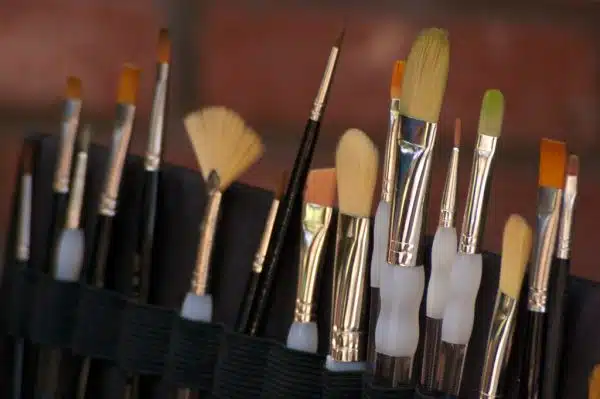
When it comes to painting walls, one of the most important aspects is choosing the right type of paint brush. There are several factors that need to be considered when selecting a paint brush, such as types of bristles, brush sizes and shapes. Each type of brush is designed to achieve specific results, so it’s crucial to choose the right one for your painting project.
The first factor to consider when selecting a paint brush is the type of bristles. There are two main types: natural and synthetic. Natural bristle brushes are made from animal hair and are best used with oil-based paints. On the other hand, synthetic bristle brushes are made from nylon or polyester and work well with water-based paints. When selecting a brush, it’s essential to consider the type of paint you’ll be using as this will affect your choice of bristle material.
Another important factor when choosing a paint brush is its size and shape. Brushes come in a range of sizes, with larger brushes being ideal for covering large areas quickly while smaller brushes allow for greater precision in tight spaces. Brush shapes also vary, with flat brushes being suitable for broad strokes and straight edges while angled brushes can help create more precise lines and corners.
In summary, selecting the right type of paint brush is essential when painting walls. Factors such as types of bristles, brush sizes and shapes should all be considered before making your selection. By choosing the correct brush for your project needs, you’ll be able to achieve professional-looking results. In the next section, we’ll discuss how to properly load your brush with paint for optimal coverage on your walls.
Properly Loading Your Brush With Paint
After selecting the right type of paint brush for your project, it is time to learn some basic techniques that will help you achieve a smooth and even coat on your walls. One important tip is to always paint in a “W” pattern, starting at the top left corner of the wall and working your way down to the bottom right. This method helps ensure that you cover every inch of the surface while avoiding drips and streaks.
Another vital aspect of painting with brushes is choosing the right bristle type. Natural bristle brushes made from animal hair are ideal for oil-based paints, as they hold more paint and offer a smoother finish. Synthetic bristles, on the other hand, are better suited for water-based paints because they don’t absorb as much moisture and are easier to clean. When selecting a brush, consider its size as well – larger brushes are best for covering large areas quickly, while smaller brushes work well for details such as corners and edges.
Technique tips and selecting appropriate bristle types play an essential role in achieving professional-looking results when painting with a brush. By using proper technique and choosing the correct brush, you can avoid common mistakes like leaving visible brush strokes or having uneven coverage. Next up: properly loading your brush with paint so that you can begin applying your first coat of paint onto your walls flawlessly.
Applying Your First Coat Of Paint
Now that you have prepared the walls, it is time to apply your first coat of paint. Start by pouring a sufficient amount of paint into a bucket and stir it thoroughly until it becomes smooth and even. You can then start painting using a brush or roller, depending on your preference.
To achieve an even coverage, use long, sweeping strokes and try to maintain a wet edge as you move from one section of the wall to another. This means that you should avoid letting the paint dry before you apply the next stroke. Techniques for blending paint include starting from an unpainted area and working towards a painted area, or painting in W-shaped patterns.
While applying your first coat of paint, be mindful of avoiding streaks and drips. Streaks occur when there are visible lines left by the brush strokes, while drips happen when excess paint accumulates on the surface. To prevent these mistakes, use light pressure when painting and avoid overloading your brush with too much paint. Additionally, ensure that you clean up any drips immediately to prevent them from drying on the wall.
Now that you have applied your first coat of paint using appropriate techniques, it is time to let it dry before proceeding with subsequent coats. This will give the first coat enough time to adhere properly to the surface and dry evenly without smudging or leaving marks. Remember that drying times vary depending on factors such as humidity and temperature, so consult your paint manufacturer’s instructions for guidance on how long to wait before applying your next coat.
Letting Your First Coat Dry
Prior to painting a wall, it is important to evaluate the wall’s condition and fill any cracks or holes with spackle or plaster.
After applying a coat of paint with a brush, it is essential to allow it to dry thoroughly before applying a second coat.
It is also important to consider the type of paint being used and the conditions of the room in order to accurately estimate the amount of time needed for the first coat to dry.
If a second coat is applied before the first coat is dry, it can cause the paint to become gummy and ruin the finish of the wall.
Preparing The Wall
To achieve a smooth and even finish when painting your walls, it is crucial to properly prepare the surface beforehand. One of the first steps in this process is to sand down any rough spots or imperfections on the wall. Sanding techniques can vary depending on the type of wall you are working with. For example, if you have a plaster wall, you may want to use a fine grit sandpaper to avoid damaging the surface. On the other hand, if you have a drywall surface, a coarser grit sandpaper may be more appropriate.
After sanding down any rough areas, it’s essential to thoroughly clean the walls before applying any paint. The wall cleaning process involves removing any dirt, dust or grime that may have accumulated on the surface over time. This can be done using a damp cloth or sponge and mild soap solution. It’s important to allow enough time for the walls to dry completely before moving on to the next step.
By taking care to properly prepare your walls before painting them, you’ll ensure that your paint job turns out looking professional and flawless. Remember to use an appropriate sanding technique for your specific type of wall and take extra care when cleaning off any debris or dirt from the surface. With these steps completed successfully, you’re ready to move on to letting your first coat dry!
Letting The Coat Dry
After properly prepping your walls for painting, the next step is letting your first coat dry. This step is crucial in achieving a professional and flawless finish. To ensure that your first coat dries properly, it’s important to follow some tips for avoiding paint drips and streaks.
One of the essential tips is to avoid overloading your brush or roller with paint as this can cause drips and an uneven application. It’s best to apply thin coats of paint and let them dry completely before applying another layer. Additionally, make sure to paint in one direction to prevent any visible brush strokes or streaks.
Another important consideration when letting your first coat dry is environmental factors such as temperature and humidity. Painting in high temperatures or humidity can cause the paint to dry too quickly and result in cracking or peeling. On the other hand, painting in low temperatures may slow down the drying process, causing the paint to take longer to set.
In conclusion, properly letting your first coat of paint dry is essential in achieving a smooth and even finish on your walls. By following these tips for avoiding paint drips and streaks, you’ll ensure that each coat dries evenly without any visible imperfections. Remember to consider environmental factors when painting and allow enough time for each coat to dry before moving on to the next layer.
Sanding Your Walls For A Smooth Finish
Achieving a smooth and professional-looking finish on your walls requires more than just applying paint with a brush. One important step in the process is sanding your walls. Sanding is crucial because it helps to remove any imperfections on the surface of the wall, resulting in a smoother and even finish.
Before you start sanding, it’s essential to ensure that your walls have been primed properly. Priming your walls before painting them helps to create an even surface, allowing for better adhesion of the paint. It also helps to prevent any stains or discolorations from bleeding through the paint. Without proper priming, sanding may not be effective in achieving a smooth finish.
Different types of wall textures require different techniques for sanding. For smooth walls, use fine-grit sandpaper and make light passes over the entire surface area. Be sure to wipe away any dust with a cloth after sanding to avoid creating bumps or ridges on the wall surface. For textured walls, use a sanding sponge with medium-grit sandpaper to avoid removing too much texture from the wall.
Now that you have sanded your walls to achieve a smooth finish, it’s time to move onto applying your second coat of paint. But first, make sure that all dust has been removed from the surface by wiping it down with a clean cloth or vacuuming it up using a soft brush attachment. By taking these steps, you can achieve professional-looking results that will last for years to come.
Applying Your Second Coat Of Paint
Before applying the second coat of paint, it is important to prepare the wall by wiping away any dust or debris that accumulated on the surface.
To ensure a uniform finish, the paint should be stirred thoroughly before use.
When applying the paint, use a brush with medium to long bristles and use long strokes to get even coverage.
Allow the paint to dry for at least 24 hours before adding any additional coats.
Preparing The Wall
Preparing the wall is a crucial step in achieving a smooth and even finish when applying your second coat of paint. Wall cleaning is an essential part of the preparation process. Before painting, remove any dirt, dust, or debris on the surface of the wall by using a soft-bristled brush or vacuum cleaner. It’s important to ensure that the wall is free from any residues that could affect the adherence of your paint.
Once you’ve cleaned your walls thoroughly, you’ll need to prepare your equipment for painting. You will need to gather all necessary tools such as brushes, rollers, and trays before starting. Make sure that all equipment is clean and ready for use before beginning. Preparing your brushes correctly will help achieve a smooth finish; dip them in water before use to prevent paint from drying on them while using.
In addition to equipment preparation and wall cleaning, consider sanding down any rough patches or bumps on the wall surface. This ensures that your paint adheres well and creates an even surface for painting. Taking these steps before applying your second coat will ensure that you end up with a flawless finish for your walls. Remember to take time with each step and enjoy the process!
Applying The Paint
Now that you have prepared your walls, equipment, and yourself, it’s time to start applying the paint. Before opening the can of paint, make sure to stir it well to ensure an even consistency. Using a clean brush or roller, start by painting areas that are hard to reach such as corners and edges. Once done with these parts, work on the larger areas of the wall using different brush strokes for a consistent finish.
When applying your second coat of paint, it’s essential to avoid drips and smudges. To do this, apply each stroke in one direction only and avoid overloading your brush or roller with too much paint. If you notice any drips, wipe them off immediately using a dry cloth before they dry up. You may also use a small angled brush to touch up areas where the roller or brush could not reach.
After completing the second coat of paint application, allow it to dry completely before inspecting for any missed spots or unevenness. If necessary, you may need to apply another coat for better coverage. Remember always to take your time when painting and enjoy the process; this will ensure that you end up with a beautiful finish that will last for years!
Creating Smooth, Even Brush Strokes
Now that you have applied the second coat of paint, it’s important to focus on creating smooth, even brush strokes. This will give your walls a professional-looking finish that is both aesthetically pleasing and durable. Follow these tips for blending and avoiding brush marks:
- Use a high-quality paintbrush with tapered bristles to create smooth strokes.
- Apply light pressure when painting, and avoid overworking the paint on the brush.
- Keep a wet edge by working in small sections and blending each section into the next.
Another important factor to consider is lighting and angle. Make sure you have adequate lighting in the room so you can see any imperfections or areas that need touch-up work. Additionally, hold your brush at a 45-degree angle to the wall and use long, fluid strokes to create an even finish.
By following these tips for blending and avoiding brush marks, as well as paying attention to lighting and angle, you can achieve a flawless finish on your painted walls. In the next section, we’ll discuss how to touch up any imperfections or mistakes that may occur during the painting process.
Touching Up Any Imperfections
After painting your wall, it’s important to inspect the surface for any imperfections. Sometimes, paint can settle unevenly or leave gaps between coats. To fix this, you’ll need to start by filling any noticeable gaps or holes in the wall. This is especially important if you’re going for a smooth finish.
To fill gaps, use a putty knife and apply spackle over the area of concern. Be sure to spread it evenly and let it dry completely before sanding. Once the spackle is dry and hardened, use fine-grit sandpaper to smooth out any bumps or rough areas. This will create a seamless surface that’s ready for touch up painting.
Sanding techniques are crucial when touching up walls. Use light pressure and circular motions when sanding over the spackled areas to avoid creating divots or scratches in the wall surface. After you’ve sanded down any faults, wipe down the entire area with a damp cloth to remove any dust or debris before moving on to painting again. With these steps done correctly, your walls will look perfect and professionally finished – no one will be able to tell there were ever imperfections in the first place!
Now that we have filled in all gaps and sanded them down smoothly, it’s time to clean your brushes properly before storing them away until next use. The cleanliness of your brushes is essential when it comes to their longevity and performance during future projects. In order to maintain their quality, follow these simple steps:
Cleaning Your Brushes Properly
After touching up any imperfections on the wall, it is important to clean your brushes properly. Many people make the mistake of simply rinsing their brushes with water, but this can lead to damage and decreased lifespan of the brush. Proper brush care involves using a brush cleaner solution that is specifically designed for the type of paint you are using.
To clean your brushes, start by removing as much excess paint as possible by wiping it off onto a cloth or paper towel. Then, dip the brush into the appropriate brush cleaner solution and work it in with your fingers or a brush comb. Rinse thoroughly with water and repeat until all paint has been removed from the bristles. For stubborn paint buildup, consider using a specialized brush cleaning tool.
Properly cleaning your brushes not only extends their lifespan but also ensures that they perform optimally for future projects. To store your brushes for future use, hang them upside down or lay them flat on a surface until completely dry. Avoid storing them standing upright as this can cause damage to the bristles over time. With proper care and storage, your brushes will be ready for use whenever you need them again.
Storing Your Brushes For Future Use
- It is important to clean brushes thoroughly after each use in order to ensure quality painting results and extend the life of the brush.
- Paint should be removed from the brush via a solvent or soap and warm water and then rinsed thoroughly with clean water.
- When cleaning brushes, it is important to avoid warping the bristles by using a gentle hand.
- Brushes should be dried completely before storing, which can be done by blotting the bristles with a cloth or paper towel and then allowing the brush to air dry.
- Storing brushes in an upright position will help ensure that the bristles remain intact.
- Brushes should be stored in a cool and dry place, away from direct sunlight and high temperatures.
Cleaning Brushes
Maintaining the quality of paint brushes is an essential aspect of prolonging their lifespan. Proper brush maintenance can save you money and time in the long run. Cleaning your brushes after every use is a crucial step in maintaining their quality and ensuring they are ready for future use.
To clean your brushes, start by removing as much excess paint as possible using a rag or paper towel. Then, rinse the brush with warm water and gently work any remaining paint out of the bristles with a brush comb or your fingers. Be sure to never let the paint dry on the brush, as it can cause irreversible damage to the bristles.
After cleaning, reshape the bristles and wrap them in paper or plastic wrap to prevent them from getting damaged during storage. Store your brushes upright in a container or hang them on hooks to keep their shape intact. Properly cleaning and storing your brushes will help ensure that they are always ready for use when you need them next, saving you time and money in repurchasing new ones.
In conclusion, taking good care of your paint brushes is crucial for prolonging their lifespan and ensuring that they perform at their best every time you use them. Proper cleaning techniques and careful storage will help maintain their shape and prevent damage to the bristles over time. By following these simple steps, you can continue using your favorite paint brushes for many projects to come!
Drying Brushes
Maintaining the quality of paint brushes is an essential aspect of prolonging their lifespan. Cleaning and storing your brushes properly can save you money and time in the long run. In addition to cleaning, proper drying techniques are also important to prevent brush bristles from drying out.
After cleaning your brushes, carefully shake off any excess water and reshape the bristles to their original shape. Avoid leaving them in a damp area or directly under sunlight as this could cause damage to the bristles. Instead, hang your brushes upside down or lay them flat on a clean surface until they are completely dry.
If you accidentally left your brush out too long and it has dried out, there are ways to revive it. Start by soaking the brush in warm water or vinegar for up to an hour. Gently work any remaining paint out of the bristles using a brush comb or your fingers, then rinse with warm water and reshape the bristles. Repeat this process until all paint residue is removed and the brush is soft again. Proper drying techniques will help prevent this from happening in the future, but if it does occur, don’t toss out your favorite brush just yet – try restoring it instead!
Storing Brushes
Properly storing your paint brushes is crucial to maintaining their longevity. When not in use, brushes should be kept in a clean and dry area. Avoid placing them in direct sunlight or near sources of heat as this can cause the bristles to become brittle and break. It’s also important to store brushes with the bristles facing up or down to prevent them from becoming misshapen.
One tip for storing your brushes is to wrap them in paper towels or a clean cloth before putting them away. This helps absorb any excess moisture and keeps the bristles protected from dust or debris that may accumulate over time. Another option is to use a brush holder, which allows you to keep your brushes neatly organized and easily accessible when you need them.
In addition to proper storage techniques, it’s important to regularly inspect your brushes for any signs of damage or wear. If you notice any frayed or split bristles, it may be time to replace the brush. By taking these steps, you can ensure that your paint brushes remain in good condition and ready for use whenever you need them.
Admiring Your Beautifully Painted Walls
After all the hard work of painting your walls, it is time to sit back and admire your newly transformed space. The satisfaction of completing a DIY wall painting project is unparalleled. However, before you can fully appreciate your hard work, you need to take a few steps to ensure that your painted walls are looking their best.
Firstly, make sure that the paint has dried completely before removing any tape or coverings. This will prevent any accidental smudging or peeling of the paint. Once the tape is removed, inspect the edges and corners for any touch-ups that may be needed. It is always better to fix any mistakes immediately rather than waiting until later.
Secondly, consider color coordination ideas for your room décor. You want to ensure that your newly painted walls complement the other elements in the room such as furniture, curtains, and accessories. If you are unsure about color combinations, consider consulting with a professional interior designer or home improvement expert for advice.
Overall, DIY wall painting tips can be challenging but ultimately rewarding when done correctly. Taking pride in your work can significantly contribute to overall feelings of satisfaction and accomplishment in your home improvement endeavors. Remember to give yourself credit for a job well done and enjoy living in a space that reflects your style and personality!
Conclusion
Painting walls with a brush can be an excellent way to save money and add a personal touch to your home decor. By following the tips and techniques outlined in this article, you can achieve professional-looking results that will impress your family and friends.
Remember to choose the right paint color, measure your walls accurately, and properly prepare your room for painting. Gathering the necessary supplies, selecting the appropriate type of paint brush, and touching up any imperfections are also crucial steps in achieving a flawless finish. Once you have completed your project, be sure to clean your brushes thoroughly and store them properly for future use.
As a professional painter or home improvement expert, I recommend taking pride in your work by admiring your beautifully painted walls. With practice and patience, you can become proficient in using paint brushes to transform any room into a work of art. So whether you’re looking to update an old space or add some personality to a new one, grab your brushes and let’s get started!
Image Credits
- “Paint Brushes Close-Up” by Tech109 (featured)

