Chalkboard paint is a versatile material that can be used to create a variety of surfaces that are both functional and decorative. Its unique properties allow it to be applied to almost any surface, and it can be used in a variety of ways, from creating a fun accent wall to adding a writing surface in your home office or kitchen. In this article, we will explore the basics of chalkboard paint and how you can use it to create beautiful and functional pieces in your home.
Chalkboard paint has been around for over a century, but it has recently experienced a surge in popularity due to its versatility and ease of use. It is available in a wide range of colors, including traditional black, as well as more modern shades like navy blue and deep green. Chalkboard paint is perfect for creating surfaces that can be written on with chalk or liquid chalk markers, making it ideal for use in schools, offices, and homes. Whether you want to create a fun accent wall or add some functionality to your space, chalkboard paint is an excellent choice for anyone looking to add some personality and creativity to their surroundings.
Understanding Chalkboard Paint
Chalkboard paint has become increasingly popular in recent years as a fun and functional way to add character to any space. The benefits of using chalkboard paint are numerous, including the ability to transform any surface into a writable and erasable canvas. This type of paint is perfect for creating interactive spaces that encourage creativity, learning, and communication.
While there are many misconceptions about chalkboard paint, it is important to understand that not all types of this paint are created equal. There are different types of chalkboard paint available on the market, each with its own unique properties and uses. Some chalkboard paints require priming before use, while others can be applied directly to the surface. It is crucial to choose the right type of chalkboard paint based on your specific needs.
Choosing the right surface to apply your chalkboard paint is just as important as selecting the right type of paint. Not all surfaces are ideal for painting with chalkboard paint, so it is important to know which ones work best for this purpose. In the next section, we will discuss some common surfaces that can be painted with chalkboard paint and provide tips on how to prepare them for painting.
Choosing The Right Surface To Paint
After understanding the basics of chalkboard paint, it is essential to choose the right surface for your project. The two most common choices are wood or metal, but there are other factors to consider as well. One crucial decision is whether you want a smooth or textured surface.
When choosing between wood and metal surfaces, there are key differences to keep in mind. Wood is a more porous material that absorbs the paint better than metal surfaces, which can have issues with adhesion. However, metal surfaces tend to be smoother and more uniform, making them an excellent choice for intricate designs or lettering. It ultimately depends on your project’s needs and aesthetic preferences.
Another important consideration when selecting a surface for chalkboard paint is whether you want a smooth or textured finish. Textured surfaces, such as brick or stucco walls, can add character and interest to your design but may require additional coats of paint for full coverage. Smooth surfaces like glass or plastic will give you a cleaner look with fewer layers needed. Common mistakes to avoid when choosing a surface for chalkboard paint include not properly cleaning the surface beforehand and failing to test the adhesion of the paint before committing fully.
In summary, choosing the right surface for chalkboard paint requires careful consideration of several factors such as texture and material type. By avoiding common mistakes and following proper preparation techniques, you can ensure that your project will turn out beautifully. In the next section, we will discuss the tools and materials you’ll need to complete your chalkboard painting project successfully.
Tools And Materials You’ll Need
Before diving into the world of chalkboard painting, it’s important to make sure you have the tools and materials necessary for a successful project. While some may believe that any paintbrush and paint will suffice, there are certain brands and types of tools that will make your job easier and provide better results.
Popular brands for chalkboard paint include Rust-Oleum, Krylon, and Benjamin Moore. These companies offer various options such as spray cans or brush-on paints in a range of colors. However, if these brands are not within your budget, there are cost-effective alternatives available at most hardware stores or online retailers. It’s important to remember that quality should not be compromised for affordability when it comes to paint.
In addition to choosing the right paint, essential safety gear should also be considered before beginning any painting project. This includes gloves, goggles, and a mask to protect from harmful fumes or particles. Taking these precautions can prevent potential harm and ensure a safe experience while creating your chalkboard masterpiece.
| Tools | Materials | Safety Gear |
|---|---|---|
| Paintbrushes | Chalkboard Paint | Gloves |
| Painter’s Tape | Sandpaper | Goggles |
| Drop Cloth | Primer (if necessary) | Mask |
With the proper tools and materials on hand, you’re one step closer to achieving your desired result when painting with chalkboard paint. But before applying any paint to the surface, it’s crucial to prepare it properly for optimal adhesion and longevity of the finished product.
Preparing The Surface For Painting
Now that you have all the tools and materials you need, it’s time to start with the surface preparation. This step is crucial because it ensures that the chalkboard paint adheres well to the surface and lasts for a long time. Begin by cleaning the surface thoroughly with soap and water. Use a scraper or sandpaper to remove any bumps or rough patches on the surface. Once the surface is clean and smooth, wipe it down with a damp cloth, and let it dry completely.
After preparing the surface, it’s time to move on to painting techniques. Before you begin painting, make sure to read the instructions on the chalkboard paint can carefully. Some paints may require mixing before use, while others may need multiple coats of paint for better coverage. Start by applying a thin layer of paint using a brush or roller. Make sure to apply even strokes in one direction for a smooth finish.
Once you’ve applied the first coat, wait for it to dry completely before applying another layer of paint. It’s recommended to apply at least two coats of chalkboard paint for better results. After applying each layer of paint, inspect your work closely for any drips or uneven areas. If necessary, sand down any rough spots and apply touch-ups as needed. With these tips in mind, you’ll be able to create a beautiful and functional chalkboard surface in no time!
Applying The First Coat
“Practice makes perfect” is a saying that perfectly applies to painting with chalkboard paint. After preparing the surface, it’s time to apply the first coat. The first coat is crucial as it sets the stage for subsequent coats. Here are some tips to apply your first coat of chalkboard paint:
- Use a high-quality brush for a smooth finish.
- Brush in one direction to avoid visible brush strokes.
- Apply paint thinly and evenly.
Brush types matter when painting with chalkboard paint. A high-quality brush will give you a smooth finish without leaving behind any bristles or hair. It is also essential to use a brush that can hold enough paint so that you don’t have to dip excessively into the can while painting. You can choose between natural bristle brushes or synthetic bristle brushes, depending on your preference.
Drying time is an important consideration when painting with chalkboard paint. It takes about 30 minutes for the first coat to dry completely, but it may vary depending on the temperature and humidity in your area. Be patient and avoid touching the painted surface until it has fully dried to avoid smudging or ruining the finish. Once dry, you can start applying subsequent coats using the same process as stated above.
As you move forward with your project, remember that sanding and cleaning between coats are crucial steps in achieving a smooth finish for your chalkboard surface. By removing any rough spots or dust particles before applying another layer of paint, you ensure that each layer adheres well and contributes to an even overall finish.”
Sanding And Cleaning Between Coats
To ensure a smooth and even finish, sanding and cleaning between coats is crucial when painting with chalkboard paint. After the first coat has dried completely, lightly sand the surface with a fine-grit sandpaper. This will help to remove any bumps or imperfections in the paint and create a better surface for the next coat to adhere to. Once sanded, use a damp cloth to wipe away any dust or debris before proceeding with the next coat.
Choosing paint colors can be exciting but it’s important to keep in mind that some hues may require more coats than others. Darker shades will typically need more layers of chalkboard paint to achieve full coverage. If you’re having trouble achieving an opaque finish after several coats, try adding a few drops of black or white acrylic paint to your chosen color. This can help to boost coverage without altering the overall hue.
While most common issues can be avoided by following proper application techniques, it’s not uncommon for minor imperfections such as drips or bubbles to appear during the painting process. To troubleshoot these issues, allow the paint to dry completely before gently sanding away any visible bumps or lumps. For larger mistakes such as drips, use a razor blade or scraper tool to carefully remove excess paint without damaging the underlying surface.
To achieve optimal results, it’s recommended that at least two coats of chalkboard paint be applied. After completing each coat, repeat the sanding and cleaning process before proceeding with additional layers. By doing so, you’ll not only create a smoother finish but also ensure maximum durability and longevity of your painted surface.
Applying Additional Coats
- Prior to applying additional coats of chalkboard paint, it is important to sand the surface to ensure a smooth and even finish.
- Additionally, priming the surface before applying the paint is recommended if it is a porous surface, such as wood or plaster, as it will improve adhesion and help prevent uneven paint application.
- When sanding between coats, it is important to use a fine grit sandpaper in order to ensure a smooth, even finish on the painted surface.
- Before priming, be sure to clean the surface with a damp cloth to remove any dirt or dust that may interfere with the adhesion of the primer.
Sanding Between Coats
Sanding between coats is an essential step in achieving a smooth and uniform finish when applying additional coats of chalkboard paint. The benefits of sanding include creating a better surface for the next coat to adhere to, removing any imperfections or bumps, and ensuring a professional-looking final product. Common sanding mistakes include using too much pressure, not sanding enough, or using the wrong grit sandpaper.
One of the main benefits of sanding between coats is that it creates a more porous surface for the next coat to bond with. This creates a stronger adhesion and reduces the likelihood of peeling or chipping in the future. Additionally, sanding can remove any bumps or ridges that may have formed during the drying process, resulting in a smoother finish overall. It’s important to note that even if you don’t see any bumps or imperfections on your first coat, it’s still important to sand before adding subsequent coats.
However, it’s also crucial to avoid common sanding mistakes that can actually cause more harm than good. One common mistake is using too much pressure when sanding, which can create deep scratches and damage the surface of your project. Another mistake is not sanding enough between coats, which can result in an uneven finish that looks unprofessional. Finally, using the wrong grit sandpaper can also lead to unsatisfactory results – be sure to follow manufacturer recommendations for grit size based on your specific project.
In conclusion, while it may seem like an extra step, sanding between coats has numerous benefits and is essential for achieving a smooth and professional-looking final product when working with chalkboard paint. By avoiding common mistakes and following best practices such as using gentle pressure and selecting appropriate grits, you’ll be able to achieve stunning results every time.
Priming Before Coats
When it comes to applying additional coats of chalkboard paint, there’s more to it than simply sanding in between. One crucial step that often gets overlooked is priming before painting. Using a primer can help create a smooth and even surface for the paint to adhere to, and can even enhance the color and durability of the final product. There are several types of primers available, including oil-based, water-based, and shellac-based options.
One major benefit of using a primer before painting is that it helps seal porous surfaces and prevent any bleeding or discoloration from occurring. This is especially important if you’re working with a wood surface or other porous material. Additionally, priming can help improve the overall adhesion of the paint, resulting in a stronger bond and less chance of peeling or chipping over time. Depending on your specific project and goals, there may be different types of primers that are better suited for your needs – be sure to consult with an expert or follow manufacturer recommendations.
In summary, while sanding between coats is certainly important for achieving a smooth finish when using chalkboard paint, don’t overlook the benefits of priming before painting as well. By selecting an appropriate primer based on your specific project needs and applying it correctly before adding additional coats of paint, you’ll be able to create a stunning final product with enhanced durability and longevity.
Allowing The Paint To Cure
Once you have applied the chalkboard paint, it is essential to allow it to cure properly. Best practices dictate that you should wait for at least three days before using the painted surface. This waiting period ensures that the paint dries and hardens correctly, allowing for optimal performance when used as a chalkboard surface.
One of the most common mistakes people make when using chalkboard paint is not giving it sufficient time to cure. Rushing this process can cause the paint to peel or scratch easily, leading to an uneven and unsightly finish. To avoid this, make sure you follow the recommended curing time and avoid using the surface before it has fully dried.
If you are looking for alternative curing methods or time-saving techniques, there are a few options available. For instance, some people choose to use a hairdryer on low heat to speed up the drying process. However, if you decide to take this route, be careful not to overheat the paint as this can cause it to bubble or crack. Alternatively, if you are short on time but want your painted surface ready quickly, consider using a clear coat sealant that can speed up drying times while also protecting the painted surface from scratches and damage.
To ensure that your chalkboard paint has a smooth finish once cured, there are several tips you can follow. These include ensuring that your painting area is dust-free and clean before applying the paint; using high-quality brushes or rollers that do not leave behind lint or fibers; and applying multiple thin coats of paint rather than one thick layer. By following these tips and waiting for your painted surface to cure correctly, you’ll be able to enjoy a durable and long-lasting chalkboard surface perfect for all your creative needs!
Tips For Creating A Smooth Finish
After allowing the chalkboard paint to cure for at least three days, it’s important to ensure that your surface is as smooth as possible. Any bumps or rough areas can make it difficult to write on the finished product. One way to achieve a smooth surface is by using primer before applying the chalkboard paint. This will create a consistent base and help fill in any uneven spots.
If you encounter any issues while painting with chalkboard paint, there are several troubleshooting solutions available. If you notice that the paint is cracking or peeling, it may be due to an unclean surface or incorrect application technique. Sanding down the area and starting over with a clean surface can often solve this problem. If the paint is not adhering properly, try using a bonding primer before applying the chalkboard paint.
Creating a chalkboard wall is a fun and trendy DIY project, but achieving a smooth finish requires attention to detail and patience. By allowing your paint to cure and using primer when necessary, you’ll be one step closer to a perfect finished product. In the next section, we’ll go over some tips for creating an even smoother finish on your chalkboard wall.
Creating A Chalkboard Wall
To prepare the wall, it is essential to thoroughly clean it and make sure it is free of any dirt or dust before applying the chalkboard paint.
For best results, it is recommended to use a high quality primer before applying the chalkboard paint.
The chalkboard paint should be applied in multiple thin coats, allowing each coat to dry before applying the next.
After the paint is completely dry, it is advisable to condition the chalkboard wall by rubbing the side of a piece of chalk over the entire surface and then erasing it.
Preparing The Wall
Wall preparation is a crucial step in creating a chalkboard wall. Before applying the chalkboard paint, it is important to ensure that the surface is clean and smooth. The first step in wall preparation is to remove any existing wallpaper or loose paint. Using a scraper or sandpaper, gently remove any bumps or rough spots on the wall.
Surface cleaning should follow next. After scraping off any loose paint or wallpaper, clean the wall thoroughly using warm water and soap. This will remove any dirt, dust, or grime on the surface of the wall. It is important to let the wall dry completely before proceeding with painting.
Once you have completed these steps, your wall will be ready for painting with chalkboard paint. Proper preparation of the wall ensures that the final product will be smooth and long-lasting. With a little patience and attention to detail during this process, you can create a beautiful and functional chalkboard wall in no time!
Applying The Paint
After properly preparing the wall, it is time to move on to the next step in creating a chalkboard wall: Applying the paint. This step requires careful attention to detail and proper technique to ensure that the final product is smooth and long-lasting. In this section, we will discuss some technique tips and common mistakes to avoid when applying chalkboard paint.
The first technique tip is to use a high-quality roller brush. This will help you achieve an even layer of paint on the wall without leaving any streaks or bubbles. It is also important to apply multiple thin coats of paint rather than one thick coat. This will prevent the paint from dripping or running down the wall while ensuring that it dries evenly.
Common mistakes during this step include using too much paint at once, which can result in drips and uneven coverage, as well as not allowing each coat of paint enough time to dry completely before applying another layer. Another mistake is using a low-quality brush or roller, which can leave behind rough spots and uneven texture on the surface of the wall.
By following these technique tips and avoiding these common mistakes, you can create a beautiful and functional chalkboard wall that will last for years to come. Remember to take your time during this step and be patient as each coat of paint dries before moving on to the next one. With a little practice and attention to detail, anyone can create a stunning chalkboard wall in their home or office!
Adding A Writing Surface To Furniture
To add a writing surface to furniture, consider using chalkboard paint. This versatile paint comes in a variety of colors and can be used on wood, metal, glass, and other surfaces. Before applying chalkboard paint, make sure the surface is clean and dry. Sand any rough spots and fill in any holes or cracks with wood filler.
When painting furniture with chalkboard paint, there are several techniques you can use to achieve different effects. For a smooth finish, use a foam roller to apply thin coats of paint in one direction. For a more textured finish, use a brush to apply thicker coats of paint in a criss-cross pattern. You can also lightly sand between coats for an even smoother finish.
Once your furniture is painted with chalkboard paint, you can get creative with chalkboard crafts. Use stencils or freehand designs to create unique patterns or quotes on your furniture pieces. You can also use chalk markers for more precision and color options. Adding a writing surface to your furniture not only adds functionality but also allows for personalized touches that reflect your style.
Using chalkboard paint in the kitchen is another great way to add both functionality and style. From labeling jars to creating weekly meal plans on the fridge, the possibilities are endless. In the next section, we will explore some tips and tricks for incorporating chalkboard paint into your kitchen decor.
Using Chalkboard Paint In The Kitchen
Chalkboard paint is an excellent way to add a unique and functional touch to your kitchen. One of the most popular uses for chalkboard paint in this room is creating a chalkboard menu. This allows you to easily write out your meal plans for the week, making it easy for everyone in your household to know what’s on the menu. It’s also a great way to keep track of items that need to be used up before they expire.
Another popular use for chalkboard paint in the kitchen is creating a chalkboard grocery list. By painting a section of wall or cabinet with this type of paint, you can easily keep track of what items you need to purchase on your next trip to the store. This makes meal planning and grocery shopping much more efficient since you’ll have everything in one place.
Overall, using chalkboard paint in the kitchen is an excellent way to stay organized and make meal planning and grocery shopping easier. By creating a chalkboard menu and/or grocery list, you’ll be able to save time and money while ensuring that everyone in your household knows what’s going on. In the following section, we will explore how you can use chalkboard paint in your home office.
Using Chalkboard Paint In The Home Office
Transition: Now that we’ve explored the versatility of using chalkboard paint in the kitchen, let’s shift our focus to another room in the house where it can also be incredibly useful – the home office.
Chalkboard Paint for Organization One of the many benefits of using chalkboard paint in a home office setting is increased organization. By applying it to a wall or other surface, you can create a custom message board to keep track of deadlines, appointments, and tasks. This makes it easy to stay on top of your work and avoid missing important deadlines. Additionally, you can use chalkboard labels on storage containers and bins to easily label and organize supplies.
Creative Chalkboard Designs Another advantage of using chalkboard paint in your home office is that it allows for endless creativity. You can use different colors and designs to create a unique workspace that reflects your personality and inspires creativity. For example, you could create a large chalkboard calendar to help plan out your week or add motivational quotes or artwork to your walls.
4 Item Numeric List:
- Boost productivity by creating a visual reminder of tasks and appointments.
- Eliminate clutter with labeled storage containers.
- Customize your workspace with creative designs.
- Inspire creativity with motivational quotes and artwork.
Transition: While chalkboard paint can be incredibly useful in a home office setting, its applications go far beyond just household settings. In fact, one area where it has seen significant use is schools.
Using Chalkboard Paint In Schools
Chalkboard paint has become increasingly popular in schools as a way to create interactive classrooms and enhance school decor. This type of paint creates a surface that is easy to write on and erase, making it perfect for teachers who want to engage their students in a more hands-on way. Additionally, chalkboard paint can be applied to any smooth surface, including walls, doors, and furniture.
One of the greatest advantages of using chalkboard paint in schools is the ability to transform traditional classrooms into interactive learning spaces. By painting entire walls or sections of walls with chalkboard paint, teachers can create large surfaces that allow students to collaborate on projects or work through problems together. This not only makes learning more engaging but also helps students develop important social skills such as teamwork and communication.
Overall, using chalkboard paint in schools is an excellent way to enhance classroom decor and promote interactive learning. Whether you are looking for a way to create unique accent walls or want to completely transform your classroom into an interactive space, chalkboard paint is a versatile and affordable option that can help you achieve your goals. With its ease of use and versatility, it’s no wonder that more and more schools are choosing this innovative type of paint for their classrooms.
As we have seen, using chalkboard paint is an effective way to create interactive classrooms and enhance school decor. However, over time even the best quality chalkboard paints may begin to wear out or become stained from repeated use. In the next section, we will explore how you can remove or touch up your existing chalkboard paint so that it continues to look great for years to come.
Removing And Touching Up Chalkboard Paint
Maintaining the pristine appearance of chalkboard paint can be a daunting task. However, with the right techniques and tools, anyone can learn how to touch up and remove chips from their chalkboard paint. It is important to remember that even the most durable paints are not invincible and may require occasional maintenance.
Fixing chips in your chalkboard paint involves some simple steps. First, clean the area around the chip with a damp cloth and let it dry completely. Next, use fine-grit sandpaper to smooth out any rough edges surrounding the chip. Then, apply a small amount of chalkboard paint with a fine brush or roller on just the chipped area. Allow it to dry completely before applying another coat if necessary.
Maintaining durability is key when it comes to preserving your chalkboard paint’s longevity. Regular cleaning is crucial for removing dust and debris that can accumulate on its surface over time. Avoid using abrasive cleaners or scrubbers as they can damage the finish of your paint. Instead, opt for a soft cloth or sponge with mild soap and water to gently clean any stubborn spots.
Overall, taking care of your chalkboard paint requires patience and dedication but it’s worth it in the end! Remember to always handle any chips promptly by following our simple repair tips. By following these steps regularly, you’ll maintain its durability and ensure that your painted surfaces continue looking clean and fresh for years to come!
Conclusion
Chalkboard paint has become an increasingly popular choice for individuals looking to add a creative touch to their homes, offices, and classrooms. Understanding the unique properties of chalkboard paint is crucial to achieving a successful painting project. Once you have chosen the right surface and gathered all necessary tools and materials, it’s time to prepare the surface for painting by sanding and cleaning it thoroughly.
Applying the first coat requires patience and precision in order to achieve an even finish. Once dry, you can begin using your chalkboard surface in a variety of ways, from creating grocery lists in the kitchen to organizing tasks in the home office. It is important to remember that while chalkboard paint is durable, it may require touch-ups or even removal at some point. Overall, with careful preparation and attention to detail, anyone can successfully use chalkboard paint to create a functional and stylish addition to their space.
Image Credits
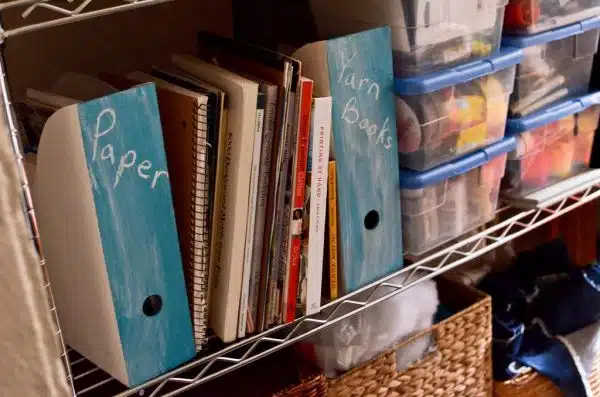
- “Tutorial: Make Your Own Chalkboard Painted Magazine Files” by osiristhe (featured)

