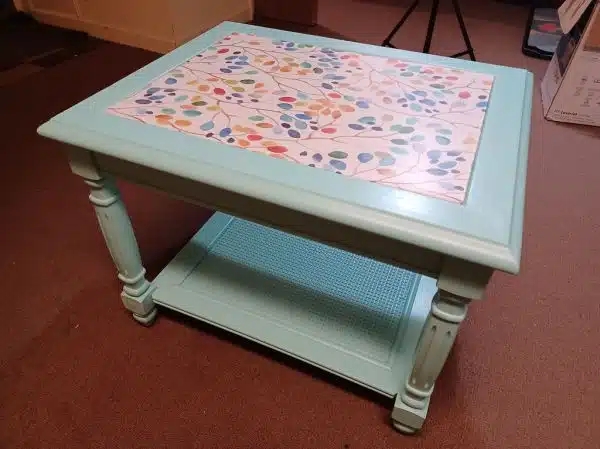
As a professional furniture painter, I have come across countless clients who are in search of an affordable and easy way to transform their old and outdated end tables. Chalk paint has become a popular choice for DIY enthusiasts due to its versatility and ease of use. With just a few simple steps, anyone can achieve a stunning end table that looks like it was refinished by an expert.
In this article, we will explore how to paint an end table with chalk paint. From the materials needed to the step-by-step process, you will learn everything you need to know to transform your own end table into a beautiful piece of furniture that will impress all who see it. Whether you are new to painting or have some experience under your belt, this guide will provide you with the knowledge and confidence needed to tackle your next furniture painting project with ease. So grab your brushes and let’s get started!
Materials Needed For Painting With Chalk Paint
When it comes to painting an end table with chalk paint, there are a few essential materials that you will need. Firstly, you will need chalk paint, which is readily available in most hardware stores or online. Chalk paint has a unique matte finish and can be used on various surfaces without the need for stripping or sanding.
Secondly, using different brushes is crucial when painting with chalk paint. A medium-sized brush is perfect for larger areas while a small-sized one will work well for intricate parts of the end table. For distressing techniques, you may require a stiff-bristled brush to create texture and add character to the piece.
Lastly, Techniques for distressing the end table are essential when working with chalk paint. Distressing gives your furniture a vintage look by creating small cracks and chips on the surface. One way to achieve this effect is by using sandpaper or steel wool after painting your piece; another method involves lightly tapping the surface with a hammer or chain before applying wax.
With these materials at hand, anyone can transform an old end table into something beautiful and unique. But first, let’s discuss how to prepare your end table for painting with chalk paint.
Preparing Your End Table For Painting
- Prior to painting, it is essential to thoroughly clean the end table using a degreasing agent to remove any dirt, grease, or wax buildup.
- A primer should then be applied to ensure a smooth, even coverage of the paint.
- Sanding the end table with a fine grain sandpaper is also recommended to ensure a good bond between the surface and the paint.
- Once the end table has been cleaned, primed, and sanded, it is important to wipe off any dust particles with a damp cloth.
- When all preparations are complete, the end table is ready for its first coat of chalk paint.
- Before each coat of paint is applied, it is important to lightly sand the end table with a fine grain sandpaper to ensure the paint adheres properly.
Cleaning
To achieve the best results when painting your end table with chalk paint, it is important to start with a clean surface. Cleaning your furniture properly will ensure that the paint adheres well and does not peel off easily. Before you begin cleaning, make sure you have all the necessary tools to do so effectively.
The best practices for cleaning an end table include using a non-abrasive cleaner that is gentle on the surface. Avoid using harsh chemicals or abrasive materials as they can damage the finish of your furniture. Additionally, make sure to remove any dust or debris from the surface before cleaning to prevent scratching the finish.
When it comes to tools, a soft cloth and warm water are typically sufficient for cleaning an end table. However, if there are tough stains or dirt buildup, you may need to use a mild soap solution or furniture polish. Always test any new cleaner on an inconspicuous area of your table first before applying it to the entire surface.
By following these best practices and using appropriate tools for cleaning your end table, you will be able to create a smooth and flawless base for painting with chalk paint. Taking these extra steps in preparation will pay off in the long run by ensuring that your finished product looks professional and lasts for years to come.
Priming
Preparing your end table for painting involves several important steps to ensure that the final result is flawless and long-lasting. In addition to cleaning the surface properly, priming is another crucial step in the process. Priming provides a smooth base for the paint to adhere to, which leads to better coverage and durability in the long run.
The benefits of priming are numerous. First, it seals any imperfections or stains on the surface of your end table, preventing them from showing through the paint. Second, it helps the paint adhere better to the surface by giving it something to grip onto. Finally, it reduces the number of coats needed for full coverage, saving both time and money in the long run.
While some furniture painters may choose not to prime their pieces before painting with chalk paint, there are alternatives available. For instance, you could use a sealer or bonding agent instead of primer. However, keep in mind that these options may not provide all of the benefits that come with priming. Ultimately, choosing whether or not to prime depends on personal preference and the condition of your end table’s surface.
Sanding
As a professional furniture painter, preparing an end table for painting is a meticulous process that requires attention to detail. One of the crucial steps in this process is sanding. Sanding smooths out imperfections and creates a rough surface for the primer to adhere to.
Using different sandpaper grades is essential in achieving a smooth and even surface on your end table. Start with a coarse grit sandpaper (around 80 grit) to remove any bumps or scratches on the surface. Then use a finer grit sandpaper (around 120-150 grit) to create a smoother and more polished finish. Finally, use an extra fine grit sandpaper (around 220-240 grit) for a silky-smooth finish.
Sanding techniques for end tables include using circular motions, long strokes, or back-and-forth motions depending on the type of wood grain and level of imperfections on the surface. If you prefer not to sand your end table, alternatives such as liquid deglosser or a sanding sponge could be used instead. However, keep in mind that these alternatives may not provide as smooth of a finish compared to traditional sanding methods. Using proper sanding tools and techniques will ensure that your end table is ready for priming and painting, resulting in a flawless and long-lasting finish.
Sanding Your End Table
Like a sculptor chiseling away at marble, sanding is a crucial step in preparing your end table for painting. Choosing the right sandpaper can help you achieve the desired texture and smoothness of your furniture. Generally, a coarse-grit sandpaper is ideal for removing old finishes or paint, while finer grits are better suited for creating a smooth surface.
Before starting, detach any hardware or knobs from your end table to make sanding easier. Begin with coarse-grit sandpaper and use light to moderate pressure to remove any imperfections or bumps on the surface. Once you have achieved an even texture, switch to finer grits of sandpaper until you reach the desired level of smoothness. However, be cautious not to over-sand as this may damage the wood grain or create uneven patches.
Avoiding over-sanding is key to achieving an excellent finish on your end table. Always test the surface by running your hand over it to check if it feels smooth and free from rough spots. If you notice that some areas feel more polished than others, then simply touch up those spots with finer grits of sandpaper until they match the rest of the surface. In addition, after finishing with all the grits needed for smoothing out your end table’s surface, clean off all debris before moving on to painting by wiping it down gently with a clean cloth.
Cleaning Your End Table
Before you begin painting your end table with chalk paint, it is important to clean it thoroughly. This ensures that the paint adheres well to the surface and results in a smooth finish. There are several ways to remove stains from your end table, depending on the type of stain.
Choosing the right cleaning products is key to getting rid of stains effectively. For example, for water stains or rings, using a mixture of equal parts vinegar and olive oil can do the trick. For tougher stains like ink or marker, rubbing alcohol or nail polish remover can help remove them. Be sure to test any cleaning product on an inconspicuous area first to make sure it doesn’t damage the finish.
Here are some additional tips for cleaning your end table:
- Use a soft cloth or sponge when wiping down your end table to avoid scratching the surface.
- Avoid using abrasive cleaners or harsh chemicals as they can damage the finish.
- Always wipe off any excess moisture after cleaning to prevent water damage.
- If you have any doubts about how to clean your specific type of end table, consult the manufacturer’s recommendations.
With these tips in mind, you can ensure that your end table is thoroughly cleaned and ready for painting with chalk paint. In the next section, we will discuss applying primer to your end table for optimal results.
Applying Primer To Your End Table
Imagine a blank canvas waiting to be transformed into a work of art. This is what your end table represents as you prepare it for painting. Before applying the chalk paint, it is essential to apply primer to ensure that the paint adheres well and lasts longer. Applying primer serves as an anchor for the paint, preventing it from chipping or peeling off easily.
When should you apply primer? The answer is simple: always! It doesn’t matter if you’re painting over an old finish, bare wood, or even metal – a coat of primer is always necessary. Primer promotes adhesion and creates a smooth surface for painting with chalk paint.
Choosing the right primer can be overwhelming, but here are some tips to ease the process. First, consider the type of material your end table is made of. For example, if it’s bare wood, use a wood primer specifically designed for chalk paint. If your end table has an existing finish, use a multi-purpose primer that works on various surfaces. Additionally, check if your chosen primer is water-based or oil-based and ensure that it’s compatible with your chalk paint brand for best results. Remember that using high-quality products will make all the difference in achieving a professional-looking finish.
With the application of primer complete, next comes choosing the right chalk paint color – another exciting step in transforming your end table!
Choosing The Right Chalk Paint Color
Color is one of the most important factors when it comes to painting furniture with chalk paint. It can transform an old piece of furniture into something new and refreshing. When choosing a color for your end table, consider the following:
Firstly, think about the overall look you want to achieve. Do you want something bold and bright or more subdued? Consider the existing color scheme in your room and choose a color that complements it. If you want to make a statement, choose a bold color like red or navy blue. If you prefer a more subtle look, opt for neutral colors like white or gray.
Secondly, consider color matching. If you have other pieces of furniture in the room that are already painted, try to match the new end table with those pieces. This will create a cohesive look in your space.
Lastly, don’t be afraid to experiment with color combinations. Some of the best results come from pairing unexpected colors together. Look at a color wheel for inspiration and try out different combinations until you find one that works well for your space.
- Consider creating a mood board before selecting your paint color
- Take into account natural lighting in the room
- Don’t forget to factor in any patterns or textures on the piece
- Always test your chosen paint colors on a small area before committing to painting the entire piece
By taking these factors into consideration when choosing your chalk paint color, you can ensure that your end table will not only look great but also fit seamlessly into the rest of your home’s decor.
Transition: Now that you have chosen your chalk paint color, it’s time to move onto mixing it properly for use on your end table.
Mixing Your Chalk Paint
- Before beginning, the surface should be cleaned and sanded to ensure a smooth finish for optimal paint adhesion.
- If a primer is needed, it should be applied prior to painting.
- When selecting a chalk paint color, consider the existing decor and ensure the paint color is compatible with the desired look.
- Different finishes can be achieved by mixing and layering multiple chalk paint colors.
Preparing The Surface
Choosing the right primer is essential for preparing the surface of your end table before applying chalk paint. A high-quality primer will ensure that your paint adheres properly and lasts longer. It will also help to cover any stains or discolorations on the surface of your table. Make sure to choose a primer that is compatible with chalk paint, and follow the manufacturer’s instructions for application.
The importance of proper sanding cannot be overstated when preparing a surface for chalk paint. Sanding not only helps to smooth out any rough spots or imperfections in the wood, but it also helps to create a better bond between the paint and the surface. Use a fine-grit sandpaper to gently sand your end table, making sure to remove any dust or debris before painting. If you’re working with a piece of furniture that has been previously painted or varnished, you may need to use a coarser grit sandpaper first to remove the old finish.
In conclusion, taking the time to properly prepare your end table before painting with chalk paint will ensure that you achieve a beautiful and long-lasting finish. Choosing the right primer and using proper sanding techniques are crucial steps in this process. By following these steps, you’ll be able to transform an ordinary piece of furniture into something truly special.
Choosing The Paint Color
Once you have primed and sanded your end table, it’s time to choose the right chalk paint color that will complement the overall design of your living space. Color palettes are essential in any interior design project, and choosing the right paint color can make all the difference in how a room looks and feels. As a professional furniture painter, I would recommend exploring different color palettes that match the existing colors in your home. This way, you can create a cohesive look that ties everything together.
When choosing a paint color for your end table, it’s important to use color matching techniques to ensure that the paint matches your vision. You can start by gathering swatches or sample cards from your local hardware store and comparing them with the colors in your living space. Another option is to use an online color tool to help you visualize what different combinations of colors will look like in your room. Remember, don’t be afraid to experiment with different shades until you find the perfect fit.
Lastly, keep in mind that using chalk paint allows for endless possibilities when it comes to customizing your end table’s finish. You can mix different colors together to create unique shades or even add water for a more washed-out effect. The key is to have fun and let your creativity flow! By following these simple steps and incorporating various color matching techniques, you’ll be able to create a stunning piece of furniture that perfectly complements your home’s decor.
Applying The First Coat Of Chalk Paint
Like a chef preparing the canvas for his culinary masterpiece, choosing the right brush is crucial in applying the first coat of chalk paint to your end table. A quality brush with natural bristles will ensure that your paint glides smoothly onto the surface, preventing any unsightly streaks or smudges. When selecting a brush, consider the size and shape of your table – larger surfaces may require a wider brush while smaller spaces may benefit from more precise detailing.
Once you have selected your brush, it’s time to start painting! Dip your brush into the chalk paint and begin applying a thin layer onto the surface of your end table. Avoid applying too much pressure as this can cause bubbles to form in the paint. Take care to cover all areas evenly and thoroughly, ensuring that no spots are left uncovered.
After completing the first coat of chalk paint on your end table, allow it to dry completely before moving on to applying the second coat. The length of time required for drying may vary depending on factors such as humidity and temperature but generally takes around 1-2 hours. Be patient during this step as allowing sufficient drying time will ensure that subsequent coats adhere properly and prevent any peeling or cracking later on.
Allowing The First Coat To Dry
Once you’ve applied the first coat of chalk paint to your end table, it’s important to allow it to dry completely before adding a second coat. The drying time for chalk paint can vary based on factors such as humidity and temperature, but generally, it should take around 24 hours for the first coat to dry completely.
During this time, there are a few tips you can keep in mind to achieve a smooth finish with your chalk paint. First, avoid touching or moving the table while the first coat is drying. This can cause smudging or unevenness in the finish. Additionally, ensure that the area where you’re painting is well-ventilated and free from dust or debris that could stick to your wet paint.
To further aid in achieving a smooth finish, lightly sand the surface of your end table with fine-grit sandpaper after the first coat has dried. This will help remove any imperfections or brush strokes and create a smoother surface for your next coat of paint.
Once you’ve allowed enough time for the first coat to dry and have sanded lightly, it’s time to apply the second coat of chalk paint. But before doing so, be sure to read up on how long you should wait between coats for best results.
Applying The Second Coat Of Chalk Paint
With the first coat of chalk paint properly applied and allowed to dry, it is now time to move on to the second coat. The second coat is where you can really start to see your vision come to life, with a more solid and consistent color across the entire piece. Applying the second coat is similar to applying the first, but there are a few techniques that can be used to create a beautiful finish.
One technique for blending chalk paint during the application of the second coat is called cross-hatching. This involves brushing over the first layer in one direction, then going over it again in a perpendicular direction. Doing so creates an even texture and helps blend any brush marks or streaks from the first layer. Choosing the right brush for applying chalk paint is also important for achieving a smooth finish. A natural bristle brush with long, flexible bristles works well with chalk paint as it allows for even pressure distribution and reduces brush marks.
To apply your second coat of chalk paint, use your chosen brush and work in small sections at a time. Brush on thin layers, making sure each one is fully dry before moving on to the next. Use cross-hatching or other blending techniques as needed to achieve an even finish throughout the entire piece. Remember that less is often more when it comes to chalk paint – thick layers can lead to cracking or peeling over time.
Next up: distressing your end table!
Distressing Your End Table
Creating texture is an important aspect of distressing your end table. This can be achieved by using various techniques such as sandpaper, steel wool, and even a wire brush. Each method provides a different level of texture, so it is important to experiment and find the one that suits your desired look. Sandpaper creates a smooth worn effect, while steel wool adds a more rustic touch. A wire brush is ideal for creating deep grooves and scratches for a heavily distressed appearance.
Using multiple colors can also enhance the distressed look of your end table. Layering different shades of chalk paint creates depth and dimension. Apply the base color first, then add accent colors in small areas where natural wear and tear would occur. Use a dry-brush technique to apply the second color, allowing some of the base coat to show through. This will give the appearance of layers of paint worn away over time.
By incorporating both texture and multiple colors into your distressing process, you can create an authentic vintage look for your end table with chalk paint. Remember to experiment with different techniques and colors until you achieve the desired effect. The next step in finishing off your newly distressed end table is to seal it with wax or polyurethane to protect it from further wear and tear while preserving its unique character.
Sealing Your End Table
Although chalk paint is a durable option for furniture, it requires sealing to protect against scratches and stains. There are two common sealants used on chalk-painted furniture: wax and polyurethane. Many people prefer using wax because it provides a matte finish and can be buffed for a subtle sheen. However, wax is not as durable as polyurethane and may require reapplication every few years.
Choosing the right brush for sealing your end table is crucial to achieving a smooth finish. A high-quality bristle brush or foam brush works well with both wax and polyurethane sealants. Avoid using cheap brushes as they may leave streaks or shed bristles onto your freshly painted surface. It’s also important to clean your brush thoroughly between coats to prevent buildup and ensure an even application.
When applying the sealant, work in small sections, overlapping each stroke slightly to avoid visible brush marks. Be sure to follow the manufacturer’s instructions for drying time between coats, typically 24 hours for wax and up to four hours for polyurethane. After the final coat has dried completely, gently sand any rough spots with fine-grit sandpaper before adding finishing touches to your end table.
Smooth application of the sealant is essential in creating a beautiful finish on your end table. Whether you choose wax or polyurethane, selecting the right brush will make all the difference in achieving an even application. Take your time when applying the sealant and remember that patience pays off in creating a stunning piece of furniture that will last for years to come.
Adding Finishing Touches To Your End Table
After sealing your end table, it’s time to add some personality to it using chalk paint. Chalk paint is a versatile medium that can be used for various painting techniques, including stenciling and decoupage. Before starting, make sure you have all the necessary tools, including brushes, sandpaper, and wax.
To use stencils on your end table, start by selecting a design that complements the overall look of the furniture piece. Secure the stencil onto the surface using painter’s tape. Using a stencil brush or sponge applicator, gently dab the chalk paint onto the stencil in thin layers. Once dry, carefully remove the stencil to reveal your design. For added durability and protection, apply a layer of clear wax over the painted surface.
Another technique you can use with chalk paint is decoupage. This involves adhering paper or fabric onto the surface of your end table using a special glue called Mod Podge. To do this, first clean and sand down any rough spots on your furniture piece. Next, cut out your desired pattern or image and apply a thin layer of Mod Podge onto both the back of the paper/fabric as well as on top of where you want it placed on your end table. Smooth out any air bubbles and let dry completely before applying another layer of Mod Podge to seal it in place.
When working with chalk paint, always remember to work in thin layers and let each coat dry completely before adding another one. This will prevent clumping and ensure an even finish. Additionally, be sure to experiment with different techniques and colors to find what works best for you and your unique sense of style.
Tips And Tricks For Working With Chalk Paint
Applying Wax: After the painted surface is dry, you can apply wax to provide a lasting protective finish.
Distressing Techniques: Distressing techniques such as sanding and staining can be used to add character and age to the furniture.
Selecting Colors: When selecting colors for your project, it is important to consider the style and overall look you are trying to achieve.
Sanding Surfaces: When sanding surfaces, it is important to use the correct grit sandpaper for the job to ensure a smooth finish.
Applying Wax
As a professional furniture painter, I have found that applying wax can be a bit tricky for those new to chalk painting. Using different wax finishes can help achieve a variety of looks, but it’s important to understand the best way to apply each one. For example, clear wax can be used as a protective layer and applied with a brush or cloth in small sections, while colored waxes are better suited for adding dimension and depth to specific areas of the piece.
Troubleshooting wax application is also important in achieving a flawless finish. One common issue is streaking, which can occur if too much pressure is applied when buffing the wax. To avoid this, use light pressure and work in small areas at a time. Another issue is uneven coverage, which can happen if the wax is not spread evenly across the surface. To fix this, go over the affected area with additional wax until it blends seamlessly with the rest of the piece.
Remember that applying wax should be done with care and precision to achieve the desired results. By using different finishes and troubleshooting any issues that arise, you can create a beautiful end table that will last for years to come without sacrificing your personal style or creativity.
Distressing Techniques
Creating texture is an important aspect of furniture painting, and distressing techniques can be a great way to achieve this. There are multiple ways to distress furniture using chalk paint, each with its own unique result. One popular technique is called dry brushing, which involves lightly brushing a small amount of paint over the surface in short strokes to create a worn, vintage look. Another technique is sanding, where you can remove layers of paint to reveal the wood or previous colors underneath.
Using multiple distressing techniques can also create depth and interest in your piece. For example, you could use dry brushing on some areas and sanding on others for a more varied effect. It’s important to experiment with different techniques and find what works best for your desired outcome.
When distressing furniture, it’s important to keep in mind that less is often more. Start with small amounts of paint or sandpaper and build up slowly until you reach the desired effect. This will prevent you from going too far and ruining the piece entirely. With practice and patience, distressing techniques can add character and charm to your furniture pieces while allowing you to express your personal style through your work.
Common Mistakes To Avoid When Painting With Chalk Paint
One common mistake that people make when painting with chalk paint is not properly preparing the surface. For example, a homeowner may decide to give an old end table a new look by painting it with chalk paint, but they fail to clean the table first. This can lead to the paint not adhering properly and chipping off in the long run. The key to success here is to clean the surface thoroughly, remove any old paint or varnish, and sand down any rough spots before applying the chalk paint.
Another mistake that people often make is using too much water when mixing their chalk paint. While it’s true that adding a small amount of water can help achieve a smoother finish, adding too much water can cause the paint to be thin and watery. This will result in an uneven finish and may even cause the paint to peel or chip more easily. A tip for success here is to add only a small amount of water at a time and mix it thoroughly until you achieve your desired consistency.
Lastly, failing to apply enough coats of chalk paint is another common mistake among DIYers. Many people assume that one coat of chalk paint will be sufficient, but this is rarely the case. In fact, most pieces of furniture will require at least two coats of chalk paint for optimal coverage. A tip for success in this case would be to plan ahead and purchase enough paint for multiple coats so that you don’t run out mid-project.
By avoiding these common mistakes and following these tips for success, you’ll be able to achieve a beautiful finish on your end table (or any other piece of furniture) with ease! Remember to take your time and follow each step carefully for best results.
Conclusion
When it comes to painting an end table with chalk paint, preparation is key. To begin, gather all the necessary materials including sandpaper, primer, and a sealant. Before applying any paint, ensure that your end table is clean and smooth by sanding it down. Afterward, wipe away any dust or debris before applying a layer of primer to help the paint stick better.
Once you’ve applied your chosen color of chalk paint, be sure to seal it with a coat of wax or sealant to protect the finish from wear and tear. As with any DIY project, there are certain tips and tricks that can make the process easier such as using high-quality brushes and working in a well-ventilated area.
Overall, painting an end table with chalk paint can be a fun and rewarding project for those looking to give their furniture a new lease on life. By following these steps and avoiding common mistakes such as failing to properly prepare the surface or using too thin of layers of paint, anyone can achieve professional-looking results in no time.
Image Credits
- “painted end table” by amlusch (featured)

