In today’s fast-paced world, it is crucial to have a well-organized pantry. A tidy pantry can save time and money by making meal planning and grocery shopping more efficient. One of the best ways to keep your pantry organized is by building custom shelves that are tailored to your needs.
Building pantry shelves may seem daunting, but with the right tools, materials, and approach, anyone can do it. In this article, we will provide step-by-step instructions on how to build sturdy and practical pantry shelves that will help you make the most of your space. Whether you are a seasoned DIY enthusiast or a beginner looking for a new project, this guide will give you all the information you need to create beautiful and functional pantry shelves that will serve you for years to come.
Assessing Your Pantry Needs
Before building pantry shelves, it is crucial to assess your storage needs. This process involves taking inventory of all the items that need to be stored in the pantry and evaluating how much space each item requires. By doing so, you can determine the number of shelves needed and their respective sizes.
Maximizing space is also a crucial aspect of assessing your pantry needs. To make the most of your pantry’s available space, consider utilizing vertical storage options such as wall-mounted shelves or hanging organizers. Additionally, adjustable shelving units can be used to accommodate items of varying heights and sizes.
By assessing your pantry needs and maximizing available space, you can create an organized and functional pantry that meets all your storage requirements. The next step in this process involves measuring your space, which will help determine the size of the shelves needed for optimal utilization of space.
Measuring Your Space
Measuring Your Space To start building your own pantry shelves, it is essential to measure the space where you plan to install them. Measuring the area will give you an idea of how much storage space you can maximize while customizing your design. Take note of the width, height, and depth of the area where you want to put your pantry shelves. It is also crucial to measure any obstructions such as light fixtures or vents that may affect the installation.
Maximizing storage is key when building pantry shelves. To do this, ensure that there is enough clearance between each shelf so that taller items can fit without being squished. Consider adding adjustable shelving so that you can customize the spacing according to your needs and avoid any wasted space. Moreover, installing pull-out drawers or baskets underneath or on top of your pantry shelves can provide additional storage options for smaller items.
Customizing design allows you to create a unique look for your pantry shelves while maximizing storage space. You can choose from various materials such as wood, wire shelving, metal brackets, or pre-finished shelving boards. Additionally, consider incorporating labels on each shelf to help keep track of items and maintain organization within your pantry. With proper planning and measuring techniques in place, you’ll be able to create a functional and aesthetically pleasing pantry shelf system that meets all your needs.
Transition: Now that we have measured our space and thought about maximizing storage and customizing our design let’s move on to choosing materials for our DIY pantry shelves.
Choosing Materials
When choosing materials to build pantry shelves, plywood, particle board, MDF, hardwood and laminate are popular choices. Each material has its own unique benefits in terms of durability, cost, strength, water resistance, and finishes. Installation methods such as screws, nails, and glue also play a role in the longevity of the shelves. The weight capacity of the shelves is also a key factor to consider, as is the cost of the materials, installation, and finishes. Ultimately, the best material for a home project such as building pantry shelves will depend on the preferences and needs of the homeowner.
Plywood
When it comes to building pantry shelves, one of the most important decisions you’ll make is choosing the right materials. While there are many alternatives to plywood, it remains a popular choice for its durability and affordability. However, not all plywood is created equal, so it’s important to consider the different finishes available.
One alternative to traditional plywood is MDF, which stands for medium-density fiberboard. This option is made from compressed wood fibers and resin, making it denser and stronger than standard plywood. It also has a smooth surface that’s easy to paint or cover with adhesive paper. Another option is particle board, which is made from small wood particles that are glued together under high pressure. While this material can be less expensive than plywood or MDF, it may not hold up as well over time.
When it comes to plywood finishes, there are several options to choose from. One popular choice is birch plywood, which has a smooth surface and light color that makes it easy to stain or paint. Another option is oak veneer plywood, which has a more textured surface and darker color that gives it a rustic look. Whichever finish you choose, be sure to sand and seal the edges of your shelves before installation to prevent splintering and moisture damage over time.
Particle Board
When it comes to building pantry shelves, choosing the right materials is crucial. While plywood and MDF are popular options, particle board is another alternative that’s worth considering. Particle board is made from small wood particles that are glued together under high pressure. It’s less expensive than plywood or MDF, which makes it a budget-friendly choice for those who want to build their pantry shelves without breaking the bank.
One benefit of using particle board for your pantry shelves is its affordability. It’s one of the least expensive options available on the market, which makes it an ideal choice for those who want to save money without compromising quality. However, particle board may not hold up as well over time compared to other materials. It can be more susceptible to moisture damage and may not be as durable as plywood or MDF.
Despite its disadvantages, particle board can still be a good option for those who want to build their own pantry shelves. If you’re planning on using this material, make sure you seal the edges of your shelves properly to prevent moisture damage. With proper care and maintenance, particle board shelves can last for many years while still providing an affordable option for your pantry storage needs.
Mdf
When it comes to building pantry shelves, the material you choose can make a significant difference in both the durability and cost of your project. While particle board is a budget-friendly option, it may not be as durable over time as other materials. Another popular alternative is MDF or medium-density fiberboard.
MDF is made from wood fibers that are combined with resin and wax under high pressure and heat. It’s an affordable option that is often used in furniture and cabinetry. Compared to particle board, MDF has a smoother surface and is less likely to warp or crack.
While MDF is more expensive than particle board, it’s still less expensive than plywood. MDF also has several advantages over plywood, such as its uniform texture and lack of voids or knots. However, MDF may not hold screws or nails as well as plywood due to its denser composition. When deciding between MDF alternatives such as plywood, consider your budget and the level of durability you need for your pantry shelves.
Tools You’ll Need
To build pantry shelves, you will need a variety of tools to help you complete the project. These tools include a drill, saw, level, measuring tape, and screws. You may also need sandpaper and wood glue to ensure your shelves are smooth and sturdy.
Before using any power tools or handling any materials, it’s important to take safety precautions. This includes wearing protective eyewear and gloves when necessary and making sure all tools are in good working condition before use. Additionally, make sure your workspace is well-ventilated to prevent inhaling harmful fumes or dust.
Choosing accessories such as brackets or shelf liners can also enhance the functionality and aesthetics of your pantry shelves. Be sure to consider these options when planning out your design and gathering materials. With the right tools, safety measures, and accessories, you’ll be on your way to building beautiful and practical pantry shelves that will serve you for years to come.
Next up is preparing your workspace by clearing out any clutter or debris and making sure you have ample space for measuring and cutting materials.
Preparing Your Workspace
Now that you have gathered all the necessary tools, it’s time to prepare your workspace. The first step is to clear out any clutter that may be in the area where you plan on building your pantry shelves. This will not only give you more space to work with but also prevent any accidents from occurring. Make sure to remove any objects that may obstruct your movement or cause tripping hazards.
Once you have cleared out your workspace, it’s time to start thinking about how you can maximize the space for your pantry shelves. Take a look at the area and determine the measurements of the shelves that you want to build. It’s important to take accurate measurements so that you don’t end up wasting precious wood materials. You can use a measuring tape or ruler to ensure precise measurements.
After determining the size of your pantry shelves, it’s time to move onto cutting your wood. This is an essential step in building sturdy and durable shelves that can hold heavy items. In this next section, we will go over the proper techniques for cutting wood and how to make sure your cuts are straight and even. With these tips in mind, let’s get started on creating beautiful and functional pantry shelves!
Cutting Your Wood
As you begin the process of building your pantry shelves, one of the most crucial aspects to consider is the wood selection. The type of wood you choose will have a significant impact on the durability and overall quality of your shelves. When selecting wood for your project, it is important to keep in mind factors such as cost, availability, and suitability for your specific needs. Some popular options for pantry shelves include plywood, pine, and oak.
Once you have selected your wood, it’s time to move on to cutting techniques. Before starting any cutting work, make sure that all safety precautions are taken into account – this includes wearing protective gear such as gloves and goggles. One essential thing to consider when cutting your shelves is accuracy – even small mistakes can result in uneven or unstable shelving units. It’s also important to use the right tools for the job; a circular saw or table saw are ideal for cutting large sheets of plywood while a handsaw may be more appropriate for smaller cuts.
To ensure that your pantry shelves are sturdy and even in size and shape, follow these five tips:
- Measure twice before making any cuts
- Make sure that all boards are straight before beginning the cutting process
- Use clamps or other securing methods to keep wood in place during cutting
- Cut slowly and with precision
- Double-check measurements after each cut
With these tips in mind, you’ll be well-equipped to successfully cut your pantry shelf boards without any hiccups. Once you’ve finished this step, it’s time to move on to sanding – an essential task that will help smooth out any rough edges and prepare your shelves for painting or staining.
Sanding Your Shelves
Once you have cut and sanded your shelves to size, it’s time to focus on the sanding process. Sanding is a crucial step in building pantry shelves as it helps to create a smooth surface for staining and painting. Before sanding, make sure you have all the necessary tools at hand, such as sandpaper, an orbital sander or belt sander, and a dust mask.
When it comes to sanding tools, there are two main types: orbital sanders and belt sanders. Orbital sanders are ideal for small areas with gentle curves while belt sanders are best suited for large flat surfaces. Depending on the type of wood you’re using, you can choose from different grits of sandpaper. For instance, coarse grits are suitable for rough surfaces while fine grits work well for finishing touches.
Staining techniques play a vital role in enhancing the look of your pantry shelves. Once you’ve completed the sanding process and cleaned up any dust particles, it’s time to apply your desired stain or paint. There are several techniques to choose from when staining your shelves such as wiping stains, brushing stains or spraying stains. Each technique provides a different finish that will impact the overall look of your shelves. Ultimately, the choice between painting or staining is yours but remember that staining allows natural woodgrain to show through while painting covers it up entirely.
Assembling your shelves is the next logical step after completing the sanding and staining processes. In this section, we’ll cover everything from selecting shelf supports to installing them correctly on your wall. By following these straightforward steps, you’ll have beautiful pantry shelves that will transform your kitchen space completely.
Assembling Your Shelves
Just like how a painter needs to prepare their canvas before they start painting, you need to ensure that your shelves are prepped and sanded before you begin assembling them. Sanding helps create a smooth surface, allowing paint or stain to adhere better and making it easier for you to wipe away dust and dirt in the future. Once your shelves are sanded, you can move on to the next step: shelf height and spacing.
Shelf height is crucial when building pantry shelves. You want to make sure that there is enough space between each shelf so that taller items such as cereal boxes or bottles can fit comfortably without toppling over. The standard shelf height is around 12 inches, but it ultimately depends on what you plan on storing in your pantry. Consider measuring the tallest item you have and add an extra inch or two for clearance.
In addition to shelf height, proper shelf spacing is essential for creating functional pantry shelves. You don’t want too much space between each shelf as this could lead to wasted storage space. On the other hand, having too little space can make it difficult to access items stored on the lower shelves. Aim for a spacing of 14-16 inches between each shelf for optimal storage capacity and accessibility. With these factors in mind, you’re now ready to move onto adding support brackets for added stability and strength.
Transition sentence: Now that your shelves are prepped and properly spaced out, let’s look at how adding support brackets can enhance the overall durability of your pantry shelves.
Adding Support Brackets
Choosing brackets for your pantry shelves is an essential step in ensuring the durability and stability of your storage space. Before selecting brackets, you must consider the weight of the items you plan to store, as well as the height and depth of your shelves. For heavier items, look for heavy-duty brackets with a weight capacity that exceeds the expected load. Additionally, ensure that the brackets are compatible with your chosen shelf material.
Installing brackets is a crucial step in building sturdy pantry shelves. Begin by marking where you want to attach each bracket on both sides of the wall. Use a level to ensure that each bracket is straight before drilling pilot holes into the wall studs. Once you have drilled all necessary holes, screw in the brackets using long screws to secure them firmly into place.
By properly installing support brackets, you can prevent sagging or collapsing shelves and keep your pantry organized and functional for years to come. In the next section, we will go over how to secure your shelves to the wall for added stability and safety.
Securing Your Shelves To The Wall
- When installing pantry shelves, it is important to secure them to the wall with anchors to ensure they are secure and safe.
- Choosing the right anchors is essential to ensure the shelf is properly secured.
- Drilling pilot holes is important before installing the anchors to ensure the shelf is properly secured to the wall.
- Pilot holes should be drilled into the wall at the same level as the anchors, ensuring the shelf is level and secure.
- Installing anchors is the final step to ensure the pantry shelf is properly secured to the wall.
- Anchors should be securely fastened into the pilot hole, and the shelf should be tested to ensure it is properly secured.
Choosing Anchors
To ensure that your pantry shelves are secure and safely hold all your kitchen essentials, choosing the right anchors is crucial. There are different types of anchors available in the market, each designed to work with specific wall materials. For instance, if you have drywall walls, you should opt for expansion or toggle bolts as they can easily grip onto the surface and provide strong support. On the other hand, if your walls are made of masonry or concrete, wedge anchors will be a better option.
Proper spacing and placement of anchors is also an essential factor to consider when securing your shelves to the wall. The distance between each anchor should be no more than 16 inches apart to distribute weight evenly across the shelf. It’s important to note that placing too few anchors could cause sagging or instability of the shelf over time. Therefore, it’s recommended that you use at least two anchors per stud for maximum support.
In summary, choosing the right type of anchor and properly spacing and placing them is critical in ensuring that your pantry shelves remain stable and sturdy over time. By following these guidelines, you’ll not only have a functional pantry but also a safe one for all your kitchen storage needs.
Drilling Pilot Holes
Now that you have selected the right type of anchor and determined the proper spacing for your pantry shelves, the next step is to drill pilot holes before securing them to the wall. Pre-drilling is an essential step as it helps prevent splitting or cracking of the wood when screws are inserted, ensuring a secure and long-lasting attachment. It also makes it easier to drive screws into place without any resistance.
When drilling pilot holes, you need to choose the right size drill bit for your screws. The drill bit should be slightly smaller than the diameter of your screws to ensure a snug fit and prevent stripping or loosening over time. There are different types of drill bits available in the market, such as brad point, twist, or auger bits. Brad point bits are ideal for drilling precise holes on wood surfaces while twist bits work well with softer materials like plastic or aluminum.
Properly drilling pilot holes can make a significant difference in how well your pantry shelves hold up over time. It ensures that they are securely fastened to the wall without damaging either surface. By choosing the right size and type of drill bit and following best practices for pre-drilling, you can achieve a strong and sturdy attachment between your shelves and walls.
Installing Anchors
Once you have drilled pilot holes in your pantry shelves, the next step is to install the anchors. Anchors are crucial because they provide additional support and distribute the weight of the shelves evenly across the wall. There are different types of anchors available, including toggle bolts, plastic anchors, and metal sleeves. The type of anchor you choose will depend on the weight of your shelves and the type of wall material.
Proper placement of anchors is also essential for securing your pantry shelves to the wall. You should place them at equal distances apart from each other, ensuring that they align with the pre-drilled holes on your shelves. It’s important to use a level when installing anchors to ensure that your shelves are straight and level once they’re attached. If you’re unsure about how many anchors you need or where to place them, consult with a professional or refer to manufacturer guidelines.
To install anchors, simply insert them into the pre-drilled pilot holes until they’re flush with the wall surface. Then, tighten screws into each anchor until they’re snug against the wall. Be careful not to over-tighten as this can cause damage to both the anchor and shelf. Once all anchors are installed, attach your pantry shelves by screwing them into each anchor using appropriate screws based on their weight capacity. By properly installing anchors and ensuring their proper placement, you can achieve a sturdy and long-lasting attachment between your pantry shelves and walls that will serve you well for years to come.
Painting Or Staining Your Shelves
Like the icing on a cake, painting or staining your pantry shelves is the final touch that will bring your project to life. The decision to paint or stain your shelves will ultimately depend on personal preference and the overall aesthetic of your pantry. While painting provides an opportunity to add bold pops of color, staining allows for the natural beauty of the wood grain to shine through.
If you choose to paint your shelves, there are a variety of color choices available. Soft neutrals such as white or gray can create a clean and modern look, while bright colors like yellow or red can add a fun and playful touch. Consider using multiple colors for a more eclectic feel or incorporating stencils for added interest.
On the other hand, if you opt for staining your shelves, you’ll need to decide whether you want a light or dark finish. A lighter stain will give a more rustic and natural feel, while a darker stain provides a sophisticated and elegant touch. Keep in mind that staining may require multiple coats and additional drying time compared to painting.
With painting or staining complete, it’s time to add finishing touches to complete the look of your newly built pantry shelves.
Adding Finishing Touches
After building your pantry shelves, it is important to consider the finishing touches that will bring your project to completion. Decorative options are a great way to add style and personality to your shelves. Consider adding decorative brackets, trim, or molding to give your shelves a more polished look. You could even paint or stain the wood to match the color scheme of your kitchen.
Another DIY alternative for finishing your pantry shelves is to use wallpaper or contact paper as a liner. This adds an extra layer of protection against spills and scratches while also providing a pop of color or pattern. Alternatively, you could use adhesive labels or stencils to add labeling or designs onto the shelves themselves.
To further enhance the functionality of your pantry shelves, consider incorporating organization tools such as baskets, wire racks, or pull-out drawers. These items can help maximize storage space and make it easier to find specific items in your pantry. Additionally, don’t forget about lighting options such as under-cabinet lights or battery-powered motion-sensor lights that can make it easier to see all of the items on your shelves.
With these finishing touches in place, you can admire the beauty and functionality of your newly built pantry shelves. The next step is organizing all of your pantry items in a way that makes sense for you and your family’s needs.
Organizing Your Pantry Items
Opening with rhetorical literary device: Are you tired of digging through a cluttered pantry to find the right ingredients for your meals? It’s time to take control and organize your pantry items. Having an orderly pantry can save you both time and money, as well as reduce stress when preparing meals. In this section, we’ll explore some effective ways to organize your pantry items using a labeling system and various container options.
Labeling system: One of the most efficient ways to keep your pantry organized is by implementing a labeling system. Labeling allows you to quickly identify what’s inside each container or shelf. You can use simple labels such as sticky notes or invest in a label maker for a more professional look. Be sure to include important details such as expiration dates, cooking instructions, and quantities on each label. By doing so, you’ll be able to keep track of what you have on hand and avoid unnecessary trips to the grocery store.
Container options: Another way to maintain an organized pantry is by using containers of different sizes and shapes. Clear plastic containers are great for storing dry goods such as pasta, rice, and beans. They allow you to see exactly how much food is left inside without having to open the container. For smaller items such as spices or snacks, consider using baskets or wire bins that can be easily pulled out when needed. Using containers also helps preserve food freshness by keeping out moisture and pests.
Transition sentence: Now that you’ve learned how to organize your pantry items with a labeling system and container options, let’s move on to maintaining your newly organized shelves.
Maintaining Your Pantry Shelves
Once you’ve built your pantry shelves, it’s important to maintain them to ensure that they stay organized and clean. One of the best organizing strategies is to group items by category – for example, all baking supplies should be together, while canned goods should have their own section. This makes it easier to find what you need when you need it. You can also use baskets or bins to corral smaller items like spices or snacks.
In addition to keeping your pantry shelves organized, regular cleaning is also important. Start by removing everything from the shelves and wiping them down with a damp cloth. Pay special attention to any spills or stains that may have accumulated over time. Once the shelves are clean, take this opportunity to check expiration dates on food items and toss anything that has gone bad.
To keep your pantry in top shape, consider doing a deep clean every few months. This could include removing all items from the shelves and vacuuming or sweeping out any crumbs or debris. You can also take this time to reorganize your shelves if needed, and make any necessary repairs or adjustments. With these organizing strategies and cleaning tips in mind, your pantry shelves will remain functional and tidy for years to come.
As much as we try our best, sometimes issues may arise in maintaining our pantry shelves despite our efforts in organizing and cleaning them regularly. Troubleshooting common issues like pests infestation or molds growth can be tricky but not impossible. In the next section, we’ll discuss some helpful tips on how to identify these problems early on before they get out of hand so you can nip them in the bud quickly.
Troubleshooting Common Issues
Maintaining your pantry shelves ensures that it remains clutter-free and well-organized. However, even with proper maintenance, you may encounter common issues that could affect the functionality of your pantry shelves. It is essential to troubleshoot these issues as soon as possible to prevent further damage.
Adjusting heights is a common issue encountered when building pantry shelves. Most pantry items come in varying sizes, and it is crucial to adjust the shelf height accordingly to maximize space utilization. To fix this issue, you can install adjustable brackets that allow you to move the shelves up or down quickly.
Maximizing space is another issue that could arise when building pantry shelves. To make the most out of your storage space, consider installing wire baskets or pull-out drawers. These accessories not only increase storage space but also make it easier to access items on lower shelves.
In summary, maintaining your pantry shelves helps keep them functional and organized. However, it is essential to address common issues such as adjusting heights and maximizing space utilization for optimal use of your storage area. With these tips in mind, you can ensure that your pantry remains tidy and efficient for years to come.
Conclusion
Assessing your pantry needs, measuring your space, choosing materials, and preparing your workspace are all important steps in building pantry shelves. By adding finishing touches and organizing your pantry items, you can create a functional and organized storage solution for your home.
To maintain your pantry shelves, it is important to regularly clean and declutter the space. Troubleshooting common issues such as sagging shelves or unstable structures can keep your pantry functioning properly.
In conclusion, building pantry shelves requires careful planning and attention to detail. By following the steps outlined in this article, you can create a customized storage solution that meets your specific needs. With proper maintenance and organization, your pantry will become a functional and efficient space in your home. Remember that building pantry shelves is a DIY project that requires patience and determination. With the right tools and materials, anyone can create beautiful and functional pantry shelves for their home.
Image Credits
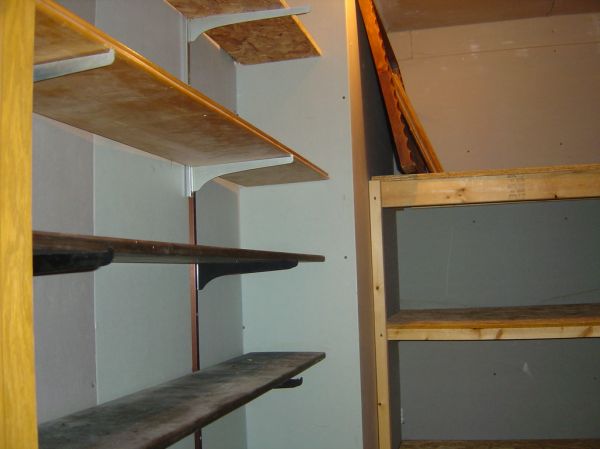
- “Pantry with empty shelves” by Daniel M. Hendricks (featured)

