Asphalt driveways are a common feature in many homes around the world. They provide an easy and affordable way of creating a smooth surface for vehicles to drive on and enhance the overall look of the property. However, despite their numerous benefits, asphalt driveways require regular maintenance to remain in good condition. One of the most important forms of maintenance is sealing.
Sealing your asphalt driveway not only enhances its aesthetic appeal but also protects it from damage caused by weather elements, such as UV rays, water, and snow. As a beginner, it can be challenging to know where to start when it comes to sealing your driveway. This guide aims to provide you with all the information you need to get started on sealing your asphalt driveway successfully. From choosing the right sealant products to applying them correctly, we will cover everything you need to know about sealing your driveway like a pro.
Understanding The Importance Of Regular Driveway Maintenance
Regular driveway maintenance is crucial to extend the lifespan of your asphalt driveway. Neglecting regular upkeep can result in expensive repairs or even a complete replacement of the driveway. Preventive measures such as sealing and cleaning can help to prevent damage caused by weather conditions, oil spills, and UV rays.
Assessing damage should be the first step in regular driveway maintenance. Cracks, potholes, and drainage problems are signs of damage that need to be addressed immediately. Failure to do so can lead to further deterioration of the asphalt surface. Regular inspection of your driveway is essential in identifying potential problems before they worsen.
Preventive measures such as sealing can help protect your driveway from damage caused by water, oil spills, and other substances that can penetrate the asphalt surface. Sealing helps to prevent water from seeping into cracks and causing further damage during freeze-thaw cycles. It also helps to protect against UV rays that cause fading and cracking. Proper maintenance will not only enhance the appearance of your driveway but will also save you money in costly repairs down the road.
To ensure that your driveway remains in good condition, it’s important to assess its condition regularly. This includes inspecting for cracks, potholes, and other signs of wear and tear. The next section will discuss how to assess the condition of your asphalt driveway in more detail and provide guidance on what steps you should take if you identify any issues.
Assessing Your Driveway’s Condition
Before sealing your asphalt driveway, it is essential to assess its condition. You need to check for any cracks, potholes, or other damage that may have occurred over time. Assessing the condition of your driveway will help you determine whether you need to repair or replace any damaged areas before sealing.
Assessing cracks is a crucial aspect of evaluating your driveway’s condition. Cracks can be caused by a variety of factors such as weather changes and wear and tear from daily use. It is essential to check for any cracks and determine their width and depth before sealing. If the cracks are small, less than a quarter-inch wide, they can be easily filled with asphalt crack filler. However, if the cracks are more extensive, it may require professional repair.
Checking drainage is another crucial factor when assessing your driveway’s condition. Standing water on your driveway can cause significant damage over time. Ensure that there is proper drainage so that water does not pool in one area. This will prevent further damage and prolong the life of your asphalt driveway.
Now that you have assessed the condition of your driveway by checking for cracks and ensuring proper drainage, it’s time to prepare it for sealing. In the next section, we will go through some steps on how to prepare your driveway for sealing without damaging it further.
Preparing Your Driveway For Sealing
Before sealing your asphalt driveway, it is crucial to prepare the surface adequately. The process involves clearing debris and repairing any cracks to ensure a smooth and even surface. Neglecting to do so will result in a flawed final product that won’t last long.
Clearing debris from your driveway is the first step towards preparing it for sealing. Remove any loose stones, dirt, or leaves using a broom or leaf blower. If there are oil stains on the surface, use an oil stain remover to get rid of them. These impurities can weaken the bond between the sealant and your driveway’s surface, so make sure you remove as much of them as possible.
The second step involves repairing any cracks on your driveway’s surface using an appropriate filler. Cracks left unattended will only expand over time and eventually compromise the integrity of your entire driveway. For small hairline cracks, use a crack filler, but for more substantial cracks, consider asphalt patching. With these steps complete, your driveway will now be ready for sealing with a quality sealant product that will prolong its lifespan and maintain its aesthetic appeal.
With debris cleared and all necessary repairs made, your asphalt driveway is now ready for sealing. But before proceeding with this critical step, it’s essential to choose the right sealant product for optimal results!
Choosing The Right Sealant Product
When it comes to sealing your asphalt driveway, choosing the right sealant product is crucial. There are various types of sealant products available in the market, and each one has its own unique features that make them suitable for different kinds of driveways. Some of the most popular types of sealant products include coal tar, acrylic, and asphalt emulsion.
When comparing sealant brands, it’s important to consider factors such as quality, durability, and price. While some brands may be more expensive than others, they may also provide better protection and last longer. It’s always advisable to do some research before purchasing a sealant brand so that you can make an informed decision based on your needs and budget.
Choosing the right sealant product is just one aspect of sealing your driveway. In the next section, we’ll discuss how to estimate the amount of sealant needed for your driveway so that you can purchase the correct quantity without any wastage or shortage.
Estimating The Amount Of Sealant Needed
Just like a painter needs the right amount of paint to complete a masterpiece, you will need the right amount of sealant to properly seal your driveway. Calculating coverage is essential in determining how much sealant you need. Most sealant products have guidelines on their packaging, but it is always best to overestimate rather than underestimate. This will help ensure that you do not run out of sealant halfway through the project.
When buying your sealant product, it is highly recommended that you purchase extra sealant. The reason for this is because it can be difficult to match the exact color and texture of the original batch if you run out and need to purchase more later on. Additionally, having some extra sealant on hand can come in handy for touch-ups or future maintenance.
With the appropriate amount of sealant calculated and extra product purchased, now is the time to gather the necessary tools and equipment to complete the sealing process.
Gathering The Necessary Tools And Equipment
Before starting with the sealing process, you need to gather all the necessary tools and equipment. Depending on your personal preference and budget, you can either buy or rent them from a local hardware store. Renting equipment is an excellent option if you only have a few driveways to seal, and it can save you money in the long run. However, if you plan on sealing numerous driveways in the future, then buying your equipment may be a better investment.
Regardless of whether you decide to rent or buy your equipment, safety should always be your top priority during driveway preparation. Proper safety precautions must be taken when using any power tools or chemicals. You should wear protective gear such as gloves, goggles, and a respirator mask to prevent any accidents or health hazards.
When preparing your driveway for sealing, you will need a few essential tools such as a broom or leaf blower to remove debris and dirt from the surface. A pressure washer is also necessary to remove any stubborn stains and dirt that cannot be swept away easily. Lastly, ensure that you have plenty of tarps or plastic sheets to protect surrounding plants and surfaces from accidental spills or drips during the sealing process.
With all the necessary tools and safety precautions in place for driveway preparation, you are now ready to proceed with applying the sealant.
Applying The Sealant
Now that you have gathered all the necessary tools and equipment, it’s time to move on to the next step of sealing your asphalt driveway – applying the sealant. This is a crucial step in protecting your driveway from damage caused by harsh weather conditions and daily wear and tear. In this section, we will discuss some useful tips and techniques for applying sealant to your asphalt driveway.
Before you start, make sure that the weather conditions are suitable for sealing your driveway. The temperature should be above 50°F for at least 24 hours before and after sealing. Also, check the forecast to ensure there is no rain expected within the next 24-48 hours. Next, clean your driveway thoroughly using a broom or leaf blower to remove any debris or loose dirt. You can also use a pressure washer if there are tough stains or oil spots that need cleaning.
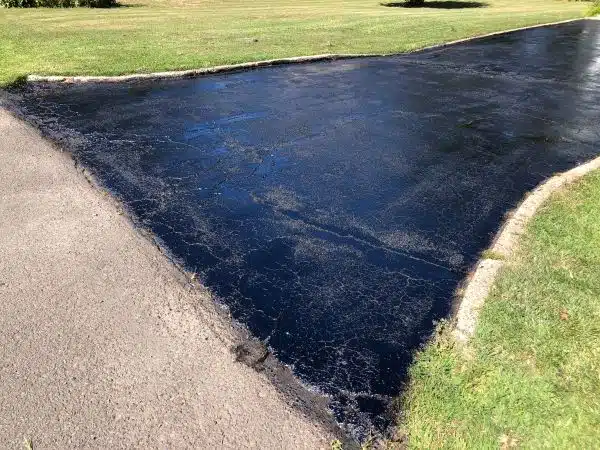
Once your driveway is clean, it’s time to apply the sealant. Start by pouring the sealant in a straight line along one edge of your driveway using a squeegee or brush. Spread it evenly across the surface of your driveway using long strokes in one direction. Make sure not to overlap the sealant as this can cause uneven drying and create unsightly marks on your newly sealed driveway. Use our table below as a guide for proper application techniques:
| Technique | Description |
|---|---|
| Squeegee | Ideal for larger driveways |
| Brush | Great for small areas and edges |
| Roller | Used for an even spread |
By following these tips and techniques, you can achieve a smooth and even coat of sealant on your asphalt driveway. Remember to start at the top of your driveway and work your way down towards the bottom when applying the sealant. This will ensure that you do not step on freshly coated areas while working on other sections of your driveway, which can leave footprints and ruin your hard work. With these guidelines in mind, you can successfully seal your driveway and protect it from damage for years to come.
Starting At The Top And Working Your Way Down
- Prior to beginning the process of sealing an asphalt driveway, it is necessary to ensure that the surface is adequately prepared.
- This can be accomplished by cleaning the driveway of debris and filling any cracks or holes that have developed over time.
- Once the surface is clean and prepped, sealer can be applied in a thin coat using a brush, roller, or sprayer.
- It is important to ensure that the sealer is applied evenly to ensure a uniform finish.
- Once the sealer has dried, any edges that have not been properly sealed can be touched up with additional sealer.
- To finish, any excess sealer can be removed and the driveway can be allowed to dry for at least 24 hours before any vehicles use the driveway.
Preparing The Asphalt Surface
Before beginning the process of sealing an asphalt driveway, it is crucial to prepare the surface properly. Cleaning equipment such as a pressure washer or a hose with a nozzle should be used to remove any dirt, debris, or stains from the asphalt surface. This ensures that the sealant can adhere correctly and provides a smooth finish. Furthermore, any cracks or potholes should be repaired prior to sealing the driveway.
Pre-seal repairs are an essential part of preparing the asphalt surface for sealing. Any cracks or holes in the pavement must be filled in before applying the sealant. This helps prevent water from seeping into these areas and causing further damage over time. Additionally, it is recommended to apply a primer to any oil spots on the driveway before sealing to ensure proper adhesion.
Overall, preparing the asphalt surface is vital for achieving long-lasting results when sealing an asphalt driveway. By properly cleaning and repairing any damages beforehand, homeowners can ensure that their newly sealed driveway will withstand weathering and traffic for years to come. As professionals in this field, we highly recommend taking these necessary steps before starting at the top and working your way down during the sealing process.
Applying Sealer
Sealing an asphalt driveway is a task that requires proper technique and attention to detail. Applying sealer is the final step in the process of sealing an asphalt driveway, and it is crucial to do it correctly to achieve long-lasting results. Sealing techniques play a significant role in ensuring that the sealant adheres well, provides a smooth finish, and protects the surface from weathering and traffic.
One common mistake when applying sealer is starting at the bottom of the driveway instead of starting at the top and working your way down. This can cause the sealer to pool at the bottom, leading to an uneven finish. To avoid this issue, we recommend using a squeegee or a sprayer to apply the sealant evenly across the entire surface. Starting from the top allows for gravity to work in your favor and helps distribute the sealant more evenly.
Another common mistake when applying sealer is using too much product. Over-application can lead to an overly thick coat that takes longer to dry and may crack over time. It’s essential to follow manufacturer guidelines regarding how much product should be used per square foot of pavement. Using too little sealant can also be problematic as it may not provide adequate protection against weathering and traffic.
In conclusion, applying sealer is a critical part of sealing an asphalt driveway, requiring proper techniques and attention to detail. To achieve optimal results, start at the top and work your way down while using appropriate amounts of sealant per square foot of pavement. Avoid common mistakes such as over-application or starting at the bottom by following manufacturer guidelines closely. By doing so, homeowners can ensure their newly sealed driveway will withstand weathering and traffic for years to come.
Finishing Touches
Asphalt driveway sealing is a task that must be done correctly to achieve long-lasting results. Starting at the top and working your way down is an essential technique when applying sealer to ensure that it distributes evenly across the surface. However, this is not the only crucial aspect to consider when sealing an asphalt driveway. Other factors include choosing the right color options and deciding whether to apply the sealant yourself or seek professional assistance.
After applying sealer, homeowners can add finishing touches to enhance their driveway’s appearance. Choosing the right color options can help create a cohesive look for your property. With many color options available, it’s important to select colors that complement your home’s exterior and landscape. Additionally, DIY vs professional application is another factor to consider when adding finishing touches to your newly sealed driveway. While DIY application may save money, it requires proper equipment and expertise in handling the materials. Professional services can provide quality results with minimal effort from homeowners.
In conclusion, starting at the top and working your way down is an essential technique when applying sealer to an asphalt driveway. However, homeowners should also consider other factors such as color options and DIY vs professional application when adding finishing touches after sealing their driveways. By following these guidelines, homeowners can achieve a well-protected and visually appealing driveway for years to come.
Applying A Second Coat, If Necessary
Metaphorically speaking, sealing an asphalt driveway is like creating a work of art. Each layer applied adds depth and beauty to the final product. Applying a second coat of sealant is often necessary to ensure maximum protection against weather elements and wear and tear. However, it is crucial to follow proper guidelines when doing so.
When applying a second coat, it is essential to apply thin coats rather than attempting to cover the surface with thick layers. Overapplication can lead to uneven drying and cracking of the sealant over time. It is best to apply two thin coats rather than one thick layer for optimal results.
Timing between coats is also critical in ensuring that the sealant cures properly. Waiting too long between applications may result in the first coat curing entirely, making it difficult for subsequent layers to adhere correctly. Generally, waiting 24 hours between coats provides sufficient curing time for each layer before applying another.
To summarize, applying a second coat of sealant can be beneficial in providing extra protection for your asphalt driveway. However, it is important to follow proper guidelines when doing so by applying thin layers and waiting at least 24 hours between coats for optimal curing time. In the next section, we will discuss allowing the sealant to cure properly before using your driveway again.
Allowing The Sealant To Cure
After applying the sealant, it’s important to allow it to cure properly. This is the stage where the sealant will dry and harden, creating a protective layer over your asphalt driveway. Tips for ensuring proper curing include avoiding foot and vehicle traffic on the newly sealed driveway for at least 24 hours. This will give the sealant enough time to dry and prevent any damage or disturbances.
Another tip is to avoid exposing the sealant to extreme temperatures during curing. High temperatures can cause the sealant to dry too quickly, while low temperatures can slow down the curing process significantly. It’s best to apply sealant when temperatures are between 50-85°F and ensure that there is no rain in the forecast for at least 48 hours after application. Common mistakes to avoid during curing include using your driveway too soon, which can cause tire marks or scuffing on the freshly sealed surface.
Taking care of your newly sealed driveway doesn’t end with allowing it to cure properly; you also need to clean up your work area thoroughly. Removing any excess debris or equipment from the area will prevent unwanted dirt or debris from sticking onto your newly sealed driveway once it has dried. Additionally, be sure to dispose of any used materials safely and responsibly, following local regulations regarding waste disposal. Cleaning up after sealing your driveway will leave you with a pristine finished product that will continue looking great for years to come.
Cleaning Up The Work Area
Sweeping the asphalt driveway is an important step in the preparation process as it helps to remove any large debris or dirt. Raking is necessary to ensure a smooth surface for the sealant to adhere to by smoothing out any bumps or large cracks. After the debris has been cleared, it should be disposed of in the appropriate manner, such as in a dumpster or trash bin. Furthermore, any vegetation should be removed from the area, such as grass or weeds, to ensure that the sealant is properly applied. It is also important to remove any residual dirt and other particles by using a pressure washer. Finally, any oil or gas stains should be treated with a degreaser prior to sealing the asphalt driveway.
Sweeping
To ensure a smooth and professional-looking asphalt driveway sealant job, it is crucial to clean up the work area properly. This includes sweeping the surface of the driveway before sealing it. Proper sweeping techniques are essential to remove all loose debris, dirt, and dust particles that could interfere with the adhesion of the sealant.
One of the best tools for sweeping an asphalt driveway is a sturdy broom with stiff bristles. It is important to use a broom that can withstand heavy use without bending or shedding bristles. A leaf blower can also be effective for removing larger debris such as fallen leaves or twigs. However, it may not be sufficient in removing finer particles such as sand or dust.
When sweeping an asphalt driveway, start at one end and work your way towards the other end to avoid missing any spots. Use long, consistent strokes and be sure to sweep along the edges as well. Check for any remaining debris by running your hand over the surface of the driveway before proceeding with sealing.
Remember that proper cleaning and preparation are key factors in achieving a successful asphalt driveway sealant job. By using proper sweeping techniques and choosing the best tools for the job, you can ensure that your driveway is clean and ready for sealing.
Raking
After sweeping the surface of the driveway, another important step in cleaning up the work area before sealing an asphalt driveway is raking. Raking involves removing any remaining debris that may have been missed during sweeping. This includes small stones, pebbles, and other loose materials that could interfere with the adhesion of the sealant.
Using a leaf blower for raking can be effective for removing larger debris such as fallen leaves or twigs. However, it may not be sufficient in removing finer particles such as sand or dust. In this case, using a rake with flexible tines is recommended. Choosing the right rake for the job can make a big difference in achieving a clean and smooth surface for sealing.
When raking an asphalt driveway, start at one end and work your way towards the other end to avoid missing any spots. Use long, consistent strokes and be sure to rake along the edges as well. Check for any remaining debris by running your hand over the surface of the driveway before proceeding with sealing. By incorporating proper raking techniques into your cleaning process, you can ensure that your driveway is thoroughly cleaned and ready for sealing.
Disposing Debris
After raking the surface of the driveway, the next crucial step in cleaning up the work area before sealing an asphalt driveway is proper debris disposal. Disposing of debris in a responsible and eco-friendly manner is not only good for the environment but also shows consideration for your neighbors. It is essential to avoid leaving debris on the street or in your neighbor’s lawn.
When disposing of debris, you can choose from various eco-friendly options. One option is composting, where organic materials are decomposed to create nutrient-rich soil that can be used for gardening or landscaping purposes. Another option is recycling, where recyclable materials such as plastic bottles and aluminum cans are collected and sent to recycling centers. Lastly, landfill disposal should only be considered when all other options have been exhausted.
It is important to remember that proper debris disposal not only ensures a clean and safe work area but also contributes to preserving our planet’s health and well-being. By choosing eco-friendly disposal options and demonstrating care for our environment, we can inspire others to do the same.
Maintaining Your Sealed Driveway
After sealing your asphalt driveway, it is crucial to keep it in good shape. The sealing process protects your driveway from harsh weather conditions and increases its lifespan. However, without proper maintenance, the seal will not last as long as it should. Here are some tips for preventing driveway damage and best practices for cleaning and maintaining sealed driveways.
Tips for Preventing Driveway Damage Avoid parking heavy vehicles on your driveway as they can cause cracks and indentations on the surface, especially during hot weather. Also, do not turn your steering wheel while the car is stationary as this puts pressure on one spot of the driveway. Instead, make sure you turn the wheels when moving. Furthermore, remove any debris or sharp objects that might scratch or puncture the surface.
Best Practices for Cleaning and Maintaining Sealed Driveways To maintain a clean and polished look of your sealed driveway, you should sweep it regularly with a broom or blower to remove dirt and leaves. For stubborn stains like oil spills or tire marks, use a mild detergent mixed with water to scrub them off using a stiff brush. Avoid using harsh chemicals or power washers as they can strip away the sealant leaving behind an uneven surface.
In conclusion, maintaining your sealed driveway is essential for prolonging its lifespan and keeping it looking new. By following these tips for preventing damage and best practices for cleaning and maintaining sealed driveways, you can ensure that your investment lasts longer than expected. In the next section, we will discuss troubleshooting common sealing issues that may arise over time.
Troubleshooting Common Sealing Issues
Proper preparation is essential to getting the sealing job done right. This includes cleaning the surface with a pressure washer and filling any cracks and holes with asphalt patching material.
The sealing process should begin with a coat of asphalt primer to ensure that the sealant adheres properly.
After the primer has dried, the asphalt sealant should be applied in two thin coats, allowing the first coat to dry before applying the second.
After the sealant has been applied, a broom should be used to create a uniform texture.
Regular maintenance of the sealed asphalt surface is necessary to ensure that it remains in good condition. This includes cleaning the surface with a pressure washer and filling any new cracks and holes as soon as they appear.
It is important to inspect the sealed surface regularly for signs of wear and tear, and to reapply sealant as needed.
Preparing
Asphalt driveways require regular maintenance to stay in good condition, and sealing is an essential part of that process. However, before you start sealing your driveway, it’s important to prepare properly to avoid common issues that can arise during the process. To do this, you’ll need a few tools and some safety precautions.
One of the first things you’ll need to do is gather the necessary tools for the job. These include a pressure washer or hose, a sturdy broom or brush, a squeegee or applicator tool, and of course, the sealant itself. It’s also important to wear protective clothing and eyewear to prevent any splatters from getting on your skin or eyes.
Another crucial aspect of preparing for sealing your driveway is ensuring that it’s clean and free of debris. This means using your pressure washer or hose to remove any dirt, oil stains, or other substances that may be present. Once the surface is clean and dry, use your broom or brush to sweep away any remaining debris. With these steps completed and your tools at hand, you’re ready to move on to applying the sealant itself.
In conclusion, preparing for sealing an asphalt driveway requires gathering the right tools and taking safety precautions while ensuring that the surface is thoroughly cleaned beforehand. By following these steps carefully and taking your time during application, you can avoid common issues such as uneven coverage or peeling over time. With proper preparation and attention to detail, you can enjoy a smooth and long-lasting sealed driveway for years to come.
Sealing Process
When it comes to sealing an asphalt driveway, the process can be simple and straightforward. However, there are common sealing issues that can arise if the job is not done correctly. One of the biggest factors contributing to these issues is the sealing process itself. While DIY sealing can save money, it may not always be the best option for homeowners looking for long-lasting results.
There are benefits to doing a DIY driveway sealing project, including cost savings and convenience. However, there are also drawbacks to consider. For example, without proper knowledge and experience, a homeowner may apply too much or too little sealant, resulting in uneven coverage or other problems. Additionally, some sealants may not hold up as well over time compared to those used by professional services.
Ultimately, when deciding whether to pursue a DIY driveway sealing project or hire a professional service, cost should be weighed against potential issues that may arise from improper application. While it may seem like a quick and easy solution at first glance, taking precautions such as proper preparation and attention to detail during application can help ensure long-lasting results. By keeping these factors in mind and considering all options carefully before starting any sealing project, homeowners can avoid common issues and enjoy the benefits of a smooth and protected driveway for years to come.
Maintenance
Maintenance is a crucial aspect of ensuring that your driveway remains in good condition. Regular maintenance can not only help to extend the life of your driveway but also prevent common sealing issues from occurring. One of the benefits of regular maintenance is that it can be cost-effective in the long term, as it can help to prevent more costly repairs or replacements down the line.
One important part of maintaining your asphalt driveway is cleaning it regularly. This means removing any debris, dirt, or stains that may have accumulated on the surface. Failure to do so can result in these substances penetrating the surface and causing damage over time. Additionally, regular sealing can help to protect your driveway from weathering and other environmental factors.
To ensure that your driveway remains in good condition, it’s important to address any issues as soon as they arise. This includes cracks or potholes that may develop over time, which should be repaired promptly before they worsen. If left untreated, these issues can lead to more extensive damage and require costly repairs or even replacement. By investing in regular maintenance and addressing any issues promptly, homeowners can enjoy a smooth and protected driveway for years to come at a reasonable cost.
Knowing When To Call In A Professional
Hiring professionals to seal your asphalt driveway is a wise decision if you lack the necessary skills and experience. The process of sealing an asphalt driveway requires expertise, proper equipment, and safety precautions. Professionals have the knowledge and tools to identify any underlying issues that may affect the durability of your driveway. Also, they use high-quality sealants that last longer than those used in DIY projects.
On the other hand, opting for DIY sealing of your asphalt driveway can come with risks. Lack of experience may lead to over-application or under-application of sealant, which could result in premature cracking or peeling. Moreover, using low-quality sealant could lead to a faster deterioration of your driveway, leading to costly repairs in the long run.
Before hiring professionals or embarking on a DIY project, consider factors such as cost, time, and experience. While DIY projects may seem cheaper initially, mistakes made during the process can end up costing more than hiring a professional would have. Ultimately, it’s essential to weigh the pros and cons before making any decision.
Moving forward with sealing your asphalt driveway requires careful consideration of all available options. Whether you decide to hire professionals for their expertise or opt for a DIY project, it’s crucial to understand the associated risks so that you can make an informed decision. In the next section, we will address some frequently asked questions about sealing asphalt driveways that will help guide you through this process.
Frequently Asked Questions About Sealing Asphalt Driveways
Are you considering sealing your asphalt driveway? As a sealing expert, I’m here to answer some frequently asked questions. There are many misconceptions about sealing driveways, so let’s clear those up first.
One common misconception is that new driveways don’t need to be sealed. This is not true. Even new driveways can benefit from being sealed because it protects the surface from damage caused by UV rays, oil spills, and other substances that can stain or etch the surface. The best time to seal a new driveway is after it has cured for at least 90 days.
Another common misconception is that sealing should only be done in the summer. While warmer temperatures may make it easier to apply the sealer and ensure proper curing, fall is actually the best time to seal your driveway. This is because cooler temperatures allow for better adhesion and drying times. It’s important to avoid sealing during rainy or damp weather conditions as this can affect how well the sealer adheres.
As you can see, there are many factors to consider when it comes to sealing your driveway. Clearing up these misconceptions and understanding the best time to seal will help ensure a successful project. If you’re unsure about any aspect of the process or want more information, don’t hesitate to consult with a professional in your area who specializes in driveway sealing.
Conclusion
As an expert in the field of asphalt driveway sealing, it is my duty to emphasize the importance of proper maintenance. Neglecting your driveway leads to costly repairs and frustration down the road. A well-maintained driveway not only enhances curb appeal but also ensures safety for you and your loved ones.
Before sealing your driveway, assess its condition and prepare it accordingly. Choosing the right sealant product is crucial in achieving optimal results. Estimating the amount needed prevents unnecessary waste and expenses.
However, even with proper preparation, issues may arise during and after sealing. Knowing how to troubleshoot common problems can save time and money. But when all else fails, do not hesitate to call in a professional.
In conclusion, maintaining your asphalt driveway may seem like a daunting task for beginners. But with proper guidance, it can be a simple yet rewarding experience. Remember, neglecting your driveway leads to costly consequences. So don’t wait until it’s too late! Take action today and give your driveway the attention it deserves.
Image Credits

