Garage floors are susceptible to wear and tear due to heavy traffic, spills, and exposure to chemicals. Epoxy coating is a popular solution for protecting garage floors as it provides a durable, glossy surface that resists abrasions and stains. However, applying garage floor epoxy can be a challenging task if not done correctly. As an expert in garage floor epoxy application, I will provide you with the necessary knowledge and steps to apply garage floor epoxy flawlessly.
The application of garage floor epoxy requires proper planning, preparation, and execution to achieve optimal results. In this article, we will discuss the essential steps involved in applying garage floor epoxy that guarantee durability and longevity. From cleaning and repairing the concrete surface to selecting the right type of epoxy coating for your needs, we will cover everything you need to know about this process. By following our expert advice on how to apply garage floor epoxy, you can get your garage floors looking as good as new while adding value to your home or business property.
Understanding The Benefits Of Epoxy Coating For Garage Floors
Garage floors are prone to wear and tear due to the constant foot traffic, heavy equipment, and chemicals that they are exposed to. Applying an epoxy coating to your garage floor provides several benefits, including enhanced longevity, durability, and cost-effectiveness. As an expert in epoxy garage floor application, I highly recommend this process to anyone looking for a long-lasting solution for their garage flooring needs.
Epoxy coatings are incredibly durable and resistant to wear and tear, making them ideal for high-traffic areas like garages. They can withstand heavy loads from cars, trucks, and other equipment without cracking or chipping. Additionally, they are resistant to oil stains, chemicals, and water damage. In the long run, this translates into significant cost savings since you won’t have to replace your garage floor as frequently.
Another benefit of applying an epoxy coating is its longevity. Epoxy coatings can last up to 20 years with proper maintenance. This means that you won’t have to worry about resurfacing or repairing your garage floor every few years, saving you time and money in the long run. The durability of the coating also means that it will retain its appearance over time, ensuring that your garage always looks clean and presentable.
Assessing your garage floor’s condition is the first step towards applying an epoxy coating. By examining any cracks or damage on the surface of your garage floor, you can determine whether it’s suitable for an epoxy coating or if repairs need to be made first.
Assessing Your Garage Floor’s Condition
Before applying garage floor epoxy, it is crucial to assess the condition of your garage floor. This step will help you determine whether you need to repair any damage or cracks before proceeding with the epoxy application process. Start by inspecting your garage floor for any signs of wear and tear. Check for any visible cracks or unevenness on the surface that could compromise the epoxy’s adhesion.
If there are any visible cracks, it is essential to repair them before applying epoxy. Small cracks can be fixed using a concrete crack filler, while larger ones may require more extensive repairs. Make sure to follow the manufacturer’s instructions when repairing any damage to ensure that it sets correctly and does not affect the final outcome of the epoxy application process.
Assessing your garage floor’s condition is a crucial step in ensuring a successful epoxy application process. By taking the time to examine and repair any damage beforehand, you will have a smooth surface that allows for proper adhesion of the epoxy coating. Once you have assessed and repaired your garage floor as needed, you can move on to gathering the tools and materials you’ll need for applying garage floor epoxy.
Gathering The Tools And Materials You’ll Need
After assessing the condition of your garage floor, it is important to gather all the tools and materials needed for a successful epoxy application. This process can seem overwhelming, but with proper planning and organization, it can be accomplished with ease. First, make sure you have all necessary safety equipment including gloves and eye protection.
Choosing colors for your epoxy coating is another important aspect of the application process. Consider the overall aesthetics of your garage and choose a color that complements or enhances its appearance. It is also important to keep in mind that lighter colors may show dirt and stains more easily than darker colors. Take time to explore different color options before making a final decision.
When applying epoxy to your garage floor, safety should always be a top priority. Make sure to take necessary precautions such as properly ventilating the area and wearing appropriate protective gear. Follow all instructions carefully and avoid rushing through any steps. By taking these measures, you can ensure a safe and successful application process.
Now that you have gathered all necessary tools and materials, chosen a color scheme, and taken necessary safety precautions, it’s time to move on to choosing the right type of epoxy coating for your garage floor.
Choosing The Right Type Of Epoxy Coating
When it comes to choosing the right type of epoxy coating for your garage floor, durability is a key factor to consider. The primary function of an epoxy coating is to protect your concrete floor from damage caused by moisture, chemicals, and heavy foot traffic. Therefore, you should opt for an epoxy coating that has high resistance against these factors. A high-quality epoxy coating will not only keep your garage floor protected but also increase its lifespan.
Another important factor to consider when choosing an epoxy coating is color. Epoxy coatings come in a variety of colors, allowing you to customize the look of your garage floor according to your preferences. You can choose a color that matches the rest of your home’s decor or go for something bold and unique. It is important to note that not all epoxy coatings are created equal in terms of color retention. Some may fade or yellow over time, so make sure you choose a high-quality epoxy coating that guarantees long-lasting color.
In summary, when choosing the right type of epoxy coating for your garage floor, prioritize durability and color retention. Look for products that offer high resistance against moisture, chemicals and heavy foot traffic while providing long-lasting vibrant colors. A well-chosen epoxy coating will not only withstand daily wear and tear but also add aesthetic value to your garage space. In the next section, we will discuss how to prepare the surface for proper application of the chosen epoxy coating without compromising its quality and effectiveness.
Preparing The Surface For Epoxy Application
Surface preparation is one of the most important steps in applying garage floor epoxy. Proper surface preparation will ensure that the epoxy adheres well to the concrete and provides a long-lasting finish. The first step in surface preparation is to clean the floor thoroughly. This can be done by sweeping or vacuuming up any loose debris, then washing the floor with a degreaser.
After cleaning, it’s important to etch the concrete surface. This can be done using an acid-based etching solution, which will help to roughen up the surface and create small pores that allow the epoxy to grip onto the concrete better. Once you’ve applied the etching solution, rinse it off thoroughly with water and let it dry completely before moving on to the next step.
When it comes to epoxy application techniques, there are several methods you can use depending on your preferences and experience level. One popular technique involves using a roller or squeegee to apply a thin coat of epoxy onto the surface, making sure to work quickly and evenly so that you don’t miss any spots or leave behind streaks. Another technique involves using a spray gun or paint sprayer to cover larger areas more quickly and efficiently. Whatever method you choose, be sure to follow manufacturer instructions carefully and work in sections so that you don’t accidentally overlap coats or leave behind uneven spots.
Moving forward, filling in cracks and holes is an essential step before applying garage floor epoxy. This will help ensure that your new flooring has a smooth surface without any bumps or lumps that could affect its appearance or durability over time. There are various products available for filling cracks and holes in concrete surfaces, including specialized epoxies designed for this purpose. It’s important to choose a product that is suitable for your specific needs and follow manufacturer instructions carefully when applying it so that you achieve optimal results.
Filling In Cracks And Holes
Filling in Cracks and Holes is a crucial step in preparing your garage floor for epoxy application. The first thing to do when filling cracks and holes is to ensure that the surface is clean and dry. Any dirt, dust or debris will prevent the filler from adhering properly. Once the surface is clean, use a wire brush to remove any loose concrete around the crack or hole.
There are several Filling Techniques that you can use depending on the size of the crack or hole. For small cracks, you can use an epoxy or polyurethane injection kit. These kits come with everything you need to inject the filler into the crack and ensure it sets properly. For larger cracks and holes, you may need to use a cement-based filler that requires mixing before application.
Epoxy Color Options are vast, so you can choose colors that match your garage aesthetic or personal preference. When choosing an epoxy color, consider factors such as lighting conditions in your garage, how much natural light enters your space, and whether you want a glossy or matte finish. Remember that darker colors will absorb more heat than lighter colors, so if your garage gets hot during summer months, lighter colors may be a better choice.
Now that you have filled in all cracks and holes on your garage floor using appropriate Filling Techniques and chosen your desired Epoxy Color Options, it’s time to move onto cleaning the garage floor thoroughly before applying epoxy coating. This ensures proper adhesion of the epoxy coating to the floor surface without any hindrance caused by dirt or dust residues left on the surface after filling in all cavities on the floor’s surface.
Cleaning The Garage Floor Thoroughly
Before applying garage floor epoxy, it is crucial to clean the surface thoroughly. This step ensures that the epoxy adheres well and lasts longer. Cleaning garage floors might seem like a daunting task, but it is essential in ensuring an even coating of the epoxy.
There are different types of cleaners available for cleaning garage floors. However, not all cleaners work effectively on all surfaces. Therefore, it is recommended to choose a cleaner that suits your floor type. For example, if your floor has oil stains, you can opt for a degreaser to remove them effectively.
When cleaning the floor, best practices must be followed to ensure that the surface is free from any debris or dirt particles that could affect the bonding of the epoxy coating. Using a broom or vacuum cleaner to remove loose debris and dust is advisable before using any cleaner on the surface. Additionally, scrubbing with a stiff bristle brush and rinsing with water after using cleaners will help remove any remaining dirt and debris.
To apply an even coat of primer on your garage floor after cleaning it thoroughly, you need to follow specific instructions meticulously. The primer acts as a bonding agent between your cleaned garage floor and epoxy coating; thus, it’s crucial to apply it correctly for optimal results.
Applying The Primer Coat
The garage floor primer coat is an essential step in achieving a durable and long-lasting epoxy finish. The primer serves as a bonding agent between the concrete surface and the epoxy coating, ensuring that the coating adheres securely to the floor. To apply the garage floor primer, you will need a paint roller, paintbrush, and an extension pole.
Before applying the primer, it’s crucial to prep the garage floor surface thoroughly. Clean any debris or dust from the surface using a vacuum cleaner or broom. You should also remove any oil stains or grease spots with a degreaser before rinsing off with water. Once dry, use painter’s tape to protect walls and baseboards from any splatter of epoxy.
When you’re ready to apply the garage floor primer, start at the far end of your garage and work your way towards the exit point. Use a paint roller to apply an even layer of primer on all areas of your garage floor. Be sure to cover every inch of concrete surface for proper adhesion. After applying one coat, let it dry for at least 12 hours before proceeding with epoxy application techniques in the next section about mixing epoxy resin and hardener.
Mixing The Epoxy Resin And Hardener
As an experienced garage floor epoxy application expert, I know that the mixing process is a critical step in achieving a successful outcome. The right mixing techniques ensure that the resin and hardener are combined thoroughly, which guarantees that the epoxy will perform as expected. A poorly mixed batch of epoxy can result in uneven coverage or even failure of the coating.
To begin mixing, it’s crucial to wear appropriate personal protective equipment (PPE), including gloves and eye protection. Both the resin and hardener components must be measured precisely according to the manufacturer’s instructions. Once measured, pour both components into a clean mixing container and stir slowly but thoroughly for at least two minutes. Be sure to scrape the sides and bottom of the container during mixing to ensure complete incorporation.
One important safety precaution to keep in mind is that epoxy generates heat during the curing process, which means it can become hot while being mixed. To prevent overheating, avoid mixing large batches at once or over-mixing a single batch. Now that you’ve got your epoxy mixture ready let us move on to applying the first coat of epoxy on your garage floor surface!
Transition: With your freshly mixed batch of epoxy ready to go, it’s time to start applying your first coat evenly onto your garage floor surface.
Applying The First Epoxy Coat
After properly preparing the garage floor, it’s time to apply the first coat of epoxy. This is a crucial step in the process and requires careful attention to detail to ensure a successful outcome. Here are some tips and techniques to help you achieve the best results possible.
Firstly, be sure to mix the epoxy thoroughly before applying it. This will ensure that all of the components are evenly distributed, which is essential for proper curing. Use a drill with a mixing attachment or follow the manufacturer’s instructions for hand-mixing. One common mistake people make when mixing is not scraping the sides and bottom of the container during the process, which can result in incomplete mixing and uneven curing.
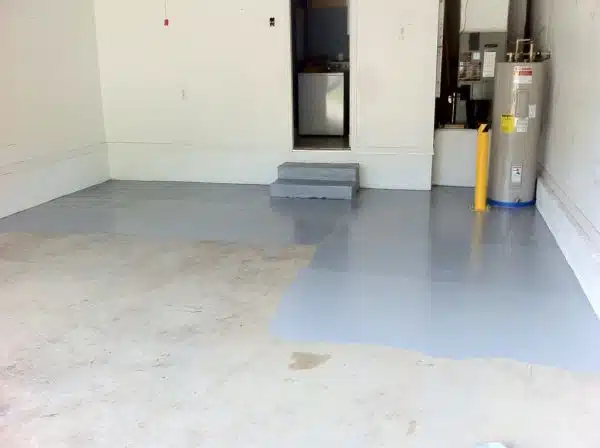
Secondly, use a roller or squeegee to apply the epoxy evenly over the entire surface of the garage floor. Start at one end of the room and work your way toward the other end, making sure to keep a wet edge as you go. A wet edge means that each section of epoxy should overlap slightly with the previous section while it’s still wet. Doing this will help prevent lap marks from forming on your garage floor surface.
When applying your first coat of epoxy, it’s important to pay attention to these common mistakes: not applying enough epoxy, applying too much epoxy in certain areas, or not working fast enough before it starts to dry. By following these tips and techniques and avoiding these common mistakes, you’ll be on your way to achieving a beautiful and durable garage floor surface that will last for years.
Next up is adding decorative flakes (optional), which can provide added texture and visual interest to your newly coated garage floor surface!
Adding Decorative Flakes (Optional)
Now that the first epoxy coat has been applied, it’s time to add some decorative flakes to give your garage floor a unique look. Using epoxy flakes for garage floor not only adds aesthetic appeal but also provides traction and helps hide any imperfections on the surface. These flakes come in various sizes and colors, allowing you to choose the right color palette for epoxy flakes that will complement your personal style.
When choosing the right color palette for epoxy flakes, consider the overall aesthetic of your garage and home. If you have a modern home with clean lines and minimalistic décor, neutral-toned flakes such as gray or beige would be a good choice. For those who prefer a bolder look, brighter colors such as blue or red can make a statement. You can also mix different colors to create a custom blend that matches your preferences.
To apply the flakes, sprinkle them onto the wet epoxy surface until it is fully covered. Use enough flakes to achieve your desired level of coverage but be mindful not to overdo it as this may affect how well they adhere to the surface. Once you’ve coated the entire area with flakes, allow them to dry overnight before proceeding with the next step of applying the second epoxy coat.
With an eye-catching finish now achieved through adding decorative flakes, it is time for applying the second epoxy coat. This step ensures durability and longevity of your garage floor while enhancing its appearance further.
Applying The Second Epoxy Coat
To achieve a smooth and durable finish for your garage floor, applying a second coat of epoxy is essential. It not only increases the thickness of the coating but also enhances the aesthetic appeal of your space. To ensure that your second coat application is successful, here are some tips and techniques to follow.
Firstly, before starting with the second coat application, ensure that the first coat has completely cured. This usually takes about 24 hours. If you apply the second coat before the first one has cured, it may lead to bubbling and peeling off. Additionally, make sure that you have all the necessary equipment ready, including a mixing bucket, drill mixer attachment, roller frame and cover, and a squeegee.
Secondly, when mixing the epoxy for the second coat application, use clean buckets and mixers to avoid contamination from any debris or dust particles. Stir slowly to avoid creating bubbles in the mixture. Apply the epoxy in thin layers using a roller or squeegee to achieve an even spread. Repeat until you have covered all areas that require coating.
Lastly, once you have applied the second coat of epoxy evenly across your garage floor surface, let it cure for another 24-48 hours before walking or driving on it to avoid damage. During this period, maintain stable temperatures between 60°F-80°F (15°C-27°C) and humidity levels below 70% for optimal curing results.
With these tips and techniques in mind, applying a second layer of epoxy on your garage floor will be seamless and effective in creating a long-lasting finish that will improve its durability and aesthetic appeal without breaking a sweat. Now that we’ve covered how to apply both coats let’s move on to letting the epoxy cure properly without damaging it further.
Letting The Epoxy Cure
After applying the garage floor epoxy, it is important to let it cure properly. This process can take anywhere from 24-72 hours depending on the specific product used and environmental conditions such as temperature and humidity. It is crucial to follow the manufacturer’s instructions regarding curing time as well as any additional tips they may provide for optimal results.
One common mistake that people make when applying garage floor epoxy is not allowing enough time for it to cure. Rushing this step can lead to a subpar finish and decrease the longevity of the coating. Additionally, some people may be tempted to use their newly coated garage floor before it has fully cured. This can also harm the final result by causing scratches or other damage to the surface.
To ensure a successful garage floor epoxy application, here are a few tips for letting it cure properly: avoid walking or driving on the surface until it has completely hardened, maintain proper ventilation in the area during curing, and monitor environmental conditions like temperature and humidity. By being patient during this step, you will end up with a durable and long-lasting coating that will protect your garage floor for years to come.
As mentioned earlier, after allowing time for proper curing of your garage floor epoxy, you have an optional step which is applying a topcoat. This additional layer provides extra protection against abrasions and other forms of wear and tear. The topcoat should be applied according to manufacturer instructions just like the initial coat of epoxy. With both coats applied correctly, your garage floor will look great and be able to withstand even heavy usage without showing signs of damage anytime soon.
Applying A Topcoat (Optional)
Now that the epoxy has cured, it’s time to consider a topcoat. Before doing so, it is important to understand the benefits of applying a topcoat. Firstly, topcoats provide an extra layer of protection against scratches and abrasions. They also enhance the gloss and appearance of the floor while making it easier to clean. Furthermore, some topcoats have anti-slip properties which can be essential in garage environments where oil spills are common.
When applying a topcoat, ensure that the surface is clean and free from debris or dust. It is recommended to use a high-quality roller with a long nap for even application. Start at one end of the garage and work your way towards the other end, taking care not to overlap areas already coated. Apply two coats for optimal results, allowing each coat to dry completely before adding another layer.
Topcoat application techniques can vary depending on the type of product used, so always refer to manufacturer instructions for best results. Remember that proper preparation and application are crucial for achieving a durable and long-lasting finish.
Next up: maintenance tips for your newly coated garage floor.
Maintenance Tips For Your Newly Coated Garage Floor
As the saying goes, “prevention is better than cure”, maintaining your newly coated garage floor is a crucial step to ensure its long term durability and cost-effective maintenance. After investing in a garage floor epoxy coating, it’s important to keep it looking new by preventing stains and maintaining shine. Here are some tips to help you maintain your newly coated garage floor.
To prevent stains, make sure to clean up any spills immediately. Use a soft-bristled brush or mop with warm water and mild soap to gently scrub the area. Avoid using harsh chemicals or abrasive cleaning tools that may damage the epoxy coating. If you notice any stubborn stains, use a non-abrasive cleaner specifically designed for epoxy floors.
Maintaining shine on your garage floor is easy with regular cleaning and waxing. Sweep or vacuum regularly to remove dirt and debris that may scratch the surface. Then, use a high-quality wax designed for epoxy floors to protect against wear and tear. Apply the wax following the manufacturer’s instructions and allow it to dry completely before walking or driving on it.
By following these maintenance tips, you can extend the life of your garage floor epoxy coating while keeping it looking good as new. Preventing stains and maintaining shine will not only improve the appearance of your garage but also save you money in costly repairs in the long run.
Conclusion
In conclusion, applying garage floor epoxy can be a time-consuming process, but the benefits are well worth the effort. A properly coated garage floor not only looks great, but it also provides added protection against spills, stains, and wear and tear. By assessing your garage floor’s condition, gathering the necessary tools and materials, choosing the right type of epoxy coating, preparing the surface properly, and following the application instructions carefully, you can achieve a professional-grade finish that will last for years to come.
As an expert in garage floor epoxy application, I cannot stress enough the importance of proper maintenance after your garage floor has been coated. Regular cleaning with a non-abrasive cleaner is essential to maintaining its durability and appearance. Additionally, avoid using harsh chemicals or heavy equipment on your newly coated surface as this can damage the finish. With proper care and maintenance, your newly coated garage floor will provide you with many years of reliable service while enhancing the overall look and feel of your space.
Image Credits
- “Mid-project on applying Rustoleum epoxy to the garage floor of our new house” by California Harts (featured)

