As a plumbing maintenance expert, one of the most common issues I come across is a malfunctioning faucet aerator. Aerator replacement is a simple and cost-effective solution to improve water flow and conserve water usage. In this article, I will provide step-by-step instructions on how to replace a faucet aerator.
Faucet aerators are small attachments at the end of the faucet spout that mix air with water to reduce splashing and increase water pressure. Over time, mineral deposits can build up and cause the aerator to clog or restrict water flow. Replacing a faucet aerator can be done in just a few minutes with basic tools and without the need for professional assistance. By following these simple steps, you can save money on your water bill while ensuring efficient usage of your home’s plumbing system.
Understanding Faucet Aerators
Understanding faucet aerators is crucial for anyone who wants to maintain the optimal performance of their plumbing fixtures. Faucet aerators are small devices that attach to the end of a faucet’s spout, and they are designed to control the flow of water while reducing splashing and conserving water. These attachments have a mesh screen that filters out impurities from the water, making it healthier and safer for use.
One of the benefits of aerator replacement is that it can save you money on your water bill. By controlling the flow rate, an aerator can help reduce overall water consumption, which translates into lower utility costs at the end of each month. Moreover, replacing a faucet aerator is an easy and cost-effective way to improve your home’s energy efficiency without sacrificing performance or style.
The importance of understanding faucet aerators cannot be overstated. Replacing your old or damaged aerator with a new one will not only ensure optimum performance but also help conserve natural resources. So if you’re looking for an affordable and straightforward way to enhance your plumbing system’s functionality, consider replacing your faucet aerator today! In the next section, we will discuss some signs that indicate when it’s time to replace your faucet aerator.
Signs That Your Faucet Aerator Needs Replacing
Identifying when your faucet aerator needs to be replaced is an essential aspect of maintaining a functional plumbing system. One of the most common problems associated with a faucet aerator that requires replacing is low water pressure. When this occurs, it may indicate that there is a buildup of mineral deposits or debris within the aerator that prevents water from flowing through efficiently. Another sign that it’s time for a replacement is if you notice that water is spraying out in different directions rather than in a steady stream.
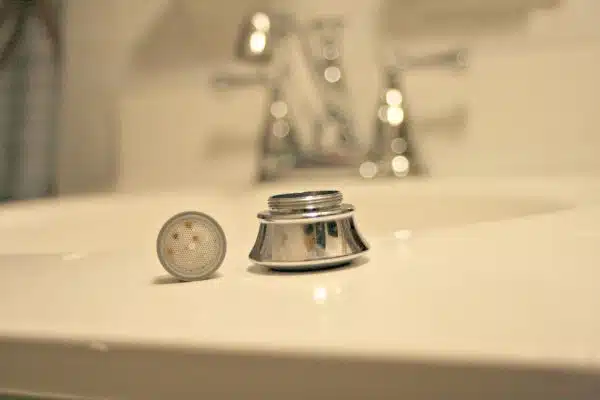
Fortunately, many DIY solutions can help you fix these common problems with your faucet aerator. The first step is to unscrew the aerator from the faucet using pliers while being careful not to damage any surrounding fixtures. Once removed, soak the aerator in vinegar or CLR for several hours to break down and dissolve any mineral buildup or debris inside. After soaking, rinse thoroughly with warm water and reattach it to the faucet head.
In conclusion, identifying signs that your faucet aerator needs replacing and performing DIY solutions are crucial steps toward maintaining a well-functioning plumbing system. By taking these simple steps, you can avoid costly repairs and ensure optimal water flow throughout your home. In the next section, we will discuss the tools required for replacing a faucet aerator so that you can perform this task with ease and efficiency.
Tools Required For Replacing A Faucet Aerator
When replacing a faucet aerator, it is important to have the necessary tools on hand. The most essential tool for this job is a pair of pliers. These will be used to unscrew the old aerator from the faucet spout. Other tools that may come in handy include an adjustable wrench or channel locks to help loosen stubborn aerators, and a cloth or rag to protect your hands while working.
Aerator compatibility is another key consideration when replacing a faucet aerator. There are many different sizes and styles of aerators available, so it’s important to make sure you choose one that is compatible with your faucet model. Before purchasing a new aerator, check the manufacturer’s instructions or consult with a plumbing professional to ensure that you get the correct size and style for your specific needs.
Necessary precautions should also be taken before beginning any work on your plumbing system. Make sure that you turn off the water supply to your sink before attempting to remove the old aerator. This will prevent any water from spraying out unexpectedly and causing damage or injury. Additionally, be careful when handling sharp metal parts like pliers or wrenches, as they can easily cause cuts or injuries if not handled properly.
Transition into subsequent section: Now that you have gathered all necessary tools and taken necessary precautions, it’s time to prepare for the replacement procedure by removing the old aerator.
Preparing For The Replacement Procedure
- For an effective replacement of the faucet aerator, the necessary tools must first be gathered, such as a basin wrench, pliers, and a slot screwdriver.
- Subsequently, the water supply to the faucet should be shut off to prevent any accidental flooding.
- The faucet aerator should then be removed and cleaned before proceeding with the replacement procedure.
- The aerator should be unscrewed from the faucet using the appropriate tools.
- Once the aerator has been unscrewed, it should be placed in a bucket of warm soapy water and left to soak for a few minutes.
- After a few minutes, the aerator should be removed from the soapy water, wiped clean, and set aside until ready for installation.
Gather Necessary Tools
To properly replace a faucet aerator, it is crucial to gather the necessary tools for the procedure. As a plumbing maintenance expert, I recommend selecting appropriate tools such as pliers, channel locks, Teflon tape and a cloth or rag. These tools will ensure an efficient and successful replacement of the faucet aerator.
When selecting pliers for this task, it is important to choose ones that are adjustable to fit different sizes of nuts or bolts. Channel locks are also useful in gripping onto difficult-to-reach areas. Teflon tape is crucial in sealing any gaps between parts and ensuring a leak-free installation. Lastly, a cloth or rag can be used to clean any debris or sediment from the area before starting the replacement procedure.
Common mistakes to avoid when gathering necessary tools include using incorrect sized pliers or channel locks which can damage parts during removal or installation. Additionally, forgetting to use Teflon tape can result in leaks after installation. Proper preparation and tool selection can save time and money by avoiding these mistakes.
By taking the time to gather appropriate tools and avoiding common mistakes in preparation, you are well on your way towards successfully replacing your faucet aerator. Remember that proper preparation is key for any plumbing maintenance task.
Turn Off Water Supply
One crucial step in preparing for the replacement procedure of a faucet aerator is shutting off and draining the water supply. This step ensures that there is no water flow during the replacement, preventing any potential damage or leaks. As a plumbing maintenance expert, I recommend turning off the main water supply valve to the house or building before starting the replacement process. Once turned off, turn on the faucet to drain any remaining water from the pipes.
After successfully draining the water from pipes, it is important to check for any leaks around the area where the faucet aerator will be replaced. This can be done by turning on a nearby faucet or checking for any visible moisture around pipes and connections. It is crucial to address any leaks before proceeding with the replacement process as they can cause further damage or complications.
In conclusion, shutting off and draining water supply before replacing a faucet aerator is an essential preparation step that must not be skipped. Checking for leaks in nearby pipes and connections ensures a smooth replacement process without future complications. As a plumbing maintenance expert, I highly recommend taking these steps before proceeding with any plumbing maintenance task involving faucets or other fixtures.
Clean Faucet Aerator
Another important step in preparing for the replacement procedure of a faucet aerator is to clean the existing aerator before replacing it. The buildup of mineral deposits and debris can affect the aerator’s performance and reduce water flow, leading to unnecessary expenses on water bills. As a plumbing maintenance expert, I recommend cleaning the aerator using appropriate cleaning methods such as soaking it in vinegar or using a toothbrush to scrub off any stubborn buildup.
Cleaning the faucet aerator not only improves its performance but also provides other benefits. A clean aerator helps to maintain good water quality by filtering out sediment, rust, and other contaminants that may be present in the water supply. It also reduces the risk of clogging and prolongs the lifespan of the faucet by preventing corrosion caused by mineral buildup.
In conclusion, cleaning an existing faucet aerator before replacing it is an essential step that should not be overlooked. Using appropriate cleaning methods not only improves its performance but also provides other benefits such as maintaining good water quality and prolonging its lifespan. As a plumbing maintenance expert, I highly recommend taking these steps before proceeding with any plumbing maintenance task involving faucets or other fixtures.
Removing The Old Aerator
Imagine a clogged drain is like a traffic jam. Just as cars can’t move freely on congested roads, water flow can be restricted by debris buildup in a faucet aerator. Aerator removal is the only solution to restore smooth water flow. However, it’s important to remove the old aerator correctly to avoid damaging the faucet.
Before attempting to remove the aerator, ensure that you have turned off the water supply. Otherwise, you might end up with an unexpected fountain of water splashing around your sink area. To remove the aerator, you can try different techniques depending on how tightly it’s screwed in place. If it’s not too tight, grip its sides firmly with your fingers and turn it counterclockwise until it comes off. If this doesn’t work and you’re worried about damaging the threads or scratching the chrome plating on your faucet, wrap a rubber band around its edges for better grip or use pliers covered with masking tape.
Another technique is using a wrench specifically designed for removing stubborn aerators. This tool fits over the outside of the aerator and provides leverage to unscrew it without exerting too much force that could damage your faucet. Once you’ve successfully removed the old aerator, inspect its condition for any damage or corrosion that may have caused poor water flow and decide whether it needs replacing altogether.
Now that you’ve successfully removed your old aerator without causing any damage to your plumbing fixtures, let’s move onto identifying what type of replacement aerator is best suited for your faucet model and size in our subsequent section about identifying correct replacement aerators.
Identifying The Correct Replacement Aerator
After successfully removing the old aerator, the next step is to choose and install a new one. Aerator sizes vary depending on the faucet type and manufacturer. To ensure that you choose the correct size, measure the diameter of your faucet spout before heading to the store. Keep in mind that aerators come in both male and female threads, so it is important to check which type your faucet requires.
When choosing a replacement aerator, consider different types available in the market. Standard aerators are designed to reduce water flow while still maintaining adequate pressure. Low-flow aerators are ideal for those who want to conserve water and save on utility bills. These aerators have a lower flow rate than standard ones, but they still provide sufficient pressure. If you live in an area with hard water, consider purchasing a laminar flow aerator to prevent mineral buildup.
Once you have measured your faucet spout and selected a suitable replacement aerator, it’s time to install it. Remember to apply plumber’s tape around the threads of the new aerator before screwing it onto the faucet spout. This will prevent leaks and ensure a tight seal. Use pliers or a wrench if necessary to tighten the aerator securely onto the spout without over-tightening it. With these steps completed, you can now enjoy better water efficiency and pressure from your newly installed aerator!
Installing The New Aerator
Now that you have removed the old aerator, it is time to install the new one. This section will guide you on how to properly install the new aerator on your faucet to avoid potential issues in the future.
Firstly, before installing the new aerator, make sure to clean the threaded area of the faucet spout thoroughly. Proper cleaning of this area ensures that no debris or mineral buildup interferes with a proper fit and installation of the new aerator. Use a soft brush and mild detergent to clean this area.
Secondly, ensure that you are using the correct size and type of aerator for your faucet model. Refer to your manufacturer’s instructions or seek professional plumbing advice if unsure. Installing an incorrect size or type of aerator can cause potential issues such as leaks or reduced water flow.
Lastly, when installing the new aerator, hand tighten it firmly onto the threaded area of the faucet spout until snug. Do not over-tighten as this can damage both the aerator and faucet spout threads. Once installed, turn on your tap water and check for any leaks around the base of the aerator.
Now that we have installed your new aerator onto your faucet spout correctly, let us move on to tightening it securely without causing any damages.
Tightening The Aerator
After removing the aerator, you will need to reinstall it and make sure that it is tight enough. The aerator should be screwed back on clockwise until it is snugly in place. However, it is important not to over-tighten the aerator as this can cause damage to the threads or even break the aerator.
One common mistake made when tightening the aerator is using too much force. This can result in a stripped thread, making it difficult to replace or remove the aerator in the future. Another mistake is not using proper lubrication when reinstalling the aerator. A small amount of plumber’s grease or silicone lubricant should be applied to the threads before screwing on the aerator. This helps prevent corrosion and makes future removal easier.
Proper lubrication and careful tightening are essential for ensuring that your faucet operates effectively and efficiently. Once you have tightened the aerator, turn on your faucet and check for any leaks around the base of the spout or from underneath the sink. If there are no leaks, you can move on to testing water flow, which we will discuss in more detail in the next section.
Testing The Water Flow
The rush of water filling the sink can be a satisfying sound, but low water pressure can be frustrating. After replacing the faucet aerator, it’s important to test the water flow to ensure that it is working correctly. The flow rate of water is measured in gallons per minute (GPM) and can vary depending on the type of faucet or showerhead being used.
To test the water pressure, turn on the hot and cold water at full blast and place a measuring cup under the faucet. Time how long it takes to fill up one cup with water. A standard flow rate should be around 2.5 GPM for kitchen faucets and 1.5 GPM for bathroom faucets. If the flow rate is lower than this, there may still be some debris clogging the aerator or other parts of the faucet that need to be cleaned.
If you have tested the water pressure and are still experiencing low flow rates, there may be other issues with your plumbing system that need attention. Troubleshooting common issues like clogged pipes, leaks, or faulty valves can help restore your home’s plumbing system back to its optimal performance. It’s important to address any plumbing issues promptly as they can lead to costly repairs down the road if left unchecked.
Troubleshooting Common Issues
After testing the water flow, it’s time to move on to the next step of faucet maintenance: replacing the aerator. Common aerator problems include low water pressure, splashing, and sputtering. Fortunately, troubleshooting these issues is relatively simple and can be done without having to call in a professional.
Firstly, if you’re experiencing low water pressure, try removing and cleaning the aerator. Sediment buildup can restrict water flow through the aerator, causing a decrease in pressure. If cleaning doesn’t solve the problem, check for any leaks or obstructions in the pipes leading up to the faucet. Additionally, make sure that all shut-off valves are fully open.
Splashing and sputtering can also be caused by clogs in the aerator. Remove and clean the component thoroughly with vinegar or a descaling solution. If this doesn’t work, check for any blockages in other parts of your plumbing system or consider installing a new aerator altogether. By following these troubleshooting tips, you’ll be able to maintain a steady stream of water and keep your faucet functioning smoothly.
Now that you’ve successfully replaced your old aerator with a new one, it’s important to maintain it properly in order to avoid future issues. Regular cleaning with vinegar or descaling solution is recommended to prevent sediment buildup and ensure optimal water flow. It’s also a good idea to periodically inspect all components of your plumbing system for leaks or signs of wear and tear. With these simple steps, you can prolong the life of your new aerator and enjoy trouble-free faucet operation for years to come.
Maintaining Your New Aerator
- Cleaning your aerator regularly is essential to ensure it continues to work efficiently and effectively.
- To clean, the aerator should be removed from the faucet, and any debris or build-up should be removed with a soft-bristled brush.
- If necessary, a vinegar and water solution can be used to dissolve any mineral deposits that may have collected on the aerator.
- Once the aerator has been cleaned, it should be reinstalled and checked for proper operation.
Cleaning
As a plumbing maintenance expert, I understand the importance of maintaining your new aerator. Not only does it help extend the lifespan of your faucet and aerator, but it also ensures that you have clean and safe water to use. That being said, cleaning is one of the most crucial parts of maintaining your new aerator.
To ensure that your new aerator remains in good condition, it is essential to use the best cleaning techniques. Some of the most common cleaning mistakes include using harsh chemicals or abrasive materials on the aerator. Instead, opt for gentle soap and water solutions or vinegar and baking soda mixtures. These will help remove any buildup without causing damage to the aerator itself.
In conclusion, cleaning your new faucet aerator is an essential aspect of maintaining its functionality. By utilizing the best cleaning techniques and avoiding common mistakes, you can ensure that your aerator remains in good condition for years to come. Remember to be gentle with your cleaning methods to avoid any unnecessary damage to the aerator itself.
Debris Removal
As a plumbing maintenance expert, I cannot stress enough the importance of maintaining your new aerator. One of the most vital aspects of this maintenance is debris removal. Over time, minerals and sediment can accumulate in your aerator, causing blockages that can lead to reduced water flow or even complete blockage.
To prevent such issues, it is crucial to remove any debris from your aerator regularly. One effective way to do this is by using a toothbrush or small brush to gently scrub away any buildup. Additionally, you can soak the aerator in vinegar overnight to dissolve any mineral deposits.
Prevention measures are also essential when it comes to debris removal. Using a mesh screen over your faucet can help catch larger particles before they have a chance to enter your aerator. Also, regularly cleaning out sink strainers and shower drain covers can help prevent debris from entering your plumbing system in the first place.
In summary, maintaining your new aerator requires regular debris removal to ensure optimal functionality. By utilizing proper cleaning techniques and prevention measures such as using mesh screens and cleaning sink strainers, you can extend the lifespan of your aerator while enjoying clean and safe water usage.
Importance Of Regular Cleaning
Metaphorically speaking, your faucet is the heart of your plumbing system. It pumps clean water into your home and expels dirty water out. However, just like any other vital organ, the faucet requires regular maintenance to ensure its proper functioning. Neglecting to clean your faucet aerator can cause a buildup of mineral deposits, bacteria growth, and even corrosion. Therefore, it is crucial to understand the importance of regular cleaning.
Regular maintenance ensures that your faucet operates at optimal performance levels. By cleaning your aerator regularly, you prevent mineral buildup that can reduce water flow and cause leaks. Furthermore, maintaining a clean aerator promotes healthy indoor air quality by preventing the growth of harmful bacteria in stagnant water.
Benefits of regular cleaning extend beyond functionality and safety concerns. As a homeowner or renter, you will appreciate long-term cost savings by avoiding potential repairs caused by neglecting proper maintenance. Hiring professional plumbers for repairs can be expensive and time-consuming; however, with regular faucet aerator cleaning as part of your home maintenance routine, you can avoid such costs altogether.
By understanding the importance of regular cleaning for your faucet aerator, you are better equipped to maintain a healthy living environment while saving money in the long run. In the subsequent section, we will discuss the benefits of replacing your faucet aerator entirely and how easy it is to do so on your own without professional assistance.
Benefits Of Replacing Your Faucet Aerator
Regular cleaning of your faucet aerator is crucial to ensure that it functions properly. However, maintenance does not end there. Replacing your faucet aerator has many benefits beyond just keeping it clean. One of the most significant benefits is cost-effectiveness. A new faucet aerator can save you money on your water bill and even prevent costly plumbing repairs.
Replacing your faucet aerator can be a relatively inexpensive way to conserve water in your home or workplace. This simple fix can reduce the amount of water that flows through the faucet, without sacrificing pressure or performance. This means less water usage, which will result in lower monthly bills. Additionally, by conserving water, you are also helping the environment by reducing your carbon footprint.
If you neglect to replace your faucet aerator when necessary, it can lead to costly plumbing repairs down the line. Over time, mineral deposits build up inside the aerator and can cause blockages or leaks that require professional attention. By replacing your faucet aerator regularly, you can avoid these issues altogether and save yourself a lot of money in the long run.
In summary, regular maintenance of your faucet aerator is essential for proper function and cleanliness; however, replacing it offers many benefits beyond just upkeep. By conserving water and saving money on monthly bills while avoiding costly plumbing repairs down the line, replacing your faucet aerator is a smart investment for any homeowner or business owner alike. The next section will discuss how to avoid these costly plumbing repairs in more detail.
Avoiding Costly Plumbing Repairs
Despite the many benefits of plumbing systems, repairs can be quite costly. The good news is that there are preventative maintenance measures that can help avoid these expenses. Regularly inspecting your plumbing system and fixing small issues early on can prevent major problems from occurring down the line.
Here are three DIY solutions to consider for preventing costly plumbing repairs:
- Clean your drains regularly: Over time, debris and other materials can accumulate in your drains, causing blockages and clogs. To avoid this, use a drain cleaner or snake to remove any buildup before it becomes a larger issue.
- Check for leaks: Even small leaks can cause extensive damage over time. Check all of your pipes and faucets regularly to ensure they are not leaking, and make repairs as necessary.
- Replace old fixtures: Old fixtures such as faucets, showerheads, and toilets may be inefficient or prone to leaks. Replacing them with newer models can save you money on water bills and prevent future repair costs.
By taking these steps and staying proactive about maintaining your plumbing system, you can save yourself a lot of money in the long run. Preventative maintenance is always less expensive than major repairs or replacements.
In summary, avoiding costly plumbing repairs requires a bit of effort but can pay off in the end. With regular inspections, cleaning, and fixture updates, you can keep your system running smoothly for years to come. In the next section, we’ll provide some final thoughts and tips for success in maintaining your plumbing system.
Final Thoughts And Tips For Success
Having discussed the importance of avoiding costly plumbing repairs, we will now move on to the topic of replacing a faucet aerator. This is a simple and effective way to improve water flow and reduce the amount of water used in your home. However, it is important to do it correctly in order to avoid making common mistakes that can lead to further plumbing problems.
Firstly, it is essential to know how to remove the old aerator before installing a new one. The most common method involves using pliers or a wrench to unscrew the aerator from the faucet spout. It is important to be gentle while doing this, as too much force can damage the faucet and cause leaks. Once removed, inspect the aerator for any debris or mineral buildup that may have accumulated over time.
Next, choosing the right replacement aerator is crucial for maintaining an efficient and functional faucet. There are different types of aerators available with varying flow rates and thread sizes that fit specific faucets. It is recommended to bring the old aerator with you when purchasing a new one in order to ensure compatibility. Furthermore, regular cleaning and maintenance of the new aerator will prolong its lifespan and prevent blockages.
In summary, replacing a faucet aerator can be an easy DIY task that improves water efficiency and reduces costs in the long run. Following these tips for maintenance and avoiding common mistakes will ensure success in achieving optimal results for your plumbing system.
Conclusion
Faucet aerators are essential components of your plumbing system that help to reduce water consumption and save you money on utility bills. Over time, they can become clogged with mineral deposits, dirt, or debris that affect their functionality. If you notice decreased water pressure or irregular spray patterns from your faucet, it may be time to replace the aerator.
To replace the aerator, you will need a few basic tools and a little bit of know-how. This article has outlined the necessary steps to guide you through the process of replacing your faucet aerator successfully. Regular cleaning and maintenance of your aerator can also go a long way in preventing costly plumbing repairs down the line.
In conclusion, as a plumbing maintenance expert, I recommend that homeowners pay close attention to their faucet aerators’ condition to ensure optimal performance. By following the steps outlined in this guide and regularly maintaining your faucets, you can avoid expensive repairs and conserve water usage in the household. Remember, prevention is always better than cure when it comes to plumbing issues. So don’t hesitate to take action today and replace your faucet aerator for better water conservation and efficiency!
Image Credits
- “Faucet Aerator” by HomeSpot HQ (featured)
















![How To Replace A Bathtub Drain In A Mobile Home 26 2/365 [Bathtub Drain]](https://green-life.blog/wp-content/uploads/2023/05/3ft8KAJsNnjq-150x150.jpg.webp)


