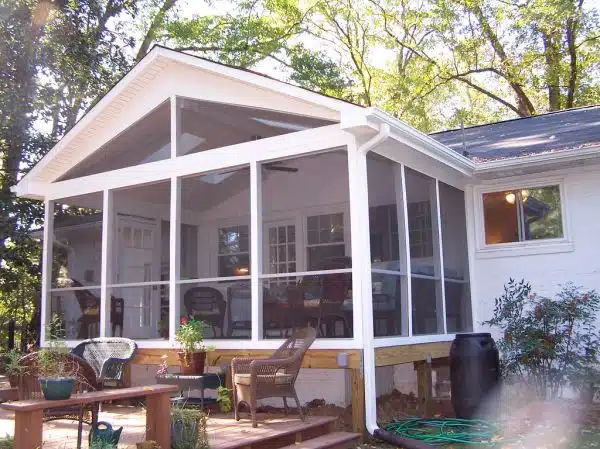
A screened-in porch is a great addition to any home, providing a comfortable outdoor space that’s protected from the elements and bugs. Building one from scratch may seem like a daunting task, but with the right tools and knowledge, it can be a satisfying DIY project. In this article, we’ll go over the steps involved in building a screened-in porch from scratch, including choosing the right location, materials, and design.
Before you begin building your screened-in porch, it’s important to have a clear idea of what you want and need from the space. Consider factors such as size, location, orientation, and functionality. You’ll also need to decide on the type of screening material you want to use and whether or not you want to include additional features such as lighting or ceiling fans. With careful planning and attention to detail, you can build a beautiful and functional screened-in porch that will enhance your home’s outdoor living space for years to come.
Tools And Materials Needed
When building a screened-in porch from scratch, it’s important to have the necessary tools and materials on hand. Some essential tools for this project include a circular saw, drill, hammer, level, measuring tape, and framing square. Other helpful tools may include a power miter saw, jigsaw, and reciprocating saw. When it comes to materials, you’ll need pressure-treated lumber for the frame and deck boards. Additionally, you’ll need screening material such as fiberglass or aluminum mesh and fasteners like screws and nails.
Choosing materials is an important part of any construction project. Pressure-treated lumber is recommended for outdoor projects because it resists rotting and insect damage. When selecting screening material, consider how much sunlight exposure your porch will receive and choose accordingly. Fiberglass offers better visibility but can deteriorate in direct sunlight while aluminum mesh is more durable but can be harder to see through.
Safety precautions should also be taken when working on this project. Wear safety glasses when cutting wood or using power tools to protect your eyes from flying debris. Take care when using ladders or scaffolding to avoid falls or injury. Finally, make sure all electrical equipment is grounded properly before use to prevent electric shock injuries. Taking these precautions will help ensure a safe and successful construction project.
When choosing the right location for your screened-in porch build, there are several factors to consider such as accessibility from your home’s interior and exterior spaces, privacy concerns, views of nature or other surroundings, zoning regulations that may affect placement options available near property lines or utility easements – all of which depend on what kind of experience you want from your finished space!
Choosing The Right Location
To ensure that your screened-in porch is a comfortable and inviting place, choosing the right location is crucial. The best locations for a screened-in porch are those that offer privacy, shade, and protection from the elements. You may want to consider placing your porch on the side of your home that receives the least amount of sun exposure, or in an area that has a natural canopy from trees.
Another important factor to consider when selecting a location for your screened-in porch is its proximity to other outdoor living spaces. For instance, you may want to place it near your patio or deck to create a seamless transition between indoor and outdoor living. Additionally, you should think about how you plan to use your porch. Will it be primarily used for dining and entertaining guests? Or will it be a quiet space for reading and relaxing? Answering these questions will help you determine the best location for your new addition.
When considering location considerations, it’s also important to take into account any local building codes or regulations in your area. Obtaining permits and following building codes can be time-consuming but necessary steps in ensuring that your new screened-in porch meets all safety requirements. In the next section, we’ll discuss obtaining permits and building codes in more detail so you can move forward with confidence in creating the perfect outdoor retreat.
Obtaining Permits And Building Codes
To ensure that your screened-in porch is built to code, you must first obtain the necessary permits. The permit process can vary depending on your location and the specific regulations in place for construction projects. It’s important to research the requirements in your area before beginning any work.
In addition to obtaining permits, it’s essential to follow building regulations when constructing your screened-in porch. Building codes are in place to ensure safety and structural integrity, so it’s crucial to adhere to them throughout the building process. Failure to comply with these regulations can result in fines or even legal action.
Before you start building, take the time to familiarize yourself with the permit process and building codes in your area. This will help ensure a smooth construction process and that your screened-in porch meets all necessary requirements. Once you have obtained the proper permits and followed all relevant regulations, you can move on to designing your dream outdoor space.
Designing Your Screened-In Porch
Once you have decided to build a screened-in porch, the next step is to start designing it. One of the first things to consider is the color scheme of your porch. You want to choose colors that complement the exterior of your home and create a cohesive look. Neutrals like beige, gray, and white are classic choices that can work well with any style of home. If you prefer something bolder, consider using bright colors in small doses for accents.
Another important consideration when designing your screened-in porch is furniture options. The type of furniture you choose will depend on how you plan to use the space. If you want a space for relaxation and reading, consider adding comfortable seating like soft chairs or a rocking chair. On the other hand, if you plan on using your porch for entertaining guests, opt for more seating options such as a dining table or bar stools.
Ultimately, designing your screened-in porch should be an enjoyable process that reflects your personal style and needs. Take time to think about what elements are important to you and how they can be incorporated into your design. Once you have settled on a general concept for your porch, it may be helpful to create a blueprint or plan before moving forward with construction. This will ensure that all aspects of the design are accounted for and executed properly.
Creating A Blueprint Or Plan
After spending countless hours designing your perfect screened-in porch, it’s now time to bring that vision to life. The next step in this process is creating a blueprint or plan for your project. While some may view this as a tedious and unnecessary step, it is truly the foundation of any successful build.
Firstly, start by measuring the area where you plan to build your porch. This will allow you to create an accurate layout that takes into consideration any potential obstructions, such as trees or uneven terrain. Once you have a general idea of the space available, begin sketching out different design options that incorporate your desired features.
After finalizing your blueprint design, it’s time to select the appropriate materials for your project. Consider factors such as durability, weather resistance, and aesthetic appeal when choosing materials for your screened-in porch. Some popular material options include pressure-treated wood, vinyl-coated aluminum framing systems, and fiberglass screens. With careful selection and planning, you can ensure that the materials used in construction are both functional and visually appealing.
Now that you have a solid blueprint design and materials list in place, it’s time to move on to preparing the site and foundation for construction. By following these guidelines and taking care during each step of the process, you’ll be well on your way to enjoying a beautiful new screened-in porch in no time.
Preparing The Site And Foundation
Site preparation is crucial for building a screened-in porch from scratch. First, you need to determine the location of your porch and ensure it complies with local building codes. Next, clear the site of any debris or vegetation that may hinder the construction process. You should also level the ground to create a stable foundation for your porch.
After site preparation, the next step is foundation construction. The most common types of foundations are pier and beam or concrete slab. The type of foundation you choose will depend on your budget, soil type, and local building codes. If using pier and beam foundation, dig holes for each pier and pour concrete into them before attaching beams between the piers. For a concrete slab foundation, excavate the area to be covered by the slab, lay down gravel or crushed stone for drainage, then pour concrete.
Proper site preparation and foundation construction are critical steps in building a screened-in porch that will last for years to come. Neglecting these steps can result in an unstable structure that may not meet local building codes. With a solid foundation in place, you can move on to framing and building the structure with confidence knowing that your porch has a sturdy base to support it.
Framing And Building The Structure
Your screened-in porch is a haven where you can relax and enjoy the outdoors without worrying about pesky bugs. But before you can bask in your own private hideaway, you must first frame and build the structure. Think of this stage as laying the foundation for your safe haven.
When it comes to building techniques, there are several methods to choose from depending on your skill level and budget. One popular option is using pressure-treated lumber for framing since it resists decay and insects. Structural considerations should also be factored in when deciding on a design plan, such as footings that will support the weight of your porch.
Once you have determined your framing strategy, it’s time to start building. This process involves measuring and cutting each piece of wood accurately so that they fit together seamlessly. Then, nail or screw them into place to create a sturdy framework that will support the weight of future additions like walls and roofs. With proper planning and execution, framing and building the structure of your screened-in porch can be an enjoyable task that sets the stage for a relaxing retreat.
Transitioning into installing the roof requires careful consideration of material choices, design plans, and weatherproofing techniques. By taking these factors into account during framing and building, you’ll ensure a smooth installation process that will result in a beautiful porch that will provide years of enjoyment.
Installing The Roof
To complete the screened-in porch, it’s essential to install the roof. There are many roofing materials available on the market, such as asphalt shingles, metal roofing, and clay tiles. Each has its advantages and disadvantages, so consider your budget, local climate conditions, and personal preferences before making a decision.
In terms of ventilation options for your porch’s roof, you can opt for a ridge vent or an exhaust fan. A ridge vent is a passive ventilation system that allows hot air to escape from the top of the roof while drawing in cool air from below. An exhaust fan is an active ventilation system that uses electricity to remove hot air from the porch. Both options provide adequate airflow and help prevent moisture buildup.
With roofing materials and ventilation options taken care of, it’s time to think about adding electrical and lighting features to your screened-in porch. This will enable you to use your space comfortably at any time of day or night. In the next section, we’ll explore how to add electrical wiring and install lighting fixtures for your porch.
Adding Electrical And Lighting Features
As the roof of your screened-in porch takes shape, it’s time to consider adding electrical and lighting features. After all, you’ll want to enjoy your outdoor space day or night. But before you start shopping for fixtures, it’s important to understand the wiring requirements for your porch. In most cases, you’ll need a dedicated circuit that meets local building codes.
Before you begin installing fixtures, consult with an electrician to ensure that your wiring meets safety standards. Your electrician will recommend the best type of fixtures for your porch and help determine their placement. Common options include ceiling fans, wall sconces, and overhead lighting. Don’t forget to install GFCI outlets in convenient locations, so you can power up your electronics or plug in appliances.
Once your electrical system is in place, it’s time to install screening materials. This step is crucial for creating a bug-free outdoor space that you can enjoy year-round. There are many options available on the market from traditional fiberglass screens to more advanced solar shades. Consider factors such as durability and visibility when choosing materials for your porch. With proper installation and maintenance, your screened-in porch will be a beautiful addition to your home that you can enjoy for years to come!
Installing Screening Materials
Screen material options for a screened-in porch are varied, and each has their own set of advantages and disadvantages. The most common types are fiberglass, aluminum, and copper screening. Fiberglass screen material is an affordable option that is easy to install and can last a long time. Aluminum screen material is stronger than fiberglass but can dent easily. Copper screening is the most durable option, but it’s also the most expensive.
Screen installation techniques vary depending on the type of screen material you choose. For fiberglass screens, start by measuring the size of your window or door opening, cut the screen to size, then attach it using a spline roller tool. For aluminum screens, use a metal snips tool to cut it to size and use a spline roller tool for installation. Copper screening should be installed using copper tacks or staples.
When installing screens, ensure that they are tight and free from any wrinkles or gaps that could let bugs in. Make sure that there is enough tension in the screen to prevent sagging or bowing over time. Be careful not to damage the screen during installation as it can be easily torn or creased.
Now that you have installed your screens successfully, it’s time to move on to building doors and windows for your screened-in porch.
Building Doors And Windows
After installing the screening materials, the next step in building a screened-in porch from scratch is to build doors and windows. These components not only provide access to the porch but also play a crucial role in ventilation. When it comes to door materials, there are various options to choose from, including wood, aluminum, and vinyl. Wood is a timeless choice that adds warmth and elegance to any porch. Aluminum and vinyl are more durable and require less maintenance than wood.
Window placement is another critical factor to consider when building a screened-in porch. The primary purpose of windows is to allow natural light into the porch while keeping out insects and other unwanted creatures. Ideally, windows should be strategically placed to maximize airflow while providing an unobstructed view of the surrounding landscape. Additionally, the size of the windows will depend on personal preference and local building codes.
Building doors and windows for a screened-in porch can be challenging but rewarding. It’s essential to select high-quality materials that can withstand harsh weather conditions while adding aesthetic value to your home’s exterior. By taking these factors into account, you can create an inviting space that seamlessly blends with your outdoor environment.
Moving on from building doors and windows for your new screened-in porch, the next step is installing flooring and finishing touches. This involves selecting appropriate flooring materials such as tiles or hardwood that complement your home’s interior design style while being practical for outdoor use. Additionally, adding lighting fixtures such as ceiling fans or chandeliers can enhance the ambiance of your new space. With careful planning and attention to detail, you can create an outdoor oasis that you will enjoy for years to come.
Installing Flooring And Finishing Touches
For a screened-in porch to be complete, the installation of flooring and decorative accents is of utmost importance. The right flooring can not only enhance the look of the porch but also offer durability and weather resistance. There are various flooring options available for screened-in porches, ranging from natural stone to porcelain tiles. If you’re looking for a low-maintenance option, vinyl or laminate flooring could be a good choice. However, if you want to go for an eco-friendly option, bamboo or cork is worth considering.
Once the flooring is in place, it’s time to add some decorative touches to your screened-in porch. To create an inviting atmosphere, you can incorporate decorative accents like throw pillows, curtains, rugs or even artwork. If you have a theme in mind for your porch, choose decorative elements that complement it. For example, if you’re going for a beachy vibe, opt for blue and white striped pillows or nautical-themed decor.
To sum up, installing flooring and adding decorative accents are crucial steps in building a functional and aesthetically pleasing screened-in porch. By carefully selecting your preferred type of flooring and incorporating well-chosen decorative accents that suit your style and personality, you can create an outdoor space that serves as an extension of your home – perfect for relaxing with family or entertaining guests.
As we move on to the next step in building your screened-in porch oasis – painting and staining – it’s important to remember that each step builds upon the last. With careful planning and attention to detail throughout the process, your DIY screened-in porch will come together beautifully.
Painting And Staining
Preparing the surface is a crucial step when it comes to painting or staining a screened-in porch. This includes ensuring the surface is free from dirt, dust, grime, and any other debris.
When choosing between paint and stain, it is important to consider the desired finish, the type of wood, and the environment the surface will be exposed to.
Applying paint or stain to a screened-in porch requires proper preparation, including masking off any areas that should not be painted or stained and prepping the surface for the application.
It is important to use the right tools and techniques to ensure the paint or stain is applied evenly and smoothly.
When it comes to painting or staining a screened-in porch, it is important to use the right type of paint or stain and the right brushes, rags, and rollers.
The number of coats applied should be determined based on the desired finish and the type of paint or stain used.
Preparing The Surface
Preparing the surface of your porch is a crucial step in ensuring that your painting and staining job goes smoothly. Surface preparation techniques include cleaning, sanding, and filling any cracks or holes. Before starting any work, make sure to remove all furniture and plants from the area to be painted or stained. A pressure washer can help remove dirt and debris from the surface, but be careful not to damage the wood. Once clean, sanding the surface will help create a smooth finish that will hold paint or stain better. Fill any cracks or holes with wood filler and allow it to dry completely.
When choosing the right flooring for your screened-in porch, consider options that are weather-resistant and durable. Porcelain tile is a popular choice as it is easy to clean and can withstand extreme temperatures. Another option is pressure-treated lumber, which is specifically designed for outdoor use and can resist moisture and insects. Composite decking is also a good choice as it requires minimal maintenance and can last for years without needing replacement.
Properly preparing the surface of your porch before painting or staining will ensure that your project lasts for years. Taking care when choosing the right flooring material for your screened-in porch will also save you time and money in the long run. Remember to always follow manufacturer’s instructions when using paints or stains on your porch floor to ensure maximum durability and longevity of your investment.
Choosing Paint Or Stain
After preparing the surface of your porch, the next step is to choose the right paint or stain. When selecting a color, consider the overall style and design of your home. Neutral colors like beige, gray, and white are timeless choices that can complement any exterior color scheme. You can also opt for bolder hues such as red or blue if you want to add a pop of color to your porch.
When it comes to application techniques, there are different methods depending on whether you’re using paint or stain. With paint, you can use brushes, rollers, or sprayers to apply the product. Brushes are best for detailed work while rollers and sprayers are ideal for larger areas. Stain, on the other hand, requires a brush or rag for application as it needs to penetrate into the wood pores. Whichever method you choose, make sure to follow manufacturer’s instructions carefully.
In addition to choosing the right color and application technique, it’s important to select a high-quality product that will provide long-lasting protection against weather damage and fading. Look for paints and stains that are specifically designed for outdoor use and offer UV protection. Investing in quality materials will ensure that your porch looks great for years to come.
Applying The Paint Or Stain
Now that you have chosen the right color and type of paint or stain for your porch, it’s time to apply it. Applying the paint or stain is a crucial step in the process of painting and staining your porch. If you don’t apply it correctly, you’ll end up with a surface that looks uneven or unattractive. In this subtopic, we will discuss some DIY techniques for applying the paint or stain to your porch.
When it comes to applying paint or stain, there are several DIY techniques that you can use depending on the product you choose. For paint, you can use brushes, rollers, or sprayers to apply the product. Brushes are ideal for detailed work while rollers and sprayers are best suited for larger areas. On the other hand, stains require a brush or rag for application as they need to penetrate into the wood pores. Whichever method you choose, make sure to follow manufacturer’s instructions carefully.
It’s important to note that applying paint or stain requires a certain level of skill and patience. If you’re not confident in your abilities, consider hiring a professional painter or contractor to do the job for you. A skilled painter can ensure that your porch looks great and is protected against weather damage and fading for years to come. By following these tips and techniques, you can achieve a beautiful finish on your porch that enhances its overall appearance and complements the style of your home.
Maintaining Your Screened-In Porch
After all the hard work of painting and staining, it’s important to keep your screened-in porch looking its best. Regular cleaning is essential to ensure that your porch stays free of dirt and grime buildup, which can lead to discoloration and even damage over time. Here are some tips for keeping your screened-in porch clean:
Sweep or vacuum regularly: This may seem obvious, but regular sweeping or vacuuming can help prevent dirt and debris from accumulating on your porch. Make sure to use a soft-bristled brush or attachment to avoid scratching the surface of your porch.
Use a mild detergent: When it comes time to give your porch a more thorough cleaning, use a gentle detergent mixed with warm water. Avoid using harsh chemicals or abrasive scrubbers, as these can damage the finish of your porch.
Consider pest control solutions: Unfortunately, screened-in porches aren’t completely immune to insects and other pests. To keep unwanted visitors at bay, consider using insect repellents or traps specifically designed for outdoor use.
Table:
| Cleaning Tips | Pest Control Solutions |
|---|---|
| Sweep or vacuum regularly | Use insect repellents |
| Use a mild detergent | Set up insect traps |
| Clean stains promptly | Keep doors closed when not in use |
| Avoid harsh chemicals | Seal any cracks or gaps in screens |
In addition to regular cleaning and pest control measures, there are other steps you can take to maintain your screened-in porch. For example, make sure to promptly clean up any spills or stains that occur on the porch surface, as these can be difficult to remove once they’ve set in. You should also keep doors closed when not in use and seal any cracks or gaps in screens to prevent pests from entering.
By following these maintenance tips, you’ll be able to enjoy your new outdoor space for years to come. Not only will regular cleaning help preserve the appearance of your porch, but pest control solutions will ensure that you can enjoy your time outdoors without any unwanted guests. So sit back, relax, and enjoy the fresh air from the comfort of your own screened-in porch!
Enjoying Your New Outdoor Space
Now that your screened-in porch is complete, it’s time to start enjoying your new outdoor space. One of the first steps to take is to decorate the area. Adding some personal touches will make the porch feel like an extension of your home and a comfortable spot to relax. Consider hanging outdoor curtains or adding some decorative lighting fixtures to create a cozy atmosphere.
Furniture selection is also an essential aspect of making your screened-in porch a comfortable place to spend time. Opt for pieces that are both functional and stylish, such as weather-resistant wicker chairs or an outdoor sofa with comfortable cushions. Don’t forget to add side tables for drinks or snacks, and consider incorporating plants or other natural elements into the decor.
When it comes to decorating tips, keep in mind that less is often more. Avoid overcrowding the space with too much furniture or accessories, as this can make it feel cramped and uncomfortable. Instead, focus on creating a cohesive look that complements the style of your home while still allowing plenty of room for relaxation and entertaining guests. With these simple tips in mind, you’ll be able to enjoy your new outdoor space for years to come.
Conclusion
Building a screened-in porch from scratch can be a daunting task, but the end result is well worth the effort. With the right tools and materials, choosing the perfect location, obtaining necessary permits, designing a plan, installing flooring and finishing touches, and maintaining your new outdoor space, you can create an oasis for relaxation and entertainment.
However, do not underestimate the amount of time and dedication it takes to complete this project. Building a screened-in porch requires patience and attention to detail. But imagine sitting on your new porch with a cold drink in hand while enjoying fresh air without pesky bugs bothering you. Or hosting family gatherings in your new outdoor space that is both comfortable and stylish. By following these steps, you can build a screened-in porch that will become the envy of all your neighbors. So roll up your sleeves and get ready to transform your backyard into an inviting haven for years to come!
Image Credits
- “Screened Porch” by ntm1909 (featured)

