Tomato gardening is like an orchestra – it’s a symphony of elements that have to be timed and executed just right to produce the desired results. But no matter how much you practice or how talented you are, without the right seeds, your performance will never reach its full potential. Growing tomatoes from seed means you can get exactly what you want out of your garden – robust plants with flavorful fruits. Here’s how to start tomato seeds indoors to ensure success in your garden.
The first step on the road to growing tomatoes from seed is selecting the right variety for your needs. There are hundreds of different kinds of tomato varieties available, ranging from heirlooms that have been passed down through generations, to modern hybrids with unique flavors and colors. Determine which type best suits your needs, whether it’s flavor, color, size or disease resistance.
Once you’ve chosen your variety, it’s time to begin preparing the soil for planting. Tomato seeds need a nutrient-rich environment for them to germinate and thrive in. Mix in compost or aged manure when preparing the soil bed for planting, as well as adding a slow-release fertilizer at this time if desired. This will provide essential nutrients for the young plants when they start their journey into life!
Selecting The Right Tomato Seeds
Selecting the right tomato seeds is a critical step in cultivating tomatoes from seed. Satisfactory success and satisfaction are found in selecting the seeds that are suitable for your climate, available space, and desired crop. Sowing the right seed is paramount for producing plentiful plants with plump, juicy fruits.
Savvy gardeners should start by scouring catalogs and websites to find varieties of tomatoes that thrive in their specific microclimate. When selecting which plants to grow, it’s important to consider whether you have enough space to accommodate them as they mature. Some tomato varieties need plenty of room, while others can be grown in containers or hanging baskets if space is at a premium.
Once you have chosen the best variety for your environment, it’s time to select quality seeds or starter plants from reliable sources like nurseries or online retailers. You’ll want to purchase seeds with good germination rates; otherwise, you could end up spending more time tending immature seedlings than harvesting ripe fruit.
By making wise selections of both variety and quality at the outset, you can ensure your gardening efforts will yield delicious rewards later on!
Acquiring Supplies For Starting Seeds
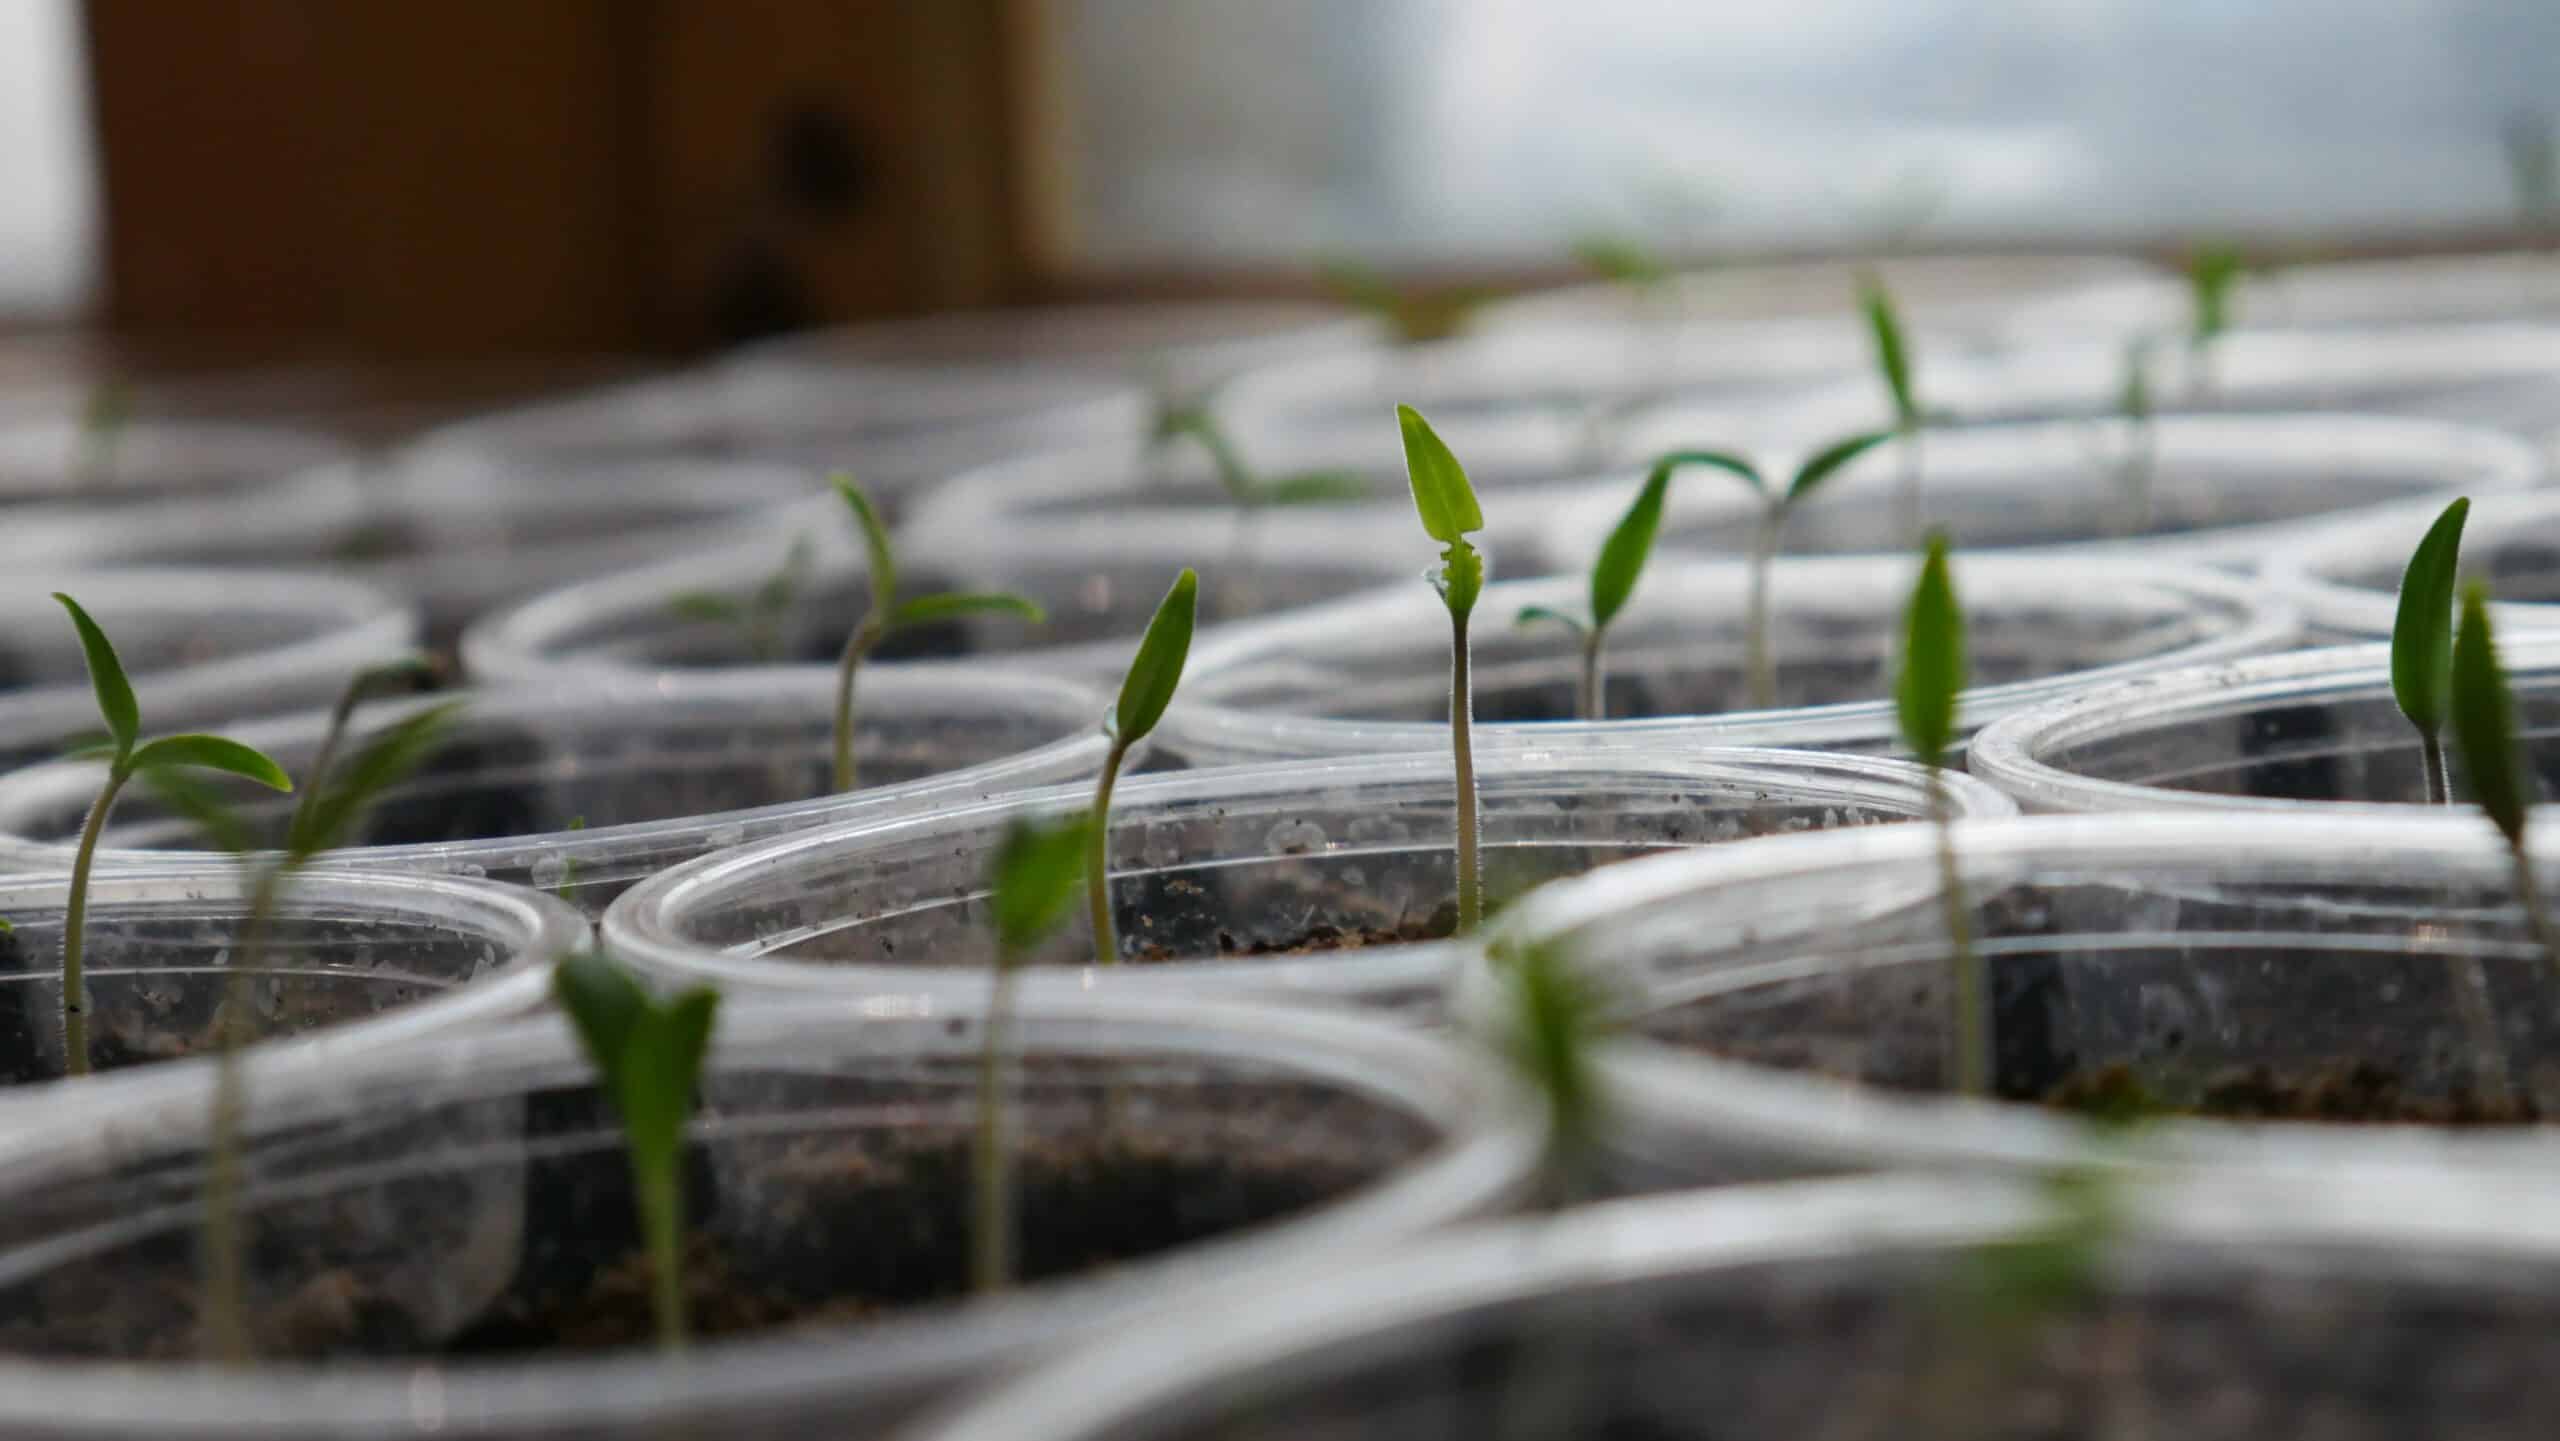
The second step in starting tomato seeds indoors is acquiring the necessary supplies. For successful germination, gardeners will need to provide a moist, warm environment for the seeds to grow. This can be achieved by purchasing soil-less seed starting mix and an appropriate container. A potting tray with a lid is ideal, as it helps to maintain humidity levels and keep out any pests. Additionally, the individual cells of the tray make it easier to transplant each seedling without disturbing its roots.
Gardeners should also consider investing in heating mats or heat lamps, as well as a timer that can be used to control lighting and temperature levels. This ensures that the tomatoes receive ample light even when grown indoors. Furthermore, having an accurate thermometer on hand allows gardeners to monitor the temperature of their environment and make any necessary adjustments accordingly.
Finally, gardeners may want to purchase grow lights that help simulate sunlight indoors and increase yield production under controlled conditions. By providing their tomato plants with the fixtures and equipment needed for healthy growth, gardeners can achieve better results in their tomato growing endeavors. With these supplies in place, they are now ready to prepare the soil for planting tomatoes from seed.
Preparing The Soil
Are you ready to take the plunge and start growing tomatoes from seed? It’s not as difficult as it may sound, but there are a few key steps to ensure success. Let’s dive in and explore the third step of preparing the soil for your tomato seeds.
When it comes to soil preparation, there are two main objectives. The first is to ensure that your tomato plants will have adequate nutrients and moisture throughout their growth cycle – both essential for a healthy harvest. The second is to loosen the soil enough so that the roots can spread out properly and get plenty of oxygen.
To prepare your soil, start by tilling it with a shovel or garden fork. This will break up any large clumps, mix in organic matter like compost or manure and add air pockets that provide oxygen to the root system. Make sure you remove any weeds or debris before tilling as these can prevent proper drainage. Then use a rake or hoe to level out the surface, removing any high spots or low spots which could impede water flow. Finally, add a layer of mulch around each plant which helps retain moisture and reduce weeds while also adding additional nutrients over time.
TIP: For best results when preparing your soil, choose an area with good drainage and plenty of sunlight – 6-8 hours per day is ideal! Also try to avoid planting too close together; tomatoes need plenty of room for their roots to spread out properly in order for them to thrive.
Planting The Tomato Seeds
The planting of tomato seeds is like a gateway to the garden. It’s where nature meets nurture and the seedling’s future unfolds in front of you. To begin, here are some tips for getting the best results:
• Gather your supplies: You’ll need a high-quality potting soil, containers, and a source of heat and light. • Prepare your containers: Clean them with hot water or a solution of bleach and water to prevent any diseases from spreading. Make sure to poke holes in the bottom for drainage. • Plant your seeds: Place two or three tomato seeds into each container and cover them with soil. Water lightly but don’t soak them as this can cause the seeds to rot.
The next step is maintaining temperature and moisture for the growing plants. For optimal germination, keep temperatures between 65°F (18°C) and 80°F (27°C). Also, keep the soil moist but not too wet as this can lead to fungal diseases such as root rot. Finally, if you’re using artificial lighting, give your seedlings at least 16 hours of light per day. With these steps followed carefully, you’ll be well on your way to having a bountiful harvest!
Maintaining Temperature And Moisture
Maintaining the correct temperature and moisture levels is a crucial step to successfully growing tomatoes from seeds indoors. It’s like creating the perfect environment for germination – like a warm, humid embrace that encourages the seedlings to thrive. Figuratively speaking, this step is like giving your tomato plants a hug.
To ensure proper germination and development of your tomato seeds, you must maintain an ideal temperature in the range of 70-85°F (21-29°C). This can be achieved with the help of a heating pad or propagation mat. To control humidity levels, provide adequate air circulation and water regularly. You may also need to use a humidifier if your indoor space has low humidity levels.
When it comes to watering, start by spraying lightly with warm water twice per day until you see the first signs of germination. After that, keep the soil damp but not soggy as this can lead to root rot and other issues. TIP: A good rule of thumb is to check in on your tomato seedlings at least once daily so that you can ensure they are getting enough moisture and warmth for optimal growth!
Potting And Transplanting
Ah, the joys of growing tomatoes from seed! What could be more satisfying than watching your little seeds sprouting and taking root in soil? Little do many gardeners realize, however, that there is more to it than just sowing the seeds. In this step we will look at potting and transplanting – the important steps that come after germination.
Firstly, when your tomato seed has germinated and grown its first true leaves, it is time to transfer it into a bigger pot or planter with soil specifically designed for tomatoes. The following are some tips to keep in mind when you are ready to pot your young tomato plants:
- Ensure that you use a light and well-draining potting mix specifically for tomatoes;
- Plant each seedling individually as soon as possible;
- Consider planting multiple seedlings into one large container – this helps reduce overcrowding of individual pots.
Once transplanted into larger containers or planters, it is essential to continue providing adequate moisture as well as ensuring proper lighting and sun exposure for the best results. As experienced gardeners know, these factors can determine whether or not your tomatoes will thrive after they’ve been potted and transplanted. With careful preparation and attention to detail, however, you can enjoy healthy plants with lush foliage and abundant fruit harvest!
Proper Lighting And Sun Exposure
The journey of starting tomato seeds indoors is a rewarding one, with the promise of an abundant crop come harvest time. But how do you ensure your seedlings make it through to that point? Proper lighting and sun exposure play a critical role in their success.
As any botanist or gardener will tell you, tomatoes require at least 6 hours of direct sunlight per day for optimum growth. If you are growing them indoors, this means making sure your seeds get enough light from a window or artificial source to meet those requirements. You may also need to adjust the height of the grow light as the plants grow taller to maintain its effectiveness.
In addition to providing adequate light, you must also be mindful of temperature control. Tomatoes prefer temperatures between 60-85°F (15-30°C). If temperatures drop too low, they risk stunted growth and can even die off; if they rise too high, they won’t be able to flower and set fruit properly. A good rule of thumb is to keep your soil temperature at least 5 degrees cooler than the surrounding air temperature.
By following these simple steps, you can give your tomato seedlings the best chance at success – with just a bit of extra care and attention!
Fertilizing And Watering The Plants
Once the tomato seeds have been planted, it is essential to provide them with adequate fertilization and watering in order to ensure they develop into healthy plants. Fertilizing the plants helps to ensure that they get the proper nutrients needed for optimal growth, while watering provides them with hydration and prevents them from drying out. These two steps are essential for successful growth and will help to ensure that the tomatoes reach their full potential.
When fertilizing the tomato plants, it is important to use a fertilizer specifically designed for tomatoes. Tomatoes require certain nutrients such as nitrogen, phosphorus, and potassium in order to grow properly and bear fruit. A good fertilizer will provide these nutrients in addition to other trace elements that will help nourish the plant throughout its life cycle. It is also important to follow the directions on the fertilizer package carefully as over-fertilization can be damaging to both the plant and surrounding environment.
Finally, watering must be done regularly in order for the tomato plants to receive adequate hydration and prevent wilting or stunted growth. Depending on how frequently it rains in your area, you may need to supplement with additional waterings from time-to-time. When doing so, make sure not to overwater as this can lead to root rot or other problems. Also, keep an eye on any signs of stress or disease which could indicate a need for additional fertilization or waterings. Proper fertilizing and watering practices will help ensure that your tomato seedlings reach their full potential!
With proper fertilizing and watering in place, you are well on your way towards supporting your tomato seedlings as they grow into mature plants capable of bearing delicious fruits!
Supporting The Plants
Supporting the plants is an essential step in growing tomatoes from seed indoors. Proper support ensures that they can grow strong and healthy, so it is important to take the necessary steps to provide the required stability. In this section, we will discuss three key elements of providing structural support for tomato plants: staking, caging, and trellising.
Staking involves pushing a sturdy stake into the ground near each plant, then tying the stalk to the stake with soft material such as string or twine. This helps keep the plant upright and prevents it from flopping over due to wind or heavy fruit production. When staking, make sure not to damage the roots by pushing too hard on them when inserting the stakes.
Caging is an alternative form of support for tomatoes grown in containers. A cage should be constructed around each plant with four sides and a top made out of wire mesh or plastic netting. As the tomato grows taller, simply add more sections to raise up the cage and continue providing support.
Finally, trellising is another option for supporting tomato plants grown in containers or raised beds. A simple trellis can be constructed by attaching strings between two poles set into the soil at each corner of a container or raised bed. The tomato vines are then tied to these strings as they grow vertically upwards towards sunlight.
These three methods provide a range of options for supporting your tomatoes during their growth cycle indoors and ensuring that they stay healthy and productive throughout their life cycle. With proper implementation of these techniques, you can rest assured that your tomatoes will reach their full potential!
Controlling Disease And Pests
The irony of it all: We’ve been slaving away, meticulously preparing the soil and planting tomato seeds, eagerly waiting for them to sprout and bear fruit. All that hard work may be in vain if we don’t take preventive measures against disease and pests. It’s time to bring out the big guns!
Controlling diseases and pests is a key component of successful tomato gardening. Fungal diseases such as early blight can infect tomato plants, leading to wilting and yellowing of the leaves. Insect infestations can also cause major damage, with root-knot nematodes being particularly problematic. If left unchecked, these pests can quickly destroy an entire crop of tomatoes.
Fortunately, there are some steps that gardeners can take to prevent or reduce the impact of disease and pest problems. Utilizing mulch to discourage fungal spores from entering the soil is one option; using neem oil or other natural insecticides is another way to keep bugs at bay. Additionally, rotating crops between seasons will help minimize the risk of disease buildup in your soil.
By taking these proactive measures now, you’ll be better positioned for success when it comes time to harvest those juicy tomatoes later on down the road!
Harvesting The Tomatoes
Ready for the reward of your labor? It’s time to harvest your tomatoes! All that hard work you put into nurturing and caring for those precious seedlings is finally paying off. As they burst into life, you are ready to reap the bounty of your efforts.
Harvesting tomatoes is a rewarding experience. Taking care of them – from planting to picking – provides a unique connection between gardener and plant. The first fruits of the season are especially sweet, as they represent the culmination of months of effort and care. To ensure optimal flavor, tomatoes should be picked when they reach their peak ripeness; this varies depending on type, but generally this means when they just turn red or orange (for red varieties).
To avoid damaging the tomato plants, always use two hands when picking; one hand should hold onto the stem while the other gently twists and pulls the fruit away. Make sure to check over each tomato before storing it in a container or basket so that any damaged or diseased fruit can be discarded. Careful harvesting will help maximize yield and ensure that future harvests remain plentiful.
Now that you’ve collected your delicious crop of tomatoes, it’s time to savor the moment and enjoy! From here, you can move on to saving seeds for next year’s planting season so that you can keep growing more delicious homegrown tomatoes year after year.
Saving Seeds For Next Year
Starting seeds indoors is like planting a garden in miniature. It’s a great way to prepare for the upcoming growing season, and it allows you to get ahead of the game by preparing your garden months in advance. As exciting as it is to grow tomatoes from seed, it’s also important to remember that saving those same seeds can ensure another successful harvest next season.
Saving tomato seeds is relatively simple and requires few materials. First, select the healthiest-looking tomatoes from your current crop; these are the ones that will produce the best seeds for planting next year. Then cut them open and scoop out the seeds, discarding all other material. Place the seeds into a bowl with some water and let them sit for a day or two so that any remaining fruit material can separate from the viable seeds; discard anything that floats. Once you have cleaned off all of the extra bits of fruity debris, rinse off any remaining residue before drying them on paper towels or newspaper.
Making sure your saved tomato seeds are properly stored is essential for their viability. Store them in an airtight container away from direct sunlight, like a jar or plastic baggie, and make sure they are labeled so you know which type they are when you go to plant them again next season. Keeping your tomato seed stock organized will help ensure success when starting your plants indoors again next year!
Composting The Remaining Plant
Once the tomato plants have been harvested, it is advisable to compost the remaining plant. Composting is an important part of gardening as it helps to create nutrient-rich soil for future plants. It’s also a great way to dispose of plant material that would otherwise be thrown away. To begin composting, start by collecting leaves, lawn clippings, and other organic material in a pile or bin. Be sure to chop or shred these materials into small pieces so they will break down faster. Then add a layer of soil on top and moisten with water. Finally, turn over the pile every few days to aerate it and add new material as needed. With proper care and attention, your compost should be ready in about four weeks.
Composting can also help reduce greenhouse gas emissions and improve the health of local ecosystems by returning nutrients back into the soil rather than them entering waterways and oceans through runoff. Additionally, composting at home can reduce reliance on chemical fertilizers which can increase pollution when used improperly or in excess amounts.
So don’t forget to give your tomatoes one last act of kindness before you move onto your next project: composting their remains! Doing so will not only benefit your garden but also help protect our environment for years to come.
Troubleshooting Common Problems
The troubleshooting of common problems can be a daunting task for those growing tomatoes indoors. As a specialist in botany and gardening, I’d like to offer some helpful advice to ensure success.
When attempting to start tomato seeds indoors, it is important to closely monitor the environment. Poor ventilation can cause seedlings to become weak and susceptible to disease. Additionally, inadequate lighting can cause stunted growth or leggy plants. Therefore, use a fan or heat mat to maintain good air circulation and provide adequate light with fluorescent lights or LED’s. It is also essential that tomato seedlings receive the proper amount of water. Overwatering can lead to root rot and prevent the absorption of nutrients from the soil, while underwatering can cause stunted growth and wilting leaves. To avoid these issues, check the soil regularly and water only when it is dry an inch below the surface.
In addition, it is important for growers to watch out for pests such as aphids or fungus gnats that may damage seedlings – both indoors and outdoors. If present, use natural remedies such as neem oil or insecticidal soap sprays to keep them under control. Finally, another issue that may arise during tomato growth is nutrient deficiencies due to an unbalanced soil mix or lack of fertilization. To counteract this effect, use organic fertilizers that are high in phosphorus and potassium at least once every few weeks during the growing season.
These tips will help prevent common problems when starting tomatoes indoors – leaving you with healthy seedlings ready for transplant! With careful monitoring and diligence throughout the process, you’ll be on your way towards successfully growing tomatoes in no time!
Tips For Growing Tomatoes Indoors
Growing tomatoes indoors is a popular practice among gardeners and botanists, as it offers an excellent way to create healthy, delicious produce. However, growing tomatoes indoors can be a tricky endeavor if one isn’t familiar with optimal practices. In this section, we’ll look at some tips for growing tomatoes indoors to ensure success.
Before embarking on any indoor tomato-growing journey, it’s important to assess the existing environment. Tomatoes require plenty of light and warmth in order to thrive; without these two key elements, plants will struggle to survive. Additionally, it’s important to make sure that the soil used is well-draining and nutrient-rich; otherwise, the plant will be unable to access essential nutrients necessary for growth.
To encourage strong roots and reduce potential disease issues, aim for air circulation around the plants; fans or open windows should do the trick. It’s also helpful to keep humidity levels low by pruning off excess foliage; this will help prevent diseases such as blight from taking hold in the garden. Finally, take care not to overwater your tomato plants; too much water can lead to root rot or other issues if left unchecked.
By following these tips for growing tomatoes indoors—along with proper planting techniques—indoor gardeners should see great success in their efforts! With a little bit of knowledge and effort, anyone can successfully grow delicious tomatoes right at home!
Frequently Asked Questions
How Long Does It Take For Tomato Seeds To Germinate?
Germinating tomato seeds is a rewarding activity for any gardener. It is an essential step in cultivating the much-loved tomato plant, and can be achieved with ease in the comfort of your own home. But, how long does it take for these seeds to germinate?
In order to answer this question, one must have a basic understanding of the germination process. When a tomato seed is placed in warm and moist soil, it begins to absorb water until it swells and splits open. This is when the embryo inside the seed begins to grow into a new plant. The time taken for this process to occur varies depending on numerous factors:
• Soil temperature: Optimal germination temperatures range between 60°F (15°C) and 85°F (29°C). • Air temperature: Temperatures above 95°F (35°C) may inhibit germination or cause newly emerging plants to wilt or die. • Humidity: Tomato seeds need moisture to germinate; too little humidity will slow down or prevent germination altogether. • Seed quality: High-quality seeds typically germinate faster than older, less viable ones. • Light availability: While not necessary during the initial stages of growth, light helps promote healthy growth once the seedling emerges from soil.
On average, a healthy tomato seed can take anywhere from 7–14 days before sprouting under optimal conditions – though this timeframe may be extended due to environmental factors outside of our control. With proper care, however, you can ensure that your tomato seedlings are off to an ideal start!
How Often Should Tomato Plants Be Watered?
It is essential to understand how often to water tomato plants in order to give them the best chance at producing a successful harvest. It can be tricky to get the balance just right, as too much or too little water can cause issues with growth and fruit production. So, it’s important to find out what the optimal watering frequency should be for your particular tomato plants.
When it comes to watering tomato plants, regularity is key. Depending on their stage of growth, tomatoes need different amounts of water. When they are young seedlings, you should water frequently but lightly – about once a day – so that the soil does not dry out completely overnight. Once the plants become more established and start producing fruit, you should aim for deeper, less frequent watering sessions; this encourages plant roots to grow deeper into the soil in search of moisture.
Ideally, you want to create a consistent pattern of watering that allows the soil around your tomato plants to remain moist but not saturated with water. Check your soil’s moisture level before adding additional water and ensure that it isn’t overly wet or dry. It may take some experimentation in order to find the right balance for your specific needs; just remember that well-hydrated tomato plants tend to produce higher yields!
What Is The Best Soil Type For Growing Tomatoes Indoors?
The best soil for growing tomatoes indoors is one that will provide proper nourishment and moisture to the seedlings. It should be light and airy, but not too loose; a combination of potting soil, compost, and perlite or vermiculite is ideal. Not only does this give your tomatoes the perfect balance of nutrients, but it also allows plenty of oxygen to reach their roots—essential for healthy growth.
When preparing your tomato seedlings’ soil, you’ll want to make sure it has a neutral pH level as well. A slightly acidic mix is preferred (around 6.5 on the pH scale). Adding organic matter like compost can help with this; however, it’s best to have the soil professionally tested before planting if you’re unsure about its pH levels.
You may also want to consider adding some slow-release fertilizer to your potting mix. This will ensure that your tomato seedlings get all the nutrients they need throughout their growing season without having to add additional fertilizer later on.
TIP: When choosing a potting mix for your tomato seedlings, make sure it’s lightweight and contains plenty of oxygen so the roots can breathe easily!
What Is The Optimal Temperature Range For Tomato Plants To Thrive?
Growing tomatoes indoors requires the same ideal growing conditions as those grown outdoors. This includes having a temperature range that is optimal for the tomato plants to thrive. The ideal temperature range for tomatoes to do well is between 65 and 80 degrees Fahrenheit.
It’s important to remember that if the temperature gets too hot or too cold, it can cause damage to the tomato plants. If temperatures rise above 85 degrees Fahrenheit, it can lead to blossom end rot, a condition caused by calcium deficiency in the fruit. Too low of temperatures, such as those below 55 degrees Fahrenheit, can slow down growth and even kill the plant altogether.
Therefore, providing an environment with temperatures between 65 and 80 degrees Fahrenheit is essential for tomato plants to flourish indoors. To ensure your tomatoes get this optimal temperature range, you may need to invest in additional heating or cooling equipment depending on your local climate. With proper management of temperature ranges and other necessary growing conditions, you will be sure to have a successful indoor gardening experience!
Are There Any Special Precautions Needed When Transplanting Tomato Seedlings?
Are there any special precautions needed when transplanting tomato seedlings? This is a critical question to ask before embarking on the process of growing tomatoes from seeds. Transplanting is an important step in the process, and it’s essential to make sure that you take the necessary steps to ensure your seedlings thrive. As a specialist in botany and gardening, I’m here to help guide you through this process.
The first thing you should know is that it’s best to wait until the seedlings have grown several sets of leaves before attempting to transplant them. If done too early, the seedlings may become stressed, causing them to fail before they even get a chance to take root. The soil temperature also needs to be just right; if it’s too cold or too hot, your seedlings may struggle during their transition from soil mix to outdoor environment.
In addition, it’s important that you prepare your outdoor garden bed prior to transplanting. Make sure the area receiving your tomato plants has had plenty of compost or aged manure added for extra nutrients and moisture retention. Digging deep holes will also ensure that your plants are able to spread out their roots once they’re planted in the ground. Finally, don’t forget about watering! Watering regularly – but not excessively – is key in helping your tomato plants thrive after transplantation.
By following these simple steps, you can rest assured that your tomato seedlings will have a successful transition into their new home!
Conclusion
As we’ve seen, starting tomato seeds indoors is an easy and rewarding process! With the right knowledge, you can successfully grow a lush crop of tomatoes in your home. Whether you’re a beginner or a seasoned gardener, these tips will help ensure that your tomatoes reach their full potential.
The key to success lies in understanding the needs of your plants. Be sure to provide them with quality soil and sufficient water. Keep an eye on temperature fluctuations and take extra precautions when transplanting. Then just sit back and watch as your tomato plants thrive!
Growing tomatoes from seed is a great way to take control of your gardening experience. So don’t be afraid to get your hands dirty – with just a little effort, you’ll have succulent tomatoes ready for harvest before you know it!

