Phlox drummondii, commonly known as annual phlox, is a beautiful and versatile plant that can add color and texture to any garden. These plants are perfect for those who want to enhance their outdoor spaces with vibrant blooms that last throughout the summer season. However, growing phlox drummondii might seem challenging for some gardeners, especially those who are new to horticulture. This article will provide a comprehensive guide on how to grow phlox drummondii successfully.
In this article, we will cover various aspects of growing phlox drummondii, including its characteristics, soil requirements, watering needs, and pest control methods. We will also discuss different types of phlox drummondii available in the market and how to choose the best one for your garden. Whether you’re an experienced gardener or a beginner looking to start your gardening journey, this article will provide you with all the information you need to grow healthy and vibrant phlox drummondii plants. So let’s dive in and discover the secrets of growing this beautiful annual plant!
Understanding The Characteristics Of Annual Phlox
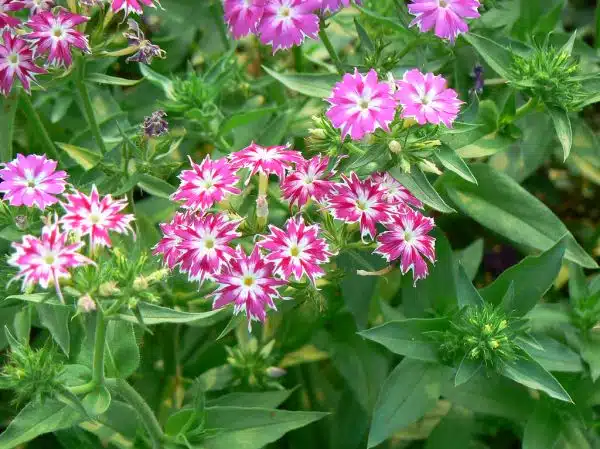
Annual phlox, also known as Phlox drummondii, is a member of the Polemoniaceae family and is native to Texas. This plant is characterized by its beautiful, showy flowers that bloom in an array of colors from pink to red to white. It is also known for its sweet fragrance that attracts pollinators such as bees and butterflies.
The growing season for annual phlox begins in early spring and extends through the summer months until the first frost. During this time, it requires full sun exposure and well-draining soil with moderate moisture levels. Propagation methods for this plant include sowing seeds directly into the ground or starting them indoors before transplanting.
Annual phlox comes in a variety of cultivars with different flower colors, heights, and growth habits. Selecting the right variety for your garden can depend on factors such as your location, soil type, and desired aesthetic. In the following section, we will delve deeper into how to choose the best annual phlox cultivar for your specific needs.
Choosing The Right Variety For Your Garden
Understanding the Characteristics of Annual Phlox has given you a good idea of what to expect from these lovely plants. Now, it’s time to delve into selecting the right variety for your garden. With so many options available, it can be challenging to know which one is best suited for your needs.
Color options are one factor that you’ll want to consider when selecting an annual phlox variety. These plants come in a wide range of hues, including white, pink, red, and purple. Some varieties even have bi-colored flowers that add interest and depth to your garden design. When deciding on color options, think about the overall look and feel you want to achieve in your garden.
Garden design is another crucial aspect when choosing the right phlox variety for your garden. Different types of annual phlox grow to varying heights and widths, so pay attention to their growth habits before making a selection. For example, if you’re looking for a low-growing plant that works well as a border or ground cover, then choose a variety that stays compact and doesn’t get too tall. On the other hand, if you want a show-stopping centerpiece for your garden bed or container planting, select a taller variety with large blooms.
Selecting the ideal location for planting is another essential step in growing annual phlox successfully. The ideal spot should receive full sun exposure for at least six hours per day and have fertile soil with good drainage. Avoid planting them in low-lying areas where water tends to collect as this can lead to root rot and other issues down the line. By taking these factors into consideration when selecting your annual phlox variety and finding the perfect location for planting them, you’ll be well on your way to creating a beautiful garden display that will impress anyone who sees it!
Selecting The Ideal Location For Planting
The location where you choose to plant your phlox drummondii is critical to its growth and development. The first thing you need to consider is the amount of sun exposure that the area receives. These annual phlox plants require full sun, which means that they need at least six hours of direct sunlight each day. Therefore, it is essential to choose a spot in your garden that gets plenty of sunlight.
Another important factor to consider when selecting a planting location is the soil type. Phlox drummondii prefers well-drained soils with a pH range between 6.0 and 7.5. This plant can tolerate different soil types, but it thrives best in moist, fertile soil that has good drainage. You can add compost or organic matter to improve soil fertility and structure.
When choosing a location for planting your phlox drummondii, try to avoid areas where water tends to accumulate or where there is heavy shade from trees or buildings. These conditions can cause root rot and make it challenging for the plant to grow properly. Instead, look for an open space with good air circulation that will allow the plant to thrive.
Now that you have selected the ideal location for planting your phlox drummondii, it’s time to prepare the soil properly before planting your seeds or seedlings.
Preparing The Soil For Planting
Soil pH is an important factor to consider when preparing the soil for planting Phlox drummondii. Testing soil pH levels will help to ensure the proper balance of nutrients that can be used by the plant. When the soil pH is too low, adding nutrients such as lime can help to raise the pH to the desired range of 6.0 to 7.5. Adding organic matter such as compost can also help to add nutrients and improve the soil texture for Phlox drummondii.
Testing Soil Ph
In horticulture, the first step towards preparing the soil for planting is to test its pH. Soil testing methods are crucial in determining the type of plants that can thrive in a particular soil condition. Interpreting soil test results correctly is also essential in providing adequate nutrition to plants, which ensures optimal growth and yield.
One of the most common soil testing methods is using a pH meter or test kit to measure the pH level of the soil. The ideal pH range for growing Phlox drummondii is between 6.0 and 7.0, which is slightly acidic to neutral. If the pH level of the soil is too low or too high, it can negatively affect plant growth by limiting nutrient availability, causing root damage, or even killing the plants.
Interpreting soil test results involves analyzing various factors such as organic matter content, nutrient levels, and texture. A comprehensive soil analysis report provides information on how much nitrogen (N), phosphorus (P), potassium (K) and other nutrients are present in the soil. It also highlights any deficiencies or excesses that may be present in the soil and recommends appropriate measures to correct them.
Testing Soil pH is an integral part of preparing the soil for planting Phlox drummondii. Knowing your soil’s pH level helps you determine what amendments you need to add to make your garden hospitable for your plants. With proper interpretation of your test results, you’ll be able to provide adequate nutrition and create an environment that will promote healthy plant growth throughout their lifecycle.
Adding Nutrients
In addition to testing soil pH, adding nutrients is another crucial step in preparing the soil for planting. Plants require a range of essential nutrients to grow and thrive, and these nutrients can be added to the soil using organic fertilizers or composting. Composting benefits the soil by improving its structure, increasing water retention capacity, and providing slow-release nutrients over time.
Organic fertilizers are also an excellent way to add essential nutrients to the soil. They are derived from natural sources such as animal waste, bone meal, blood meal, and fish emulsion. These fertilizers provide a balanced mix of macro and micronutrients that plants need to grow strong roots, healthy foliage, and abundant blooms. Unlike synthetic fertilizers, organic fertilizers release nutrients slowly over time, reducing the risk of nutrient burn or leaching.
When adding nutrients to the soil, it is important not to overdo it. Too much fertilizer can cause excess growth or even harm your plants. It is recommended that you follow the instructions on the fertilizer package or consult with a horticulture expert when determining how much fertilizer to use. With proper nutrient management techniques in place, you will be able to create a garden environment that promotes healthy plant growth and maximizes yield potential.
Planting And Transplanting Techniques
Phlox drummondii, commonly known as annual phlox, is a popular plant among gardeners due to its vibrant colors and easy-to-grow nature. According to recent statistics, this plant can grow up to 2 feet tall and 1 foot wide, making it an ideal choice for borders or containers. However, planting and transplanting this species require some techniques that every gardener should know.
Container gardening is an excellent option for those who lack garden space. To grow Phlox drummondii in containers, choose a pot with drainage holes and fill it with well-draining soil. Sow the seeds about ¼ inch deep and keep the soil moist until the seedlings emerge. Once they reach a height of two inches, transplant them into individual pots or into your desired location outdoors.
Propagation methods for Phlox drummondii include both seeds and cuttings. Seeds can be collected from the mature plants in late summer or early autumn. Cuttings are taken from new growth during spring or early summer when the plant is actively growing. Use rooting hormone on the cuttings before planting them in well-draining soil.
To ensure that your Phlox drummondii thrives, proper watering and fertilizing are essential. In the next section, we will discuss how to meet these requirements for optimal growth and blooming of your annual phlox plant.
Watering And Fertilizing Requirements
Watering and fertilizing the Phlox Drummondii is crucial for its growth and optimum performance. The plant requires a consistent watering schedule to ensure it thrives throughout its growing season. Frequency and timing of watering should be considered to avoid waterlogging or drought stress. It is recommended to water the plant once a week, or more frequently during hot, dry weather conditions. It is also important to note that overwatering may cause root rot, which could lead to plant death.
Fertilizing is equally important in ensuring the Phlox Drummondii grows vigorously with lush foliage and abundant blooms. Types and amounts of fertilizer applied depend on the condition of the soil and the stage of growth. A balanced fertilizer with equal amounts of nitrogen, phosphorus, and potassium can be applied every four weeks during the growing season. However, before applying any fertilizer, it’s advisable to test the soil pH level first as an imbalanced pH level may hinder nutrient uptake by plants leading to poor growth.
Watering and fertilizing are essential for healthy Phlox Drummondii growth. When watering this plant, it’s important not to overdo it; frequency should be once a week unless there are extreme weather conditions such as prolonged heatwaves or droughts. On the other hand, fertilizing should be done regularly using balanced nutrients every four weeks but testing soil pH levels first will ensure optimal absorption by plants. With proper watering and fertilizing practices in place, your Phlox Drummondii will reward you with vibrant colors all season long.
To maintain healthy growth throughout its growing season, pruning and deadheading tips can help keep your Phlox Drummondii looking great!
Pruning And Deadheading Tips
As gardeners, we all want our plants to look their best. Pruning and deadheading are two techniques that can help us achieve this goal with our phlox drummondii plants. Pruning involves removing unwanted or damaged parts of the plant, while deadheading is the practice of removing spent flowers.
Benefits of Deadheading: Deadheading can encourage your phlox drummondii to produce more blooms throughout the growing season. When you remove spent flowers, you prevent the plant from putting energy into seed production and instead redirect that energy into producing new blooms. This results in a more abundant and longer-lasting display of flowers in your garden.
Pruning Frequency: Phlox drummondii benefits from regular pruning to maintain its shape and promote healthy growth. You should prune your plant about once a year during its dormant period or in early spring before new growth begins. Removing any damaged or diseased branches will help keep the plant healthy, as well as thinning out overcrowded areas to prevent fungal diseases.
As important as pruning and deadheading are for maintaining a healthy and beautiful phlox drummondii, they are only part of the equation. Pest and disease control methods also play a crucial role in keeping your plants thriving.
Pest And Disease Control Methods
After pruning and deadheading your phlox drummondii, it is important to keep an eye out for any potential pests and diseases that may affect the health of your plant. Prevention is key when it comes to maintaining a healthy garden, so implementing companion planting techniques can help deter pests and improve soil fertility. Some good companion plants for phlox drummondii include marigolds, chamomile, and basil.
In addition to companion planting, there are also natural remedies you can use to combat common garden pests and diseases. For example, spraying a mixture of water and dish soap can help control aphids, while neem oil is effective against powdery mildew. It is important to research which remedies work best for specific pests or diseases before applying them to your plants.
By implementing these pest and disease control methods, you can ensure the health and longevity of your phlox drummondii plant. However, it is important to remember that prevention is always easier than treatment. Regular monitoring of your plants and creating a healthy growing environment through proper watering and fertilization can go a long way in preventing issues from arising in the first place.
- Implement companion planting techniques
- Research natural remedies for common garden pests
- Monitor plants regularly for signs of pest or disease
- Create a healthy growing environment through proper watering and fertilization
As you continue caring for your phlox drummondii plant, it is important to also consider harvesting and seed saving techniques. By properly harvesting seeds from mature blooms, you can save money on purchasing new seeds each year while also preserving the genetic diversity of the plant species. In the next section, we will explore some tips and techniques for successful harvests and seed saving.
Harvesting And Seed Saving
Phlox Drummondii is known for its beautiful, vibrant blooms that add a pop of color to any garden. Once the blooming season is over, it’s time to start thinking about harvesting and seed saving. This process can be intimidating for beginners, but with the right knowledge and tools, it’s quite simple.
To harvest Phlox Drummondii seeds, wait until the flowers have died back and the seed pods have formed. The pods will turn brown and begin to split open when they’re ready to be harvested. Gently remove the pods from the plant and place them in a paper bag or envelope to dry further. Once completely dry, open the pod and remove the seeds. It’s important to store them in a cool, dry place until you’re ready to use them.
Propagation methods for Phlox Drummondii include both sowing directly in soil or starting indoors before planting outside. When sowing directly into soil, make sure the area is weed-free and has been tilled or loosened for proper drainage. Sow seeds about 1/8 inch deep and water regularly until germination occurs. For indoor starting, use a sterile potting mix and sow seeds in trays or individual pots about 6-8 weeks before planting outside. Keep soil moist until germination occurs.
| Seed Storage | Propagation Methods |
|---|---|
| Store in cool, dry place | Direct sowing |
| Use paper bags or envelopes | Starting indoors |
| Ensure seeds are completely dry before storing | Proper watering techniques |
Harvesting and seed saving are important steps in maintaining your Phlox Drummondii plants year after year. Storing seeds properly ensures their viability for future use, while propagation methods allow you to expand your garden without having to purchase new plants each year. In the next section, we’ll discuss common issues that may arise during this process and how to troubleshoot them effectively.
Troubleshooting Common Issues
Common Issues and Troubleshooting for Phlox Drummondii
Even with proper care, phlox drummondii may encounter some common issues that can affect their growth and development. One of the most prevalent problems is pest infestations. Aphids and spider mites are the most common pests that attack phlox drummondii plants. Aphids are small insects that feed on the sap of the plant, causing stunted growth, yellow leaves, and curling foliage. Spider mites, on the other hand, create webs around the leaves and stems of the plant, causing discoloration and dropping of leaves.
To prevent pest infestations in phlox drummondii plants, it is essential to maintain good hygiene practices. Regularly inspect your plants for signs of infestation and remove any affected areas immediately. You can also use natural insecticides or homemade remedies such as neem oil or garlic spray to keep pests at bay. Additionally, planting companion plants such as marigolds or chives can also help repel pests.
Another issue that can affect phlox drummondii growth is soil pH levels. These plants thrive in slightly acidic soil with a pH range of 5.5 to 7.0. If the soil pH level is too high or too low, it can lead to nutrient deficiencies or toxicities that inhibit plant growth and development. To avoid this problem, test your soil regularly using a pH meter or testing kit and adjust accordingly by adding lime or sulfur to raise or lower the pH level.
In conclusion, preventing pest infestations and maintaining proper soil pH levels are crucial steps in troubleshooting common issues encountered when growing phlox drummondii plants. By following these practices along with regular watering, fertilization, and sunlight exposure, you can ensure healthy growth and vibrant blooms from your annual phlox plants for many seasons to come!
Conclusion
Annual phlox, also known as Phlox drummondii, is a beautiful and easy-to-grow flower that can add color and fragrance to any garden. Understanding its characteristics, choosing the right variety for your garden, selecting the ideal location for planting, preparing the soil, planting and transplanting techniques, pruning and deadheading tips, pest and disease control methods, harvesting and seed saving are all crucial steps in successfully growing this plant. However, like any other plant, there may be some common issues that one might face while growing annual phlox.
One important thing to remember while growing annual phlox is that it requires full sun or partial shade to thrive. It is also necessary to maintain good soil moisture throughout the growing season. With proper care and attention, you can enjoy a beautiful display of colorful blooms from late spring until early fall. Remember the old saying “A stitch in time saves nine.” This applies here too; timely pruning and maintaining healthy soil can prevent many diseases from affecting your precious plants. So start your journey with Phlox drummondii today and enjoy their vibrant colors in your garden!
Image Credits
- “Phlox drummondii” by Dinesh Valke (featured)

