Hand planes are essential tools for any carpenter or woodworker who desires precision and accuracy in their work. A hand plane is a woodworking tool that consists of a flat sole, a cutting blade, and an adjustable lever used to shave off thin layers of wood. It has been in use for centuries and remains relevant today due to its versatility and ability to produce smooth surfaces on different types of woods.
Using a hand plane requires skill and expertise, as it involves the careful manipulation of the tool to achieve desired results. The process involves holding the plane at the correct angle, adjusting the depth of cut, and applying consistent pressure while moving it along the grain direction. In this article, we will explore how to use a hand plane effectively by discussing the various parts of the tool, sharpening techniques, basic usage tips, and maintenance practices. By mastering these skills, you can elevate your woodworking game and take your craft to new heights.
Anatomy Of A Hand Plane: Understanding The Parts
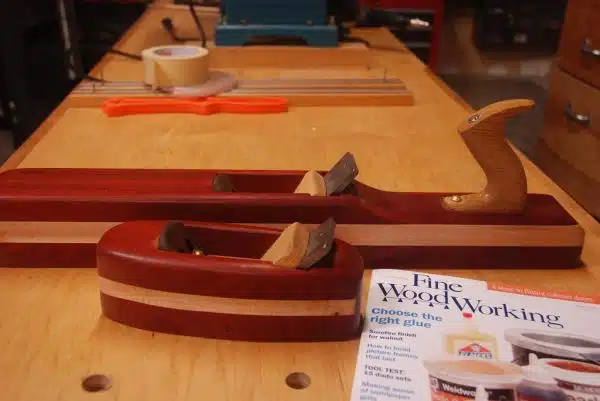
Hand planes are essential tools for any woodworker, and understanding the different parts is crucial to their effective use. The main components of a hand plane include the blade, chipbreaker, cap iron, frog, knob, tote, sole, and mouth.
The blade is the most important part of a hand plane as it does most of the work. It should be sharp and free from nicks or chips. The chipbreaker sits atop the blade and helps to break up shavings as they pass through. The cap iron holds everything in place and provides pressure against the blade.
The frog is an adjustable piece that holds the blade in place at a specific angle. The knob and tote are used for gripping and guiding the plane over the wood surface. The sole is the flat bottom surface that runs along the wood while preventing tear-out during use. Common problems with hand planes include dull blades, misaligned frogs or soles, and loose knobs or totes. Understanding these parts will help you identify any issues that may arise during use.
When choosing which type of hand plane to use for your project, there are several factors to consider such as size, shape, and angle of attack. In the next section, we will discuss each type of hand plane in detail so you can make an informed decision on which one to use for your next woodworking project.
Types Of Hand Planes: Which One To Use For Your Project
As a carpenter or woodworker, you know that every project has its unique requirements, and using the right hand plane can make all the difference. When it comes to types of hand planes, there are two main categories to consider: block planes and bench planes. Block planes are smaller and ideal for one-handed use on smaller projects, while bench planes are larger and designed for use on bigger projects.
Within these categories, there are many specialty planes to choose from depending on your needs. For instance, jack planes are versatile and suitable for both roughing and smoothing workpieces. Smoothing planes are used primarily for fine finishing work while scrub planes excel at removing a lot of material quickly. Ultimately, the type of hand plane you choose should depend on the specific task at hand.
When it comes to vintage vs. modern hand planes, each has its own advantages. Vintage hand planes often have more character and history behind them but may require some restoration work before they can be used effectively. Modern hand planes, on the other hand, are often made with more advanced materials that can withstand wear and tear better than their vintage counterparts. Ultimately, choosing the right type of hand plane depends on your preferences as well as your budget and intended usage for the tool.
Transitioning into the next section about choosing the right blade material and size is essential because selecting an appropriate blade is crucial in achieving desired results when using a hand plane. Factors such as blade thickness and material can impact how smoothly a plane will cut through wood or other materials. By selecting the right blade for your project’s needs, you’ll be able to achieve better results in less time with less effort – something every carpenter or woodworker desires!
Choosing The Right Blade: Material And Size
After selecting the appropriate hand plane for your project, choosing the right blade is equally important. The blade of a hand plane is responsible for cutting and shaping wood, which means it needs to be sharp and durable. There are various options available for blade materials such as high-speed steel, carbon steel, and laminated steel.
Blade maintenance is crucial for ensuring optimal performance and longevity of your hand plane. Regular honing and sharpening will keep the blade sharp and ready to use. However, after extended use, the blade may need to be replaced. Replacement blades are readily available in different sizes and materials, allowing you to choose one that best suits your needs.
When it comes to sharpening techniques, honing is the first step in maintaining a sharp blade. Honing involves using a specialized stone or abrasive surface to remove small amounts of metal from the blade’s edge until it becomes razor-sharp again. Grinding is another technique used when there are chips or nicks in the blade that need to be removed before honing can take place. Polishing follows honing or grinding to ensure that the edge of the blade has a smooth finish.
Transition: Now that you understand how to maintain your hand plane’s blade through proper maintenance techniques like honing and grinding, let’s delve into some tips on how to sharpen your hand plane blades effectively for optimal usage.
Sharpening Techniques: Honing, Grinding, And Polishing
Honing requires the use of a sharpening stone and a lubricant to refine the edge geometry, while grinding involves the use of abrasives such as stone grits to form a bevel angle. Polishing can be done with honing compound or stropping with sandpaper to burnish the edge and remove any burr. To ensure a sharp edge, the direction and alignment of the strokes should be considered when using sharpening techniques.
Honing
Achieving a razor-sharp edge on your hand plane is essential to achieving a smooth and effortless cut. Honing is the final step in sharpening, and it involves removing any burrs or imperfections left after grinding. As a carpenter or woodworker, honing is one of the most critical techniques to master.
To begin honing, first, ensure that you’re using the proper honing angle. Most hand planes require a 25-degree angle, but some may require more or less. Next, select your sharpening stone grits. Start with a coarse grit to remove any nicks or chips in the blade’s edge and then move on to finer grits for polishing the edge until it’s razor-sharp.
Honing tools such as honing guides and strop boards make this process easier by ensuring consistent angles and providing a surface for polishing. With practice and patience, honing can become second nature, allowing you to achieve perfect cuts every time. Remember that proper honing is key to achieving professional-grade results in your woodworking projects.
Grinding
After achieving a razor-sharp edge on your hand plane through honing, the next step is to discuss grinding, which is an essential technique in sharpening. Grinding involves removing material from the blade’s edge to create a new bevel angle or sharpen an existing one. This process requires specific equipment such as a grinder or belt sander, and it’s crucial to avoid common mistakes like overheating the blade or creating uneven angles.
When grinding, ensure that you’re using the proper equipment for the task at hand. A bench grinder is ideal for larger blades, while a belt sander works best for smaller blades. It’s also important to wear protective gear such as safety glasses and gloves when operating these machines. One of the most common mistakes in grinding is overheating the blade, which can cause it to lose its temper and become brittle. To avoid this, dip the blade frequently in water during grinding.
Another mistake to avoid when grinding is creating uneven angles on the blade’s edge. This can result in inconsistent cuts and poor performance. To prevent this from happening, use a jig or guide that ensures consistent angles throughout the grinding process. With practice and attention to detail, mastering grinding can lead to smoother and more effortless cuts on your woodworking projects.
In conclusion, honing and grinding are both critical techniques in sharpening your hand plane blades. While honing removes any burrs or imperfections left after grinding, grinding creates a new bevel angle or sharpens an existing one by removing material from the blade’s edge. By using proper equipment and avoiding common mistakes like overheating and uneven angles, you can achieve perfect cuts every time with your hand planes.
Setting The Blade: Adjusting The Depth Of Cut
To achieve the perfect cut, one must set the blade of a hand plane correctly. The first step is to adjust the depth of cut by setting the blade angle. This can be done by loosening the lever cap and adjusting the depth adjuster until it lines up with the mouth opening. The correct angle will depend on the type of wood being planed, but as a general rule, a low angle is best for end grains and highly figured woods, while a higher angle works better for harder woods.
Once the blade angle has been set, you should move on to adjusting the chip breaker. This piece is located directly behind the edge of the blade and helps prevent tear-out by breaking up chips before they have a chance to lift up from the surface. To adjust it, loosen the screw that secures it in place and move it closer or further away from the cutting edge until there is only a small gap between them. Be sure not to tighten it too much or else it may cause clogging or jamming.
By following these steps, you will have successfully set your hand plane’s blade and chip breaker for optimal performance. Now you are ready to move on to preparing your wood by smoothing, flattening, and truing it out for your desired project.
Preparing The Wood: Smoothing, Flattening, And Truing
Wood preparation is an essential step before beginning any woodworking project. Sanding and planing are two necessary methods for getting the desired finish. While sanding can be done using various tools, hand planing has its advantages. The benefits of hand planing include precision and control over the surface.
Hand planing is a technique that requires practice and patience to master. The process involves running a sharp blade over the surface of the wood to remove any roughness or unevenness. This process helps to flatten, smooth, and true up the wood, making it ready for further finishing work. The hand plane’s advantage is that it allows you to feel the texture and grain of the wood as you work on it, helping you achieve a more refined finish.
One of the critical factors when using a hand plane is maintaining proper pressure and angle while holding your grip on the tool. This factor ensures that you get a consistent cut on your workpiece throughout each pass. A good grip will allow for better control of your tool while working on hard or softwood species. In addition, understanding pressure will help reduce tear-out and damage to your piece during use.
Hand Positioning: Grip, Pressure, And Angle
After preparing the wood for smoothing, flattening, and truing, it’s time to pick up your trusty hand plane. But before diving into the planing process, it’s important to understand the proper hand plane grip techniques. A correct grip is essential for maintaining control over the tool and achieving optimal results.
To start, place your dominant hand on the handle of the plane with your thumb facing forward. Your other hand should rest on top of the blade housing, applying pressure downwards onto the wood. Make sure to keep your body in a comfortable position, allowing for easy movement back and forth along the board.
Controlling pressure and angle are also key factors when using a hand plane. You want to apply just enough pressure to remove shavings without gouging or damaging the wood. The angle at which you hold the blade will affect how much material is removed with each pass. Experiment with different angles until you find what works best for your specific project. By mastering these techniques, you’ll be able to create smooth and even surfaces that are ready for any finishing touches.
As important as grip technique, controlling pressure and angle are when using a hand plane, there is still more to learn about this versatile tool. Next up: planing across the grain: techniques for optimal results. Achieving smooth surfaces going against the grain can be tricky but with these tips and tricks, you’ll be able to tackle any woodworking project with confidence!
Planing Across The Grain: Techniques For Optimal Results
When it comes to cross-grain planing, it is important to take necessary precautions to prevent unwanted tear-out from occurring. One of the primary ways to reduce tear-out is by using a sharp blade. A dull blade will inevitably cause more damage than good, so make sure your blade is sharpened before beginning any planing work.
Another way to reduce tear-out while planing across the grain is by making sure you are going against the grain in small increments. This helps prevent large chunks of wood being removed at once, which can lead to unsightly tear-out. Instead, work in small sections and slowly move across the surface until the desired smoothness is achieved.
Overall, reducing tear-out while cross-grain planing requires patience and attention to detail. By taking the necessary precautions such as using a sharp blade and working in small sections, you can achieve optimal results without sacrificing the quality of your work.
To continue with achieving optimal results when using a hand plane, let’s move on to discussing planing with the grain: avoiding tear-out and snipe.
Planing With The Grain: Avoiding Tear-Out And Snipe
As a carpenter or woodworker, you understand that the process of planing with the grain is crucial to achieving smooth and even surfaces. However, if you fail to follow the right approach, you may encounter problems such as tear-out and snipe. Fortunately, these issues are entirely avoidable with proper technique and attention to detail.
One way of preventing tear-out when planing is by ensuring that your blade is sharp enough to make clean cuts through the wood fibers without tearing them. Additionally, it would be best to orient your board in such a way that the plane blade cuts parallel to the direction of the wood grain. This strategy helps to reduce any resistance between the blade and the wood surface, thereby minimizing any chances of unwanted tear-out.
Another common issue when planing is snipe, which occurs when your hand plane cuts too deeply into either end of your board. To prevent this problem from occurring, consider supporting both ends of your board using additional pieces of scrap lumber before starting to plane your workpiece. You should also ensure that each pass with your hand plane covers an equal length across your board’s width.
In conclusion, avoiding tear-out and preventing snipe while planing requires you to emphasize proper technique and attention to detail as a carpenter or woodworker. By ensuring that your blade is sharp enough and orienting your board in line with its grain direction, you can minimize any chances of unwanted tear-out during planing operations. Furthermore, supporting both ends of your workpiece using scrap lumber can help prevent snipe while giving you smoother results from each pass with your hand plane. With these tips in mind, let us now move on to finishing touches such as sanding, scraping, and buffing for a flawless finish on our woodworking projects.
Finishing Touches: Sanding, Scraping, And Buffing
Once you have finished using your hand plane, it is important to give the wood a smooth finish. This can be achieved through a combination of sanding, scraping, and buffing. Sanding involves using sandpaper to create a smooth surface by removing any rough spots or imperfections. Start with a coarse grit and gradually work your way up to finer grits until you achieve the desired level of smoothness.
Scraping techniques are another effective way to remove any remaining rough spots or tear-out. A scraper can be used in place of sandpaper or in conjunction with it. To use a scraper, hold it perpendicular to the wood and apply pressure while pulling it towards you. The key is to use a consistent angle and pressure so that you don’t create any new scratches or marks on the wood.
Finally, buffing materials such as steel wool or polishing compounds can be used to bring out the natural shine of the wood. Steel wool can be used for light buffing, while polishing compounds are better suited for heavier applications. Apply these materials with a soft cloth and use gentle circular motions until you achieve the desired level of shine.
Moving onto maintenance and care: cleaning, lubricating, and storing are all important aspects of keeping your hand plane in good condition. By taking proper care of your tool, you’ll extend its lifespan and ensure that it performs at its best every time you use it. Let’s take a closer look at each of these steps now.
Maintenance And Care: Cleaning, Lubricating, And Storing
Maintenance and Care: Cleaning, Lubricating, and Storing
Keeping hand planes in good condition is essential to ensure that they work efficiently and remain useful for extended periods. Regular cleaning, lubrication, and proper storage can prevent rust, wear and tear, and other issues that may affect the tool’s performance. Maintaining a hand plane is as important as using it properly.
To start, one effective way of preventing rust on metal parts is to keep them dry and clean at all times. After use, wipe the blade with a dry cloth or rag to remove any moisture or debris that may have accumulated during the job. You can also apply a thin layer of oil or wax to protect it from rusting further. Remember always to store your hand plane in a clean, dry place away from direct sunlight or moisture.
Storing tools correctly is essential if you want them to last longer. When storing hand planes, make sure you keep them in their original cases or boxes if possible. If not available, wrap the tool with a soft cloth or towel before placing it in a drawer or cabinet. Always avoid exposing your hand plane to extreme temperatures or humidity levels as this may cause warping or cracking of wooden parts over time.
As you can see, taking care of your hand plane is simple but crucial if you want it to serve you well for years to come. With regular cleaning and proper storage techniques in place, you will be able to prevent rust and other common issues that could affect its performance over time. In the next section, we will discuss troubleshooting common problems people encounter when using hand planes while also providing solutions on how best to deal with these issues effectively without causing further damage.
Troubleshooting: Common Issues And Solutions
After properly cleaning, lubricating, and storing your hand plane, it’s time to use it. However, you may encounter some issues while using the tool that need troubleshooting. One common issue is blade alignment. If the blade is not aligned correctly, it can result in uneven and inconsistent cuts. To troubleshoot this problem, check if the blade is straight and centered in the mouth of the plane. Adjust it accordingly until it is aligned properly.
Another issue you may face while using a hand plane is tear out. Tear out occurs when the wood fibers are torn instead of being cut cleanly by the blade. This results in rough and uneven surfaces on your workpiece. To avoid tear out, ensure that your blade is sharp and positioned at a low angle relative to the wood grain. Additionally, make sure you are planing with the grain rather than against it.
To make sure you are using your hand plane correctly, here are three helpful tips:
- Start with light passes: It’s always better to remove less material at first than to take off too much and ruin your workpiece.
- Use two hands: Applying even pressure with both hands ensures consistent cuts and prevents injury.
- Keep your plane flat: Make sure that you’re not twisting or tilting the plane as you move it along the wood surface.
Next up on our journey of hand planing techniques are advanced techniques such as chamfering, beveling, and jointing. These techniques require more skill but can produce incredible results with practice and patience. Let’s dive into these techniques in our next section!
Advanced Techniques: Chamfering, Beveling, And Jointing
The hand plane is a versatile tool that can be used for a variety of woodworking tasks. Advanced techniques such as chamfering, beveling, and jointing can be achieved with the use of a hand plane.
Creating patterns with a hand plane is an art that requires precision and skill. By adjusting the blade angle and depth, intricate designs can be carved into wood surfaces. The key to achieving precision in pattern-making is to take small, shallow cuts until the desired depth is reached. Careful attention must also be paid to the angle and direction of each cut to ensure consistency in the pattern.
Beveling and jointing are two techniques that require precise angles and straight edges. Beveling involves cutting a sloping edge on a piece of wood, while jointing involves creating perfectly flat surfaces for joining pieces together. Both techniques require careful adjustment of the blade angle and depth to achieve accurate results. The use of jigs and fixtures can enhance accuracy and consistency when working on these types of projects.
By mastering advanced techniques such as chamfering, beveling, and jointing with a hand plane, woodworkers can create intricate designs with precision and accuracy. The use of jigs and fixtures further enhances accuracy by providing consistent angles and measurements for each cut. With practice, these skills can be honed to perfection, allowing woodworkers to create beautiful works of art that showcase their craftsmanship. In the next section, we will explore how using jigs and fixtures can enhance accuracy and consistency even further when working with a hand plane.
Using Jigs And Fixtures: Enhancing Accuracy And Consistency
After mastering advanced techniques like chamfering, beveling, and jointing, the next step is to use jigs and fixtures to enhance accuracy and consistency in hand planing. Using fixtures and clamps is crucial in holding the wood securely while planing. This not only ensures safety but also prevents any unwanted movement that can affect the outcome of your work.
Before planing, measuring and marking are important steps that cannot be overlooked. Accurate measurements ensure that the final product meets the desired specifications. Marking allows you to keep track of your progress as you work through each pass with your hand plane. This is especially important when working on larger projects where precision is key.
While using jigs and fixtures can definitely improve your woodworking skills, it’s important to remember safety practices when operating a hand plane. Protect yourself by wearing safety goggles or glasses to prevent any debris from entering your eyes. Make sure your workspace is free from clutter and anything that may cause accidents or injuries. In the next section, we will discuss more about safety practices that every carpenter or woodworker must know before using their hand plane.
Safety Practices: Protecting Yourself And Your Workspace
According to a recent study, hand tool injuries account for 8% of all workplace injuries in the construction industry. This fact highlights the importance of practicing safety measures when using hand planes and other tools. As a carpenter or woodworker, it is essential to prioritize your safety and that of your workspace.
One key safety measure is workspace organization. A cluttered workshop or worksite increases the risk of accidents. Ensure that you have enough space to move around freely and store your tools properly after use. Keep your work area well-lit and clear of any debris that may cause tripping hazards.
In addition, it is crucial to have emergency procedures in place in case an accident occurs. Have a first aid kit readily available, and ensure that all workers are aware of how to use it in case an injury occurs. It would be best if you also had a plan for dealing with more severe incidents such as calling an ambulance or contacting emergency services. By prioritizing safety measures such as workspace organization and having emergency procedures in place, you can protect yourself and others while using hand planes and other tools on the job site.
Conclusion
To master the art of woodworking, it is imperative to learn how to use a hand plane. Understanding the anatomy of a hand plane and the different types available will allow you to choose the right one for your project. Choosing the right blade and sharpening techniques are also important factors in achieving precision and accuracy in your work.
Setting the blade and troubleshooting common issues will ensure that you can achieve consistent results every time. Advanced techniques such as chamfering, beveling, and jointing require practice, but using jigs and fixtures can enhance your accuracy. Lastly, safety practices must be taken seriously to protect yourself and your workspace.
As a carpenter or woodworker, using a hand plane is an essential skill that requires attention to detail and patience. With practice, you can achieve flawless results that will make any project stand out. Whether you are a novice or seasoned woodworker, mastering the use of a hand plane is an investment worth making for quality craftsmanship. So grab your hand plane today, start practicing these techniques, and take your woodworking skills to new heights!
Image Credits
- “Steve Knight Hand Planes” by Let Ideas Compete (featured)







![How To Repair Rotted Wood 11 Texture : Altario Buick Estate Wagon : Rotting Faux Wood Paneling [1 of 2]](https://green-life.blog/wp-content/uploads/2023/05/z1CersK-gCjq-150x150.jpg.webp)


