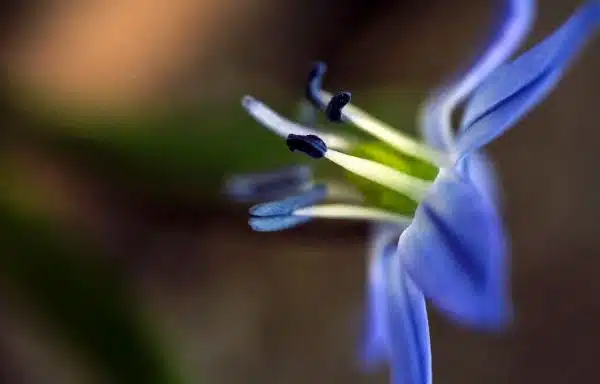
Siberian squill (Scilla siberica) is a charming, petite plant that thrives in the early spring. This low-growing flower is native to Siberia and Turkey but has become popular throughout the world due to its ease of cultivation and attractive blue-violet blooms. Siberian squill is a member of the Asparagaceae family and can be grown in various climates, making it an ideal addition to any garden or landscape.
To ensure optimal growth and development of Siberian squill, it is important to understand its unique growing requirements. In this article, we will provide a comprehensive guide for plant care and cultivation of this ornamental flower. Whether you are a seasoned horticulturist or just starting out in gardening, our guide will equip you with the necessary knowledge to successfully grow this stunning spring-blooming plant. So, let’s dive into the world of Siberian squill and discover how to best care for and grow this delightful plant.
Overview Of Siberian Squill
Siberian squill, also known as Scilla Siberica, is a beautiful and low-maintenance bulb that is commonly grown for its ability to add color and vitality to gardens. This hardy plant boasts delicate blue or purple flowers that bloom in early spring, just in time to signal the end of winter. It is native to Russia, Iran, and the Caucasus region but has gained popularity worldwide due to its many benefits.
One of the main benefits of Siberian squill is its ability to naturalize quickly and easily. This means that once planted, it will multiply rapidly, forming attractive colonies without much effort on your part. As such, it is perfect for gardeners looking for a cost-effective way to add color and life to their landscape without breaking the bank.
When compared with other popular spring bulbs such as daffodils and tulips, Siberian squill stands out for its versatility and adaptability. Unlike these more demanding plants, it can grow in almost any soil type or light condition as long as it has good drainage. Additionally, it is deer resistant and can be used in combination with other bulbs or perennials to create stunning displays throughout the season. In the next section, we will explore some of the botanical characteristics that make this plant so unique.
Botanical Characteristics Of Siberian Squill
It is always fascinating to learn about the botanical characteristics of any plant species. Siberian Squill (Scilla siberica) is no exception. This lovely, small perennial plant has a lot to offer to both amateur and professional gardeners. The plant grows up to 15 cm tall and blooms in early spring with beautiful blue flowers. It has narrow leaves that are deep green and measure around 10-15 cm long.
Growing conditions play an important role when it comes to cultivating Siberian Squill successfully. The ideal growing conditions for this plant include well-drained soil that is rich in organic matter. It prefers partially shaded areas but can also grow in full sun. The plant is highly adaptable and can tolerate different types of soils, including clay, loam, and sandy soils. However, it does not grow well in wet or waterlogged soil.
Habitat preferences of Siberian Squill are diverse too. It is native to Russia and western Asia but has now become naturalized in many parts of Europe and North America. In nature, the plant prefers woodland edges, meadows, and rocky slopes. In gardens, it makes a wonderful addition to rock gardens or underplanting for deciduous trees or shrubs. Its ability to naturalize makes it perfect for mass planting as a ground cover or as a border plant.
When it comes to planting Siberian Squill, choosing the right location is crucial for its growth and development. In the next section, we will discuss some important factors that you need to consider before planting this lovely little plant in your garden.
Choosing The Right Location For Planting
The Siberian Squill is a hardy plant that grows well in various types of soil. However, it thrives best in well-draining soil that is rich in organic matter. When choosing the right location for planting, it is important to consider the soil type and the amount of sun exposure that the area receives.
Sun exposure is critical for the growth and development of any plant, including the Siberian Squill. This plant requires a moderate amount of sunlight to flourish. Therefore, when selecting a location for planting, look for an area that receives partial shade or full sun for at least six hours per day.
Regarding soil type, Siberian Squills prefer soils that are moist but not waterlogged. The ideal soil pH range for this plant is between 4.5 to 7.5. If your soil falls outside this range, consider amending it with compost or other organic matter to improve its quality and provide necessary nutrients.
As we have seen, selecting the right location for planting Siberian Squills involves considering two critical factors: sun exposure and soil type. Once you have identified an appropriate spot in your garden or landscape, it’s essential to prepare your soil adequately before planting your bulbs. In the next section, we will discuss how to prepare and fertilize your soil effectively to ensure optimal growth and yield of these beautiful plants.
Soil Preparation And Fertilization
- Siberian squill is a perennial flower that prefers a soil pH between 6.0 and 7.0.
- It is important to test the soil pH before planting to ensure the proper nutrients are available for the plant’s growth.
- Fertilizing with a well balanced fertilizer such as a 10-10-10 or 8-8-8 formulation can help to ensure the optimal growth of siberian squill.
- Slow-release fertilizers are often recommended for siberian squill as they can provide a steady supply of nutrients to the plant over a longer period of time.
Soil Ph
The soil pH level is an essential factor to consider when preparing and fertilizing the soil for siberian squills. These plants require a slightly acidic to neutral soil with a pH range of 6.0 to 7.0. If the soil pH level is too low or high, it can affect the plant’s growth and development, resulting in poor yield, stunted growth, or even death. Therefore, it is crucial to conduct regular pH testing of the soil to ensure that it falls within the appropriate range.
Adjusting soil pH levels is necessary when preparing the soil for siberian squill cultivation. Suppose the soil test reveals that the pH level is too low or high than the desired range. In that case, it requires adjusting the pH levels by adding suitable amendments such as lime to increase alkalinity or sulfur to lower acidity levels. It is crucial to follow recommended application rates for these amendments since excess amounts can harm plants’ roots and negatively impact their growth.
In conclusion, maintaining proper soil pH levels plays a vital role in ensuring healthy siberian squill growth and optimal yield potential. Regular testing of the soil is necessary to monitor changes in pH levels over time since various factors such as rainfall and crop rotation can affect them. Adjusting soil pH levels using appropriate amendments will enhance nutrient uptake by plants, promote root development, and improve overall plant health.
Fertilizer Types
Soil preparation and fertilization are essential components of growing healthy siberian squills. While pH levels play a crucial role in plant growth, equally important is the use of appropriate fertilizers to enhance soil nutrient content. Fertilizers provide plants with essential nutrients such as nitrogen, phosphorus, and potassium necessary for optimal growth and yield potential. In this section, we will discuss the types of fertilizers used for siberian squill cultivation.
Fertilizers can be broadly categorized into organic and chemical fertilizers. Organic fertilizers are derived from natural sources such as animal waste, compost, or bone meal. These types of fertilizers provide slow-release nutrients to plants and improve soil structure and water-holding capacity. On the other hand, chemical fertilizers are usually manufactured using synthetic compounds that provide an immediate nutrient boost to plants but do not improve soil health over time.
When to apply fertilizer during the growing season depends on the plant’s stage of growth and its nutrient requirements. For siberian squills, it is best to apply fertilizer during their active growing period in early spring before flowering starts. Applying fertilizer too late in the season can cause excessive foliage growth at the expense of bulb development. It is also essential to avoid over-fertilizing since excess nutrients can lead to leaf burn or root damage, resulting in poor plant performance.
Watering And Irrigation Techniques
When it comes to watering Siberian squill, it’s essential to strike a balance between overwatering and underwatering. Too much water can cause the bulbs to rot, while insufficient water can stunt their growth. Therefore, it’s crucial to determine the right watering frequency and technique.
Drip irrigation is an ideal watering technique for Siberian squill as it allows water to be delivered directly to the plant’s roots without wetting its foliage. Drip irrigation systems have a series of small pipes that deliver water at a slow and steady rate, ensuring that the soil remains moist but not saturated. This method also reduces water waste and prevents fungal diseases caused by overwatering.
To ensure that your Siberian squill plants are healthy, here are some watering tips you should keep in mind:
- Water your plants deeply but infrequently
- Water in the morning or late afternoon when temperatures are cooler
- Avoid getting water on the leaves as this can lead to fungal infections
By following these simple tips and utilizing drip irrigation, you’ll be able to maintain optimal soil moisture levels for your Siberian squill plants without risking overwatering or underwatering. In the next section, we’ll discuss propagation methods for Siberian squill so that you can expand your collection of these beautiful spring bloomers.
Propagation Methods For Siberian Squill
Siberian Squill: Propagation Methods
Siberian squill is an early blooming, low-growing plant that is often used in garden beds and borders. If you want to propagate more of these lovely flowers, there are a few methods you can use. The most common propagation methods for Siberian squill include dividing the bulbs and planting bulb scales.
Dividing the bulbs is the easiest way to propagate Siberian squill. This method involves digging up the clump of bulbs and gently separating them into smaller pieces. Each piece should have at least one shoot or growing point. Replant the small bulbs immediately after division in ideal growing conditions to ensure successful establishment.
Another propagation method for Siberian squill is planting bulb scales. This technique involves removing the outer scales from mature bulbs and planting them individually in well-draining soil mixtures under ideal conditions. The scales will develop roots and shoots, eventually forming new bulbs that can be transplanted once they reach maturity.
| Propagation Method | Ideal Timeframe | Ideal Conditions |
|---|---|---|
| Dividing Bulbs | Late Summer or Early Fall | Well-draining soil with full sun exposure |
| Planting Bulb Scales | Fall or Spring | Moist soil at a depth of 2-3 inches |
| Raising From Seeds | Spring | Warm, moist soil with a temperature of 60°F |
Overall, propagating Siberian squill can be achieved through various means, such as dividing bulbs or planting bulb scales. Both methods require ideal environmental conditions such as well-draining soil mixture or adequate moisture levels to ensure successful establishment, growth and development of new plants. In the subsequent section we’ll discuss how transplanting and dividing siberian squill can help maintain healthy plant growth over time.
Transplanting And Dividing Siberian Squill
As gardeners, we all desire to see our plants thrive and multiply. If you want to propagate your Siberian squill or give it a new home, transplanting and dividing the bulbs is the way to go. But when is the best time to transplant or divide? And what tools should you use?
Best time for transplanting Siberian Squill bulbs:
- Transplant in the fall after foliage has died back
- Alternatively, transplant in early spring before new growth appears
Tools for transplanting:
- Garden fork or spade
- Hand trowel
- Watering can or hose
Dividing Siberian Squill: when and how to do it:
- Divide every 3-4 years to prevent overcrowding
- Dig up clumps carefully with a fork or spade
- Separate bulbs by gently pulling them apart
- Replant immediately at the same depth as before
Transplanting and dividing Siberian squill can be an easy and rewarding task if done correctly. By following these guidelines, you can ensure that your plants will continue to thrive and provide beauty in your garden for years to come. However, as with any plant, there are pests and diseases that you need to watch out for. In the next section, we will discuss some common problems that may affect your Siberian squill and how to prevent or treat them.
Pests And Diseases To Watch Out For
After successfully transplanting and dividing Siberian Squill, it is important to remain vigilant for any pests or diseases that may threaten the health and growth of the plant. Common pests include aphids, slugs, and snails. Aphids are small insects that feed on the sap of plants, causing leaves to curl and turn yellow. They can be controlled by spraying a mixture of soapy water on the affected areas. Slugs and snails, on the other hand, tend to eat leaves and flowers. They can be deterred by placing copper tape around the base of the plant.
Another common disease that affects Siberian Squill is Botrytis blight, also known as gray mold. It is caused by a fungus that thrives in damp conditions and manifests as brown spots on leaves or stems. The best way to prevent Botrytis blight is to ensure proper ventilation around the plant and avoid overwatering. If it does occur, affected areas should be removed immediately before applying a fungicide.
Effective treatments for common pests and diseases vary depending on severity but generally involve pruning away affected areas and applying insecticides or fungicides as necessary. It is also important to properly dispose of any infected plant matter in order to prevent further spread of disease.
With proper care, Siberian Squill can thrive in gardens and landscapes alike. Companion planting options for this bulbous perennial include other early-blooming bulbs like crocus or hyacinth as well as groundcovers like creeping phlox or creeping thyme which provide additional texture and color contrast while also helping to suppress weeds.
Companion Planting Options For Siberian Squill
When it comes to companion planting combinations, there are several options that can benefit your siberian squill. Firstly, pairing it with daffodils is a popular choice as they both bloom in early spring and have similar soil requirements. Additionally, planting siberian squill alongside other small bulbs like snowdrops or crocuses can create a beautiful carpet of flowers that will brighten up any garden.
Another companion plant option is to pair siberian squill with ground covers like creeping thyme or sedum. These plants not only provide a nice contrast in texture and color but also help suppress weeds and retain moisture in the soil. However, it’s important to note that these ground covers may compete with siberian squill for nutrients so make sure to space them out accordingly.
There are some drawbacks to consider when choosing companion plants for siberian squill such as overcrowding or competition for resources. It’s important to choose plants that have similar soil requirements and growth habits as well as giving each plant enough space to thrive. Additionally, seasonal planting options should be taken into consideration when planning your garden layout. For example, if you plan on planting annuals in the summer, make sure they won’t overtake your siberian squill during its dormant period.
Transitioning into the next section about pruning and deadheading techniques, it’s important to note that proper care of your companion plants can lead to a healthier and more vibrant garden overall. By understanding how different plants interact with one another, you can create a harmonious ecosystem where each plant supports the others. In the following section, we will discuss pruning and deadheading techniques that will help keep your garden looking its best year-round.
Pruning And Deadheading Techniques
Pruning and Deadheading Techniques:
Pruning techniques are essential for maintaining the health and beauty of your Siberian squill plants. It is recommended that you prune your plants once a year, preferably in late winter or early spring before new growth starts. Pruning helps to remove any dead or diseased branches, encourage new growth, and maintain the shape of the plant.
Deadheading methods are also crucial for promoting healthy growth in your Siberian squill plants. Deadheading involves removing spent flowers from the plant to prevent them from producing seeds. This process redirects energy back into the plant, encouraging it to produce more blooms rather than going to seed production. Deadheading also helps to keep your garden looking neat and tidy.
To properly prune your Siberian squill plants, start by removing any dead or diseased branches with sharp, clean pruning shears. Cut at a 45-degree angle just above a healthy bud to promote new growth. To deadhead your plants, snip off spent flowers just below the base of the flower head using sharp scissors or pruning shears.
- Regular pruning and deadheading will encourage healthy growth and promote more blooms.
- Removing spent flowers redirects energy back into the plant.
- Proper technique is necessary when pruning and deadheading to ensure healthy growth.
Transition: Now that we have covered proper pruning and deadheading techniques for Siberian squill plants, let’s move on to harvesting and storing their bulbs for optimal results.
Harvesting And Storing Siberian Squill Bulbs
It is estimated that over 50% of Siberian squill bulbs are lost due to poor storage and post-harvest care. This is a startling statistic that highlights the importance of proper bulb storage and care. After harvesting your Siberian squill bulbs, it is crucial to take certain steps to ensure their survival and growth in the upcoming season.
Firstly, it is imperative to clean the bulbs thoroughly by removing any dirt or debris. Next, inspect each bulb for damage or disease. Any damaged or diseased bulbs should be immediately discarded as they can infect healthy ones. Once you have inspected and cleaned all the bulbs, allow them to dry completely before storing them.
Proper bulb storage involves keeping them in a cool, dry location with good air circulation. You can store them in a mesh bag or paper bag with holes punched in it to allow for ventilation. Avoid storing them in plastic bags as they can cause excess moisture buildup and lead to rotting. With these simple post-harvest care techniques, you can ensure that your Siberian squill bulbs will thrive in the next growing season.
As important as bulb storage is, winter care for Siberian squill is equally crucial for their continued growth and health. In the next section, we will discuss how you can provide optimum winter care for your Siberian squill plants.
Winter Care For Siberian Squill
Mulching Siberian Squill in winter is beneficial in order to protect from extreme cold temperatures and to conserve soil moisture. It is important to use an organic material such as straw, leaves or bark mulch that is around two to four inches thick.
Watering Siberian Squill during winter should be done only when the soil is dry, and should be done in the early morning to avoid potential freezing of the water.
Pruning Siberian Squill should always occur at the beginning of winter before the coldest temperatures arrive. Pruning should be conducted using sharp tools to ensure clean and accurate cuts.
Mulching
Mulching is an essential part of winter care for Siberian Squill. This practice involves covering the soil around the bulbs with a layer of organic material to help retain moisture and regulate temperature. The benefits of mulching include protecting the bulbs from extreme cold temperatures, preventing them from drying out, and suppressing weed growth.
There are several types of mulch that are suitable for Siberian Squill, including shredded leaves, straw, pine needles, and compost. Shredded leaves are an excellent choice because they are readily available and provide a slow-release source of nutrients as they decompose. Straw is another popular option as it is effective at retaining moisture in the soil. Pine needles also work well as they do not break down quickly and can improve soil acidity levels.
When applying mulch to Siberian Squill, ensure that it covers the ground around the bulbs but does not touch the foliage or stem. This will prevent rotting from occurring and allow air circulation around the plant. It is recommended to apply a layer of 2-3 inches thick for optimal protection. With proper mulching techniques, your Siberian Squill will thrive during the winter months and continue to bloom beautifully in springtime.
Watering
Winter care for Siberian Squill is an essential task that requires proper attention to maintain the health and beauty of the plant. In addition to mulching, watering is another critical aspect of winter care that must be done correctly. Watering frequency and techniques are vital considerations when caring for this bulbous plant during the colder months.
Watering frequency for Siberian Squill should be reduced during the winter season to prevent overwatering, which can lead to rotting. It is recommended to water once a week or every other week, depending on the weather conditions. However, it is essential to monitor soil moisture regularly and adjust watering accordingly. Overwatering can also occur if there is inadequate drainage in the planting area, so ensure proper drainage by amending the soil with organic matter or creating raised beds.
Watering techniques are equally important when caring for Siberian Squill in winter. Water should be applied directly to the soil around the bulbs rather than overhead watering, which can cause excess moisture on the foliage and increase the risk of fungal diseases. Additionally, avoid using cold water as it can shock the plant’s roots and damage them. Instead, use tepid water at room temperature when irrigating your Siberian Squill during winter.
In summary, watering plays a crucial role in maintaining healthy Siberian Squill plants during winter. Proper watering frequency and techniques will help prevent overwatering and fungal diseases while ensuring optimal growth conditions for these beautiful bulbs. By following these guidelines along with proper mulching techniques discussed earlier, you can ensure your Siberian Squill thrives through winter and continues to bloom beautifully in springtime.
Pruning
Seasonal pruning is an essential aspect of winter care for Siberian Squill. Pruning helps to promote healthy growth, control diseases, and remove dead or damaged plant parts. The frequency of pruning depends on the specific needs of the plant and the severity of the winter season. While Siberian Squill does not require extensive pruning, it is recommended to prune once a year during late fall or early spring when the plant is dormant.
Pruning frequency for Siberian Squill primarily involves removing dead or yellowing foliage and any broken stems. This can be done by gently pulling off wilted leaves or cutting them back to the base of the plant with clean, sharp shears. Be sure to avoid damaging healthy foliage or bulbs when pruning. Additionally, if you notice any signs of disease such as mold or discoloration, it is crucial to remove affected areas promptly to prevent further spread.
It is also important to note that excessive pruning can damage the plant and hinder its ability to bloom in spring. Therefore, it is recommended to only prune what is necessary and avoid cutting back more than one-third of the plant’s total foliage at a time. By following these guidelines for seasonal pruning, you can help ensure optimal growth conditions for your Siberian Squill while maintaining its natural beauty and health throughout winter.
Frequently Asked Questions About Siberian Squill
As the winter months approach, it is important to take proper care of your Siberian squill to ensure its survival during the colder temperatures. One key aspect of winter care for this plant is to make sure not to cut back any foliage until it has completely died back on its own. This allows the plant to store necessary energy for the following season. Additionally, mulching around the base of the plant can help protect it from harsh winter conditions.
When it comes to planting Siberian squill, choosing the best soil is crucial for successful growth. This plant prefers well-draining soil with a neutral pH level. Adding organic matter such as compost or peat moss can also improve soil quality and provide necessary nutrients. The ideal time for planting is in the fall, about 4-6 weeks before the first frost.
As with any plant, there are common mistakes that should be avoided when growing Siberian squill. Overwatering can cause root rot and other fungal diseases, so it is important to wait until the top inch of soil is dry before watering again. It’s also important not to overcrowd plants, as they need enough space to spread out and grow properly. Finally, avoid planting in areas with high foot traffic or heavy machinery use, as this can damage delicate bulbs beneath the soil surface.
Common Mistakes To Avoid When Growing Siberian Squill
Growing siberian squill is an exciting experience; however, mistakes can be made that can negatively impact the plant’s health and beauty. Here are some common mistakes to avoid when growing siberian squill.
Overwatering: One of the most common issues with growing siberian squill is overwatering. Overwatering leads to root rot and other fungal diseases, which can cause the plant to die. Ensure you water your siberian squill plant only when the soil is dry, about 2 inches deep.
Poor drainage: Siberian squills require well-draining soil for optimal growth. Poorly draining soil holds water, leading to root rot and fungal diseases. To ensure your plants have adequate drainage, consider planting them in raised beds or add organic matter such as compost or peat moss to improve soil drainage.
Planting too shallow or too deep: Planting depth is a crucial factor that affects your siberian squill’s growth rate and overall health. Planting too shallow exposes the bulb to heat damage, while planting too deep delays sprouting and may result in rotting bulbs.
Not providing enough sunlight: Siberian squills prefer full sun or partial shade exposure for optimal growth and blooming. Inadequate sunlight causes stunted growth, reduced blooming rates, and weakens the plant’s immune system against pests and diseases.
Troubleshooting Tips:
- If you notice signs of overwatering like yellow leaves or wilted foliage, reduce watering frequency.
- If your soil has poor drainage issues, consider adding sand or perlite.
- Proper planting depth ensures healthy bulbs; aim for a planting depth of 3-4 inches.
- For insufficient sunlight levels, move your plants to areas with more light exposure.
To maximize the beauty and health of your siberian squill plant, there are several tips you can incorporate into your gardening routine.
Tips For Maximizing The Beauty And Health Of Your Siberian Squill Plant
After avoiding common mistakes when growing Siberian Squill, you can now focus on maximizing the beauty and health of your plant. One way to do so is through container gardening. Container gardening allows you to control the soil quality and moisture content of your plants, making it easier to maintain their health. When planting in containers, ensure that they are well-draining and have enough space for your squill bulbs. Also, use a high-quality potting mix and fertilize regularly.
Another way to maximize the beauty and health of your Siberian Squill is through natural pest control methods. Pests such as aphids, slugs, and snails can damage your plants’ foliage and flowers. One effective method of controlling pests is through companion planting. Planting herbs such as basil or chamomile around your squill can deter pests due to their strong scent. Additionally, using organic pesticides such as neem oil or insecticidal soap can help control pest infestations without harming beneficial insects.
To further enhance the beauty of your Siberian Squill plant, deadhead regularly to promote more blooms. Deadheading involves removing spent flowers before they form seeds to encourage new growth and increase the number of flowers produced by the plant. Additionally, mulching around your plants with organic matter such as compost or leaves can help retain moisture in the soil and suppress weed growth.
| Tips for Maximizing Beauty & Health | | — | — | — | | Container Gardening | Use well-draining containers with high-quality potting mix | | | Fertilize regularly | | Natural Pest Control | Companion planting with herbs like basil & chamomile | | | Use organic pesticides like neem oil & insecticidal soap | | Other Tips | Deadhead regularly to promote new growth & more blooms | | | Mulch around plants with organic matter for moisture retention & weed suppression |
In summary, there are various ways you can maximize the beauty and health of your Siberian Squill plant. Container gardening allows for better soil control, while natural pest control methods like companion planting and organic pesticides can help prevent pest infestations. Additionally, deadheading and mulching can enhance the beauty of your plant by promoting new growth and retaining moisture in the soil. By following these tips, you can maintain a healthy and beautiful Siberian Squill that will bring joy to your garden or indoor space.
Conclusion
The Siberian Squill is a charming and easy-to-grow plant that can add color and beauty to any garden. Its delicate blue flowers are a sight to behold, especially in the early spring when few other plants are in bloom. This article has provided an overview of the plant’s characteristics, as well as tips for planting, fertilization, watering, winter care, and more.
When choosing a location for planting Siberian Squill, it is important to consider factors such as sunlight exposure and soil quality. The plant prefers well-drained soil that is rich in organic matter. It also requires regular watering during its growing season to maintain healthy growth.
One common mistake that many gardeners make when growing Siberian Squill is over-fertilizing or over-watering the plant. This can lead to root rot or other problems that can negatively impact the health of the plant. By following the guidelines outlined in this article and taking proper care of your Siberian Squill plant, you can ensure that it thrives year after year.
In conclusion, the Siberian Squill is a delightful addition to any garden or landscape. With proper care and attention, it can provide years of beauty and enjoyment for both novice and experienced gardeners alike. So why not give this wonderful plant a try? You won’t be disappointed!
Image Credits
- “siberian squill, 2x life size” by jlodder (featured)

