Textile dyeing is an art that requires precision and technique to achieve desired results. Liquid fabric dye, in particular, has become increasingly popular due to its versatility and ease of use. However, improper use of liquid fabric dye can lead to disastrous results such as uneven color distribution or bleeding.
As a textile dyeing expert, I have witnessed many individuals struggle with liquid fabric dye and its application. In this article, I will provide valuable insights on how to use liquid fabric dye correctly. By following these guidelines, you can ensure that your fabrics are dyed evenly and effectively without any unwanted surprises. Whether you are a beginner or an experienced dyer, this guide will help you master the art of using liquid fabric dye for your textile projects.
Choosing The Right Fabric For Liquid Dyeing
As a textile dyeing expert, it is important to choose the right fabric for liquid dyeing. Fabric types and color compatibility play a huge role in achieving desired results. Natural fibers like cotton, wool, and silk work best with liquid dyes, as they absorb the color more easily than synthetic fibers like polyester or nylon. However, some synthetic fabrics can also be dyed with special types of liquid dyes.
Factors affecting dye absorption are also crucial considerations when selecting fabric for liquid dyeing. The tighter the weave of the fabric, the better it will hold onto the color. Lighter colored fabrics are easier to dye than dark-colored ones because they require less dye to achieve a desired hue. Additionally, pre-treatment techniques such as washing and scouring your fabric prior to dyeing can improve dye absorption by removing any residual chemicals or oils present in the fabric.
To prepare your fabric for dyeing, you need to consider several factors that will affect how well it absorbs color. By choosing the right fabric type and considering factors affecting dye absorption such as weave tightness and color compatibility, you can ensure that your final result is exactly what you envisioned. Pre-treatment techniques like washing and scouring can also help ensure that your fabric is ready for successful liquid dye absorption.
Preparing Your Fabric For Dyeing
After identifying the right fabric for liquid dyeing, the next step is to prepare it for the dyeing process. Preparation techniques are crucial in ensuring that the dye penetrates and binds well with the fabric. The first step is to wash the fabric thoroughly using detergent to remove any dirt or oil that might hinder proper absorption of the dye. After washing, rinse it in cold water and then soak it in warm water for a few minutes to open up its fibers.
Before proceeding with dyeing, it’s important to test your fabric using a fabric testing method. This helps you determine how much dye you need and what kind of results you can expect after dyeing. There are several methods for testing fabrics, including dipping a small piece of fabric into the dye bath or painting a small section of your fabric with a brush dipped in the dye solution. These tests help determine if there are any issues with color absorption or if additional preparation steps are required.
By following these preparation techniques and testing methods, you can ensure that your fabric is ready for liquid dyeing. The next step is selecting the right type of liquid fabric dye that will meet your specific needs. It’s essential to choose a high-quality product that will produce vibrant colors and long-lasting results on your chosen material. In the subsequent section, we’ll discuss some tips for selecting the right type of liquid fabric dye based on your project goals and desired outcomes.
Selecting The Right Type Of Liquid Fabric Dye
When it comes to selecting the right type of liquid fabric dye, there are a few things to consider. Firstly, it is essential to choose the appropriate dye for your fabric. Not all fabrics can be dyed, and some require specific dyes. Cotton, linen, rayon, and silk are some of the most common fabrics that can be dyed using liquid fabric dye. However, polyester and nylon may require different types of dyes due to their synthetic composition.
Once you have determined that your fabric is suitable for dyeing, the next step is choosing the best liquid fabric dye brands. There are several options available in the market, and selecting the right one can be overwhelming. It’s crucial to consider factors such as colorfastness, ease of use, and quality before making a purchase. Some top-rated brands include Rit Liquid Dye, Jacquard Procion MX Dye, and Dylon Fabric Dye.
When selecting a liquid fabric dye brand or type, it’s always best to follow the manufacturer’s instructions carefully. The guidelines will typically provide information on how much dye to use per weight of fabric and any additional steps required for pre-treatment or post-treatment processes. By choosing the right type of liquid fabric dye for your material and following the instructions provided by the manufacturer, you can ensure optimal results for your project.
Moving forward into measuring and mixing dye without losing consistency requires careful attention to detail in both quantity measurement and mixture agitation techniques.
Measuring And Mixing The Dye
- Accurate measuring of dye is essential for obtaining consistent results in textile dyeing.
- The amount of dye used should be determined by the weight of the fabric being dyed.
- It is important to use a non-metallic container when mixing dye and to add the dye to water rather than the reverse.
- Mixing the dye solution should be done with a stirring rod until all of the dye is dissolved and no undissolved particles remain.
Measuring Dye
Achieving the perfect shade of color when dyeing fabric requires measuring accuracy and proper dye concentration. Measuring dye accurately is crucial to ensure that the final product achieves the desired color intensity. Dye concentration refers to how much dye is used in relation to the amount of fabric being dyed.
When measuring dye, it is important to use a scale that is accurate and measures in small increments. This will prevent errors in measuring and ensure that the correct amount of dye is added to the mixture. Additionally, using a graduated cylinder or other measuring tool can help maintain consistency in measurement accuracy.
Dye concentration plays a significant role in achieving the desired color intensity. The ratio of dye to fabric should be carefully measured for best results. Too much dye can cause uneven coloring or even damage to the fabric, while too little may result in a weak or faded hue. By carefully measuring and mixing the dye, you can achieve beautiful and consistent results every time.
Mixing Dye
To achieve the perfect shade of color on fabric, measuring and mixing the dye properly are crucial components. While measuring the dye accurately is important, it is equally essential to mix it correctly to achieve the desired results. Mixing techniques can impact the final color outcome, and different mixing methods may be required for various types of dyes.
When it comes to mixing dye, there are several techniques that can be used depending on the type of dye and fabric being used. Some common techniques include using a blender or mixer, stirring with a spoon or stick, or even shaking the mixture in a jar. The key is to ensure that all components are thoroughly mixed to avoid any uneven coloring.
Color combinations play an important role in mixing dye as well. Depending on the intended outcome, different shades and hues can be achieved by combining different colors of dye. It is essential to follow a precise recipe when creating custom colors to ensure consistency in color intensity across multiple batches. By mastering measuring accuracy and proper mixing techniques, achieving beautiful and vibrant colors on fabric can become effortless.
Choosing The Right Dyeing Method
Did you know that choosing the right dyeing method can significantly affect the quality of your final product? In fact, a study conducted by textile experts showed that hand dyeing produces more vibrant and intricate colors compared to machine dyeing. However, machine dyeing is faster and more efficient, making it a popular choice for large-scale production.
Before beginning any dyeing process, it is important to consider the benefits of pre soaking. Pre soaking not only helps remove any dirt or impurities from the fabric but also allows the fibers to absorb the dye evenly. This step is especially crucial for natural fibers such as cotton or silk, which tend to resist liquid dyes without proper preparation.
When deciding between hand dyeing and machine dyeing, there are several pros and cons to consider. Hand dyeing allows for greater control over color intensity and pattern design, but can be time-consuming and physically demanding. On the other hand, machine dyeing is much faster and requires less effort but may result in uneven coloring if not done correctly.
In preparing your dye bath, it is important to follow specific guidelines based on your chosen method of dyeing. By carefully measuring out your ingredients and using appropriate tools, you can ensure that your fabric absorbs the color evenly and produce a high-quality finished product.
Preparing Your Dye Bath
To properly prepare your dye bath, there are several key steps to follow. First, make sure that you have selected the correct type of dye for your fabric. Using natural dyes will give you a different result than using synthetic dyes, so it’s important to know which type is best for your project.
Next, carefully measure out the amount of dye that you will need based on the weight of your fabric. Too much or too little dye can result in uneven color distribution or color fading over time. It’s also important to consider the temperature and pH of your water and adjust them as necessary for optimal results.
Once you have measured out your dye, dissolve it completely in hot water before adding it to your dye bath. This will ensure that the color is evenly distributed throughout the fabric. It’s also a good idea to add salt or vinegar to the bath to help set the color and improve absorption.
- Use a clean container for mixing and measuring
- Wear gloves and protective clothing to avoid staining
- Stir constantly during the dyeing process
- Avoid overcrowding the fabric in the dye bath
- Rinse thoroughly after dyeing
Troubleshooting color fading can be a common issue when using liquid fabric dyes. To prevent this from happening, make sure that you are following all preparation and care instructions carefully. If you notice any fading or discoloration after washing, try rewashing with cold water and mild detergent or adding a color-safe laundry booster to help revive the color.
Ensuring even color distribution is crucial for achieving professional-looking results with liquid fabric dyes. In the next section, we will discuss techniques for preparing your fabric before dying to ensure optimal absorption and even color saturation throughout your project.
Ensuring Even Color Distribution
1.The first step in ensuring even color distribution when dyeing fabric is to mix the dye to the correct ratios as indicated on the product packaging. 2. The next step is to prepare the fabric for dyeing. This involves ensuring the fabric is clean, wetting it with water, and then adding salt or soda ash to the dye bath. 3. It is important to note that most fabrics require different dyeing processes, such as acid, direct, and sublimation dyes. It is important to choose the correct dyeing process for the specific fabric being used. 4. Additionally, when dyeing with multiple colors, it is essential to add the dye to the fabric in a systematic process to ensure even color distribution.
Mixing The Dye
To achieve even color distribution when dyeing fabric, it is crucial to mix the dye correctly. Mixing techniques are essential to ensure that the dye dissolves and blends evenly before application. One common method is to add hot water to the dye powder and stir continuously until it dissolves entirely. Another technique involves adding salt or vinegar to the mixture, depending on the type of fabric being dyed. Proper mixing of the dye will help achieve an even color result.
Color blending is another essential aspect of achieving even color distribution when using liquid fabric dye. Before applying the dye, it’s advisable to create a sample swatch by mixing small amounts of different dyes together. This allows for experimentation with different color combinations and helps determine how much of each color should be used in the final mix. It’s important to keep track of the proportions used in case adjustments need to be made.
In summary, proper mixing techniques and color blending play a significant role in ensuring even color distribution when using liquid fabric dye. Taking time to experiment with different colors and proportions will help achieve desired results while avoiding unexpected outcomes such as uneven or patchy coloring. By following these guidelines, fabrics can be dyed flawlessly for various projects ranging from clothing items to home decor pieces without any complications or issues arising during the process.
Preparing The Fabric
When it comes to achieving even color distribution while dyeing fabric, properly preparing the fabric is just as important as mixing the dye. Different types of fabric require different pre-treatment methods to ensure that they absorb the dye evenly. Some fabrics, such as polyester and acrylic, are difficult to dye and should be avoided if possible. Natural fibers like cotton and silk are easier to work with and often yield better results.
To prepare the fabric for dyeing, it’s essential to wash it thoroughly beforehand. This removes any dirt or residue that may interfere with the dye absorption process. Pre-treating the fabric by soaking it in a solution of water and salt or vinegar can also help enhance its ability to absorb the dye evenly. It’s important to follow the manufacturer’s instructions when using pre-treatment agents as using too much can cause issues such as uneven coloring.
By taking care to properly prepare the fabric before dyeing, one can significantly increase their chances of achieving even color distribution. Understanding which types of fabrics work best for dying and utilizing pre-treatment methods will ensure that the end result is not only vibrant but also consistent throughout the entire piece of fabric.
Achieving Desired Color Depth
Ensuring even color distribution is crucial when dyeing fabrics with liquid fabric dye. However, achieving the desired color depth is equally important to get that perfect shade. Color blending can be done by mixing different colors of liquid fabric dye to achieve a unique hue.
To achieve the desired color depth, refer to the instructions on the liquid fabric dye package for guidance on how much dye to use based on the type and weight of the fabric. The more dye used, the deeper the color will be. Also, ensure that you use enough water to allow the fabric to move freely in the dye bath. This will ensure that every part of your fabric gets equal exposure and absorption of the liquid fabric dye.
Color fastness is another critical aspect when using liquid fabric dye. It refers to how well a dyed fabric holds its color after washing or exposure to light. Always choose high-quality dyes that are known for their excellent color fastness properties. Another way to increase color fastness is by adding salt or vinegar during the dying process, depending on your type of dye.
Maintaining the right temperature when using liquid fabric dye is essential for getting consistent results each time you use it. A temperature range between 60°F and 130°F is ideal for most types of dyes. Be sure not to let your water temperature exceed 140°F as this can damage some fabrics and cause uneven coloring in others. By following these guidelines, you can achieve beautiful and long-lasting colors with your liquid fabric dyes without compromising on quality or consistency in your workmanship.
Maintaining The Right Temperature
Maintaining the right temperature is crucial in achieving the desired results when dyeing fabrics. Think of it as a delicate balance, much like walking on a tightrope. Just as a slight imbalance can cause a person to fall, even a small deviation in temperature can ruin your fabric dyeing project. To ensure the correct temperature, use a thermometer to measure the water and dye mixture accurately. A thermometer is an essential tool that helps you maintain consistency throughout the process.
Controlling your heat source is another way to maintain the right temperature for your fabric dyeing project. You want to avoid sudden fluctuations in temperature because it can have disastrous effects on your finished product. To prevent this from happening, make sure to insulate your pot or container with towels or blankets. This insulation will help regulate the temperature and keep it steady throughout the process. Moreover, timing adjustments are necessary when working with heat sources such as gas stoves or electric burners.
The importance of maintaining consistent temperatures cannot be overstated when it comes to fabric dyeing. By following these simple steps and utilizing thermometers and insulation techniques effectively, you can ensure that you have achieved optimal results every time. In our next section on timing your dyeing process, we will explore how timing plays a crucial role in ensuring that you achieve precisely what you envision with your fabric dyed products.
Timing Your Dyeing Process
Timing techniques are essential in the liquid fabric dyeing process. Timing is crucial because it determines how long your fabric will stay in the dye bath and how deep the color will be. To achieve a uniform color, you need to time your dyeing process correctly. For example, if you leave your fabric for too long in the dye bath, it may become darker than what you intended.
Timing your dyeing process also depends on the type of fabric and dye you are using. Different fabrics require different timing techniques. For instance, natural fibers like cotton take longer to absorb dyes than synthetic fibers like polyester. So, when timing your dyeing process, it’s important to read the manufacturer’s instructions carefully and follow them accordingly. This way, you can avoid making any mistakes that may ruin your project.
Dyeing mistakes to avoid include under-dyeing or overdyeing your fabric. Under-dyeing occurs when you don’t leave your fabric long enough in the dye bath resulting in a lighter shade than what you expected. On the other hand, overdyeing happens when you leave your fabric for too long in the dye bath causing an over-saturation of color that may result in unevenness or splotches. To prevent such mistakes from happening, always time your dyeing process carefully and monitor it closely.
Transition into rinsing and washing:
Now that you have timed your dyeing process correctly and achieved a uniform color on your fabric let’s move onto rinsing and washing it to ensure durability of color and eliminate any excess dye residue from the material.
Rinsing And Washing Your Fabric
Have you ever experienced the disappointment of your favorite clothing item bleeding dye after a wash? Preventing color bleeding is crucial to maintaining the vibrancy and longevity of your dyed fabric. Proper rinsing and washing techniques are essential in ensuring that the dye adheres to the fabric without bleeding or fading.
For effective rinsing, make sure to use cold water during the entire process. Hot or warm water can cause the dye to bleed or fade. Start by filling a basin with cold water and submerging your fabric in it. Swirl it gently for a few minutes before draining the water completely. Repeat this process until the water runs clear, indicating that all excess dye has been removed.
Choosing the right detergent for washing dyed fabrics is equally important. Avoid using bleach or harsh detergents, as these can cause fading and color bleeding. Instead, opt for a gentle detergent designed specifically for delicate fabrics. Always read the label and follow instructions carefully when washing dyed fabrics to prevent any damage or discoloration. By following these tips, you can ensure that your dyed fabric remains vibrant and long-lasting.
To fix the dye and prevent bleeding, stay tuned for our next section where we will discuss some simple yet effective methods to ensure that your dye stays put on your fabric even after multiple washes.
Fixing The Dye To Prevent Bleeding
Preventing dye bleeding is a crucial step in the fabric dyeing process. When the dye is not adequately fixed, it can easily bleed onto other fabrics or fade over time. To avoid this, it is essential to follow the instructions on the liquid fabric dye package carefully. The instructions may vary depending on the type of fabric and dye being used, so be sure to read them thoroughly before beginning.
One method for fixing the dye to prevent bleeding is by adding salt or vinegar to the dye bath. Adding salt helps to set the color, while vinegar works as a fixative for natural dyes such as indigo. For synthetic dyes, use a product called Retayne that helps lock in color and prevent bleeding. It’s also important to rinse the fabric thoroughly after dying to remove any excess dye that could cause uneven color distribution.
Fixing uneven color distribution is another common issue when using liquid fabric dyes. To avoid this problem, make sure that you mix the dye thoroughly before adding it to the water and fabric. Also, ensure that there is enough water in the pot for even distribution of color throughout the fabric. Follow recommended agitation methods during dying; this will help ensure even coverage of all areas of your fabrics.
Preventing dye bleeding and fixing uneven color distribution are essential steps in achieving vibrant and long-lasting results with liquid fabric dyes. By following these tips and paying close attention to instructions on your specific product package, you can enjoy beautiful results every time you use liquid fabric dyes. In our next section, we will discuss what common mistakes people make when working with liquid fabric dyes and how to avoid them for better results.
Avoiding Common Dyeing Mistakes
- Before beginning the dyeing process, fabrics should be properly prepared to achieve the desired results. This can include washing and drying the fabric, and if needed, pretreating with a mordant.
- Liquid fabric dyes should be mixed according to the manufacturer’s instructions to ensure even color and to prevent unexpected reactions.
- Dye should be applied in a consistent way to ensure even coverage and an even distribution of color. This can be done by hand or with a dyeing machine.
- To ensure an even distribution of dye, fabrics should be agitated periodically during the dyeing process.
- The dye bath should be monitored to ensure the dye is not over-saturated with dye. This can result in a muddy color and a damaged fabric.
- After the desired color is achieved, the dye bath should be thoroughly rinsed with warm water to remove any remaining dye.
Preparing Fabrics
When it comes to dyeing fabrics, one of the most important aspects is preparing the fabric. Choosing appropriate fabric types and preparing them correctly can make all the difference in the final outcome of your dyeing project. Different fabrics require different preparation techniques, so it’s important to take time to research and understand what kind of preparation is necessary for the type of fabric you’re working with.
One key aspect of preparing fabrics for dyeing is choosing the right type of fabric. Natural fibers such as cotton, silk, and wool are ideal for dyeing because they absorb color well. Synthetic fibers like polyester or nylon can be more difficult to dye due to their chemical makeup. It’s also important to consider any finishes on the fabric such as sizing or starch that could prevent even color absorption.
Once you’ve chosen your fabric type, it’s time to prepare it for dyeing. This typically involves prewashing with a mild detergent and warm water to remove any dirt, oils or other substances that may affect dye absorption. Some fabrics may also require additional steps such as bleaching or mordanting to ensure even color uptake. Properly preparing your fabric before dyeing will help ensure a successful outcome and avoid common mistakes such as uneven color or bleeding.
Mixing Dye
As a textile dyeing expert, it’s important to understand that mixing dye is a crucial step in the dyeing process. Mixing dye can be challenging, especially for beginners. However, with the right tips and tricks, you can avoid common mixing mistakes and achieve beautiful, even color results.
One of the most important things to keep in mind when mixing dye is to use accurate measurements. It’s essential to measure both the amount of water and dye accurately. Using too much or too little can result in uneven color or bleeding. Another important tip is to mix the dye thoroughly before adding it to your fabric. This helps ensure even distribution of color throughout your project.
Another common mistake when mixing dye is not considering the type of fabric being used. Different fabrics absorb color differently, so it’s important to adjust your mixture accordingly. For example, silk may require a different mixture than cotton or wool. Taking the time to research and understand how different fabrics interact with dye will help you avoid common mistakes and achieve beautiful results every time.
Applying Dye
After successfully mixing the dye, the next step is to apply it evenly to your fabric. Applying dye evenly can be a daunting task, especially for beginners. It’s essential to ensure that the dye covers every part of the fabric to prevent patchiness and uneven coloring.
One of the most effective ways of applying dye evenly is by using a brush or sponge. This method helps distribute color evenly and allows you to cover hard-to-reach areas easily. Another way is by soaking your fabric in a container filled with the prepared mixture. However, this method may result in bleeding if not done correctly.
To prevent bleeding, it’s crucial to rinse your fabric thoroughly after applying the dye. This helps remove any excess dye and prevents it from transferring onto other fabrics when washed. Additionally, avoiding overcrowding when washing dyed fabrics can also help prevent bleeding. By spacing out your dyed fabrics during washing, you reduce friction and prevent them from rubbing against each other, which can cause colors to bleed into one another.
Troubleshooting Common Dyeing Issues
Like a painter with their canvas, using liquid fabric dye is an art form that requires precision and care. Even the slightest mistake can lead to unwanted results. In this next section, we’ll explore how to troubleshoot common dyeing issues.
Fixing bleeding is a common issue when using liquid fabric dye. This occurs when the dye seeps into areas of the fabric you did not intend to color, often resulting in blotchy or uneven hues. To fix this issue, try these tips:
- Rinse the item in cold water immediately after dyeing
- Soak the item in a mixture of cold water and white vinegar for 30 minutes
- Use a color remover product specifically designed for fabric dyeing
Color correction is another issue that may arise during the dyeing process. Sometimes the color may turn out too dark or too light. Here are some steps you can take to correct it:
- If the color is too dark, mix a solution of hot water and bleach and soak the item for 10-15 minutes
- If the color is too light, repeat the dyeing process with a darker shade of liquid fabric dye
- Always follow manufacturer’s instructions carefully and use gloves to protect your hands from chemicals
Properly storing and maintaining your liquid fabric dye can help prevent common issues from arising in future projects. In our next section, we’ll discuss tips on how to do just that.
Storing And Maintaining Your Liquid Fabric Dye
Proper storage of your liquid fabric dye is crucial to maintain its quality and extend its shelf life. Here are some tips for storing your fabric dye properly:
Store in a cool, dry place: Avoid exposing your dye to direct sunlight or high temperatures as it can cause the color to fade or change.
Keep the lid tightly closed: Air exposure can cause oxidation of the dye, leading to changes in color and consistency.
Use within recommended time frame: Liquid fabric dyes have a limited shelf life, so it’s best to use them within their recommended time frame for optimal results.
To extend the shelf life of your liquid fabric dye, consider these helpful tips:
Store in an airtight container: Transfer the remaining dye into an airtight container to prevent air exposure that can contribute to oxidation.
Keep in a dark place: UV rays from light sources can degrade the quality of your liquid fabric dye, so keep them in a dark place like a cupboard or closet.
Refrigerate if possible: Storing your liquid fabric dye at lower temperatures can help preserve its quality and prolong its shelf life.
By following these simple storage tips, you can ensure that your liquid fabric dye stays fresh and vibrant for longer periods of time, giving you more opportunities to create beautiful works of art on fabrics. Remember that proper storage is key to achieving consistent results with every use!
Conclusion
When it comes to liquid fabric dyeing, choosing the right fabric is crucial. Before dyeing, prepare your fabric by washing and drying to remove any sizing or finishes. When selecting a dye, consider the type of fabric and the color you want to achieve. Measuring and mixing the dye correctly is important for achieving consistent results.
There are several methods for dyeing fabric, including immersion, tie-dyeing, and dip-dyeing. After dyeing, fixing the dye with heat or chemicals will prevent bleeding. To avoid common mistakes such as uneven color or patchy areas, follow instructions carefully and test on a small piece of fabric first.
As an expert in textile dyeing, it is important to remember that every step in the process can affect the final result. Troubleshooting common issues such as streaks or color bleeding requires attention to detail and patience. Properly storing and maintaining your liquid fabric dyes will ensure their longevity.
In conclusion, mastering liquid fabric dyeing requires a combination of knowledge and skill. With careful preparation, selection of materials and techniques, attention to detail during each step of the process and avoiding common mistakes by following instructions precisely; you can create beautiful garments that express your creativity like never before! So let’s dive into the colorful world of liquid fabric dyes with confidence knowing that we have all we need to make our designs come alive with vibrant colors that will make us stand out from the crowd!
Image Credits
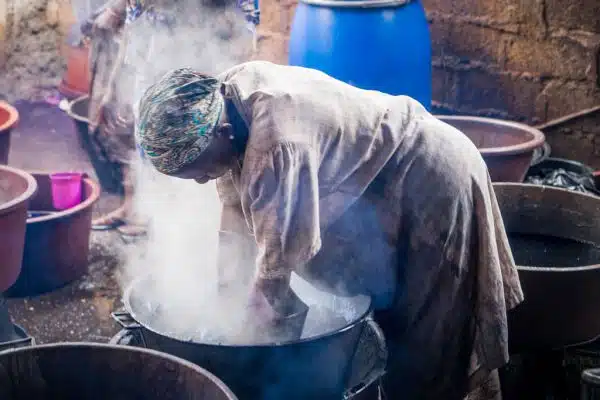
- “Bamako Fabric Dyeing” by Mark Fischer (featured)

