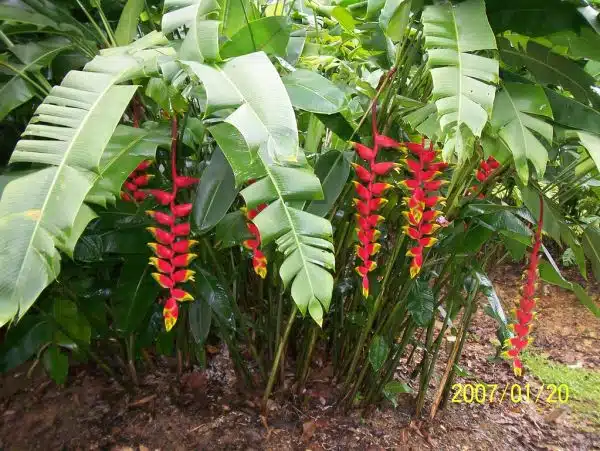
Heliconia, commonly known as lobster claw, is a tropical plant that is often grown for its striking and vibrant flowers. While it is typically grown outdoors in warm climates, it is also possible to grow heliconia indoors with the right conditions and care. As a horticulturalist or plant care specialist, it is important to understand the specific needs of this unique plant in order to successfully cultivate it indoors.
Growing heliconia indoors requires attention to several key factors, including lighting, temperature, humidity, soil composition, and watering schedule. Understanding these requirements and providing the necessary conditions can result in healthy growth and beautiful blooms for this tropical plant. In this article, we will explore the best practices for growing heliconia indoors, from selecting the right container to providing adequate light and water. With these tips and techniques, you can successfully cultivate heliconia as a stunning addition to your indoor garden or as a gift for someone who loves plants.
Understanding The Heliconia Plant
The Heliconia plant, also known as the Lobster Claw, is an exotic tropical plant that is admired for its unique and colorful flowers. This plant is native to South America and requires warm temperatures to thrive. Heliconia propagation can be done through division or by using seeds. However, propagating from seeds may take longer than division and requires extra care.
Lobster Claw care tips are essential in maintaining healthy growth in this plant. It needs well-draining soil with plenty of organic matter, regular watering, and proper lighting conditions. Heliconias prefer bright indirect light but can tolerate some direct sunlight during the morning hours. Avoid placing it near cold drafts or air conditioning vents.
Choosing the right variety for indoor growth is crucial in ensuring success with your Lobster Claw plant. Some species can grow up to 15 feet tall, which may not be suitable for indoor spaces with limited space. Select a dwarf variety such as Heliconia stricta ‘Dwarf Jamaican’ or Heliconia rostrata ‘Mini Lobster Claw’ that can grow up to 4-6 feet tall and have smaller foliage while still producing vibrant flowers. With proper care and selection of the right variety, your indoor Heliconia will undoubtedly become a stunning centerpiece in any room.
Choosing The Right Variety For Indoor Growth
Understanding the Heliconia plant is crucial before starting indoor growth. It is a tropical plant that requires warmth, humidity, and bright indirect light. These plants have large leaves that can collect dust, so it is important to regularly wipe them down with a damp cloth or spray them with water to keep them clean. Additionally, Heliconias require regular watering and fertilization to grow healthy and strong.
When choosing the best indoor varieties of Heliconia, it’s important to consider their size and growth habits. The smaller varieties such as ‘Parakeet’ or ‘Sexy Pink’ are great for indoor growth since they only reach up to 4-5 feet tall. The larger varieties like ‘Sassy’ or ‘Golden Torch’ may be too big for indoor spaces unless you have high ceilings or ample space. It’s also worth noting that some Heliconias bloom more frequently than others, so choose a variety that fits your preferences.
Heliconia care tips include providing ample warmth and humidity, regular watering and fertilization, and pruning dead leaves regularly. These plants prefer well-draining soil that retains moisture but does not become waterlogged. When planting in containers, ensure there are drainage holes at the bottom to prevent root rot. Furthermore, it’s recommended to repot every two years into a slightly larger container with fresh soil.
Selecting the ideal container for your Heliconia plant is crucial for its growth and health. Choose a container that is slightly larger than the current one to allow room for growth but not too large as this may cause overwatering problems. Plastic or ceramic pots are good options as they retain moisture better than terracotta pots which tend to dry out quickly. Additionally, ensure the pot has drainage holes at the bottom to prevent water accumulation in the soil which may lead to root rot. With proper care and attention, your indoor Heliconia will thrive and bring tropical beauty into your home.
Selecting The Ideal Container
When considering the ideal container for growing heliconia (lobster claw) indoors, the pot must be chosen carefully. It should be large enough to accommodate the plant’s root system, yet small enough to fit in the desired location. Additionally, it should have drainage holes in the bottom to ensure that the soil does not become waterlogged. Finally, it should be made of a material that will not rot or break down in the presence of water.
Choosing A Pot
Choosing the right pot for growing heliconia indoors is crucial to ensure the plant thrives. One of the key factors to consider when choosing a pot is the size. The pot should be large enough to accommodate the plant’s root system and allow for growth. However, it should not be too big as it can lead to overwatering and stagnant soil conditions. A good rule of thumb is to choose a pot that is one size larger than the current container.
Material options are another important consideration when selecting an ideal container for heliconia. Clay pots are a popular choice among gardeners since they are porous and allow for better airflow and drainage. However, they can become heavy when watered, making them difficult to move around. Plastic pots, on the other hand, are lightweight and easy to move but may not provide adequate drainage if there are no drainage holes at the bottom.
When choosing a pot for heliconia, it’s important to strike a balance between size and material options. A good-sized pot made from breathable material with proper drainage holes will help ensure that your heliconia grows healthy and strong in an indoor environment. With these factors in mind, you’ll be able to select an ideal container that will provide your plant with everything it needs for optimal growth and development.
Drainage Holes
Understanding drainage holes is crucial when selecting the ideal container for heliconia. Drainage holes allow excess water to drain out of the pot, preventing waterlogging and stagnant soil conditions that can harm the plant’s root system. Without proper drainage, heliconia can develop root rot, which can eventually lead to the plant’s demise. Horticulturalists recommend choosing a pot with adequate drainage holes to ensure the health and longevity of your indoor heliconia.
The importance of proper drainage cannot be overstated when it comes to container gardening. While some materials such as clay pots are porous and provide better airflow and drainage, plastic pots may not have adequate drainage unless there are holes at the bottom. It’s essential to choose a container that has proper drainage holes in addition to selecting a material that allows for optimal airflow and moisture control. This will prevent overwatering and encourage healthy root development, resulting in lush foliage growth.
In summary, understanding how drainage holes work and their importance is essential when selecting an ideal container for your indoor heliconia. Adequate drainage ensures that excess water flows out of the pot, preventing waterlogging and stagnant soil conditions that can harm your plant’s root system. When selecting a pot for your heliconia, choose one with proper drainage holes in addition to considering other important factors such as size and material options that promote optimal growth and development.
Preparing The Soil Mix
Soil preparation is crucial when it comes to growing heliconia indoors. It is essential to have a well-draining and nutrient-rich soil mix to ensure healthy growth. The potting mix composition should be light and porous, with a pH level of 6.0 to 7.5.
To prepare the soil mix, start by mixing equal parts of peat moss, perlite, and vermiculite in a container. This will create a light and airy base for the soil mixture. Next, add slow-release fertilizer pellets to the mix, following the manufacturer’s instructions for the appropriate amount needed per gallon of soil. Mix thoroughly until all ingredients are evenly distributed.
It is important to note that heliconia plants prefer slightly acidic soil conditions, so adding organic matter such as compost or leaf mold can help maintain an optimal pH level. Once the soil mix is prepared, fill your pot(s) halfway with the mixture and gently press down on the soil to remove any air pockets. In the next section, we will discuss providing adequate lighting for your heliconia plant(s).
Providing Adequate Lighting
Heliconias require bright, indirect light to thrive indoors. The amount and quality of light they receive are crucial for their growth and overall health. While natural light is the best source for plants, LED grow lights can also provide the necessary light spectrum that heliconias need to flourish.
When it comes to positioning the light source, it’s essential to place it at a distance of about 18-24 inches above the plant canopy. This distance helps prevent heat damage while allowing the heliconia to get enough light. Additionally, rotating the plant every few days ensures that all parts of it receive equal amounts of light.
While natural light is ideal for most plants, indoor gardeners may not have access to adequate sunlight conditions. In such cases, LED grow lights can be a great alternative. LED grow lights come in different spectrums and intensities, making them suitable for different stages of plant growth. It’s worth noting that not all LEDs are created equal—plants require specific wavelengths of light for optimal photosynthesis, so it’s important to choose a high-quality LED grow light that emits the right color spectrum for your heliconia.
With proper lighting, your heliconia will thrive and produce beautiful blooms indoors. However, adequate lighting alone isn’t enough; you’ll also need to manage temperature and humidity levels carefully.
Managing Temperature And Humidity
Proper management of temperature and humidity is essential in the successful growth of heliconia (lobster claw) indoors. These plants thrive in warm, humid environments with temperatures ranging from 70 to 85 degrees Fahrenheit during the day and a minimum of 60 degrees Fahrenheit at night. Maintaining these ideal ranges can be achieved by placing the plant in a greenhouse or using heating pads, humidifiers, and fans.
Temperature control equipment such as thermostats can be used to regulate the temperature while humidifiers can add moisture to the surrounding air. Fans can also be utilized to increase air circulation and prevent stagnant air that may lead to fungal growth. However, it is important to avoid sudden changes in temperature or humidity levels which may cause stress on the plant.
Troubleshooting is necessary when managing temperature and humidity levels for heliconia growth. If the leaves are turning yellow, this may indicate overwatering or poor drainage. On the other hand, if the edges of leaves are turning brown or curling up, it may be due to low humidity levels. Checking soil moisture regularly and adjusting water intake accordingly can help with maintaining proper humidity levels within the plant’s environment.
As you manage your heliconia’s environment, be sure to keep an eye on watering techniques and frequency. By paying close attention to all aspects of your plant’s environment you will ensure that your heliconia grows beautifully indoors!
Watering Techniques And Frequency
Maintaining the ideal temperature and humidity levels is crucial for the successful growth of heliconia (lobster claw) indoors. By keeping the plant in a warm, humid environment, you can ensure that it thrives and produces vibrant blooms. However, managing the temperature and humidity alone is not enough to guarantee its healthy growth.
Watering frequency is another important factor to consider when growing heliconia indoors. The soil moisture levels should be regularly checked to avoid overwatering or underwatering the plant. Overwatering can lead to root rot, while underwatering can cause dehydration and stunted growth. As a general rule of thumb, water the plant once a week, but adjust accordingly depending on the environmental conditions and soil moisture levels.
To provide more specific guidance on watering techniques and frequency for heliconia plants, refer to the table below:
| Watering Technique | Frequency |
|---|---|
| Drench-and-dry method | Once a week |
| Bottom watering method | Once every two weeks |
| Mist-spraying method | Twice a day |
By following these recommended watering techniques and frequencies, you can ensure that your heliconia plant receives just enough water without risking any damage from overwatering or underwatering. In addition to proper watering techniques, fertilizing is also crucial for promoting healthy growth in your indoor heliconia plant.
Fertilizing Heliconia Indoors
Fertilizing is an essential aspect of growing heliconia indoor plants. The right balance of nutrients can help the plant thrive and produce beautiful blooms. When it comes to fertilizers, you have two options: organic or synthetic.
Organic fertilizers are made from natural sources, including animal manure, compost, and bone meal. They provide a slow release of nutrients that gradually feed the plant over time. Organic fertilizers are generally safer for the environment and less likely to burn your plants than synthetic fertilizers. However, they are often more expensive and may require more frequent applications.
Synthetic fertilizers are chemically formulated to provide a quick burst of nutrients to your plants. They are generally cheaper than organic fertilizers and can be easier to apply since they often come in soluble form. However, they can be harmful to the environment if overused and may burn your plants if not used correctly. It’s crucial to read the instructions carefully before using any synthetic fertilizer.
Determining how frequently you should fertilize your heliconia plant depends on several factors such as its growth rate, soil type, and surrounding environmental conditions. As a general rule of thumb, it’s recommended to fertilize your heliconia plant once every two weeks during the growing season (spring and summer) using a balanced fertilizer with equal portions of nitrogen (N), phosphorus (P), and potassium (K). During the dormant season (fall and winter), you can reduce or stop feeding as the plant grows slowly during this period.
Next section: Pruning and Maintenance Tips
Pruning And Maintenance Tips
- Fertilizing heliconias should be done every two to four weeks during the growing season, using a balanced, water-soluble fertilizer.
- Watering frequency should be adjusted to the season: more during the summer and less during the winter.
- The soil should be kept moist, but not soggy, and it is important to avoid overwatering.
- Pruning should be done regularly, removing any old and dead leaves or flower stalks.
- Pruning should also be done to maintain the desired shape of the plant and to promote bushiness.
- It is also important to remove any dead or damaged leaves or stems, as well as any pest infestations.
Fertilizing
Fertilizing is an important aspect of growing healthy heliconia plants indoors. Regular fertilizer application will help to provide the necessary nutrients and minerals that the plant needs to thrive. To ensure proper growth, it is recommended to apply a balanced fertilizer every two weeks during the growing season.
One of the most common nutrient deficiencies in heliconia plants is nitrogen deficiency. Symptoms include yellowing leaves and stunted growth. To prevent this, a nitrogen-rich fertilizer should be used. However, it is important not to over-fertilize as this can lead to salt buildup in the soil.
Another important consideration when fertilizing heliconia plants is the type of fertilizer used. A slow-release granular fertilizer is ideal for indoor plants as it provides a consistent supply of nutrients over time. Alternatively, liquid fertilizers can also be used, but they need to be applied more frequently than granular fertilizers.
In conclusion, regular fertilizer application is essential for growing healthy heliconia plants indoors. Understanding nutrient deficiencies and using the right type of fertilizer will ensure proper growth and development of the plant. By following these simple tips, you can enjoy a beautiful display of lobster claw flowers in your home or office all year round!
Watering
As a horticulturalist or plant care specialist, it is important to understand the watering needs of heliconia plants for proper maintenance. Heliconias require consistent moisture but not waterlogged soil. Over-watering can lead to root rot and other fungal diseases, while under-watering can cause leaf yellowing and wilting.
Watering frequency varies depending on the environment, size of the pot, and season. During the growing season, heliconias require more frequent watering as they consume more water due to increased growth. It is recommended to water every 2-3 days or when the top inch of soil feels dry to the touch. In contrast, during winter dormancy, plants require less frequent watering as they are not actively growing.
One of the signs of over-watering in heliconia plants is yellowing leaves with brown tips, which may indicate root rot due to excess moisture. In severe cases, the plant may wilt and die. To prevent over-watering, ensure that there is proper drainage in pots and avoid leaving plants standing in excess water for prolonged periods. By understanding their watering needs and preventing over-watering, heliconia owners can maintain healthy and vibrant plants throughout the year.
Pruning
Pruning is an essential part of heliconia plant maintenance. In addition to promoting healthy growth, pruning helps manage the size and shape of the plant, which can be beneficial for aesthetic purposes. To prune a heliconia plant, it is necessary to have the right tools on hand, including sharp pruning shears and gloves to protect your hands from thorns or other sharp edges.
The best time to prune a heliconia plant is during its dormant period in late winter or early spring. This is when the plants are not actively growing, making it easier to spot dead or damaged leaves and stems that need removal. It is also less stressful for the plant to undergo pruning during this time as it has less energy invested in active growth.
During the pruning process, it is important to remove any yellowing or dead leaves and branches. These can attract pests and diseases that can harm the health of your plant. Additionally, removing old flowers after they have bloomed will help redirect energy back into foliage growth rather than seed production. With proper pruning techniques and timing, heliconia owners can maintain their plants’ health and appearance year-round.
Preventing And Addressing Pest Problems
Pruning and Maintenance Tips have been discussed in the previous section. It is important to keep in mind that proper maintenance of your indoor heliconia plant can help prevent pest infestations. Regularly inspect your plant and remove any dying or damaged leaves immediately, as these can attract pests. Additionally, make sure to water your plant regularly and place it in a location with adequate sunlight.
Even with proper maintenance, it is possible for pesky insects to make their way into your indoor heliconia plant. Fortunately, there are natural pest control methods that you can use to address these issues. One effective method is to introduce beneficial insects into your space. Ladybugs, lacewings, and praying mantises are all great examples of insects that prey on common garden pests such as aphids and spider mites. You can also create homemade pest remedies using ingredients such as neem oil or garlic spray.
Overall, prevention is key when it comes to pest control for indoor heliconia plants. However, if you do encounter an infestation, there are natural options available that can help resolve the issue without resorting to harsh chemicals. In the next section, we will discuss propagation methods for heliconia plants so that you can continue to grow healthy and vibrant plants for years to come.
Propagation Methods
To propagate heliconia, you can use various propagation techniques such as division and stem cuttings. Division is the most common method, which involves separating an existing clump of plants into smaller sections. To do this, carefully dig up the plant and remove any soil from its roots. Then, using a sharp knife or gardening tool, divide the root ball into smaller sections with at least one healthy shoot per section.
Stem cuttings are another effective way to propagate heliconia. Cut a 6-inch section of stem just below a leaf node and remove any leaves from the bottom half of the cutting. Dip the cut end in rooting hormone powder and place it in moist potting soil, keeping it warm and humid until new growth emerges. With either propagation method, once your new plants have developed roots or shoots, they can be transplanted into larger containers or outdoors.
Nursery care for propagated heliconia involves providing adequate light levels and water to ensure optimal growth. Keep them in a well-lit area but avoid direct sunlight as it can scorch their leaves. Water regularly but avoid overwatering, as this can lead to root rot or other issues. It’s also important to fertilize your plants every few months to provide them with essential nutrients for healthy growth. With proper care and attention, your propagated heliconia will flourish both indoors and outdoors.
As your heliconia grows larger in its container, you may need to transplant it into a bigger pot or move it outdoors if conditions allow. Transplanting should be done during the growing season when the plant is actively growing and has outgrown its current container. Choose a pot that’s at least twice as large as its current one and fill it with fresh potting soil mixed with compost for added nutrients. Carefully remove the plant from its old container without damaging its roots and replant it in the center of the new pot. Water thoroughly and place in a well-lit area to continue its growth.
Transplanting Heliconia
After successful propagation, the next step in growing heliconia indoors is transplanting them into larger pots or containers. Transplanting provides several benefits, including providing more space for root growth, which results in healthier and larger plants. It also allows for the replacement of old soil with fresh soil that has the necessary nutrients for optimal growth. Additionally, transplanting can help prevent overcrowding and ensure the proper spacing of plants.
The best time to transplant heliconia is during its active growth period in the spring or early summer. This time coincides with when new shoots begin to appear from the rhizomes. Before transplanting, it is crucial to prepare a potting mix with good drainage properties and a balanced nutrient composition. The pot should be at least 2-3 inches larger than the current container size to provide enough room for root expansion.
To transplant heliconia, gently remove it from its previous container by loosening any compacted roots and untangling them if necessary. Place it into the new potting mix and add soil around the roots until they are covered but not buried too deeply. Water thoroughly and place in an area with bright indirect light. Avoid direct sunlight as this may cause leaf burn or stress on newly transplanted plants. With proper care, heliconia will thrive after transplantation and produce vibrant blooms that are sure to add a tropical touch to your indoor garden.
Transition: Although transplantation is an essential step in growing healthy heliconia plants indoors, issues may arise during this process that could affect plant health and growth. Let’s explore some common problems encountered during transplantation and how to troubleshoot them effectively.
Troubleshooting Common Issues
Just like any other plant, heliconias are prone to various issues that can affect their growth and overall health. As a plant enthusiast, it’s important to be familiar with the common problems that may arise when growing heliconias indoors. Diagnosing these issues at an early stage can prevent further damage and ensure the longevity of your plant.
One of the most common issues that heliconias encounter is root rot. This happens when the soil is too moist or not well-draining, causing the roots to suffocate and eventually die. To avoid this problem, make sure to use a well-draining potting mix and water your plant moderately. Another issue is yellowing leaves, which can indicate overwatering or nutrient deficiency. Consider reducing watering frequency or fertilizing your plant with a balanced fertilizer to alleviate this problem.
If you notice wilting leaves or stunted growth in your heliconia, it may be suffering from pest infestation such as spider mites or mealybugs. These pests can be controlled by using organic insecticides such as neem oil or by physically removing them with a cloth dipped in soapy water. By incorporating these troubleshooting techniques into your care routine, you can ensure that your indoor heliconia thrives for years to come.
As a horticulturalist, diagnosing issues with plants is essential to ensuring their health and prosperity. Troubleshooting common problems with heliconias involves understanding what signs to look out for and how to address them effectively. In the next section, we will explore creative uses for heliconia indoors that will surely inspire you to utilize this magnificent plant in more ways than one!
Creative Uses For Heliconia Indoors
If you’ve encountered any problems with growing heliconia indoors, don’t fret. Some common issues can be easily remedied. Firstly, if your plant’s leaves are turning yellow, it may be a sign of overwatering or underwatering. Adjust your watering schedule accordingly and make sure the soil is well-draining. Secondly, if the leaves are curling or browning at the edges, it may indicate low humidity levels. Consider using a humidifier or placing a tray of water near the plant to increase moisture in the air. Lastly, pests such as spider mites or aphids can be treated with insecticidal soap.
Now that you have successfully grown heliconia indoors and addressed any potential issues along the way, it’s time to get creative! This tropical plant can make for an innovative display in your home decor. Use tall vases or containers to showcase the long stems with vibrant flowers. Alternatively, cut some flowers and place them in a shallow dish filled with water to create a unique centerpiece for your dining table. Heliconia’s bold colors and exotic appearance will add a touch of paradise to any room.
In conclusion, enjoying the beauty of heliconia indoors is not only possible but highly rewarding when done right. With proper care and attention to detail, this tropical plant can thrive inside your home while adding aesthetic value to your space. Whether you choose to display it in its natural form or incorporate it into creative decor arrangements, heliconia is sure to impress anyone who walks through your door.
Conclusion: Enjoying The Beauty Of Heliconia Indoors
Designing arrangements with heliconia can provide a striking and exotic touch to any interior space. The unique shape of the plant’s flowers, resembling the claw of a lobster, creates an eye-catching display that is sure to impress visitors. Consider incorporating other tropical plants and foliage into your arrangement for a cohesive look that will transport you to a lush rainforest.
When displaying heliconia arrangements, it is important to consider the placement of the plant in relation to light sources. Heliconia thrives in bright, indirect light and should not be exposed to direct sunlight for prolonged periods. Additionally, the plant requires moderate humidity levels and regular watering to prevent drying out. To maintain the health of your heliconia arrangements, mist the leaves regularly or place them near a humidifier.
Incorporating heliconia into your indoor decor provides an opportunity for creativity and experimentation with different design elements such as vases, pots, and other decorative items. Consider pairing vibrant blooms with neutral-toned containers for a balanced look or using oversized vases to emphasize the grandeur of larger varieties. With careful consideration of lighting and watering needs, anyone can enjoy the beauty of heliconia indoors.
Frequently Asked Questions
How Long Does It Take For Heliconia To Grow And Bloom Indoors?
Heliconia, also known as lobster claw, is a stunning plant that can add beauty to any indoor environment. However, its growth and blooming rate indoors depend significantly on the optimal growing conditions provided. To ensure successful growth and blooming of Heliconia indoors, it is essential to choose the right variety and apply proper pruning techniques. Common problems such as inadequate light, overwatering or underwatering, pest infestations, and diseases can significantly affect the overall health of the plant. As a horticulturalist or plant care specialist, it is crucial to educate individuals on providing the ideal conditions necessary for their Heliconia plant’s growth and blooming indoors. Understanding these factors will allow for an engaging experience in serving others looking to cultivate this beautiful species in their homes.
Can Heliconia Be Grown In Hydroponics Or Without Soil?
Heliconia is a tropical plant that can be grown indoors, but the question arises whether it can be cultivated hydroponically or without soil. Hydroponic heliconia cultivation involves growing the plant in nutrient-rich water instead of soil, allowing for greater control over the plant’s growth and nutrient intake. However, soilless growth requires careful monitoring of pH levels and nutrient balance to ensure optimal plant health. Indoor heliconia cultivation can be done using either hydroponic or soil-based methods, with both having their advantages and disadvantages. The choice ultimately depends on the grower’s preference and level of experience with each method. Proper care and attention are crucial to successfully growing heliconia indoors, regardless of the chosen cultivation method.
Is It Possible To Grow Heliconia From Seeds Indoors?
When it comes to growing heliconia from seeds indoors, there are a few important considerations to keep in mind. First and foremost is indoor lighting; heliconias require bright, indirect light in order to thrive. It’s also important to maintain an optimal temperature range of 75-80°F (23-27°C) and high humidity levels. To germinate the seeds, soak them in warm water for 24 hours before planting them in a well-draining soil mix. Keep the soil moist but not waterlogged, and expect germination within two to four weeks. Once the seedlings have sprouted, be sure to continue providing adequate light and moisture while avoiding over-fertilization or overwatering. With proper care and attention, it is certainly possible to successfully grow heliconia from seeds indoors.
How Do I Prevent My Heliconia From Becoming Too Tall Or Leggy?
According to a study conducted by the University of Florida, heliconia plants are prone to becoming too tall or leggy if not properly cared for. To prevent this issue, it is recommended to regularly prune the plant’s stem tips and remove any dead or yellowing leaves. Additionally, providing adequate sunlight is crucial for promoting compact growth and preventing excessive stretching. Heliconias require bright indirect light for at least six hours a day, so it is important to place them near a window that receives plenty of natural light. By implementing these pruning techniques and ensuring proper lighting conditions, heliconias can thrive in indoor environments with minimal maintenance. As a horticulturalist or plant care specialist, it is important to share this knowledge with others who may be struggling with the same issue in order to help them provide optimal care for their heliconia plants.
Can Heliconia Be Grown Alongside Other Plants In The Same Container?
Companion planting is an effective method of growing multiple plants together in the same container. However, it is important to select appropriate companion plants that have similar growth requirements as heliconia. The container size should also be taken into consideration as overcrowding can lead to competition for resources and hinder the growth of all plants involved. Additionally, selecting plants with complementary colors and textures can enhance the overall aesthetic appeal of the container garden. As a horticulturalist or plant care specialist, it is essential to provide guidance on proper companion planting techniques to ensure successful growth and development of all plants involved.
Conclusion
Heliconia, also known as lobster claw, is a beautiful and exotic plant that can be grown indoors. It requires specific care and attention to thrive in an indoor environment, but with the right conditions, it can grow and bloom successfully.
Firstly, Heliconia takes around 2-3 years to grow and bloom indoors. It requires warm temperatures, high humidity levels, and bright indirect light. Heliconia can be grown in hydroponics or without soil if provided with the proper nutrients.
Secondly, growing Heliconia from seeds indoors is possible but can take longer than propagating from cuttings. To prevent Heliconia from becoming too tall or leggy, it is important to provide support for the stem and prune it regularly.
Lastly, Heliconia can be grown alongside other plants in the same container if they have similar growing requirements. However, it is essential to ensure that the container has good drainage to prevent waterlogging.
In conclusion, growing Heliconia indoors requires patience and careful attention to detail. With the right growing conditions and proper care techniques such as pruning and providing support for its stem, this exotic plant can add a touch of tropical beauty to any indoor space.
Image Credits
- “Heliconia pendula” by wallygrom (featured)

