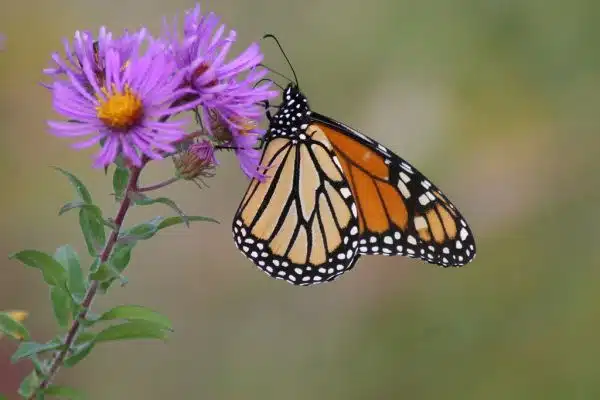
New England Asters are a popular perennial that is native to North America. They are known for their beautiful, daisy-like flowers that bloom in shades of pink, purple, and blue from late summer to early fall. These plants grow best in full sun and well-drained soil, making them an excellent addition to any garden or landscape.
Growing and caring for New England Asters requires some knowledge of their unique needs. This article will provide expert advice on how to successfully cultivate these plants in your own backyard. Whether you are an experienced gardener or just starting out, this guide will help you create a vibrant and healthy garden filled with stunning New England Asters.
Understanding New England Asters
New England asters (Symphyotrichum novae-angliae) are a popular perennial plant native to North America. They are part of the aster family, with showy flowers that bloom in shades of pink, purple, blue, and white. New England asters can grow up to 6 feet tall and 4 feet wide, making them an excellent choice for adding height and structure to garden beds.
New England Aster Anatomy: The leaves of the New England aster are lance-shaped and grow up to 5 inches long. The stem is stout and hairy, while the flower heads have a yellow center disk surrounded by ray florets. The disk flowers attract bees and butterflies with their nectar, while the ray florets provide landing platforms for pollinators. New England asters bloom from late summer through fall when most other plants have stopped flowering.
Importance of Pollinators for New England Asters: Pollinators play a critical role in the reproduction of New England asters. Bees, butterflies, moths, flies, and beetles are attracted to the flowers’ nectar and transfer pollen from one flower to another as they feed. This process leads to fertilization and seed production necessary for plant propagation. Without pollinators such as bees, these beautiful plants would not be able to thrive in their natural habitats or our gardens.
To ensure that your New England asters thrive in your garden bed or container garden, it’s crucial to choose the right location for planting.
Choosing The Right Location For Planting
The key to growing healthy and vibrant New England asters is choosing the right location for planting. The perfect spot for these beautiful flowers should receive full sun exposure for at least six hours a day. Additionally, it should have well-draining soil that is not too acidic or alkaline.
When selecting a location for planting, keep in mind that New England asters can grow up to four feet tall and two feet wide. This means they need plenty of space to spread out and thrive. To help visualize the ideal planting location, refer to the table below:
| Location | Sun Exposure | Soil Type |
|---|---|---|
| Garden bed | Full sun (6+ hours per day) | Well-draining |
| Large container | Full sun (6+ hours per day) | Potting mix with added perlite |
| Raised garden bed | Full sun (6+ hours per day) | Rich loamy soil |
To ensure your New England asters reach their maximum potential, take the time to prepare the soil correctly. Loosen the soil with a garden fork or tiller to improve drainage and promote root growth. Also, amend the soil with organic matter such as compost or aged manure. This will provide essential nutrients needed for healthy plant growth.
By carefully selecting the right location for planting and preparing your soil correctly, you can set your New England asters up for success. Once planted, continue monitoring them regularly for any signs of pest or disease issues so that you can address them promptly and enjoy your beautiful flowers year after year.
Preparing The Soil
Choosing the right location for planting is crucial in growing new england asters. However, preparing the soil properly is equally important. Before planting, it is essential to amend the soil with organic matter, such as compost or well-rotted manure.
The first step in preparing the soil is to remove any weeds and debris from the planting area. Then, loosen the soil with a garden fork or tiller to a depth of at least 12 inches. Once the soil is loosened, mix in a few inches of organic matter to improve drainage and enrich its nutrient content.
Amending the soil not only provides an excellent growing medium for new england asters but also helps them establish strong root systems. In addition to adding organic matter, consider conducting a soil test to determine if any specific nutrients are lacking. By doing so, you can tailor your fertilization plan accordingly and ensure optimal growth for your new england asters.
Up next: Planting New England Asters
Planting New England Asters
As the saying goes, “the first step towards a beautiful garden is the right planting.” When it comes to planting New England Asters, there are a few key considerations to keep in mind. These perennials thrive in full sun and well-draining soil, but they can also tolerate some shade. If you’re limited on space or want to add these stunning flowers to your patio or balcony, container gardening is a great option.
To get started with planting New England Asters, choose a location that receives at least six hours of sunlight each day. The soil should be moist but not waterlogged, so consider adding soil amendments such as compost or perlite to improve drainage. When planting in the ground, dig a hole that’s slightly larger than the root ball and backfill with soil so that the top of the root ball is level with the surrounding ground.
If you’re opting for container gardening, choose pots that are at least 12 inches deep and have drainage holes to prevent waterlogging. Fill your containers with high-quality potting mix and add soil amendments as needed. When planting New England Asters in containers, ensure that they receive enough water since they may dry out faster than those planted in the ground.
| Soil Amendments | Description | Benefits |
|---|---|---|
| Compost | Organic matter made from decomposed plant material | Improves soil structure and fertility |
| Perlite | Lightweight volcanic glass used to improve soil drainage | Reduces compaction and increases aeration |
| Vermiculite | Expands when heated and improves water retention | Holds moisture near roots for longer periods |
Next up: watering tips for your New England Asters!
Watering Tips
Watering is an important aspect of caring for New England asters. Proper watering practices ensure that the plant thrives and produces beautiful blooms. The frequency of watering depends on various factors such as temperature, humidity, and soil moisture levels.
New England asters require consistent moisture levels to thrive. It is important to keep the soil moist but not waterlogged. Overwatering can lead to root rot and other fungal diseases that can damage the plant. You should water your New England asters when the top inch of soil feels dry to the touch.
To determine when it is time to water your New England asters, you can use a moisture meter or simply stick your finger into the soil to check its moisture level. If it feels dry, it is time to water. It may be necessary to water your plants more frequently during hot, dry weather or less frequently during periods of high humidity or rainfall.
Maintaining proper moisture levels in your New England aster’s soil is crucial for promoting healthy growth and vibrant blooms. By keeping an eye on your plant’s needs and watering frequency, you’ll be able to help it flourish and bring beauty to your garden. In addition to proper watering practices, fertilization is also essential for optimal growth and health of New England asters.
Fertilizer Needs
With proper watering techniques in place, it is also important to consider the fertilizer needs of New England asters. These plants are heavy feeders and require regular nutrient supplementation to thrive. In fact, studies have shown that applying a balanced fertilizer once every four weeks during the growing season can increase flower production by up to 50%.
When it comes to fertilizing New England asters, there are a variety of options available. Organic options include compost or well-rotted manure, which can be worked into the soil before planting or applied as a top-dressing throughout the growing season. Chemical fertilizers can also be used, with timed applications being key to their effectiveness. Slow-release granules or liquid fertilizers diluted according to package instructions should be applied just before new growth appears in spring and then again at six-week intervals throughout the growing season.
It is important not to over-fertilize New England asters, as this can lead to excessive foliage growth and fewer flowers. Always follow package instructions carefully and monitor your plants for signs of stress or nutrient deficiency. With proper fertilization techniques in place, your New England asters will produce an abundance of beautiful blooms throughout the growing season. In the next section, we will discuss pruning techniques that can further enhance their appearance and longevity.
Pruning Techniques
Pruning Techniques:
Pruning is an essential part of caring for New England asters. It helps to maintain the plant’s shape, prevent disease, and promote healthy growth. Pruning frequency depends on the age and size of the plant, as well as its location and growing conditions. In general, it is best to prune these plants in early spring before new growth appears.
When pruning New England asters, it is important to use the right tools. The most common tools used are hand pruners and loppers. Hand pruners are ideal for small stems up to 1/2 inch in diameter, while loppers are better for thicker stems up to 2 inches in diameter. Both tools should be sharp and clean to prevent damage or infection to the plant. It is also recommended to disinfect your pruning tools between cuts if you are removing diseased or damaged parts of the plant.
Table:
| Pruning Tasks | Time | Tools |
|---|---|---|
| Deadheading (removing spent blooms) | Throughout blooming season | Hand pruners |
| Pinching (removing tips of young stems) | Early summer | Fingers or shears |
| Cutting back (reducing height by 1/3) | Late fall or early spring | Loppers or hand saw |
In summary, pruning is a crucial aspect of New England aster care that can significantly impact the health and appearance of your plants. By understanding when and how to prune them, you can keep them looking their best year after year. In the next section, we will discuss how to deal with pests and diseases that may affect these beautiful flowers.
Dealing With Pests And Diseases
Preventing infestations and treating fungal infections is crucial when growing New England asters. These plants are susceptible to a variety of pests, including aphids, spider mites, and Japanese beetles. To prevent infestations, it’s essential to keep the area around your plants clean and free of debris that may harbor pests. Additionally, you can use insecticidal soap or neem oil to control small populations of pests.
Fungal infections can also be a problem when growing New England asters. Powdery mildew is a common fungal disease that affects many ornamental plants, including asters. This disease appears as a white powdery coating on the leaves and stems of infected plants. To treat powdery mildew, remove any infected plant material immediately and dispose of it in the trash. You can also use a fungicide spray to control the spread of the disease.
Preventative measures are always better than reactive measures when it comes to dealing with pests and diseases in your garden. Keeping your plants healthy by providing them with proper care is one way to prevent pest infestations and fungal infections from occurring. In addition, practicing good sanitation practices such as removing dead plant material and keeping the area around your plants clean can help keep unwanted pests at bay. By following these tips for preventing infestations and treating fungal infections, you’ll be able to grow healthy New England asters that will thrive for years to come.
As important as dealing with pests and diseases is propagation methods for New England asters. There are several ways to propagate these beautiful flowers, including seed starting, division, and cuttings. Each method has its advantages and disadvantages depending on your needs as a gardener.
Propagation Methods
Propagation techniques for New England asters are relatively simple and can be achieved through several methods. One of the most common ways to propagate this plant is through nursery propagation, which involves starting new plants from cuttings or seeds. Cuttings should be taken from the plant in early summer, when it is actively growing. Seeds can be collected in late summer or early fall and should be sown in a well-draining soil mix.
When taking cuttings, choose healthy stems that are at least 4 inches long and have no flowers or buds present. Remove the lower leaves and dip the cut end in rooting hormone before planting it in a pot filled with moistened soil. Keep the cutting in a warm, bright location but out of direct sunlight until roots have formed and new growth appears. For seed propagation, sow seeds thinly on top of soil mix and cover lightly with more mix. Keep soil moist but not waterlogged until seedlings emerge.
Nursery propagation is an effective way to expand your New England aster collection or share plants with friends and family. However, keep in mind that these plants may take some time to establish themselves before blooming. With proper care and patience, you can enjoy beautiful blooms year after year from your propagated New England asters. In the next section, we will discuss overwintering strategies for maintaining healthy plants during colder months.
Overwintering Strategies
Overwintering Strategies:
Overwintering care is an essential aspect of growing and caring for New England asters. These plants require some winter protection to ensure they survive the cold temperatures. The first step in overwintering these perennials is to cut them back after they have finished blooming. This will help to prevent any disease or pest problems from developing during the winter months.
Once you have cut back your New England asters, it is time to provide them with the necessary winter protection. One option is to mulch around the base of the plant with a layer of organic matter such as leaves or straw. This will help to insulate the soil and protect the roots from freezing temperatures. Another option is to cover the plant with a layer of burlap or frost cloth. This will help to protect the above-ground portion of the plant from harsh winter winds.
In summary, overwintering care is critical for maintaining healthy New England asters year after year. By cutting back your plants and providing them with adequate winter protection, you can ensure that they survive even the harshest winters. In the next section, we will discuss companion planting ideas for New England asters that can help improve their overall health and productivity throughout the growing season.
Companion Planting Ideas
- Hellebores are a great companion to New England Asters as they provide early season interest and help attract beneficial insects.
- Lavender is an excellent companion for New England Asters. It will help deter pests and provide a wonderful fragrance to the garden.
- Yarrow is an ideal companion for New England Asters because it is both drought tolerant and deer resistant.
- To ensure optimal growth, Hellebores should be planted in a location with full sun to partial shade and well-draining soil.
- For the best results with Lavender, it should be planted in a sunny location with well-draining soil.
- Yarrow should be planted in a sunny location with well-draining soil and mulched to help retain soil moisture.
Hellebores
New England asters are a popular choice for gardeners due to their stunning purple and pink flowers that bloom in late summer and fall. Growing conditions for these plants require full sun exposure and well-drained soil, making them perfect for adding color to borders or filling in gaps in your garden. These hardy perennials can grow up to four feet tall, so providing them with support is recommended.
Caring for New England asters involves regular watering and deadheading of spent blooms. Additionally, these plants benefit from occasional fertilization during the growing season. One unique feature of New England asters is their ability to attract pollinators such as bees and butterflies, making them a great addition to any wildlife-friendly garden.
To encourage healthy growth of New England asters, it’s important to provide adequate spacing between plants and avoid overcrowding. This allows for proper air circulation and reduces the risk of disease. Pruning back the stems in early spring can also promote new growth and prevent the plant from becoming too leggy. By following these tips, you can enjoy the beauty of New England asters year after year in your garden.
Lavender
Companion planting is an effective way to maximize the potential of your garden. By strategically placing plants that complement each other, you can create a thriving ecosystem that promotes healthy growth and repels pests. One plant that is commonly used in companion planting is lavender.
Lavender, a member of the mint family, is known for its fragrant purple flowers and soothing aroma. It’s not only a popular choice for adding beauty to gardens but also has many uses in aromatherapy and herbal medicine. Lavender oil is commonly used for relaxation and stress relief, while lavender tea has been shown to have calming effects on the body.
In addition to its therapeutic benefits, lavender also has practical uses in companion planting. Its strong scent repels pests such as mosquitoes, moths, and fleas, making it an ideal plant to grow near crops or outdoor living areas. Furthermore, it attracts beneficial insects such as bees and butterflies, which help pollinate nearby plants. Overall, incorporating lavender into your garden can enhance both its aesthetic appeal and functionality.
Yarrow
As a gardening expert, it is essential to consider various companion planting ideas to maximize the potential of your garden. One great option is to incorporate yarrow into your garden. Yarrow, also known as Achillea millefolium, is a herbaceous perennial that belongs to the Asteraceae family. This plant has feathery leaves and small clusters of flowers in shades of white, pink, or yellow.
Aside from its aesthetic appeal, yarrow has many practical uses in companion planting. Its strong scent repels pests like aphids and beetles while attracting beneficial insects like ladybugs and lacewings that prey on these pests. Moreover, drying yarrow flowers can be used as a natural insecticide or added to compost for its high nutrient content.
Yarrow is also recognized for its medicinal properties since it contains compounds such as flavonoids and sesquiterpene lactones that are effective in treating various health conditions. For instance, it can help soothe digestion issues and reduce inflammation. As a result, incorporating yarrow into your garden can provide both functional and therapeutic benefits while enhancing the overall appearance of your landscape.
Using New England Asters In Floral Arrangements
New England asters make excellent cut flowers due to their long vase life and striking colors. When using new england asters as cut flowers, it is important to select stems that are fully opened but not yet wilting. It is best to harvest the flowers early in the morning when they are at their freshest. Once harvested, immediately place the stems in a bucket of water and store them in a cool location until you are ready to arrange them.
There are many creative ways to arrange new england asters in a bouquet. One option is to pair them with other fall-blooming flowers such as goldenrod or sunflowers for a rustic look. Another idea is to mix them with pink or purple blooms for a more feminine arrangement. Depending on your personal style, you can opt for a monochromatic look with just asters or mix and match different colors and textures for a more eclectic feel.
When arranging new england asters, it is important to consider their height and size. Some varieties can grow up to 4 feet tall, so they work well as statement flowers in larger arrangements. For smaller bouquets, choose dwarf varieties that stay under 2 feet tall. Additionally, it is important to trim the stems at an angle before placing them in water and removing any leaves that will be below the waterline.
Transition: Now that we have explored the creative ways of using new england asters in floral arrangements, let’s take a closer look at some of the common varieties of these beautiful fall-blooming plants.
Common Varieties Of New England Asters
New England asters are one of the most beautiful and vibrant flowers that can grace your garden. They come in a variety of popular colors, including pink, purple, and blue, to name a few. These plants are known for their ability to attract butterflies, bees, and other pollinators. They add color and vibrancy to any garden with their tall stems and delicate flowers.
There are several varieties of New England asters that you can choose from. One popular type is the Purple Dome aster which is known for its stunning purple flowers that bloom in late summer. Another variety is the Harrington’s Pink aster which has bright pink petals that attract hummingbirds. The Alma Potschke aster has deep fuchsia blooms that stand out in any garden. When planting these asters, it is important to consider the best companion plants that will help them thrive and grow.
The best companion plants for New England asters include goldenrod, black-eyed Susan, and coneflower. These plants complement each other well by adding contrasting colors and textures to your garden bed while also attracting pollinators such as bees and butterflies. With proper care and maintenance, these plants will bring beauty to your garden for years to come.
Frequently Asked Questions About New England Asters
New England asters are a popular choice for garden enthusiasts due to their beauty and ease of care. These plants have been known to provide numerous benefits, such as attracting butterflies and bees to your garden, making them an excellent choice for those interested in creating a pollinator-friendly environment. Additionally, these plants can add vibrant colors to your garden late in the season when other plants may be starting to fade.
Growing New England asters in containers is a great option for those with limited space or who want to add some color to patios, balconies, or decks. When planting in containers, it is important to choose a pot that is at least 12 inches wide and has ample drainage holes. Fill the pot with well-draining soil and make sure the plant receives full sun exposure for at least six hours per day.
While growing New England asters is relatively easy, they can face some common issues that may hinder their growth. Some common issues include powdery mildew, root rot caused by overwatering, or aphid infestations. To prevent these issues from occurring, it is important to ensure your plants receive adequate sunlight and water only when necessary. If you do encounter any problems with your New England asters, there are several troubleshooting measures you can take to address them effectively.
Transition: Now that we have covered how to grow and care for New England asters and addressed some common varieties of this plant let’s move on to frequently asked questions about this plant species.
Troubleshooting Common Issues With New England Asters
New England asters are a popular plant that adds beauty to gardens and landscapes. However, even with proper care, these plants can sometimes develop issues that can affect their growth and overall health. Identifying symptoms and understanding preventive measures can help address these common issues.
One common issue that New England asters face is powdery mildew. This fungal disease appears as a white powdery substance on the leaves, stems, and flowers of the plant. It thrives in warm and humid environments and can quickly spread if left untreated. To prevent this issue, it is essential to provide adequate air circulation around the plant by pruning back neighboring plants or thinning out crowded areas. Additionally, avoiding overhead watering and applying fungicides early on can help control this problem.
Another issue that New England asters may experience is root rot caused by overwatering or poor drainage. Symptoms of root rot include yellowing leaves, wilting, stunted growth, and blackened roots. To prevent this issue from occurring, ensure that the plant is planted in well-draining soil, water only when necessary, and avoid planting in low-lying areas where water tends to accumulate.
In conclusion, while New England asters are generally easy-to-care-for plants, they are not immune to common issues such as powdery mildew or root rot. By identifying symptoms early on and taking preventative measures such as providing adequate air circulation or ensuring proper drainage, gardeners can maintain healthy New England asters for years to come.
Frequently Asked Questions
How Long Do New England Asters Typically Live?
The life span of New England Asters is dependent on several factors, including optimal growing conditions. Under ideal circumstances, these plants can live for up to five years. Optimal conditions for New England Asters include full sunlight exposure and well-draining soil. These plants also require regular watering, especially during the hot summer months. Adequate spacing between plants is essential to prevent overcrowding and promote air circulation. Additionally, proper pruning techniques can extend the life span of these asters by promoting healthy growth and preventing disease. By providing optimal conditions and care, gardeners can enjoy the beauty of New England Asters for several years.
Can New England Asters Grow In Containers Or Do They Require Garden Space?
New England asters are a hardy perennial plant that can thrive in a variety of growing conditions. While they are commonly planted in garden beds, they can also be grown successfully in containers. When container gardening with New England asters, it is important to choose a pot that is deep enough to accommodate the plant’s root system and provides good drainage. The soil should be well-draining and enriched with organic matter to promote healthy growth. It is crucial to keep the soil consistently moist but not waterlogged. Regular fertilization with a balanced fertilizer will help to ensure vigorous growth and abundant blooms throughout the growing season. With proper care, container-grown New England asters can thrive for many years, providing a beautiful addition to any outdoor space.
How Often Should New England Asters Be Divided And Replanted?
The best time to divide New England asters is in the spring or fall, when the soil is moist and temperatures are cooler. To propagate New England asters through division and replanting, start by digging up the entire clump and gently separating it into smaller sections. Each section should have a healthy root system and several stems with leaves. It’s important to use a sharp, clean tool for dividing to prevent damage to the plant. Once divided, replant each section in well-draining soil that receives full sun. Water thoroughly after planting and keep the soil moist until new growth appears. Dividing New England asters every 3-4 years can help maintain their vigor and prevent overcrowding. With proper care, these beautiful plants can provide colorful blooms year after year.
Are New England Asters Deer-Resistant?
New England asters are a popular choice for gardeners because of their showy purple flowers and ability to attract pollinators. However, they are also attractive to deer who may cause damage by nibbling on the foliage and flowers. To combat this issue, gardeners may opt for deer-resistant alternatives such as lavender, Russian sage, or catmint. Companion plants for New England asters include goldenrod, black-eyed susans, and coneflowers which provide contrasting colors and textures while also attracting beneficial insects. It is important to carefully consider plant choices to ensure a diverse and thriving ecosystem in the garden.
Can New England Asters Be Grown From Seed, Or Do They Require Transplanting Of Established Plants?
New England asters, also known as Symphyotrichum novae-angliae, are beautiful and resilient plants that can be grown from seeds. According to research, the germination rate for New England asters is approximately 60-70%, with ideal growing conditions including moist soil and full sun exposure. Before planting the seeds, it is recommended to stratify them by refrigerating them for a period of 4-6 weeks. Once planted, it is important to keep the soil consistently moist until the seedlings are established. Transplanting established plants is not necessary, but can be done for quicker results. With proper care and attention, New England asters can provide a stunning addition to any garden or landscape.
Conclusion
New England Asters are a beautiful addition to any garden or container. These stunning perennials can bloom for up to 6 weeks in late summer and early fall, providing a burst of color when other plants have finished blooming. With proper care, New England Asters can live up to 5 years, making them a great investment for any gardener.
While New England Asters can grow well in containers, they do require ample space to spread out and thrive. It’s important to divide and replant your asters every 2-3 years to ensure healthy growth and prevent overcrowding. Additionally, New England Asters are deer-resistant, making them an ideal choice for gardens in areas with high deer populations.
Growing New England Asters from seed can be challenging, but established plants can be easily transplanted. With proper soil preparation and regular watering during the growing season, your asters will flourish year after year. Like all plants, New England Asters require patience and care, but their vibrant blooms are worth the effort.
In conclusion, tending to New England Asters requires careful planning and attention. Much like a skilled musician must tune their instrument before playing a melody, gardeners must carefully prepare their soil and tend to their plants in order to create a stunning symphony of colors in their gardens. By following these tips and tricks for growing and caring for New England Asters, you too can create a beautiful display that will last for many seasons to come.
Image Credits
- “Monarch Butterfly on New England Aster” by U. S. Fish and Wildlife Service – Northeast Region (featured)

