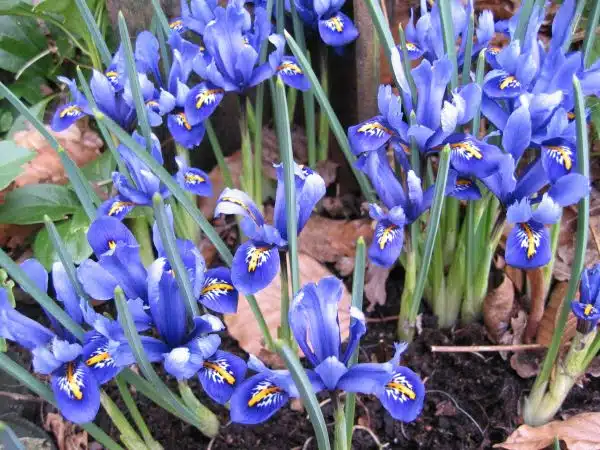
Iris reticulata is a beautiful and delicate plant that belongs to the iris family. It is a low-growing perennial that produces stunning blue, purple, or yellow flowers that bloom in early spring, making it an excellent choice for gardeners who want to add color to their landscape during the dull winter months. The plant is native to Turkey and other parts of the Middle East and has been cultivated for centuries due to its ornamental value.
In this article, we will provide you with comprehensive guidelines on how to grow and care for iris reticulata effectively. We will discuss the ideal growing conditions such as soil type, watering requirements, sunlight exposure, and fertilization. Additionally, we will explore some common pests and diseases that affect this plant and suggest tips on how to prevent or control them. By following these instructions, you can enjoy a healthy and vibrant iris reticulata in your garden or container.
Introduction To Iris Reticulata
Iris Reticulata is a popular species of iris, with its popularity owing to the aesthetic appeal of its flowers. It is native to Turkey, Iraq, and Iran, and was introduced to Europe in the 19th century. Today, it is widely cultivated for ornamental purposes and has become a favorite among gardeners.
The cultivation techniques for Iris Reticulata are relatively easy. They can be grown in pots or planted in the ground with well-drained soil. These plants require full sun exposure and should be watered consistently during the growing season. They generally bloom in late winter or early spring and may produce flowers for up to three weeks.
The history of Iris Reticulata dates back centuries ago when it was first discovered in the Middle East. It has since been cultivated globally due to its beauty and low maintenance requirements. As a gardener, understanding this plant’s characteristics will aid you in growing it successfully; from planting the bulbs to maintaining them through their blooming period.
Understanding The Plant’s Characteristics
As a horticulturalist, it is important to understand the characteristics of Iris Reticulata. This plant belongs to the Iris family, and its size can range from 10-15 cm in height. The leaves are narrow and pointed, while the flowers bloom on short stems. When it comes to flower coloration, they come in a variety of shades such as blue, purple, yellow, and white.
One unique feature of Iris Reticulata is that it blooms early in spring when most plants are still dormant. It is an excellent addition to any garden as it adds color and variety during this time. As with any plant, proper care is essential for growth and longevity. Ensure that the soil is well-drained and has enough sunlight exposure.
In order for your Iris Reticulata to thrive, choosing the right location is crucial. The plant prefers partial shade but can tolerate full sun if given enough water. It is also important to keep the soil moist but not too wet as this can lead to root rot. By understanding these characteristics and following proper care guidelines, you can enjoy a beautiful display of Iris Reticulata in your garden during early spring.
Choosing The Right Location
As the old saying goes, “location, location, location.” This phrase is just as relevant when it comes to growing and caring for iris reticulata. Sun exposure is a key consideration when choosing the right location for your irises. These plants thrive in full sun or partial shade, so pick a spot that receives at least six hours of sunlight each day.
Another important factor to take into account is drainage. Iris reticulata bulbs can rot if they sit in waterlogged soil for too long. Therefore, it’s crucial to choose a location with well-draining soil. If you’re planting in an area with heavy clay soil that doesn’t drain well, consider amending the soil with organic matter or creating raised beds to ensure adequate drainage.
When selecting the right spot to plant your iris reticulata bulbs, keep these two factors in mind: sun exposure and drainage considerations. With enough sunlight and proper drainage, your irises will grow strong and healthy. In the next section, we’ll discuss how to prepare the soil and plant your bulbs for optimal growth and longevity.
Soil Preparation And Planting
Soil Preparation and Planting:
Iris reticulata can be planted in the fall or early spring. Before planting, it is essential to prepare the soil properly. The soil should be well-drained and fertile, with a pH level between 6.0-7.5. You can amend your soil with organic matter such as compost, aged manure, or leaf mold to improve soil fertility and texture. It is also recommended to add bone meal or superphosphate at planting time to provide phosphorus for strong root development.
When planting iris reticulata bulbs, they should be placed 3-4 inches deep and spaced about 3-4 inches apart. Make sure the pointed end of the bulb faces upward and cover them with soil. After planting, water thoroughly to settle the soil around the bulbs.
Companion plants such as crocuses, snowdrops, daffodils, and tulips are excellent choices to plant alongside iris reticulata for a colorful display in your garden. Mulching techniques can also be used after planting to help retain moisture in the soil during dry periods and suppress weeds. A layer of organic mulch such as shredded leaves or bark chips can be applied around the base of each plant but avoid covering the top of the bulbs since they need access to sunlight to grow properly.
As you have prepared your soil correctly and planted iris reticulata bulbs alongside companion plants, it is now time to ensure proper watering and fertilization requirements for healthy growth.
Watering And Fertilization Requirements
After carefully preparing the soil and planting your iris reticulata bulbs, it’s time to move on to the next step of caring for these beautiful plants. Watering and fertilization are essential aspects of maintaining healthy growth throughout the season. For instance, let’s say you live in a region that experiences dry summers with occasional rainfall. In this case, you’ll need to devise a watering schedule that provides enough moisture without overwatering.
To ensure successful growth, water your iris reticulata regularly during their active growing period. A frequency schedule of once or twice weekly is generally sufficient, depending on your climate and weather conditions. Always water at the base of the plant rather than from overhead to avoid wetting the foliage, which can lead to fungal diseases. When it comes to fertilization options, using organic materials such as compost or manure is an excellent choice. These options provide nutrients while also enriching the soil structure.
When it comes to pruning and deadheading iris reticulata plants, timing is crucial. Wait until after blooming has finished before cutting back any spent flowers or foliage. This allows the plant time to replenish its energy reserves for next year’s bloom cycle. Deadheading helps promote new growth and prevents seed production, which can weaken the plant over time. Pruning should be done with sharp shears to minimize damage to the remaining foliage or stems. By following these simple care tips, you can enjoy a beautiful display of iris reticulata blooms year after year!
Pruning And Deadheading
Pruning and Deadheading:
Pruning techniques for Iris reticulata are essential to maintain their healthy growth and overall appearance. The best time to prune these plants is during the late summer or early fall. During this time, the foliage of the plant will have started to yellow, indicating that it is dying back. You can then cut back any dead or yellowing leaves to around two inches above the ground.
Deadheading is another important aspect of caring for Iris reticulata plants. Regularly removing spent flowers will not only keep the plant looking tidy but also encourage it to produce more blooms. The timing of deadheading is crucial in ensuring that new flowers continue to form throughout the growing season. It’s best to wait until the flower has completely faded before removing it, as this allows any remaining nutrients in the stem and leaves to be recycled back into the bulb.
When pruning or deadheading Iris reticulata, it’s vital to use sharp, clean tools as damaged stems can lead to fungal infections. Additionally, avoid cutting off all of the foliage at once as this could weaken the plant and reduce its ability to photosynthesize effectively.
To ensure a healthy and vibrant display of Iris reticulata blooms year after year, proper pruning techniques and timely deadheading are essential practices. By following these simple steps, you can enjoy a beautiful garden full of color and life.
Moving on from pruning and deadheading techniques, understanding common pests and diseases can help you take preventative measures against them.
Common Pests And Diseases
After pruning and deadheading, it’s important to address the potential pests and diseases that may affect your iris reticulata. These plants are susceptible to a variety of issues, including fungal diseases like root rot and bacterial leaf spot. Additionally, pests such as aphids, thrips, and spider mites can cause damage to the leaves and flowers.
To combat these problems, there are both natural remedies and chemical treatments available. For example, neem oil is a natural pest repellent that can be effective against aphids and spider mites. Copper-based fungicides can also help prevent fungal diseases from taking hold. However, it’s important to follow instructions carefully when using any chemical treatments, as overuse or improper application can harm both the plant and surrounding environment.
Prevention and control methods are crucial in maintaining healthy iris reticulata plants. One key preventative measure is ensuring proper drainage to avoid waterlogged soil that can lead to root rot. Avoid overhead watering as well, as this can promote fungal growth on foliage. Regularly inspecting your plants for signs of disease or pest infestation can allow for early intervention before the issue becomes more severe. By staying vigilant and taking appropriate action when necessary, you can keep your iris reticulata thriving for seasons to come.
Prevention And Control Methods
To prevent and control issues with iris reticulata, it is essential to maintain proper hygiene practices. Remove any dead foliage or plant matter from the area to reduce the chance of fungal infections. Additionally, avoid planting new bulbs in areas where there have been previous issues.
If natural remedies are preferred, consider using a garlic spray to deter pests or mildew. Simply crush several cloves of garlic and mix them with water. Strain the mixture and add it to a spray bottle, then apply it to the affected plants. Another option is neem oil, which can be used as an insecticide and fungicide.
If chemical treatments are necessary, always read and follow the instructions on the label carefully. Be cautious when applying pesticides near other plants or bodies of water. Copper-based fungicides can be effective against fungal diseases but may cause harm to beneficial insects such as bees. Insecticides containing pyrethroids can effectively control pests but may also harm beneficial insects.
Transition: While prevention and control methods are crucial for maintaining healthy iris reticulata, overwintering techniques are equally important for its survival in colder climates.
Nested Bullet Point List:
- Natural Remedies
- Garlic spray
- Neem oil
- Chemical Treatments
- Copper-based fungicides
- Insecticides containing pyrethroids
Tips for overwintering will ensure that iris reticulata survives in cold temperatures without damage to its delicate structure.
Tips For Overwintering
Winter storage is an essential aspect of caring for your iris reticulata. During the colder months, it is crucial to protect your plant from the harsh winter conditions. The first step in overwintering your iris reticulata is to cut back any dead or dry foliage. This will help prevent any potential diseases and pests from spreading to the healthy parts of the plant.
After cutting back the foliage, you should dig up the bulbs carefully and store them in a cool, dry place. It’s essential to ensure that the bulbs are not exposed to moisture or extreme temperatures during winter storage. You can use plastic bags, containers with lids, or paper bags for this purpose. However, it’s crucial to make sure that there is adequate ventilation as well.
To provide protective covering for your iris reticulata during winter, you can use mulch or straw. This will insulate your plant and keep it safe from freezing temperatures. Additionally, if you live in an area with severe winters, you may consider using a greenhouse for extra protection. By following these simple tips for overwintering your iris reticulata, you can ensure that your plant stays healthy and blooms beautifully next year.
Now that you know how to care for your iris reticulata during winter storage let’s move on to enjoying this beautiful plant in springtime.
Enjoying Your Iris Reticulata
As winter comes to an end, it’s time to start thinking about how to care for your iris reticulata. These beautiful flowers are a joy to behold and with the right care, they will thrive in your garden. If you’ve never grown iris reticulata before, don’t worry – they’re easy to care for once you know what to do.
Firstly, it’s important to make sure that your iris reticulata is growing in well-draining soil. This will prevent water from pooling around the roots and causing rot. You should also avoid overwatering as this can lead to fungal diseases. In terms of feeding, a slow-release fertilizer applied in early spring will provide all the nutrients your plant needs.
Once your iris reticulata has bloomed, you can start creating arrangements with them. These flowers are perfect for adding a pop of color to any arrangement and their unique shape makes them a standout feature. When taking photographs of your iris reticulata, try experimenting with different angles and lighting conditions for the best results.
In summary, caring for iris reticulata is relatively straightforward as long as you follow some simple guidelines. Keep the soil well-drained and avoid overwatering, feed with slow-release fertilizer in early spring and experiment with using them in arrangements or photographing them for stunning displays. With these tips in mind, your iris reticulata will thrive in your garden year after year.
Conclusion
Iris Reticulata is a beautiful and delicate plant that requires specific care to thrive. Understanding the plant’s characteristics, choosing the right location, preparing the soil correctly, watering and fertilizing appropriately, and preventing common pests and diseases are all essential steps in successfully growing this species.
When planting Iris Reticulata, it is crucial to choose a suitable location with proper sunlight exposure and well-draining soil. It is also important to ensure that the soil has been adequately prepared before planting. Regular watering and fertilization are necessary for healthy growth, but overwatering should be avoided. Pests such as aphids can be prevented by regularly inspecting plants for signs of damage or infestation.
In conclusion, growing Iris Reticulata requires attention to detail but can result in beautiful blooms that enhance any garden or landscape. Like a skilled painter who carefully selects each brushstroke to create an intricate masterpiece, horticulturalists must carefully cultivate their plants to achieve beautiful results. By understanding the unique needs of Iris Reticulata and implementing proper care techniques, one can enjoy the stunning beauty of this plant throughout its growth cycle.
Image Credits
- “Iris reticulata” by unknown (featured)

