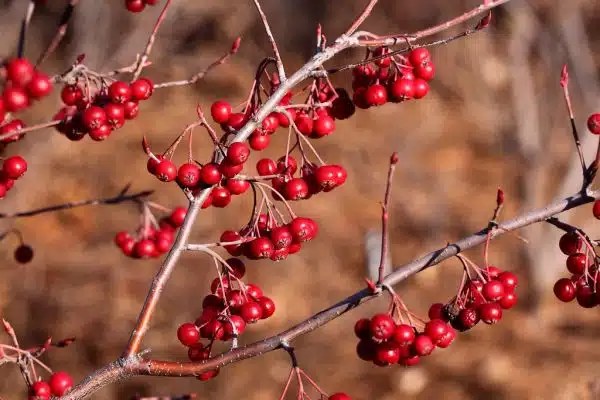
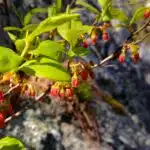
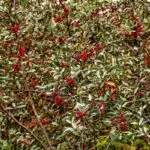
Red chokeberry, also known as Aronia arbutifolia, is a deciduous shrub that is native to eastern North America. It is an attractive plant with vibrant red fall foliage and clusters of white flowers in the spring, followed by dark red berries that persist into the winter months. The plant grows well in a variety of soil types and can tolerate both wet and dry conditions, making it a popular choice for landscaping projects.
As horticulturists, it is our duty to provide growing tips for this remarkable plant to individuals who desire to cultivate them. In this article, we will discuss some essential tips for growing red chokeberry successfully. We will explore the ideal soil type, watering requirements, pruning techniques, and other important aspects of caring for these plants. Whether you are an experienced gardener or a beginner looking to add some color and texture to your landscape, these tips will help you grow healthy and vibrant red chokeberries that will serve as a source of beauty and nourishment for many years to come.
Understanding The Basics Of Red Chokeberry
Although chokeberries are popular for their health benefits and high antioxidant content, some people may shy away from planting them due to their tart flavor. However, the red chokeberry variety can be a great addition to any garden or landscape. With its beautiful red foliage in the fall and small white flowers in the spring, this plant is not only aesthetically pleasing but also easy to grow.
Red chokeberry shrubs come in several varieties, each with unique characteristics. For example, some cultivars produce larger fruit than others, while others have more vibrant fall colors. It’s important to choose a variety that suits your specific needs and preferences when considering adding this plant to your garden.
Aside from being visually appealing, red chokeberries offer many benefits. They are low-maintenance and adaptable to a range of soil types and environmental conditions. Additionally, they attract pollinators such as bees and butterflies, making them an excellent choice for promoting biodiversity in your garden ecosystem. In the next section, we will discuss how to choose the right location for your red chokeberry plant to thrive.
Choosing The Right Location For Your Plant
Understanding the basics of red chokeberry is crucial before planting it in your garden. This deciduous shrub can grow up to 6 to 10 feet tall and wide, producing white or pinkish flowers in the spring and edible fruits in the fall. It’s a low-maintenance plant that can thrive in different soil types and conditions, making it an excellent addition to any landscape.
Choosing the right location for your red chokeberry plant is essential for its growth and fruit production. This shrub requires full sun exposure to partial shade, so pick a spot that gets at least six hours of sunlight per day. Also, keep in mind that soil acidity affects the plant’s health, so make sure to test your soil pH level first. Red chokeberries prefer acidic soils with a pH range between 4.5 to 6.5. If you have alkaline soil, consider adding sulfur or other acidifying agents to adjust its pH level.
Once you’ve found the perfect spot for your red chokeberry plant, it’s time to prepare your soil for planting. The first step is to remove any weeds or grass from the area and till the soil deeply. Adding organic matter such as compost or aged manure can improve soil drainage, structure, and fertility. You may also incorporate other amendments like peat moss or perlite if necessary, but be careful not to overdo it as too much of these materials can lead to poor drainage and root rot.
- Make sure your red chokeberry plant gets enough sunlight each day.
- Test your soil pH level before planting.
- Add organic matter like compost or aged manure for better soil structure and fertility.
As you prepare your soil for planting, keep in mind that a healthy growing environment is critical for your red chokeberry plant’s success. By providing proper sunlight exposure and adjusting your soil acidity levels accordingly, you’ll be able to grow a thriving shrub with delicious fruits. In the next section, we’ll discuss in detail how to prepare your soil for planting red chokeberries.
Preparing Your Soil For Planting
The success of any plant growth is heavily dependent on the quality of soil. The red chokeberry is no exception. Hence, it is essential to prepare your soil thoroughly before planting. Soil testing should be your first step in preparing your soil for planting. You can test the pH level, nutrient composition, and organic matter content of your soil by using an at-home testing kit or sending a sample to a professional laboratory.
Once you have tested your soil, you can determine if it needs any amendments to provide the best possible growing conditions for red chokeberries. If your soil has low levels of organic matter or nutrients, composting techniques can help improve its quality. Composting involves breaking down organic material such as leaves, grass clippings, and kitchen scraps into nutrient-rich fertilizer that can be added to your soil.
Table:
| Soil Type | pH Range | Nutrient Requirements |
|---|---|---|
| Sandy | 6.0-6.5 | Nitrogen and Potassium |
| Clay | 6.5-7.0 | Phosphorus and Calcium |
| Loamy | 6.2-7.0 | All major nutrients |
Soil type affects the pH range and nutrient requirements of plants; hence it is crucial to know which type of soil you have before deciding on amendments or fertilizers.
Incorporating proper composting techniques and amending the soil based on test results will set your red chokeberry up for success in terms of healthy growth and fruit production. However, preparing the right kind of environment for plant growth does not stop here; watering and fertilizing requirements are next steps towards achieving optimal plant growth conditions without compromising on quality or yield potential.
Watering And Fertilizing Requirements
After preparing your soil for planting, it’s time to focus on the watering and fertilizing requirements of red chokeberry. Proper irrigation is crucial in maintaining healthy plants. Drip irrigation is recommended over sprinkler systems as it delivers water directly to the root system, reducing water loss due to evaporation and minimizing the risk of disease.
When it comes to fertilizing, organic options are preferred because they improve soil health and promote long-term growth. Compost or well-rotted manure can be added to the soil before planting or used as a top dressing during the growing season. Additionally, liquid organic fertilizers can be applied through drip irrigation for more efficient absorption by the roots.
Incorporating drip irrigation and organic fertilizers into your red chokeberry care routine will help ensure optimal growth and fruit production. However, proper mulching techniques are also essential in promoting healthy plant development.
- Benefits of mulching: Mulching conserves moisture, suppresses weed growth, regulates soil temperature, and improves soil health.
- Types of mulch: Organic materials such as wood chips, straw, or shredded leaves can be used as mulch.
- How to apply mulch: Apply a 2-3 inch layer around the base of each plant while avoiding direct contact with the stem/trunk. Reapply annually as necessary.
By implementing these practices, you can create an ideal environment for red chokeberry growth while also promoting sustainability through organic methods.
Mulching Techniques For Optimal Growth
As if growing and maintaining plants wasn’t already an arduous task, there’s the added challenge of ensuring they receive proper nutrition. Sure, you could daydream about a world where plants can get their own food like humans do – but alas, that remains a far-off fantasy. In reality, one of the best ways to keep your red chokeberry in optimal health is by mulching.
When it comes to mulching, organic options are always preferred. They not only provide essential nutrients for the soil but also improve overall soil quality. Organic mulching materials include fallen leaves, grass clippings, and bark chips – all of which will decompose over time and release nutrients into the soil. Synthetic mulching materials such as plastic or rubber are not recommended as they may release harmful chemicals into the soil.
To ensure your red chokeberry thrives with organic mulching, spread 2-3 inches of material around the base of the plant while making sure not to cover any part of the stem or trunk. This will keep moisture in the soil and prevent weed growth while providing natural nourishment to your plant. For synthetic mulching options, be sure to avoid placing them too close to the plant’s stem as this may cause damage over time.
As important as it is to know how to properly mulch your red chokeberry, pruning and training your plant is equally crucial for optimal growth. By removing dead or damaged branches and shaping its structure early on, you’ll create a healthy foundation for future growth. In our next section, we’ll provide tips on how to prune and train your red chokeberry so that it can flourish for years to come.
Pruning And Training Your Plant
Pruning techniques are essential in maintaining the health and productivity of your red chokeberry plant. Regular pruning helps remove dead or diseased branches, promotes air circulation and sunlight penetration, and encourages new growth. The ideal time to prune your red chokeberry is during the dormant season, which typically occurs in late winter or early spring.
When pruning, it is crucial to use sharp tools such as pruning shears or loppers to prevent damaging the plant’s healthy branches. Cut at a 45-degree angle just above a bud or lateral branch junction, leaving around 1/4 inch of stem beyond the bud. Avoid cutting into the main stem as this may cause irreversible damage.
Training methods also play a vital role in maintaining your red chokeberry’s structural integrity. Tie young branches to stakes or trellises to promote upright growth and prevent them from drooping or breaking under the weight of fruit. Additionally, removing any low-hanging branches can help create space and reduce competition for resources among different parts of the plant.
- Here are some tips on how to effectively prune and train your red chokeberry:
- Prune during dormancy season
- Use sharp tools
- Cut at a 45-degree angle just above a bud
- Tie young branches to stakes or trellises
As you maintain your red chokeberry plant, keep an eye out for any signs of pests or diseases that may compromise its health. In the subsequent section, we will discuss some common issues that may arise with growing red chokeberries and how you can deal with them effectively.
Dealing With Pests And Diseases
Pruning and training your red chokeberry plant is key to ensuring that it produces healthy, abundant fruit. However, even with the best care, your plant may still fall victim to pests and diseases. It is important to be vigilant and take preventative measures to protect your plant from these potential threats.
Preventing infestations should be a top priority for any gardener looking to grow red chokeberries. One of the most effective ways to keep pests at bay is by maintaining good garden hygiene. Regularly removing fallen leaves and debris from around the base of your plants can help prevent infestations from taking hold. You may also want to consider using natural pest control methods such as companion planting or introducing beneficial insects like ladybugs into your garden.
Identifying disease symptoms early on is crucial for preventing the spread of infection throughout your garden. Red chokeberry plants are susceptible to a range of diseases including fire blight, powdery mildew, and rust. Symptoms can vary depending on the type of disease but may include wilting leaves, brown spots, or powdery white residue on leaves or stems. If you suspect that your plant may be infected with a disease, remove any affected areas immediately and dispose of them in a sealed bag.
When it comes to propagating red chokeberry plants, there are several methods available including seed propagation, cuttings, and layering. Each method has its own set of advantages and disadvantages but all require careful attention to detail in order to achieve success. By choosing the right propagation method for your needs and following proper techniques for soil preparation and care, you can ensure that your new plants will thrive in their new environment.
Propagation Methods For Red Chokeberry
Red chokeberry can be propagated through different methods such as seed propagation and air layering propagation. Seed propagation techniques involve stratifying the seeds before planting them in a container with soil. After planting, the container should be covered with plastic to maintain moisture levels, and the seeds should germinate within a few weeks. However, it is important to note that seedlings may not produce fruit for several years.
Another propagation method that is gaining popularity among horticulturists is air layering propagation. This technique involves making a small incision on the stem of the red chokeberry plant and wrapping it with moist sphagnum moss or peat moss. The wrapped section of the stem is then covered with plastic to maintain moisture levels, which encourages root growth. Once roots have formed, the newly propagated plant can be separated from the parent plant and planted elsewhere.
Propagation of red chokeberry through either seed or air layering methods requires patience and attention to detail. It is important to ensure that all environmental conditions such as temperature, moisture levels, light intensity, and soil pH are optimal for successful growth of new plants.
- When propagating through seed methods, choose fully ripe berries for best results.
- Soak seeds in water for 24 hours before stratifying.
- When performing air layering propagation, make sure to keep moss moist at all times.
- Propagate in spring when temperatures are mild but avoid frosty weather.
Harvesting and using your berries
Red chokeberries ripen in late summer to early fall depending on location and climate. Once they are fully ripe, they will have a deep red color and will easily come off the branch when gently pulled. These tart berries can be used fresh in smoothies or jams or dried for later use in baking or trail mix. Stay tuned for our next section on how to properly harvest your red chokeberries!
Harvesting And Using Your Berries
Harvesting should be done when the red chokeberries are fully ripe, as harvesting them earlier can result in a more sour flavor. Proper storage is essential for maintaining the quality of the berries, as refrigeration can help to extend their shelf life. Cooking with red chokeberries can take the form of making jam, syrup, juice, freeze-drying, or drying. Eating red chokeberries raw can also be a great way to enjoy the flavor, as can adding them to salads, beverages, desserts, sauces, or yogurt.
Harvesting
Harvesting red chokeberries is a crucial step in the cultivation of this fruit. The timing of harvesting is essential because it affects the quality and taste of the berries. The ideal time for harvesting red chokeberries is in late summer or early fall when they are fully ripe. At this stage, the berries have a vibrant red color and are soft to the touch.
Preserving methods can vary depending on personal preference and intended use. Some people prefer to freeze their red chokeberries for later use, while others opt to can them. Freezing these berries maintains their flavor and nutritional value, making them an excellent addition to smoothies or baked goods. Alternatively, canning red chokeberries ensures that they last longer and can be used throughout the year for various culinary uses.
Culinary uses for red chokeberries are diverse, as they can be used in both sweet and savory dishes. These tart fruits pair well with other flavors such as cinnamon and honey, making them an excellent addition to pies or jams. Additionally, red chokeberry juice can be used as a natural food coloring agent due to its rich color. Overall, ensuring that you harvest your red chokeberries at the right time and employing proper preserving methods will enable you to enjoy these versatile and flavorful fruits all year round.
Storage
After successfully harvesting red chokeberries, it is essential to store them correctly to ensure their longevity and freshness. Climate-controlled storage options are the best method for storing these berries since they can be stored for a more extended period without losing their texture and flavor. While storing the berries, it is essential to remove any damaged or overripe ones to prevent them from spoiling the rest of the batch.
Another option to preserve red chokeberries is through dehydration. This method involves reducing the moisture content in the berries by using a dehydrator, an oven, or even air drying. Using this method ensures that the berries retain their nutritional value while also making them shelf-stable for longer periods. Dehydrated red chokeberries can be used in creative recipes like trail mix or granola bars.
Utilizing stored red chokeberries requires some creativity in cooking and baking. These versatile fruits can be used in both sweet and savory recipes such as salads, sauces, jams or pies. One popular way to use stored red chokeberries is by adding them as toppings on yogurt or oatmeal bowls for a quick and nutritious breakfast. With proper storage methods and creative recipe ideas, red chokeberry enthusiasts can enjoy these versatile fruits all year round.
Troubleshooting Common Problems In Red Chokeberry Cultivation
After harvesting and using your red chokeberries, it’s important to take preventative measures to ensure the continued growth and health of your plants. Common mistakes in red chokeberry cultivation can lead to reduced yields and unhealthy plants. One common mistake is planting in unsuitable soil conditions. Red chokeberries thrive in well-draining soil that is rich in organic matter. They do not tolerate wet or poorly drained soil, which can lead to root rot and other diseases.
Another common mistake is neglecting to prune your red chokeberry plants. Pruning helps maintain the shape of the plant and encourages new growth, leading to increased fruit production. It’s important to prune during the dormant season, typically in late winter or early spring, before new growth begins. Be sure to remove any dead wood or damaged branches as well.
Preventative measures include planting in suitable soil conditions, providing proper drainage, and regular pruning. Additionally, be sure to monitor for pests such as spider mites and aphids, which can cause damage if left untreated. With proper care and attention, your red chokeberry plants will continue to produce healthy yields year after year.
Conclusion
Red chokeberry cultivation requires careful planning and attention to detail. Understanding the basics of this plant is crucial for its successful growth, from choosing the right location to harvesting your red chokeberries. Choosing a sunny spot with well-draining soil is essential for optimal growth. Mulching with organic matter can help retain moisture and protect the roots from extreme temperatures.
Watering and fertilizing requirements should be monitored closely, as over-watering can lead to root rot, while inadequate fertilization can stunt growth. Pests such as spider mites and diseases such as fire blight are common issues that can be managed through regular monitoring and proper care. Propagation methods include both vegetative propagation and seed germination, offering multiple ways to expand your red chokeberry crop.
Harvesting your berries can yield not only a delicious fruit but also a high concentration of antioxidants. An interesting statistic shows that one cup of red chokeberries contains up to 10 times more antioxidants than blueberries! Troubleshooting common problems in red chokeberry cultivation requires patience and attention to detail, but with proper care, this plant can produce beautiful blooms and flavorful fruits for years to come.
In conclusion, growing red chokeberries involves many steps that need careful consideration, including location selection, soil preparation, watering techniques, mulching strategies, pest management methods, propagation tactics, harvesting tips, and troubleshooting approaches. While it may seem daunting at first glance, following these tips will ensure a healthy crop that yields tasty fruit packed with nutrients. Remember to monitor your plants regularly for signs of stress or disease so you can address issues early on before they become major problems. And most importantly – enjoy the fruits of your labor!
Image Credits
- “Red Chokeberry” by Mr.TinDC (featured)

