Bee balm, also known as monarda, is a beautiful flowering plant that attracts bees, butterflies, and hummingbirds to your garden. It is a herbaceous perennial that belongs to the mint family and is native to North America. Bee balm has many uses in traditional medicine and culinary arts. Growing bee balm in your garden can be a rewarding experience, but it requires some knowledge and care.
To cultivate healthy bee balm plants, you need to provide them with the right growing conditions, such as well-drained soil, full sun or partial shade, and regular watering. You also need to protect them from common pests and diseases that can affect their growth and development. In this article, we will guide you through the process of growing and caring for bee balm plants in your garden. We will cover everything from selecting the right cultivars to harvesting and preserving their flowers for various uses. Whether you are an experienced gardener or a beginner looking for new challenges, our tips will help you cultivate healthy bee balm plants that will thrive in your garden for years to come.
Understanding Bee Balm: A Brief Overview
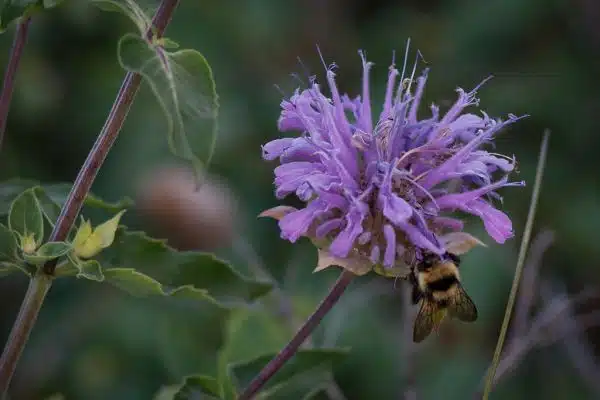
Bee balm, also known as Monarda, is a popular flowering plant that belongs to the mint family. It is native to North America and has been used for centuries due to its various benefits. The plant’s name “bee balm” comes from its ability to attract bees, butterflies, and hummingbirds.
One of the benefits of bee balm is that it has medicinal properties. Native Americans would use bee balm in tea form to treat colds, headaches, and fevers. It was also used topically on skin irritations and wounds due to its antimicrobial properties. In addition to its medicinal uses, bee balm is also commonly used in cooking. It can be used fresh or dried and gives dishes a citrusy flavor with hints of mint and oregano.
When selecting the right bee balm cultivars for your garden, there are a few things you should consider. First, make sure to choose a cultivar that is suited for your climate zone. Native species are often the best choice as they are adapted to local conditions. Additionally, consider the size of your garden and the space you have available for planting. Certain cultivars can grow up to four feet tall and may not be suitable for smaller gardens. Finally, choose cultivars based on their desired color and bloom time as different varieties come in shades of pink, red, purple, and white with varying bloom times throughout the season.
Selecting The Right Bee Balm Cultivars For Your Garden
When it comes to selecting bee balm cultivars, it is important to consider the specific species of bee balm that will grow well in your region. There are several different species of bee balm, each with its own unique characteristics and growing requirements. Some of the most popular species for gardeners include Monarda didyma, Monarda fistulosa, and Monarda citriodora.
In addition to considering the specific species of bee balm, you should also think about the pollinator attraction potential of each cultivar. Bee balm is known for its ability to attract bees, butterflies, hummingbirds, and other pollinators. However, some cultivars may be more attractive to certain types of pollinators than others. When selecting bee balm cultivars for your garden, look for those that are known to attract a wide variety of pollinators.
To help you choose the right bee balm cultivars for your garden, here are two sub-lists:
Cultivars with high pollinator attraction:
‘Blue Stocking’
‘Raspberry Wine’
‘Jacob Cline’
Cultivars with unique characteristics:
‘Prairie Night’ (dark purple flowers)
‘Petite Delight’ (dwarf size)
By carefully selecting the right bee balm cultivars for your garden based on their species and pollinator attraction potential, you can create a beautiful and functional space that supports local wildlife. In the next section, we will discuss how to choose the ideal location for your bee balm plants to ensure they thrive in their new home.
Choosing The Ideal Location For Your Bee Balm Plants
When it comes to growing bee balm, choosing the ideal location for planting is crucial. The right conditions will ensure that your plants grow well and produce vibrant flowers that attract bees and other pollinators. Sunlight requirements and soil pH are two important factors to consider when choosing a location for your bee balm plants.
Bee balm requires full sun or partial shade to thrive. In areas with hot summers, partial shade may be necessary to prevent the leaves from scorching. It is best to choose a location that receives 6-8 hours of direct sunlight daily. If you live in an area with harsh afternoon sun, consider planting your bee balm where it can receive morning sun and filtered shade in the afternoon.
The soil pH is another critical factor when growing bee balm. This plant prefers slightly acidic soil with a pH between 6.0 and 7.5. If your soil is too alkaline, add sulfur or peat moss to lower the pH level before planting. Conversely, if your soil is too acidic, add lime or wood ash to raise the pH level.
| Factor | Ideal Condition |
|---|---|
| Sunlight Requirements | Full sun or partial shade (6-8 hours direct sunlight) |
| Soil Type | Well-draining loam soil |
| Soil pH | Slightly acidic (pH between 6.0 and 7.5) |
When choosing a location for your bee balm plants, keep in mind their specific needs for sunlight and soil pH levels. With these factors in mind, you can select an optimal spot for planting that will provide ample light while ensuring proper nutrition for healthy growth. In the next section, we’ll explore how to prepare your soil before planting bee balm so that it has everything it needs to thrive.
Preparing Your Soil For Bee Balm Planting
Soil preparation is an essential aspect of bee balm cultivation. Adequate soil preparation ensures that the plant thrives, producing healthy foliage and vibrant flowers. Before planting bee balm, it’s crucial to prepare the soil adequately by eliminating weeds and debris. The following tips can help in preparing your soil for bee balm planting.
Choose a well-draining site: Bee balm prefers well-draining soil with a pH level of 6.0-7.5. Therefore, choose a site that receives at least six hours of full sun daily and has excellent drainage.
Loosen the soil: Soil compaction impedes root growth, leading to stunted plants with reduced yields. To loosen the soil, use a garden fork or tiller to break up any hardened surface layers without disturbing the subsoil.
Amend the soil: Bee balm requires rich organic matter to thrive. Therefore, amend your soil with compost, aged manure or leaf mold before planting.
Fertilize appropriately: Bee balm requires moderate fertilization to promote robust foliage and abundant blooms. Apply a balanced fertilizer (10-10-10) at planting time and again after four weeks.
By preparing your soil correctly before planting bee balm, you’ll provide an optimal environment for its growth and development while minimizing pest problems and diseases common in poorly prepared soils. Next, we’ll explore how to plant your bee balm using simple steps that guarantee success in growing this beautiful herbaceous perennial plant!
Planting Your Bee Balm: Step-By-Step Guide
When planting your bee balm, it is important to keep in mind the optimal planting time. The best time to plant bee balm is in the spring or fall when temperatures are mild and there is plenty of moisture in the soil. This will give your plants a chance to establish themselves before the hot summer weather arrives. If you live in an area with particularly hot summers, it may be best to plant your bee balm in the fall so that it has a chance to mature before being exposed to extreme heat.
Bee balm propagation can be done by seed or division. If you choose to propagate by seed, start them indoors about 6-8 weeks before the last frost date for your area. Once the seedlings have grown large enough, they can be transplanted outside. Division can be done in either spring or fall by carefully digging up a mature plant and separating it into smaller clumps. These clumps can then be replanted elsewhere.
When planting your bee balm, make sure that you choose a location with well-drained soil and full sun exposure. After digging a hole twice as wide as your root ball, place your plant in the hole and backfill with soil until it is level with the surrounding ground. Be sure to water thoroughly after planting and periodically thereafter until established.
Moving on from planting, watering and fertilizing your bee balm plants are crucial for their growth and longevity. Without proper care, they may not thrive as expected. Keep reading for some tips on how to keep your bee balm healthy and happy!
Watering And Fertilizing Your Bee Balm Plants
Bee balm plants require moderate watering, making sure the soil is dry before each watering. Overwatering prevention is crucial since bee balms are prone to root rot. The best practice for watering your bee balm plant is to water deeply once a week, giving the plant enough time to absorb the moisture before the next watering.
Fertilizing your bee balm plants will help them produce more blooms and develop stronger stems. It’s recommended to use organic fertilizers as they release nutrients slowly over time, promoting healthy growth without damaging the environment. You can apply compost or well-rotted manure around the base of your plant during spring and fall to provide enough nutrients for optimal growth.
Remember that over-fertilizing can lead to weak stems and leaves, which makes them more susceptible to insect attacks and diseases. If you notice yellow leaves or leaf drop, it’s a sign of over-fertilization. To avoid this issue, make sure you follow the manufacturer’s instructions when applying fertilizers or use natural methods like compost tea instead.
- Ensure your bee balm has access to enough water by installing an irrigation system.
- Use organic fertilizers like bone meal or fish emulsion for healthier plants.
- Consider adding companion plants such as marigolds or lavender that deter pests while providing additional nourishment for bees.
- Create a bee-friendly environment by using non-toxic products on your garden and avoiding pesticide usage.
Moving forward, common pests and diseases: prevention and treatment will be discussed in detail. Keep reading for tips on how to keep your bee balms healthy and thriving throughout their blooming season!
Common Pests And Diseases: Prevention And Treatment
As with any plant, bee balm is susceptible to a variety of pests and diseases. However, by following proper care techniques and implementing integrated pest management strategies, you can prevent and treat many common issues.
One of the most effective ways to manage pests and diseases in bee balm is through integrated pest management (IPM). This approach involves using a combination of preventive measures, cultural controls, and natural remedies to minimize the use of synthetic pesticides. For example, you can encourage beneficial insects like ladybugs and lacewings to prey on aphids by planting companion plants that attract them. You can also remove infected leaves or stems as soon as you notice them to prevent the spread of disease.
Despite your best efforts, it’s possible that your bee balm may still fall victim to pests or diseases. In these cases, there are several natural remedies you can try before resorting to harsh chemicals. For example, neem oil is an effective insecticide that can be used against a variety of pests including aphids and spider mites. A mixture of baking soda and water can also help control powdery mildew. It’s important to always follow instructions carefully when using any type of pesticide or remedy.
Managing pests and diseases in bee balm requires vigilance and a commitment to natural methods whenever possible. By implementing IPM strategies and using natural remedies when necessary, you can keep your plants healthy and productive for years to come.
To continue caring for your bee balm plants, it’s important to know how to prune and deadhead them properly.
Pruning And Deadheading Your Bee Balm Plants
Pruning bee balm plants is important in order to maintain their desired shape and size, and to encourage flowering. Deadheading, or removing spent blooms, will help to rejuvenate and encourage re-blooming. When pruning and deadheading container plants, it is important to cut back dead growth, and spent blooms to the desired height. Established bee balm plants should be sheared to maintain their growth habit and foliage.
Pruning
Pruning your bee balm plants is an essential task to maintain their overall health and appearance. Knowing when to prune is crucial, as it can affect the plant’s blooming cycle. The best time to prune bee balm plants is in early spring before new growth appears. This allows you to remove any dead or damaged stems from the previous year’s growth and shape the plant for the upcoming season.
To properly prune your bee balm plants, you will need specific tools such as pruning shears or scissors. It is essential to use sharp tools to avoid damaging the plant and causing unnecessary stress. When pruning, make sure to cut back stems just above a leaf node, which helps promote healthy growth and prevents any potential disease from entering the plant through open wounds.
In conclusion, regular pruning of your bee balm plants can help improve their overall health and appearance. By knowing when to prune and using proper tools, you can shape your plant for optimal growth and prevent any potential issues from arising. With proper care and maintenance, your bee balm plants will thrive in your garden for years to come.
Deadheading
Pruning is not the only way to maintain the health and appearance of your bee balm plants. Deadheading is another essential technique that can benefit your plant’s overall growth. Bee balm deadheading techniques involve removing spent flowers from the plant to encourage new blooms and prevent seed development. Deadheading also helps improve the plant’s appearance by removing any unsightly or withered flowers.
Benefits of deadheading bee balm include prolonging the blooming season, promoting healthy growth, and preventing self-seeding. By removing spent flowers, you allow the plant to redirect its energy towards producing new buds, resulting in a longer blooming period. Deadheading also promotes healthy growth by eliminating potential disease carriers on the plant. Additionally, preventing self-seeding through deadheading ensures that your bee balm plants do not spread uncontrollably.
To properly deadhead your bee balm plants, you will need sharp scissors or pruning shears. It is best to remove the entire flower stem just above a set of leaves instead of only cutting off the flower head. This technique encourages new growth from lower on the stem and prevents any potential disease from entering through open wounds. Regular deadheading throughout the growing season can help maintain healthy and vigorous bee balm plants in your garden for years to come.
Harvesting And Preserving Bee Balm Flowers
Once your bee balm flowers have bloomed, they can be harvested for culinary or medicinal purposes. Harvesting should be done in the morning after the dew has dried but before the heat of the day sets in. Choose flowers that are fully open and vibrant in color, avoiding any that are wilted or faded. Cut the stems just above a set of leaves to promote further growth.
Before using your bee balm flowers, it is important to preserve them properly so they can be enjoyed all year round. One effective way to do this is through drying techniques such as air drying or using a dehydrator. To air dry, tie small bundles of the flowers together and hang upside down in a dry, dark place with good air circulation until completely dry. Alternatively, use a dehydrator according to its instructions until the flowers are crisp and brittle.
Bee balm flowers have a variety of culinary uses such as infusing into tea or adding to salads for an extra burst of flavor and color. They can also be used in baking recipes such as cakes and cookies for a unique twist on traditional flavors. When using dried bee balm flowers, simply rehydrate them by placing them in hot water for several minutes before use. With proper harvesting and preservation techniques, you can enjoy the benefits and delicious taste of bee balm all year long.
Moving on to troubleshooting common issues: tips and solutions for dealing with pests and diseases that may affect your bee balm plants…
Troubleshooting Common Issues: Tips And Solutions
Bee balm is a beautiful, hardy plant that can add color and interest to any garden. However, like any other plant, bee balm can experience issues that may need to be addressed. One common issue is pests. Pests such as aphids or spider mites can harm the leaves of the bee balm plant and cause discoloration or stunted growth. To control pests, it is recommended to use an organic insecticide or spray the plant with a mixture of water and dish soap.
Another common issue with bee balm is improper soil moisture levels. Bee balm prefers well-draining soil that is kept consistently moist but not waterlogged. If the soil becomes too dry, the plant may wilt or droop. Conversely, if the soil becomes too saturated, it can lead to root rot and ultimately kill the plant. To maintain proper soil moisture levels, it is important to water regularly but not excessively and ensure that there is proper drainage in the planting area.
In summary, while bee balm is generally easy to care for, it can experience pest issues or problems with soil moisture levels. By using organic pest control methods and maintaining proper watering techniques, these issues can be avoided or resolved quickly. With proper care and attention, bee balm can thrive in any garden setting!
Conclusion
Bee balm is an excellent addition to any garden, providing both aesthetic and functional benefits. With its vibrant colors and sweet scent, it attracts bees, butterflies, and hummingbirds, making it a valuable pollinator plant. Growing bee balm is easy if you follow the recommended guidelines for selecting cultivars, choosing the ideal location, preparing soil, planting correctly, and caring for your plants.
However, growing bee balm is not just about cultivating pretty flowers; it’s also about supporting our planet’s ecosystem. By planting bee balm in your garden or yard, you are contributing to preserving biodiversity and ensuring that our environment remains healthy. Additionally, harvesting bee balm can provide you with several benefits such as using it for tea or adding it to salads.
In conclusion, bee balm is a versatile plant with numerous benefits that should be present in every garden. Whether you’re an experienced gardener or just starting on this journey of horticulture, growing this plant should be on your to-do list. Remember that by nurturing bee balm plants properly, you’re not only enjoying its beauty but also helping to sustain our planet’s natural balance.
Image Credits
- “Lavender Bee Balm – Dinner time” by MattysFlicks (featured)

